Page 25 of 38

23
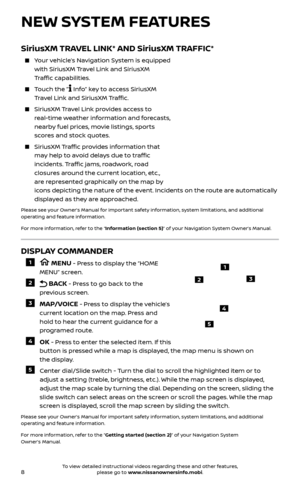
To store a station in a preset, you must first select a radio band by touching the ”AM” key
6, “FM” key 7 or “SXM” key 8 then tune to the desired AM,
FM or satellite radio station. Next, press and hold the desired station preset
key until you hear a beep. The channel indicator will then display, and the
sound will resume. Programing is now complete.
To retrieve a previously set station, select the radio band where the preset was stored then press the corresponding station select key.
6 AM KEY / 7 FM KEY
Touch the “AM Menu” or “FM Menu” key to view the station list or turn HD mode on or off.
Tag favorite songs to save to an iPod®.
•
Apple® w
ebsite: If you are listening to a radio station that supports iTunes
Tagging, you can tag a song you hear so you can preview and purchase it
later on the iTunes Store. Songs that can be tagged are marked with a tag
icon next to the song title or on the “Now Playing” screen.
8 SXM KEY
Touch the “SXM Menu” key to bring up the categories, favorites and replay options.
9 CD KEY
Touch the “CD Menu” key to view the track list.
10 AUX KEY
A cable with 1/8 in (3.5 mm) stereo mini plugs is required for audio playback.
Please see your Owner’s Manual for important safety information, system limitations, and additional
operating and feature information.
For more information, refer to the “Audio system (section 3)” of your Navigation System Owner’s Manual.
USB (Universal Serial Bus) CONNECTION PORT/AUX JACK
AND iPOD® INTERFACE (if so equipped)
The USB por ts are located in the media
pocket
1 below the climate control system.
USB1/iPod® and USB2/iPod®
• When a devic e is connected via USB, the
system will automatically start playing
music from it.
• This system suppor
ts Apple® devices and
USB memory devices. Only Apple® brand or Apple® certified cables will work.
NISSAN cannot guarantee compatibility with af termarket cables that are not
certified by Apple®.
• Apple C
arPlay™ can only be used with USB1, which is the port closest to the driver.
• It ma
y not be compatible with some versions of Android.
Touch the “USB/iPod® Menu” key to view the folder list and track listing, playlist,
albums, album art, artist and songs.
Please see your Owner’s Manual for important safety information, system limitations, and additional
operating and feature information.
For more information, refer to the “Audio system (section 3)” of your Navigation System Owner’s Manual.
1
To view detailed instructional videos regarding these and other features, please go to www.nissanownersinfo.mobi.
Page 26 of 38

The cruise control system enables you to set a constant cruising speed once the
vehicle has reached 25 mph (40 km/h).
The system wil l automatically maintai")
24
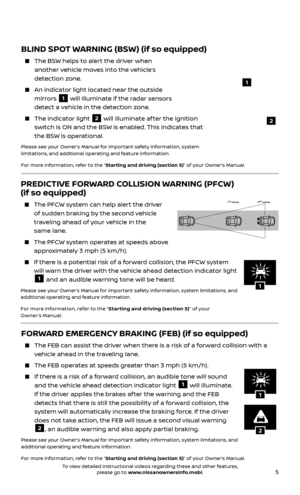
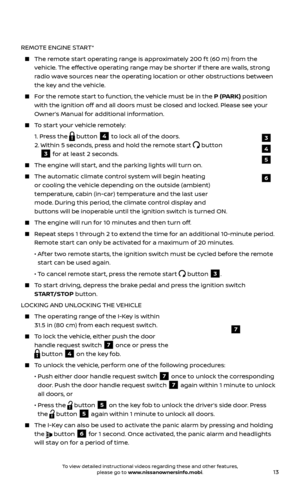
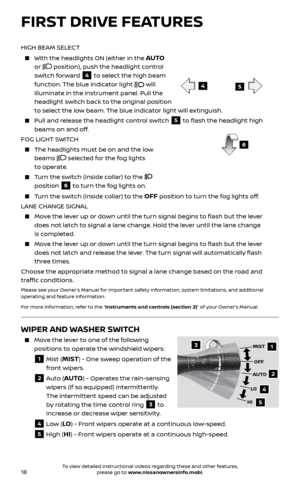
CRUISE CONTROL (if so equipped)
The cruise control system enables you to set a constant cruising speed once the
vehicle has reached 25 mph (40 km/h).
The system wil l automatically maintain the set speed until you tap the brake
pedal, accelerate, cancel or turn the system off.
To activate the cruise control, push the
switch 1 on the steering wheel. The
CRUISE indicator light in the instrument
panel will illuminate.
To set a cruising speed, accelerate the vehicle to the desired speed, push the SET- switch
2 on the steering wheel and release. Take
your foot off the accelerator pedal. Your
vehicle will maintain the set speed.
To reset at a faster cruising speed, push and hold the RES+ switch 3 on the
steering wheel. When the vehicle attains the desired speed, release the switch.
To reset at a slower cruising speed, push and hold the SET- switch 2 on the
steering wheel. Release the switch when the vehicle slows to the desired speed.
To cancel the preset speed, tap the brake pedal or push the CANCEL switch 4
on the steering wheel.
To turn off cruise control, push the switch 1 on the steering wheel. The
CRUISE indicator light in the instrument panel will extinguish.
Please see your Owner’s Manual for important safety information, system limitations, and additional
operating and feature information.
For more information, refer to the “Starting and driving (section 5)” of your Owner’s Manual.
12
3
4
FRONT ARMREST/CENTER CONSOLE
STORAGE BOX
To open the console box, press up on the lever
1 and raise the lid.
To close, push the lid down until the lock latches.
Please see your Owner’s Manual for important safety
information, system limitations, and additional operating and
feature information.
For more information, refer to the “Instruments and controls (section 2)” of your Owner’s Manual.
1
FIRST DRIVE FEATURES
To view detailed instructional videos regarding these and other features, please go to www.nissanownersinfo.mobi.
Page 27 of 38
 (if so equipped)
VEHICLE-TO-VEHICLE DISTANCE CONTROL MODE
To set Vehicle-To-Vehicle Distance Control mode, press the button 1 on
the steering wheel. The
CRUI")
25
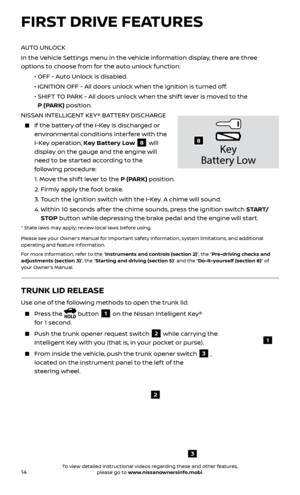
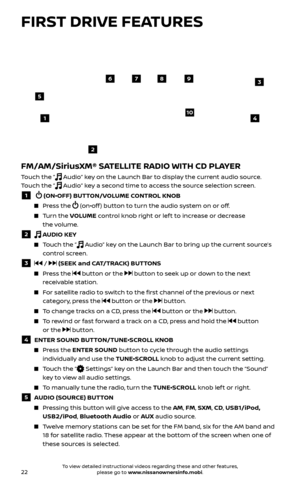
INTELLIGENT CRUISE CONTROL (ICC) (if so equipped)
VEHICLE-TO-VEHICLE DISTANCE CONTROL MODE
To set Vehicle-To-Vehicle Distance Control mode, press the button 1 on
the steering wheel. The
CRUISE indicator light 2 will illuminate.
Accelerate to the desired speed.
Push down on the SET- switch 3 on the
steering wheel and release it. Intelligent
Cruise Control will be set to the
desired speed.
Press the distance button 4 on the
steering wheel repeatedly to change the set
distance between long, middle and short.
When a v ehicle is not detected ahead of you
in the lane, the set distance and set vehicle
speed indicator lights will illuminate
5 in set mode.
When a v ehicle is detected ahead of you in the lane, the
vehicle ahead detection, set distance and set vehicle speed
indicator lights will illuminate
6 in set mode.
To reset at a faster cruising speed, push and hold the RES+
switch
7 on the steering wheel. When the vehicle attains
the desired speed, release the switch.
To reset at a slower cruising speed, push and hold the SET-
switch
3 on the steering wheel. Release the switch when
the vehicle slows to the desired speed.
To cancel the preset speed, push the CANCEL switch 8 on the steering wheel
or tap the brake pedal. The set vehicle speed indicator
5 will extinguish.
To turn off Intelligent Cruise Control, press the button 1 on the steering
wheel. The
CRUISE indicator light 2 in the instrument panel will extinguish.
Please see your Owner’s Manual for important safety information, system limitations, and additional
operating and feature information.
For more information, refer to the “Starting and driving (section 5)” of your Owner’s Manual.
2
5
6
1
4
8
7
3
To view detailed instructional videos regarding these and other features, please go to www.nissanownersinfo.mobi.
Page 28 of 38

26
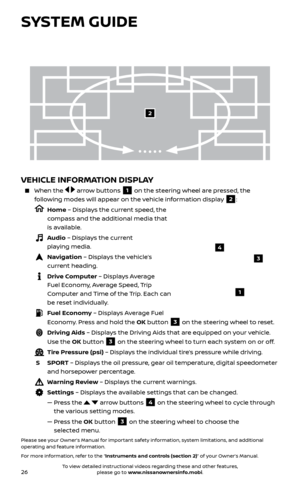
VEHICLE INFORMATION DISPLAY
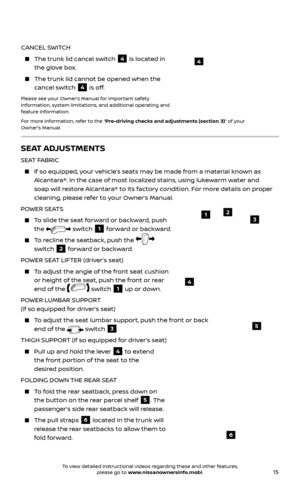
When the arrow buttons 1 on the steering wheel are pressed, the
following modes will appear on the vehicle information display
2:
Home – Displays the current speed, the
compass and the additional media that
is available.
Audio – Displays the current playing media.
Navigation – Displays the vehicle’s curr ent heading.
Drive Computer – Displays Average Fuel Economy, Average Speed, Trip
Computer and Time of the Trip. Each can
be reset individually.
Fuel Economy – Displays Average Fuel Economy. Press and hold the OK button
3 on the steering wheel to reset.
Driving Aids – Displays the Driving Aids that are equipped on your vehicle.
Use the OK button
3 on the steering wheel to turn each system on or off.
Tire Pressure (psi) – Displays the individual tire’s pressure while driving.
S
SPOR
T – Displays the oil pressure, gear oil temperature, digital speedometer
and horsepower percentage.
Warning Review – Displays the current warnings.
Settings – Displays the available settings that can be changed.
—
Pr
ess the
arrow buttons 4 on the steering wheel to cycle through
the various setting modes.
—
Pr
ess the OK button
3 on the steering wheel to choose the
selected menu.
Please see your Owner’s Manual for important safety information, system limitations, and additional
operating and feature information.
For more information, refer to the “Instruments and controls (section 2)” of your Owner’s Manual.
3
1
2
SYSTEM GUIDE
4
To view detailed instructional videos regarding these and other features, please go to www.nissanownersinfo.mobi.
Page 29 of 38

The in-vehicle system can be used as a controller for some of the iPhone® functions through Apple CarPlay™.
If your iPhone is compatible, the Apple Car")
27
APPLE CARPLAY™ (if so equipped)
The in-vehicle system can be used as a controller for some of the iPhone® functions through Apple CarPlay™.
If your iPhone is compatible, the Apple CarPlay™ can be used.
•
Selec
t the
MENU key 1 on the screen.
•
Selec
t “Apple CarPlay™” 2 from the menu.
Before using Apple CarPlay™, confirm the following settings on your iPhone®:
• T
urn on “CarPlay” on your iPhone.
•
Selec
t “Settings” —> “General” —> “Restrictions” and turn off “Restrictions” or
turn on CarPlay.
• T
urn on “Siri®” on your iPhone. Select “Settings” —> “General” —> “Siri®” and turn
on Siri®.
To connect your CarPlay capable iPhone to the system, you must connect the iPhone cable to USB1.
•
Depending on the set
ting, the “Startup Information” screen will appear.
• T
ouch “ Yes” to use Apple CarPlay™.
• The Apple C
arPlay™ top menu screen
will appear, and the iPhone functions
displayed on the screen can be operated
by the in-vehicle system.
• T
o return to the Apple CarPlay™ top
menu screen af ter operation, touch the
key 4 on the lower lef t corner of the
Apple CarPlay™ screen.
1
2
3
4
To view detailed instructional videos regarding these and other features, please go to www.nissanownersinfo.mobi.
Page 30 of 38

28
SYSTEM GUIDE
HANDS-FREE TEXT MESSAGING ASSISTANT*
This text messaging feature allows for sending and receiving text messages through
the vehicle’s interface.
Using predefined or custom messages, send a text to an entry stored in your Bluetooth®
Hands-free Phone System.
Once enabled, the text message, sender and delivery time are shown on the control panel
display when the vehicle speed is less than 5 mph (8 km/h).
Text messages have the option of being read aloud.
Once the vehicle is in motion, text messages can only be replied to using the Voice Recognition
button on the steering wheel.
Text messages can be created manually when the vehicle is not in motion.
Custom te xt messages must be created in advance.
• To exit the Apple CarPlay™ screen and display the other screens, press the
MENU button or one of the other buttons on the control panel and touch
the preferred menus.
• T
o return to the Apple CarPlay™ screen, touch the “
Info” key 3 on the
Launch Bar and then touch the Apple CarPlay™ key 2.
When connected to Apple CarPlay™, Siri® Eyes Free operation can also be accessed.
There are two ways to start a Siri® Eyes Free session.
1.
Pr
ess and hold the
button on the steering wheel.
2.
T
ouch and hold the
key 4 at the lower lef t corner of the Apple
CarPlay™ screen.
Press the button on the steering wheel or touch the key 4 at the lower
lef t corner of the Apple CarPlay™ screen to end Siri® Eyes Free operation.
Keep the interior of the vehicle as quiet as possible. Close the windows to eliminate the surrounding noises (traffic noises, vibration sounds, etc.), which
may prevent the system from recognizing the voice commands correctly.
Some Siri® E yes Free functions may not be available during driving.
For functions that can be used with Siri® Eyes Free, please refer to the
Apple® website.
Nissan Phone menu and Nissan Voice Recognition cellular phone commands will
not be available when Apple CarPlay™ is active.
Please see your Owner’s Manual for important safety information, system limitations, and additional
operating and feature information.
For more information, refer to the ”Getting started (section 2)” and the ”Information (section 5)” of your
Navigation System Owner’s Manual.
To view detailed instructional videos regarding these and other features, please go to www.nissanownersinfo.mobi.
Page 31 of 38

29
Many cellular phones may require special permission to enable text messaging. Check the cellular phone’s screen during Bluetooth® pairing. For some
cellular phones, you may need to enable “Notifications” in the cellular phone’s
Bluetooth® menu for text messages to appear on the touch-screen display.
For more detailed information and instructions, refer to your cellular phone’s
Owner’s Manual.
Text message integration requires that the cellular phone support Message Access Profile (MAP) for both receiving and sending text messages. Some cellular
phones may not support all text messaging features. Please see
www.NissanUSA.com/bluetooth for compatibility information as well as your
device’s Owner’s Manual.
* Laws in some jurisdictions may restrict the use of “Text‐to‐Speech”. Some of the applications and features, such as social networking and texting, may also be restricted. Check local regulations for any
requirements before using these features.
Please see your Owner’s Manual for important safety information, system limitations, and additional
operating and feature information.
For more information, refer to the “Hands-Free Phone (section 4)” of your Navigation System
Owner’s Manual.
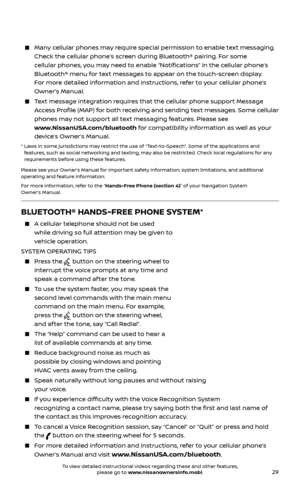
BLUETOOTH® HANDS-FREE PHONE SYSTEM*
A cellular telephone should not be used while driving so full attention may be given to
vehicle operation.
SYSTEM OPERATING TIPS
Press the button on the steering wheel to
interrupt the voice prompts at any time and
speak a command af ter the tone.
To use the system faster, you may speak the second level commands with the main menu
command on the main menu. For example,
press the
button on the steering wheel,
and af ter the tone, say “Call Redial”.
The “Help” c ommand can be used to hear a
list of available commands at any time.
Reduce background noise as much as possible by closing windows and pointing
HVAC vents away from the ceiling.
Speak naturally without long pauses and without raising your voice.
If you experience difficulty with the Voice Recognition System recognizing a contact name, please try saying both the first and last name of
the contact as this improves recognition accuracy.
To cancel a Voice Recognition session, say “Cancel” or “Quit” or press and hold the
button on the steering wheel for 5 seconds.
For more detailed information and instructions, refer to your cellular phone’s
Owner’s Manual and visit
www.NissanUSA.com/bluetooth.
Microphone
Bluetooth®
controls
To view detailed instructional videos regarding these and other features, please go to www.nissanownersinfo.mobi.
Page 32 of 38

30
CONNECTING PROCEDURE
The vehicle must be stationary when connecting the cellular phone.
1.
Press the
button on the steering wheel
and touch the “
Connect Phone” key.
2. Initiate c
onnecting from the cellular phone.
• The c
onnecting procedure varies according
to each cellular phone model. For detailed
connecting instructions and a list of
compatible cellular phones, please visit
www.NissanUSA.com/bluetooth.
• When pr
ompted, confirm the PIN on the
display with the PIN shown on the handset.
If your device does not support Secure
Simple Pairing and requests you to input a
PIN, enter “1234” from the handset.
•
Some c
ellular phones may incorrectly state
that the connection was unsuccessful.
Please verify that the touch-screen displays
that the connection is successful, or touch
“
Settings” > “Bluetooth” > “Select BT
Device”
> “Phone” and confirm that your
cellular phone is listed.
3.
When c
onnecting is complete, the screen will return to the Phone menu display.
PHONEBOOK SETUP
Press the MENU button on the control panel.
Touch the “ Settings” key on the Launch Bar, touch the “Phone” key and then
touch the “
Phonebook” key.
Depending on y our cellular phone, the system may automatically download
your cellular phone’s entire phonebook to the
vehicle’s Bluetooth® system.
The Quick Dial phonebook c an also be set for
up to five entries that can be used with your
cellular phone.
1.
Press the
button on the Launch Bar and
touch the “
Quick Dial” key.
2.
T
ouch the “
Add New” key at the top of the
display. There are different methods to input a phone number. Select one of
the following options:
SYSTEM GUIDE
To view detailed instructional videos regarding these and other features, please go to www.nissanownersinfo.mobi.