2017 NISSAN MAXIMA light
[x] Cancel search: lightPage 2 of 38
*See your Owner’s Manual for information.
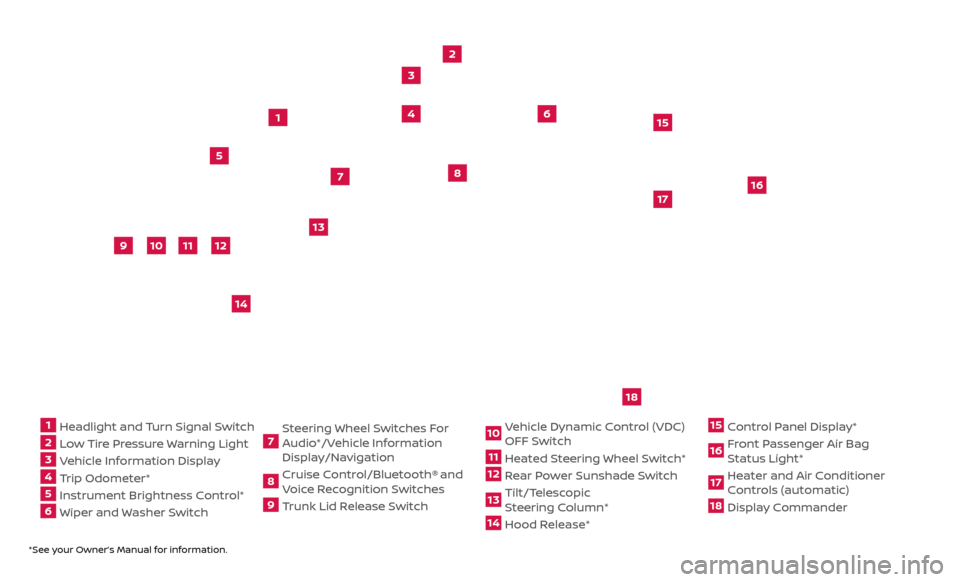
1 Headlight and Turn Signal Switch2 Low Tire Pressure Warning Light3 Vehicle Information Display4 Trip Odometer*5 Instrument Brightness Control* 6 Wiper and Washer Switch
7 Steering Wheel Switches For
Audio*/Vehicle Information
Display/Navigation8 Cruise Control/Bluetooth®
and
Voice Recognition Switches
9 Trunk Lid Release Switch
10 Vehicle Dynamic Control (VDC) OFF Switch11 Heated Steering Wheel Switch*12 Rear Power Sunshade Switch13 Tilt/Telescopic
S teering Column*14 Hood Release*
15 Control Panel Display*16 Front Passenger Air Bag Status Light*17 Heater and Air Conditioner Controls (automatic)18 Display Commander
2
3
5
4
1
6
10
11
9
12
13
14
15
16
17
7
8
Underneath
instrument
panel
18
Page 3 of 38
Please see your Owner’s Manual for important safety information and system
operation limitations.
•
A c
ellular telephone should not be used for any purpose while
driving so full attention may be given to vehicle operation.
•
A
lways wear your seat belt.
•
Supplemental air bags do not r
eplace proper seat belt usage.
•
Childr
en 12 and under should always ride in the rear seat properly secured
in child restraints or seat belts according to their age and weight.
•
Do not drink and driv
e.
For more information, refer to the “Safety — Seats, seat belts and supplemental restraint system
(section 1)”, the “Monitor, climate, audio, phone and voice recognition systems (section 4)” and the
“Starting and driving (section 5)” of your Owner’s Manual.
Additional information about your vehicle is also available in your Owner’s Manual,
Navigation System Owner’s Manual and at www.NissanUSA.com.
NEW SYSTEM FEATURESHow to Use Your Maxima’s Touch-screen Display .....................................2
Ar ound View® Monitor (AVM) with Moving Object Detection (MOD) (if so equipped)..3
Blind Spot
Warning (BSW) (if so equipped)
.............................................5
Pr
edictive Forward Collision Warning (PFCW) (if so equipped) .........................
5
F
orward Emergency Braking (FEB) (if so equipped) ...................................
5
V
ehicle Dynamic Control (VDC) ........................................................
6
NissanC
onnect
SM Services Powered by SiriusXM™ (if so equipped)....................6
SiriusXM
Travel Link and SiriusXM Traffic ..............................................8
Displa
y Commander ...................................................................
8
ESSENTIAL INFORMATIONTire Pressure Monitoring System (TPMS) with Easy-Fill Tire Alert .....................9
L oose Fuel Cap........................................................................\
10
F
uel-filler Door .......................................................................\
.
10
He
ated Steering Wheel (if so equipped)
...............................................10
Clock Set/A
djustment .................................................................
11
FIRST DRIVE FEATURESNissan Intelligent Key® System .......................................................12
T runk Lid Release .....................................................................14
Se
at Adjustments
.....................................................................15
A
utomatic Drive Positioner (if so equipped) ..........................................
16
Outside Mirr
or Control Switch ........................................................
16
S
tarting/Stopping the Engine ........................................................
17
He
adlight Control Switch
.............................................................17
Wiper and
Washer Switch
.............................................................18
Moonr
oof/Rear Sunshade Switch (if so equipped) ...................................
19
He
ater and Air Conditioner (automatic) ..............................................
20
FM/AM/SiriusXM® Satel
lite Radio with CD Player
.....................................22
USB (Univ
ersal Serial Bus) Connection Port/AUX Jack and iPod® Interface
(if so equipped)
........................................................................\
23
F
ront Armrest/Center Console Storage Box
..........................................24
Cruise C
ontrol (if so equipped)
........................................................24
Intel
ligent Cruise Control (ICC) (if so equipped)
.......................................25
SYSTEM GUIDEVehicle Information Display...........................................................26
Apple C arPlay™ (if so equipped) ......................................................27
Hands-fr
ee Text Messaging Assistant ................................................
28
Bluetooth® Hands-fr
ee Phone System ...............................................
29 S
ystem Operating Tips
.............................................................29
Bluetooth® S
treaming Audio
..........................................................32
Na
vigation System
....................................................................33
HomeLink®
Universal Transceiver
.....................................................35
TABLE OF CONTENTS
Page 7 of 38
5
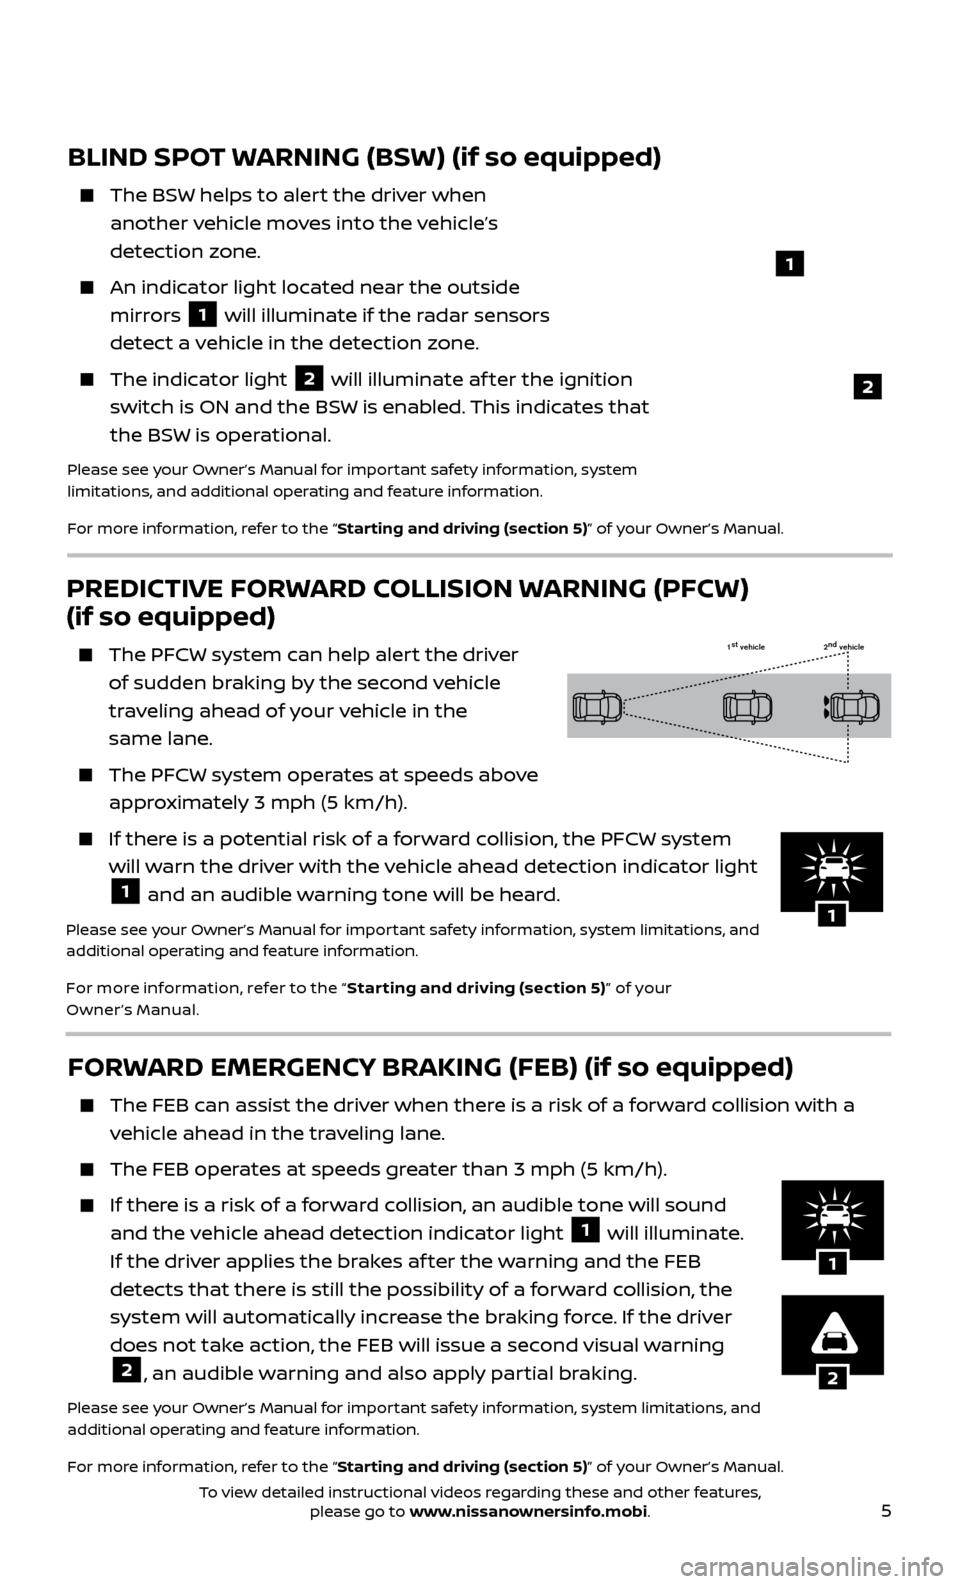
PREDICTIVE FORWARD COLLISION WARNING (PFCW)
(if so equipped)
The PFCW system can help alert the driver
of sudden braking by the second vehicle
traveling ahead of your vehicle in the
same lane.
The PFCW system operates at speeds above
approximately 3 mph (5 km/h).
If there is a potential risk of a forward collision, the PFCW system will warn the driver with the vehicle ahead detection indicator light
1 and an audible warning tone will be heard.
Please see your Owner’s Manual for important safety information, system limitations, and
additional operating and feature information.
For more information, refer to the “ Star ting and driving (section 5)” of your
Owner’s Manual.
FORWARD EMERGENCY BRAKING (FEB) (if so equipped)
The FEB c an assist the driver when there is a risk of a forward collision with a
vehicle ahead in the traveling lane.
The FEB oper ates at speeds greater than 3 mph (5 km/h).
If there is a risk of a forward collision, an audible tone will sound
and the vehicle ahead detection indicator light 1 will illuminate.
If the driver applies the brakes af ter the warning and the FEB
detects that there is still the possibility of a forward collision, the
system will automatically increase the braking force. If the driver
does not take action, the FEB will issue a second visual warning
2, an audible warning and also apply partial braking.
Please see your Owner’s Manual for important safety information, system limitations, and
additional operating and feature information.
For more information, refer to the “Starting and driving (section 5)” of your Owner’s Manual.
1 st
vehicle 2nd
vehicle
BLIND SPOT WARNING (BSW) (if so equipped)
The BSW helps to alert the driver when
another vehicle moves into the vehicle’s
detection zone.
An indicator light located near the outside mirrors
1 will illuminate if the radar sensors
detect a vehicle in the detection zone.
The indic ator light 2 will illuminate af ter the ignition
switch is ON and the BSW is enabled. This indicates that
the BSW is operational.
Please see your Owner’s Manual for important safety information, system
limitations, and additional operating and feature information.
For more information, refer to the “Starting and driving (section 5)” of your Owner’s Manual.
1
2
2
1
1
To view detailed instructional videos regarding these and other features, please go to www.nissanownersinfo.mobi.
Page 8 of 38

6
NEW SYSTEM FEATURES
NISSANCONNECTSM SERVICES1 POWERED BY SiriusXM®
(if so equipped)
NissanConnect Services is a collection of security and convenience services that add
innovation to your daily drive.
To enroll in NissanConnect Services, create an account or log into your Nissan
Owner Portal with your Vehicle Identification Number or VIN. Under the
NissanConnect Services tab, select the red button next to Manage Subscription.
Follow the prompts to enroll in NissanConnect Services. Next, download the
NissanConnect Services companion app and log into it using your Nissan Owner
Portal ID and password.
For full details on NissanConnect Services or to enroll your vehicle, please visit
www.NissanUSA.com/connect or call 855-426-6628.
Here is a quick overview of some of the features that may be available for your
vehicle. A full description of these and other NissanConnect Services can be found in
your Navigation System Owner’s Manual.
Automatic Collision Notification, a service that generates an automatic connection between the vehicle and the Emergency Response Center when the
vehicle has been involved in an accident that was severe enough to deploy the
air bags.
Emergency Call, which connects you to a NissanConnect Services Specialist who will
assist in the dispatch of emergency services
to the vehicle location. To use this feature,
press the
SOS button 1 on the overhead
console. The
SOS button should only be used
in emergency situations.1
VEHICLE DYNAMIC CONTROL (VDC)
VDC should r emain on when driving, except when freeing the
vehicle from mud or snow.
When the VDC OFF switch 1 is pushed, an indicator light
will illuminate. If the system is turned off, it will turn back on
when the switch is pushed a second time. Also, if the system
is turned off and the vehicle is restarted, the system will
automatically turn on again.
Please see your Owner’s Manual for important safety information, system limitations, and additional
operating and feature information.
For more information, refer to the “Instruments and controls (section 2)” and the “Starting and driving
(section 5)” of your Owner’s Manual.
1
To view detailed instructional videos regarding these and other features, please go to www.nissanownersinfo.mobi.
Page 10 of 38
8
NEW SYSTEM FEATURES
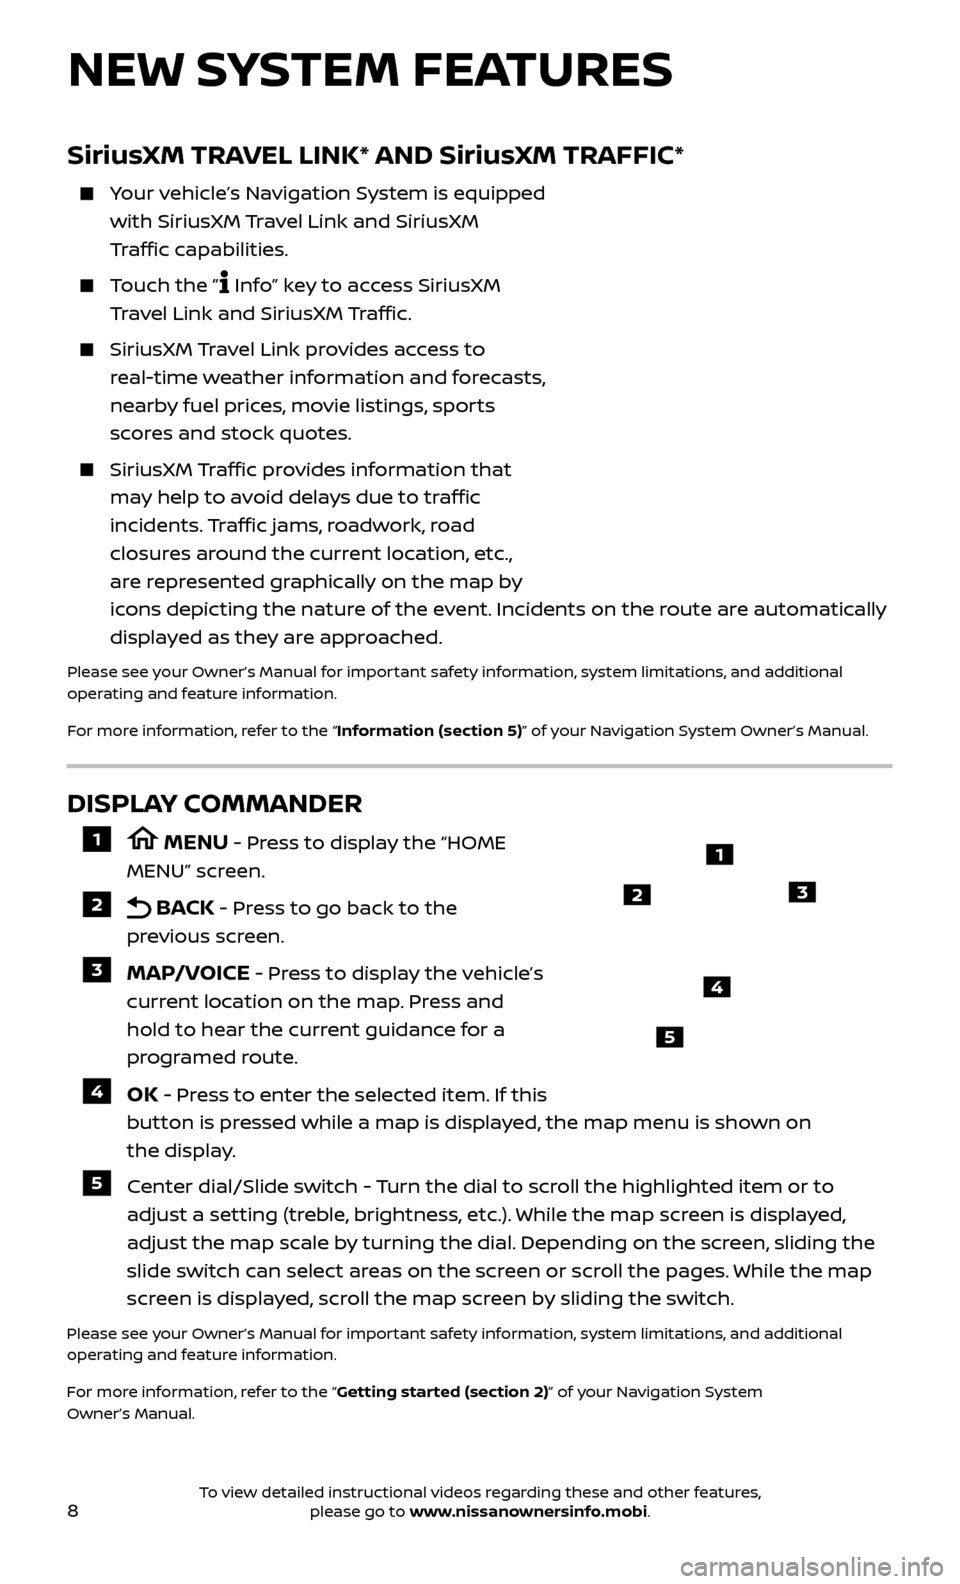
DISPLAY COMMANDER
1 MENU - Press to display the “HOME
MENU” screen.
2 BACK - Press to go back to the
previous screen.
3 MAP/VOICE - Press to display the vehicle’s
current location on the map. Press and
hold to hear the current guidance for a
programed route.
4 OK - Press to enter the selected item. If this
button is pressed while a map is displayed, the map menu is shown on
the display.
5 Center dial/Slide switch - Turn the dial to scroll the highlighted item or to adjust a setting (treble, brightness, etc.). While the map screen is displayed,
adjust the map scale by turning the dial. Depending on the screen, sliding the
slide switch can select areas on the screen or scroll the pages. While the map
screen is displayed, scroll the map screen by sliding the switch.
Please see your Owner’s Manual for important safety information, system limitations, and additional
operating and feature information.
For more information, refer to the “Getting started (section 2)” of your Navigation System
Owner’s Manual.
1
23
4
5
SiriusXM TRAVEL LINK* AND SiriusXM TRAFFIC*
Your vehicle’s Navigation System is equipped with SiriusXM Travel Link and SiriusXM
Traffic capabilities.
Touch the ” Info” key to access SiriusXM
Travel Link and SiriusXM Traffic.
SiriusXM Travel Link provides access to
real-time weather information and forecasts,
nearby fuel prices, movie listings, sports
scores and stock quotes.
SiriusXM Traffic provides information that
may help to avoid delays due to traffic
incidents. Traffic jams, roadwork, road
closures around the current location, etc.,
are represented graphically on the map by
icons depicting the nature of the event. Incidents on the route are automatically
displayed as they are approached.
Please see your Owner’s Manual for important safety information, system limitations, and additional
operating and feature information.
For more information, refer to the “Information (section 5)” of your Navigation System Owner’s Manual.
To view detailed instructional videos regarding these and other features, please go to www.nissanownersinfo.mobi.
Page 11 of 38
9
TIRE PRESSURE MONITORING SYSTEM (TPMS)
WITH EASY-FILL TIRE ALERT
A Tire Pressure Low Add Air warning
message will appear in the vehicle
information display
1 and the low tire
pressure warning light
2 will illuminate
when one or more tires are low in pressure
and air is needed.
• The tir
e pressures should be checked when
the tires are cold. The tires are considered
cold af ter the vehicle has been parked for 3 hours or more or
driven less than 1 mi (1.6 km) at moderate speeds.
Af ter tire pressures are adjusted, drive the vehicle at speeds above 16 mph (25 km/h). The Tire Pressure Low Add Air warning message and low tire
pressure warning light
2 will extinguish.
In addition to the Tire Pressure Low Add Air warning message, you can view
the individual tire’s pressure in the vehicle information display as well as the
recommended pressure, denoted by blue lettering, for each tire.
When adding air to an under -inflated tire, the TPMS with Easy-Fill Tire Alert
provides visual and audible signals to help you inflate the tire to the
recommended COLD tire pressure.
T
o use the Easy-Fill Tire Alert:
1.
Move the shif t lever to the P (PARK) position and apply the parking brake.
2.
Plac
e the ignition switch in the ON position. Do not start the engine.
3.
A
dd air to the under-inflated tire, and within a few seconds, the hazard
warning lights will start flashing.
4.
When the designated tir
e pressure is reached, the horn will beep once and the
hazard warning flashers will stop flashing.
5
. Repeat this procedure for any additional under-inflated tires.
When the lo w tire pressure warning light 2 flashes for 1 minute and then
remains on, the TPMS is not functioning properly. Have the system checked. It is
recommended that you visit a Nissan dealer for this service.
Tire pressure rises and falls depending on the heat caused by the vehicle’s operation and the outside temperature. Low outside temperature can lower
the temperature of the air inside the tire, which can cause a lower tire inflation
pressure. This may cause the low tire pressure warning light
2 to illuminate. If
the warning light illuminates, check the tire pressure in your tires.
•
Check the tir
e pressure (including the spare tire) of ten and always prior to long
distance trips.
The Tire and Loading Information label contains valuable information. Refer to the “Technical and consumer information (section 10)” of your Owner’s Manual
for the location of the Tire and Loading Information label.
Please see your Owner’s Manual for important safety information, system limitations, and additional
operating and feature information.
For more information, refer to the “Instruments and controls (section 2)”, the “Starting and driving
(section 5)” and the “Do-it-yourself (section 8)” of your Owner’s Manual.
1
2
ESSENTIAL INFORMATION
To view detailed instructional videos regarding these and other features, please go to www.nissanownersinfo.mobi.
Page 12 of 38
10
ESSENTIAL INFORMATION
FUEL-FILLER DOOR
To open the fuel-filler door, push the right side of the fuel-filler door to release.
The fuel-filler door is located on the driver’s side of the vehicle.
Please see your Owner’s Manual for important safety information, system
limitations, and additional operating and feature information.
For more information, refer to the “Pre-driving checks and adjustments (section 3)” of your
Owner’s Manual.
HEATED STEERING WHEEL (if so equipped)
Once activated, your heated steering wheel will automatically turn on and off to maintain
a temperature above 68°F (20°C).
When the sur face temperature of the steering
wheel is above 68°F (20°C) and the switch
1 is turned on, the system will not heat the
steering wheel. This does not indicate a malfunction.
Please see your Owner’s Manual for important safety information, system limitations, and additional
operating and feature information.
For more information, refer to the “Instruments and controls (section 2)” of your Owner’s Manual.
LOOSE FUEL CAP
A LOOSE FUEL CAP warning message will
appear in the vehicle information display
1
when the fuel-filler cap is not
tightened correctly.
To tighten, turn the cap clockwise until a single click is heard.
If the cap is not properly tightened, the Malfunction Indicator Light
may illuminate.
Please see your Owner’s Manual for important safety information, system limitations, and additional
operating and feature information.
For more information, refer to the “Instruments and controls (section 2)” and the “Pre-driving checks
and adjustments (section 3)” of your Owner’s Manual.
1
1
To view detailed instructional videos regarding these and other features, please go to www.nissanownersinfo.mobi.
Page 13 of 38

11
CLOCK SET/ADJUSTMENT
To adjust the time and the appearance of the clock on the display:
1.
Pr
ess the
MENU button on the
control panel.
2.
T
ouch the “
Settings” key on the
Launch Bar.
3.
Touch the “
Clock” key.
The following settings can be adjusted:
• On-screen Clock: The clock in the upper right corner of the display can be turned
ON or OFF.
• Clock Format (24h): The clock can be set to 12 hours or 24 hours.
• Offset (hour): The time can be adjusted by increasing or decreasing per hour.
• Offset (min): The time can be adjusted by increasing or decreasing
per minute.
• Daylight Savings Time: The application of Daylight Savings Time can be turned
ON or OFF.
• Time Zone: Adjust the time zone. Choose a time zone from the available list.
Touch the key or press the BACK button on the Display Commander to
return to the previous screen.
Please see your Owner’s Manual for important safety information, system limitations, and additional
operating and feature information.
For more information, refer to the “Getting started (section 2)” of your Navigation System
Owner’s Manual.
To view detailed instructional videos regarding these and other features, please go to www.nissanownersinfo.mobi.