Page 9 of 38

7
Roadside Assistance, which dispatches roadside assistance to the vehicle’s location
in non-emergency situations. Roadside
Assistance can be accessed by touching the
headset icon 2 on the map screen, via
the NissanConnect Services companion app
or by calling the Roadside Assistance
provider directly.
Stolen Vehicle Locator, a service that works in coordination with law enforcement agencies to assist in the recovery of a stolen vehicle.
Remote Door Lock/Unlock, for use when you forget to lock your vehicle or if you need to open it and do not have the keys. To use this feature, log into the
NissanConnect Services companion app or website or contact a NissanConnect
Services Response Specialist.
Assisted Se arch, a feature that allows you to verbally request point-of-interest
or destination data from a live operator by touching the
headset icon 2 on
the map screen.
Journey Planner, with which you can send a route with a destination and up to five way points directly to the vehicle.
Boundar y Alert, a feature that allows you to
monitor the movement of your vehicle in
and out of specified regions you have set on
the Monitoring section of the NissanConnect
Services web portal or companion app.
Speed Alert, which sends you alerts when your vehicle speed exceeds a threshold
you have set on the web portal or
companion app.
To access these features in your vehicle:
•
Touch the “
Info” key 3 on the
control panel.
•
Touch the NissanConnect Services key
4.
Please see your Owner’s Manual for important safety information, system limitations, and additional
operating and feature information.
For more information, refer to the “Information (section 5)” of your Navigation System Owner’s Manual.
2
4
3
To view detailed instructional videos regarding these and other features, please go to www.nissanownersinfo.mobi.
Page 10 of 38

8
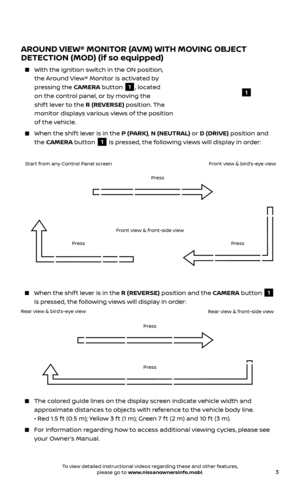
NEW SYSTEM FEATURES
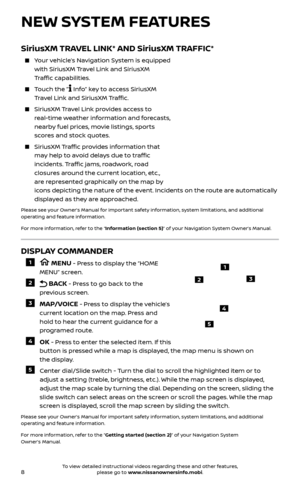
DISPLAY COMMANDER
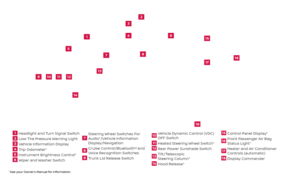
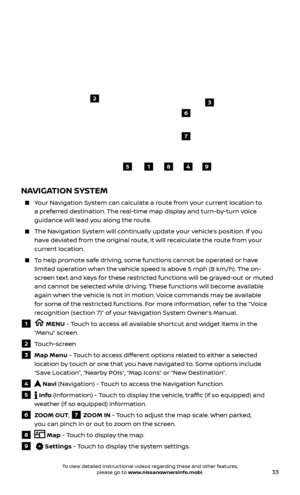
1 MENU - Press to display the “HOME
MENU” screen.
2 BACK - Press to go back to the
previous screen.
3 MAP/VOICE - Press to display the vehicle’s
current location on the map. Press and
hold to hear the current guidance for a
programed route.
4 OK - Press to enter the selected item. If this
button is pressed while a map is displayed, the map menu is shown on
the display.
5 Center dial/Slide switch - Turn the dial to scroll the highlighted item or to adjust a setting (treble, brightness, etc.). While the map screen is displayed,
adjust the map scale by turning the dial. Depending on the screen, sliding the
slide switch can select areas on the screen or scroll the pages. While the map
screen is displayed, scroll the map screen by sliding the switch.
Please see your Owner’s Manual for important safety information, system limitations, and additional
operating and feature information.
For more information, refer to the “Getting started (section 2)” of your Navigation System
Owner’s Manual.
1
23
4
5
SiriusXM TRAVEL LINK* AND SiriusXM TRAFFIC*
Your vehicle’s Navigation System is equipped with SiriusXM Travel Link and SiriusXM
Traffic capabilities.
Touch the ” Info” key to access SiriusXM
Travel Link and SiriusXM Traffic.
SiriusXM Travel Link provides access to
real-time weather information and forecasts,
nearby fuel prices, movie listings, sports
scores and stock quotes.
SiriusXM Traffic provides information that
may help to avoid delays due to traffic
incidents. Traffic jams, roadwork, road
closures around the current location, etc.,
are represented graphically on the map by
icons depicting the nature of the event. Incidents on the route are automatically
displayed as they are approached.
Please see your Owner’s Manual for important safety information, system limitations, and additional
operating and feature information.
For more information, refer to the “Information (section 5)” of your Navigation System Owner’s Manual.
To view detailed instructional videos regarding these and other features, please go to www.nissanownersinfo.mobi.
Page 11 of 38

WITH EASY-FILL TIRE ALERT
A Tire Pressure Low Add Air warning
message will appear in the vehicle
information display
1 and the low tire
pressure warn")
9
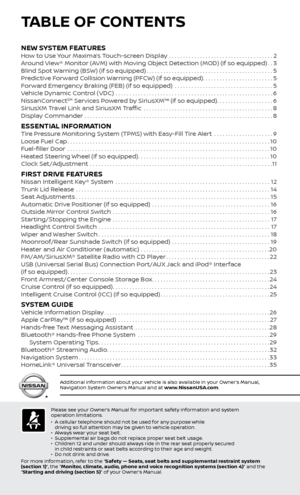
TIRE PRESSURE MONITORING SYSTEM (TPMS)
WITH EASY-FILL TIRE ALERT
A Tire Pressure Low Add Air warning
message will appear in the vehicle
information display
1 and the low tire
pressure warning light
2 will illuminate
when one or more tires are low in pressure
and air is needed.
• The tir
e pressures should be checked when
the tires are cold. The tires are considered
cold af ter the vehicle has been parked for 3 hours or more or
driven less than 1 mi (1.6 km) at moderate speeds.
Af ter tire pressures are adjusted, drive the vehicle at speeds above 16 mph (25 km/h). The Tire Pressure Low Add Air warning message and low tire
pressure warning light
2 will extinguish.
In addition to the Tire Pressure Low Add Air warning message, you can view
the individual tire’s pressure in the vehicle information display as well as the
recommended pressure, denoted by blue lettering, for each tire.
When adding air to an under -inflated tire, the TPMS with Easy-Fill Tire Alert
provides visual and audible signals to help you inflate the tire to the
recommended COLD tire pressure.
T
o use the Easy-Fill Tire Alert:
1.
Move the shif t lever to the P (PARK) position and apply the parking brake.
2.
Plac
e the ignition switch in the ON position. Do not start the engine.
3.
A
dd air to the under-inflated tire, and within a few seconds, the hazard
warning lights will start flashing.
4.
When the designated tir
e pressure is reached, the horn will beep once and the
hazard warning flashers will stop flashing.
5
. Repeat this procedure for any additional under-inflated tires.
When the lo w tire pressure warning light 2 flashes for 1 minute and then
remains on, the TPMS is not functioning properly. Have the system checked. It is
recommended that you visit a Nissan dealer for this service.
Tire pressure rises and falls depending on the heat caused by the vehicle’s operation and the outside temperature. Low outside temperature can lower
the temperature of the air inside the tire, which can cause a lower tire inflation
pressure. This may cause the low tire pressure warning light
2 to illuminate. If
the warning light illuminates, check the tire pressure in your tires.
•
Check the tir
e pressure (including the spare tire) of ten and always prior to long
distance trips.
The Tire and Loading Information label contains valuable information. Refer to the “Technical and consumer information (section 10)” of your Owner’s Manual
for the location of the Tire and Loading Information label.
Please see your Owner’s Manual for important safety information, system limitations, and additional
operating and feature information.
For more information, refer to the “Instruments and controls (section 2)”, the “Starting and driving
(section 5)” and the “Do-it-yourself (section 8)” of your Owner’s Manual.
1
2
ESSENTIAL INFORMATION
To view detailed instructional videos regarding these and other features, please go to www.nissanownersinfo.mobi.
Page 12 of 38

10
ESSENTIAL INFORMATION
FUEL-FILLER DOOR
To open the fuel-filler door, push the right side of the fuel-filler door to release.
The fuel-filler door is located on the driver’s side of the vehicle.
Please see your Owner’s Manual for important safety information, system
limitations, and additional operating and feature information.
For more information, refer to the “Pre-driving checks and adjustments (section 3)” of your
Owner’s Manual.
HEATED STEERING WHEEL (if so equipped)
Once activated, your heated steering wheel will automatically turn on and off to maintain
a temperature above 68°F (20°C).
When the sur face temperature of the steering
wheel is above 68°F (20°C) and the switch
1 is turned on, the system will not heat the
steering wheel. This does not indicate a malfunction.
Please see your Owner’s Manual for important safety information, system limitations, and additional
operating and feature information.
For more information, refer to the “Instruments and controls (section 2)” of your Owner’s Manual.
LOOSE FUEL CAP
A LOOSE FUEL CAP warning message will
appear in the vehicle information display
1
when the fuel-filler cap is not
tightened correctly.
To tighten, turn the cap clockwise until a single click is heard.
If the cap is not properly tightened, the Malfunction Indicator Light
may illuminate.
Please see your Owner’s Manual for important safety information, system limitations, and additional
operating and feature information.
For more information, refer to the “Instruments and controls (section 2)” and the “Pre-driving checks
and adjustments (section 3)” of your Owner’s Manual.
1
1
To view detailed instructional videos regarding these and other features, please go to www.nissanownersinfo.mobi.
Page 13 of 38

11
CLOCK SET/ADJUSTMENT
To adjust the time and the appearance of the clock on the display:
1.
Pr
ess the
MENU button on the
control panel.
2.
T
ouch the “
Settings” key on the
Launch Bar.
3.
Touch the “
Clock” key.
The following settings can be adjusted:
• On-screen Clock: The clock in the upper right corner of the display can be turned
ON or OFF.
• Clock Format (24h): The clock can be set to 12 hours or 24 hours.
• Offset (hour): The time can be adjusted by increasing or decreasing per hour.
• Offset (min): The time can be adjusted by increasing or decreasing
per minute.
• Daylight Savings Time: The application of Daylight Savings Time can be turned
ON or OFF.
• Time Zone: Adjust the time zone. Choose a time zone from the available list.
Touch the key or press the BACK button on the Display Commander to
return to the previous screen.
Please see your Owner’s Manual for important safety information, system limitations, and additional
operating and feature information.
For more information, refer to the “Getting started (section 2)” of your Navigation System
Owner’s Manual.
To view detailed instructional videos regarding these and other features, please go to www.nissanownersinfo.mobi.
Page 14 of 38

12
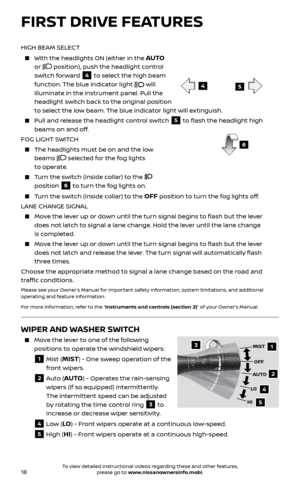
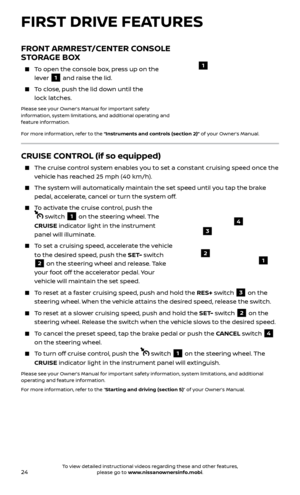
FIRST DRIVE FEATURES
NISSAN INTELLIGENT KEY® SYSTEM
The Nissan Intelligent Key® system allows you to lock or unlock your vehicle, open
your lif tgate and start the engine. It is important to make sure the Intelligent Key
(I-Key) is with you (that is, in your pocket or purse).
KEY-LINKED SYSTEM (if so equipped)
The vehicle information display has added features, allowing the Key-Linked System to
remember some of the vehicle information
display settings.
The Key-Linked System states which I-Key is being recognized
1, and enabling/disabling
of the system’s function can be easily
accessed through notifications on the vehicle
information display.
The Key-Linked System can be turned on or off through the vehicle information display in
the “Key-Linked Settings” screen
2.
You can set a maximum of two I-Keys to the Key-Linked System.
When the system is enabled , the recognized I-Key is displayed at engine start-up
(Engine ON) as well as within the “Key-Linked Settings” screen
2.
When the system is ac tive, the vehicle information display setting items are
memorized for each key that has been enabled in the Key-Linked System.
If two keys are in the vehicle, the Key-Linked System will recognize the key that was used most recently; this usually means the last key to unlock/lock the door
from the I-Key.
If there is a desire to change to another key that is in the vehicle, turn off the engine and initiate communication from the desired key.
1.
Turn the engine to OFF.
2.
Press the
button from the desired I-Key.
3.
Start the engine.
4.
The desir
ed Key Number recognized should appear on the vehicle
information display.
The vehicle information display displays a pop-up notification at Engine ON for the recognition of the system with a shortcut function to the setup menu.
From the shortcut setup menu, you can select to enable or disable the
Key-Linked System or select “Later” to keep the factory state.
When enabled , the Key-Linked System will remember the state of the items
memorized automatically from the last ignition cycle.
2
1
To view detailed instructional videos regarding these and other features, please go to www.nissanownersinfo.mobi.
Page 15 of 38
 from the vehicle. The effective operating range may be shorter if there are walls, strong
radio wave sourc")
13
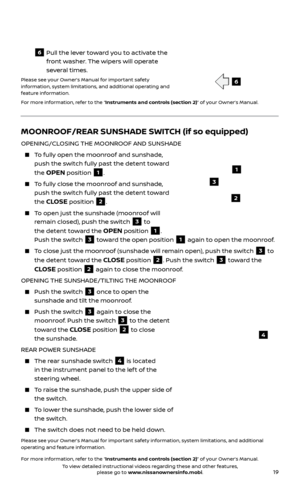
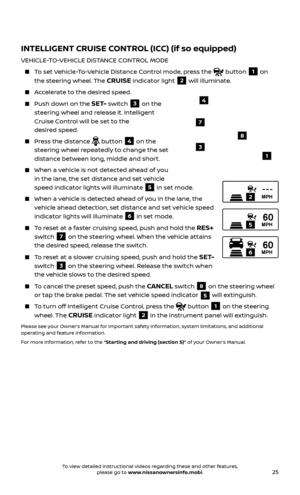
REMOTE ENGINE START*
The remote start operating range is approximately 200 f t (60 m) from the vehicle. The effective operating range may be shorter if there are walls, strong
radio wave sources near the operating location or other obstructions between
the key and the vehicle.
For the remote start to function, the vehicle must be in the P (PARK) position with the ignition off and all doors must be closed and locked. Please see your
Owner’s Manual for additional information.
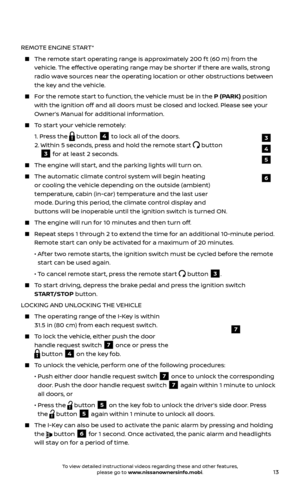
To start your vehicle remotely:
1.
Press the
button 4 to lock all of the doors.
2.
Within 5 sec
onds, press and hold the remote start
button
3 for at least 2 seconds.
The engine wil l start, and the parking lights will turn on.
The automatic climate c ontrol system will begin heating
or cooling the vehicle depending on the outside (ambient)
temperature, cabin (in-car) temperature and the last user
mode. During this period, the climate control display and
buttons will be inoperable until the ignition switch is turned ON.
The engine wil l run for 10 minutes and then turn off.
Repeat steps 1 through 2 to extend the time for an additional 10-minute period.
Remote start can only be activated for a maximum of 20 minutes.
•
A
f ter two remote starts, the ignition switch must be cycled before the remote
start can be used again.
• T
o cancel remote start, press the remote start
button 3.
To start driving, depress the brake pedal and press the ignition switch START/STOP button.
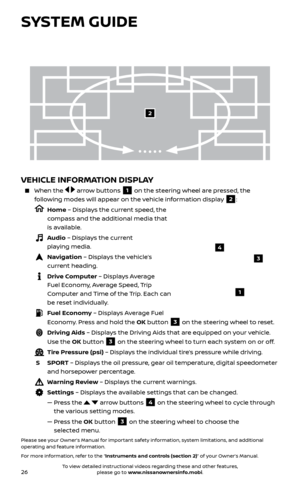
LOCKING AND UNLOCKING THE VEHICLE
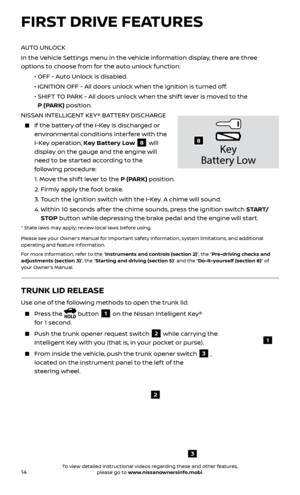
The oper ating range of the I-Key is within
31.5 in (80 cm) from each request switch.
To lock the vehicle, either push the door handle request switch
7 once or press the
button 4 on the key fob.
To unlock the vehicle, perform one of the following procedures:
•
Push either door hand
le request switch
7 once to unlock the corresponding
door. Push the door handle request switch
7 again within 1 minute to unlock
all doors, or
•
Pr
ess the
button 5 on the key fob to unlock the driver’s side door. Press
the
button 5 again within 1 minute to unlock all doors.
The I-Key can also be used to activate the panic alarm by pressing and holding the
button 6 for 1 second. Once activated, the panic alarm and headlights
will stay on for a period of time.
7
3
4
6
5
To view detailed instructional videos regarding these and other features, please go to www.nissanownersinfo.mobi.
Page 16 of 38

14
AUTO UNLOCK
In the Vehicle Settings menu in the vehicle information display, there are three
options to choose from for the auto unlock function:
•
OFF - A
uto Unlock is disabled.
•
IGNITION OFF - A
ll doors unlock when the ignition is turned off.
•
SHIFT
TO PARK - All doors unlock when the shif t lever is moved to the
P (PARK) position.
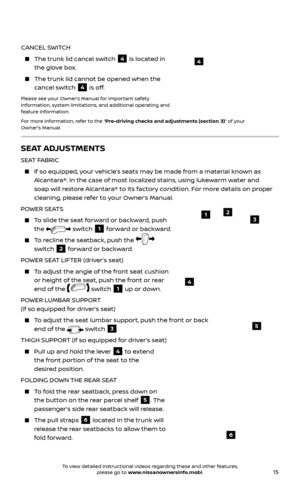
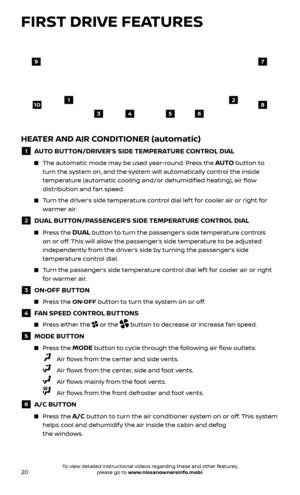
NISSAN INTELLIGENT KEY® BATTERY DISCHARGE
If the bat tery of the I-Key is discharged or
environmental conditions interfere with the
I-Key operation, Key Battery Low
8 will
display on the gauge and the engine will
need to be started according to the
following procedure:
1.
Move the shif t lever to the P (PARK) position.
2.
Firmly apply the foot brake.
3.
T
ouch the ignition switch with the I-Key. A chime will sound.
4.
Within 10 sec
onds af ter the chime sounds, press the ignition switch S TA R T/
STOP button while depressing the brake pedal and the engine will start.
* State laws may apply; review local laws before using.
Please see your Owner’s Manual for important safety information, system limitations, and additional
operating and feature information.
For more information, refer to the “Instruments and controls (section 2)”, the “Pre-driving checks and
adjustments (section 3)”, the “Starting and driving (section 5)” and the “Do-it-yourself (section 8)” of
your Owner’s Manual.
Key
Battery Lo w
8
FIRST DRIVE FEATURES
3
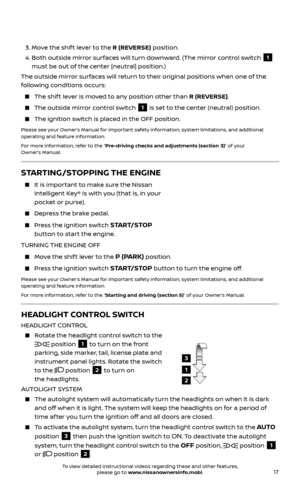
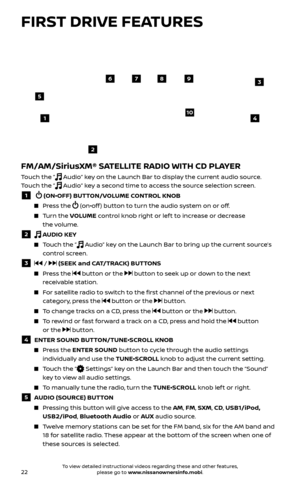
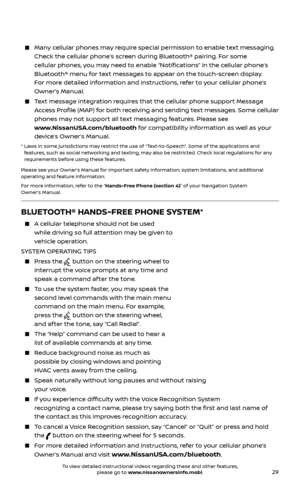
TRUNK LID RELEASE
Use one of the following methods to open the trunk lid:
Press the button 1 on the Nissan Intelligent Key®
for 1 second.
Push the trunk opener r equest switch 2 while carrying the
Intelligent Key with you (that is, in your pocket or purse).
From inside the vehicle, push the trunk opener switch 3 ,
located on the instrument panel to the lef t of the
steering wheel.
1
2
To view detailed instructional videos regarding these and other features, please go to www.nissanownersinfo.mobi.