2017 NISSAN MAXIMA phone
[x] Cancel search: phonePage 106 of 243

5. Information
INITIAL iPhone SETTINGS
Before using Apple CarPlay, check the settings
on your iPhone.
1. Turn on “CarPlay” on your iPhone:Select “Settings” ?“General” ?“Restric-
tions” and turn off the “Restrictions” or turn
on “CarPlay”.
2. Turn on “Siri” on your iPhone:
Select “Settings” ?“General” ?“Siri” and
turn on Siri.
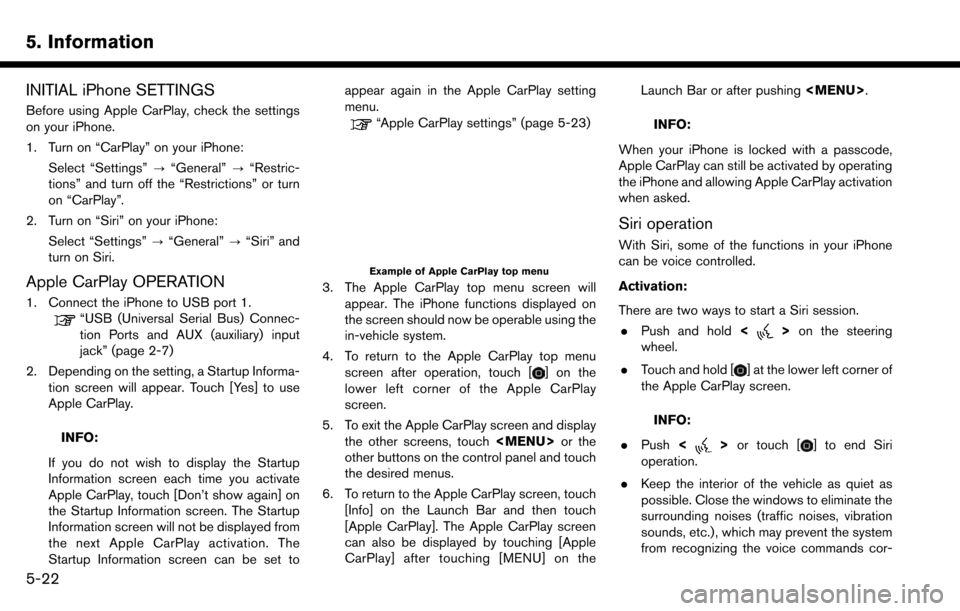
Apple CarPlay OPERATION
1. Connect the iPhone to USB port 1.
“USB (Universal Serial Bus) Connec-
tion Ports and AUX (auxiliary) input
jack” (page 2-7)
2. Depending on the setting, a Startup Informa- tion screen will appear. Touch [Yes] to use
Apple CarPlay.
INFO:
If you do not wish to display the Startup
Information screen each time you activate
Apple CarPlay, touch [Don’t show again] on
the Startup Information screen. The Startup
Information screen will not be displayed from
the next Apple CarPlay activation. The
Startup Information screen can be set to appear again in the Apple CarPlay setting
menu.
“Apple CarPlay settings” (page 5-23)
Example of Apple CarPlay top menu
3. The Apple CarPlay top menu screen will
appear. The iPhone functions displayed on
the screen should now be operable using the
in-vehicle system.
4. To return to the Apple CarPlay top menu screen after operation, touch [
] on the
lower left corner of the Apple CarPlay
screen.
5. To exit the Apple CarPlay screen and display the other screens, touch
Page 107 of 243

rectly.
. For functions that can be used with Siri,
please refer to the Apple website.
. The volume level of Siri can be adjusted.
“Volume and Beeps settings”
(page 2-20)
Phone operation (if so equipped)
If you wish to use your phone while Apple
CarPlay is activated, follow the procedure below:
1. Touch [Phone] on the Launch Bar.
2. Operate the screen displayed to make a call,
etc.
Apple CarPlay SETTINGS
1. Touch [Settings] on the Launch Bar.
2. Touch [Apple CarPlay Settings].
Available items:
. [Always Start Apple CarPlay]:
When this item is turned on, Apple CarPlay
will activate automatically when the iPhone is
connected to USB port 1.
. [Nissan’s Help for Apple CarPlay]:
Displays helpful tips for Apple CarPlay
operation. .
[Show Startup Information]:
Allows you to set whether or not to show the
Apple CarPlay Startup Information screen
upon each iPhone connection.
Touch [No] if you do not wish to show the
Startup Information screen each time the
iPhone is connected to USB port 1.
Touch [Yes] to show the Startup Information
screen upon each connection of your iPhone
to USB port 1.
This setting item will be grayed out until you
touch [Don’t show again] on the Startup
Information screen to turn the setting on.
INFO:
. [Nissan’s Help for Apple CarPlay] can also
be accessed from the Information menu.
“Information menu” (page 5-2)
. Phone menu and access to the connected
phone through voice recognition system will
be disabled while Apple CarPlay is con-
nected. To access your phone, use the Siri
function or select the phone icon in the
Apple CarPlay top menu screen.
. Normal voice recognition access to songs on
your iPod music will not be available when
connected to Apple CarPlay. To access your
iPod music, use the Siri function or select the music icon in the Apple CarPlay top menu
screen.
Apple CarPlay SYSTEM LIMITATIONS
For all features of Apple CarPlay to operate
correctly, it is necessary to have a compatible
iPhone, a cellular connection and a data plan.
When Apple CarPlay is operating, system
performance is affected by the strength of the
cellular connection or performance of the phone
itself. If performance of the system decreases:
. Disconnect and reconnect your phone
. Close all apps and restart them
. Cycle phone power off/on to restart
It is also recommended to use the Apple
Lightning cable that was provided with your
phone and confirm the latest software version is
installed.
Functionality of Apple CarPlay may decrease or
be lost if there are changes to operating systems,
hardware, software or other technologies central
to supporting the system that are outside of
NISSAN’s control. Changing government regu-
lations may also affect operation of Apple Car-
Play.
5. Information
5-23
Page 109 of 243

6 Navigation
Safety information ..................................................................... 6-3
Map operation ........................................................................\
.... 6-3Displaying current vehicle location ................................. 6-3
Map types ........................................................................\
...... 6-3
Road color ........................................................................\
..... 6-6
Moving map ........................................................................\
.. 6-6
Changing scale of map ...................................................... 6-7
Changing map ...................................................................... 6-8
Map view settings ............................................................... 6-9
Setting information on map ............................................ 6-12
Traffic information on map (for U.S. and Canada) ..... 6-13
Map Menu screen ............................................................ 6-13
Setting destination ................................................................. 6-14 Basic operations ............................................................... 6-14
Finding address ................................................................ 6-17
Finding nearby place ....................................................... 6-18
Finding points of interest ................................................ 6-19
Setting home as destination .......................................... 6-20
Searching from address book ....................................... 6-21
Searching from previous destinations ......................... 6-21
Searching by connecting to the internet (if
so equipped) ..................................................................... 6-22
Setting intersection .......................................................... 6-22
Setting by phone number ............................................... 6-23
Setting city center ............................................................ 6-23 Setting freeway entrance/exit ...................................... 6-23
Setting from stored routes ........................................... 6-24
Setting point on map ..................................................... 6-24
Setting with NissanConnect
SMServices (if
so equipped) ................................................................... 6-25
Options before starting the route guidance ............ 6-26
Route guidance ...................................................................... 6-27
About route guidance ................................................... 6-27
Route menu ..................................................................... 6-33
Setting new destination ................................................ 6-36
Canceling Route ............................................................. 6-36
Confirming route ............................................................. 6-36
Editing route .................................................................... 6-36
Recalculating route ........................................................ 6-39
Searching for detour route using traffic information
(for U.S. and Canada) ................................................... 6-39
Setting detour route ...................................................... 6-40
Route guidance settings .............................................. 6-40
Viewing traffic information (for U.S. and Canada) ......... 6-46
Viewing available traffic information ........................... 6-46
Traffic information setting ............................................. 6-48
Storing a location/route ....................................................... 6-49 Storing location .............................................................. 6-49
Storing route ................................................................... 6-50
Storing avoid area .......................................................... 6-50
Page 124 of 243
![NISSAN MAXIMA 2017 A36 / 8.G Nissan Connect Navigation Manual 6. Navigation
[Phone Number]Searches for a point of interest by a telephone number.“Setting by phone number” (page 6-23)
[City Center] Sets the center of a city as the destination.
“Setting city NISSAN MAXIMA 2017 A36 / 8.G Nissan Connect Navigation Manual 6. Navigation
[Phone Number]Searches for a point of interest by a telephone number.“Setting by phone number” (page 6-23)
[City Center] Sets the center of a city as the destination.
“Setting city](/manual-img/5/539/w960_539-123.png)
6. Navigation
[Phone Number]Searches for a point of interest by a telephone number.“Setting by phone number” (page 6-23)
[City Center] Sets the center of a city as the destination.
“Setting city center” (page 6-23)
[Freeway Entrance/Exit] Sets a freeway entrance/exit as a destination.
“Setting freeway entrance/exit” (page 6-23)
[Stored Routes] Sets a route from the stored route data.
“Setting from stored routes” (page 6-24)
INFO:
. After setting a destination, the location of the
destination can be adjusted and the location
can be stored in the Address Book, etc.
“Options before starting the route
guidance” (page 6-26)
. The destination can be deleted.
“Canceling Route” (page 6-36)
6-16
Page 131 of 243

SETTING BY PHONE NUMBER
If the phone number of a facility is known, it is
possible to search for a facility by entering the
phone number.
INFO:
. If the area code of the specified telephone
number does not exist in the map data, the
system cannot search for the location.
. Only the locations included in the database
in the map data can be searched for by
phone number. Residential phone numbers
cannot be used to search for a location.
1. Touch [Navi] on the Launch Bar.
2. Touch [Phone Number]. The telephone number input screen is displayed.
3. Enter the telephone number including the area code. After finishing entry, touch [OK].
4. The selected destination is displayed. Touch [Start] after confirming the location of the
displayed destination.
INFO:
If there are more than one location registered for
the phone number, a list screen is displayed.
Touch an item on the list to select a preferred
location.
SETTING CITY CENTER
It is possible to set the center of a specified city
as a destination.
1. Touch [Navi] on the Launch Bar.
2. Touch [City Center]. A character input screen is displayed.
3. Enter the name of the city and touch [List]. A list screen is displayed.
INFO:
Touch [Last 5 Cities] to display the last 5
cities recently set as destinations.
4. Touch the preferred destination from the list.
INFO:
Touch [By Distance] to sort the list by the
nearest distance. Touch [By Name] to sort
the list by the alphabetic order.
5. The selected destination is displayed on the map. Touch [Start] after confirming the
location of the displayed destination.
Voice command
For U.S. and Canada
1. Push <
>located on the steering wheel.
2. After the tone sounds, speak a command.
Use the following voice command to set city
center as a destination:
“City Center”*
*: This voice command operation is available only
when the language setting is in English.
SETTING FREEWAY ENTRANCE/
EXIT
It is possible to set the destination to an entrance
or exit of a freeway.
1. Touch [Navi] on the Launch Bar.
2. Touch [Freeway Entrance/Exit] to display the keyboard input screen.
3. Enter the name of the freeway. After finishing entry, touch [List].
4. Touch the preferred freeway.
6. Navigation
6-23
Page 135 of 243
![NISSAN MAXIMA 2017 A36 / 8.G Nissan Connect Navigation Manual around the destination. Touch [Call] (when
available) to make a phone call to the facility
set as a destination.ROUTE GUIDANCE
ABOUT ROUTE GUIDANCE
After setting the route, select [Start] to start the NISSAN MAXIMA 2017 A36 / 8.G Nissan Connect Navigation Manual around the destination. Touch [Call] (when
available) to make a phone call to the facility
set as a destination.ROUTE GUIDANCE
ABOUT ROUTE GUIDANCE
After setting the route, select [Start] to start the](/manual-img/5/539/w960_539-134.png)
around the destination. Touch [Call] (when
available) to make a phone call to the facility
set as a destination.ROUTE GUIDANCE
ABOUT ROUTE GUIDANCE
After setting the route, select [Start] to start the
route guidance.
Throughout the route guidance, the system
navigates you through the guide points using
visual and voice guidance.
WARNING
. The navigation system’s visual and
voice guidance is for reference pur-
poses only. The contents of the
guidance may be inappropriate de-
pending on the situation.
. Follow all traffic regulations when
driving along the suggested route
(e.g., one-way traffic) .
“Route guidance” (page 6-65)
Voice guidance during route guidance
Basics of voice guidance:
Voice guidance announces which direction to
turn when approaching an intersection for which
a turn is necessary.
INFO:
. There may be some cases in which voice
guidance and actual road conditions do not
correspond. This may occur because of
discrepancies between the actual road and
the information on the map data, or may also
be due to the vehicle speed.
. In case voice guidance does not correspond
to the actual road conditions, follow the
information obtained from traffic signs or
notices on the road.
. Route guidance provided by the navigation
system does not take carpool lane driving
into consideration, especially when carpool
lanes are separated from other road lanes.
. For U.S. and Canada:
The system will announce street names
when the system language is set to English.
Street names are not announced when the
system is set to French or Spanish.
. For Mexico:
The system will announce street names
when the system language is set to Spanish.
Street names are not announced when the
system is set to English or French.
6. Navigation
6-27
Page 160 of 243
![NISSAN MAXIMA 2017 A36 / 8.G Nissan Connect Navigation Manual 6. Navigation
EDITING STORED INFORMATION
Items stored in the system can be edited.
Editing stored home and location
1. Touch [Settings] on the Launch Bar.
2. Touch [Navigation] and touch [Address Book NISSAN MAXIMA 2017 A36 / 8.G Nissan Connect Navigation Manual 6. Navigation
EDITING STORED INFORMATION
Items stored in the system can be edited.
Editing stored home and location
1. Touch [Settings] on the Launch Bar.
2. Touch [Navigation] and touch [Address Book](/manual-img/5/539/w960_539-159.png)
6. Navigation
EDITING STORED INFORMATION
Items stored in the system can be edited.
Editing stored home and location
1. Touch [Settings] on the Launch Bar.
2. Touch [Navigation] and touch [Address Book].
Setting itemAction
[Home Location]* [Edit] [Show Icon on Map] Displays the home icon on the map. [Icon]Selects a home icon of a preferred design.
[Sound] Sets the type of the alarm that sounds when the vehicle
approaches home.
[Direction] Sets the alarm to sound when approaching from a specific
direction.
[Distance] Sets the alarm to sound when reaching a specific distance to
home.
[Phone No.] Stores the home telephone number.
[Move Location] Adjusts the stored home location.
[Delete] Deletes the stored home location.
[OK] Confirms and saves the edited home information.
[Stored Locations] [Sort] [Sorted By Number]Sorts the stored locations.
“Searching from address book” (page 6-21)
[Sorted By Name]
[Sorted By Icon]
[Sorted By Group]
6-52
Page 161 of 243
![NISSAN MAXIMA 2017 A36 / 8.G Nissan Connect Navigation Manual [Add New]Adds a new location.“Storing location by searching” (page 6-49)
Stored Location List [Edit] [Show Icon on Map] Displays the icon of a stored location on the map.
[Name]Registers a name of NISSAN MAXIMA 2017 A36 / 8.G Nissan Connect Navigation Manual [Add New]Adds a new location.“Storing location by searching” (page 6-49)
Stored Location List [Edit] [Show Icon on Map] Displays the icon of a stored location on the map.
[Name]Registers a name of](/manual-img/5/539/w960_539-160.png)
[Add New]Adds a new location.“Storing location by searching” (page 6-49)
Stored Location List [Edit] [Show Icon on Map] Displays the icon of a stored location on the map.
[Name]Registers a name of the entry.
[Voicetag] Registers a voicetag for the entry which allows the entry to be
used with the voice recognition system.
[Icon] Selects an icon for the entry.
[Sound] Sets the type of the alarm that sounds when the vehicle
approaches the location.
[Direction] Sets the alarm to sound when approaching from a specific
direction.
[Distance] Sets the alarm to sound when reaching a specific distance to
the location.
[Phone No.] Registers a phone number of the location.
[Group] Registers a group of the entry.
[Entry Number] Registers an entry number for the location.
[Move Location] Adjusts the stored location information.
[Delete] Deletes the stored location information.
[OK] Confirms and saves the edited stored location information.
*: When home location has not been stored, [Home Location (None)] is displayed and a home location can be stored from the menu.
6. Navigation
6-53