2017 NISSAN MAXIMA AUX
[x] Cancel search: AUXPage 66 of 243
3. Audio system
AUXILIARY (AUX) DEVICES
Connecting auxiliary devices
The auxiliary input jack is located in the media
pocket.
“USB (Universal Serial Bus) Connection
Ports and AUX (auxiliary) input jack”
(page 2-7)
The auxiliary input jack accepts any standard
analog audio input such as from a portable
cassette player, CD player or MP3 player.
INFO:
Insert a 1/8 in (3.5 mm) stereo mini plug in the
audio input jack. If a cable with a mono plug is
used, the audio output may not function normally.
AUX operation
Activation and playing:
Turn on an AUX device.
Connect an AUX cable to the AUX device and
the AUX jack. Select AUX mode from the audio
source menu screen.
“Selecting audio source” (page 3-12)
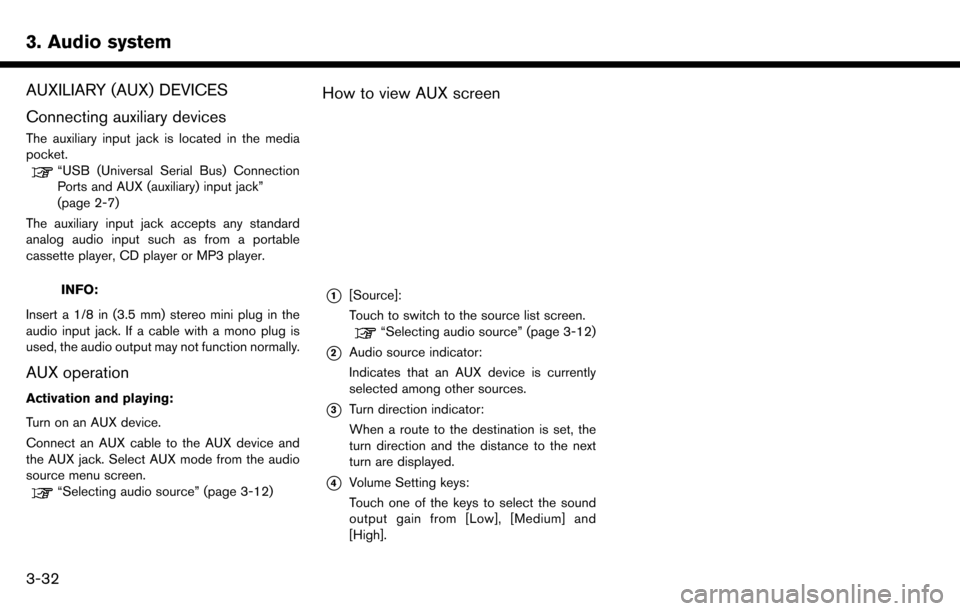
How to view AUX screen
*1[Source]:
Touch to switch to the source list screen.
“Selecting audio source” (page 3-12)
*2Audio source indicator:
Indicates that an AUX device is currently
selected among other sources.
*3Turn direction indicator:
When a route to the destination is set, the
turn direction and the distance to the next
turn are displayed.
*4Volume Setting keys:
Touch one of the keys to select the sound
output gain from [Low], [Medium] and
[High].
3-32
Page 91 of 243
NISSANCONNECTSMMOBILE
APPS (if so equipped)
NISSANCONNECT
SMMOBILE APPS
SMARTPHONE INTEGRATION
This vehicle is equipped with smartphone
integration technology. This allows many com-
patible smartphone applications to be displayed
and easily controlled through the vehicle’s touch
screen display.
Laws in some jurisdictions may restrict the use of
some of the applications and features, such as
social networking and texting. Check local
regulations for any requirements.
INFO:
A compatible smartphone and registration is
required to use mobile applications or to access
connected features of certain vehicle applica-
tions.
REGISTERING WITH NISSANCON-
NECTSMMOBILE APPS
To use the smartphone integration feature, it is
necessary for the user to register. In order to
register, visit the NissanConnect
SMwebsite for
more information and to sign up. Once regis-
tered, download the NissanConnect
SMApp from your compatible phone’s application download
source and then log into the application.
For more information about this technology, visit
the website or contact NissanConnect
SMMobile
Apps Customer Service.
Website:
www.nissanconnect.com.mx Phone:
01 800 9 64 77 26 (9 NISSAN)
CONNECTING PHONE
To use this feature, a compatible smartphone
must be connected via Bluetooth�Šor USB to the
vehicle.
“Connecting Bluetooth�Šdevice”
(page 2-21)
“USB (Universal Serial Bus) Connection
Ports and AUX (auxiliary) input jack”
(page 2-7)
INFO:
. For Apple iPhone, NissanConnect
SMMobile
Apps REQUIRES the phone to be con-
nected via USB after the Bluetooth
�Šcon-
nection is established.
. For Android phones, NissanConnect
SMMo-
bile Apps REQUIRES the phone to be paired via Bluetooth
�Š.
APPLICATION DOWNLOAD
Once connected, the NissanConnectSMApp will
search your phone to determine which compa-
tible applications are currently installed. The
vehicle will then download the in-vehicle inter-
face for each of these compatible applications.
Once downloaded, the user can access many
smartphone Applications through the vehicle
touch screen display with the following opera-
tion.
1. Touch [Info] on the Launch Bar.
2. Touch [NissanConnect Apps].
For more information on application availability
visit the NissanConnect
SMwebsite or contact
NissanConnectSMMobile Apps Customer Ser-
vice.
Website:
www.nissanconnect.com.mx Phone:
01 800 9 64 77 26 (9 NISSAN)
5. Information
5-7
Page 106 of 243
5. Information
INITIAL iPhone SETTINGS
Before using Apple CarPlay, check the settings
on your iPhone.
1. Turn on “CarPlay” on your iPhone:Select “Settings” ?“General” ?“Restric-
tions” and turn off the “Restrictions” or turn
on “CarPlay”.
2. Turn on “Siri” on your iPhone:
Select “Settings” ?“General” ?“Siri” and
turn on Siri.
Apple CarPlay OPERATION
1. Connect the iPhone to USB port 1.
“USB (Universal Serial Bus) Connec-
tion Ports and AUX (auxiliary) input
jack” (page 2-7)
2. Depending on the setting, a Startup Informa- tion screen will appear. Touch [Yes] to use
Apple CarPlay.
INFO:
If you do not wish to display the Startup
Information screen each time you activate
Apple CarPlay, touch [Don’t show again] on
the Startup Information screen. The Startup
Information screen will not be displayed from
the next Apple CarPlay activation. The
Startup Information screen can be set to appear again in the Apple CarPlay setting
menu.
“Apple CarPlay settings” (page 5-23)
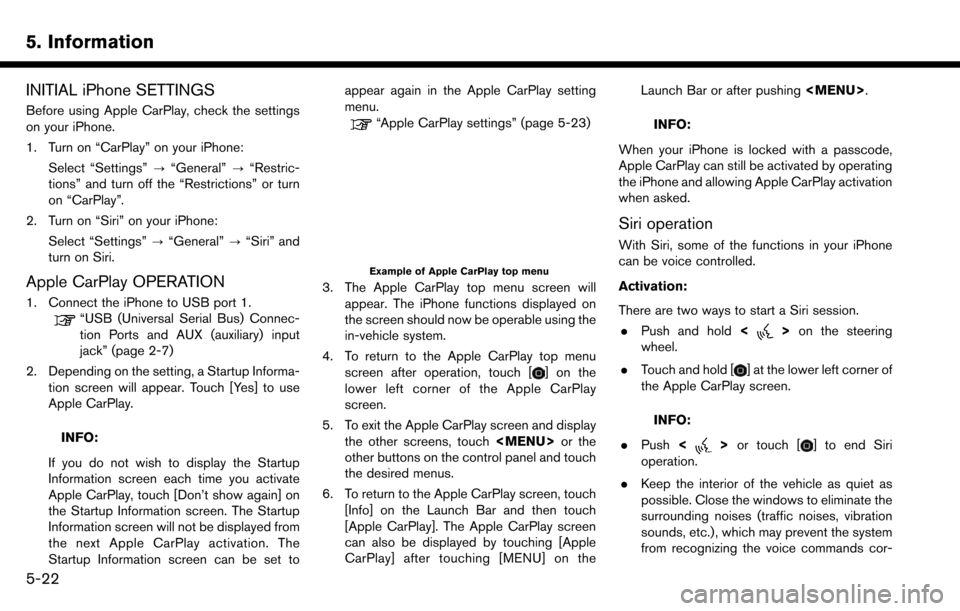
Example of Apple CarPlay top menu
3. The Apple CarPlay top menu screen will
appear. The iPhone functions displayed on
the screen should now be operable using the
in-vehicle system.
4. To return to the Apple CarPlay top menu screen after operation, touch [
] on the
lower left corner of the Apple CarPlay
screen.
5. To exit the Apple CarPlay screen and display the other screens, touch
Page 163 of 243
![NISSAN MAXIMA 2017 A36 / 8.G Nissan Connect Navigation Manual Deleting stored item individually
1. Touch [Settings] on the Launch Bar.
2. Touch [Navigation] and touch [Address Book].
3. Touch [Delete Stored Items].Select the preferred item and touch [Yes] to com NISSAN MAXIMA 2017 A36 / 8.G Nissan Connect Navigation Manual Deleting stored item individually
1. Touch [Settings] on the Launch Bar.
2. Touch [Navigation] and touch [Address Book].
3. Touch [Delete Stored Items].Select the preferred item and touch [Yes] to com](/manual-img/5/539/w960_539-162.png)
Deleting stored item individually
1. Touch [Settings] on the Launch Bar.
2. Touch [Navigation] and touch [Address Book].
3. Touch [Delete Stored Items].Select the preferred item and touch [Yes] to complete the deleting operation.
Step 1 Step2 Action
[Delete Home Location] Deletes home location.
[Delete Address
Book] [Delete All]
Deletes all stored locations.
[Delete One] Deletes a selected stored location.
[Delete Stored
Routes] [Delete All]
Deletes all stored routes.
[Delete One] Deletes selected stored routes.
[Delete Avoid
Areas] [Delete All]
Deletes all Avoid Areas.
[Delete One] Deletes a selected Avoid Area.
[Delete Pre-
vious Destina-
tions] [Delete All Previous Destinations] Deletes all of the previous destinations.
[Delete Previous Destination] Deletes a selected previous destination.
[Delete Previous Start Point] Deletes a previous start point.
[Delete Learned Routes] (for U.S. and Canada) Deletes all system learned routes.
Deleting individual item on map
1. Align the cross pointer over the preferred stored location for deletion by moving on the
map, and then touch [
].
2. Touch [Delete].
3. A confirmation message is displayed. Con-firm the contents of the message and touch
[Yes].
The stored item is deleted from the Address
Book.
TRANSFERRING INFORMATION TO/
FROM ADDRESS BOOK
The information of the stored home and ad-
dresses can be exported and imported using a
USB memory device.
“USB (Universal Serial Bus) Connection
Ports and AUX (auxiliary) input jack”
(page 2-7)
6. Navigation
6-55
Page 197 of 243
Audio Command (for U.S. and Canada)
1st Command 2nd Command 3rd Command Action
AudioPlay
AM Turns to the AM band, selecting the last played station.
FM Turns to the FM band, selecting the last played station.
SXM Turns to the SiriusXM Satellite Radio band, selecting the channel last played.
CD Turns on the CD, selecting the last played mode.
USB Turns on the USB, selecting the last played mode.
iPod Turns on the iPod, selecting the last played mode.
Bluetooth Audio Turns on the Bluetooth
�ŠAudio, selecting the last played mode.
AUX Turns on the AUX audio, selecting the last played mode.
Play AM Turns to the AM band, selecting the last played station.
Play FM Turns to the FM band, selecting the last played station.
Play SXM Turns to the SiriusXM Satellite Radio band, selecting the channel last played.
Play CD Turns on the CD, selecting the last played mode.
Play USB Turns on the USB, selecting the last played mode.
Play iPod Turns on the iPod, selecting the last played mode.
Play Bluetooth Audio Turns on the Bluetooth
�ŠAudio, selecting the last played mode.
Play AUX Turns on the AUX audio, selecting the last played mode.
AM Turns to the AM band, selecting the last played station.
FM Turns to the FM band, selecting the last played station.
SXM Turns to the SiriusXM Satellite Radio band, selecting the channel last played.
7. Voice recognition
7-15
Page 198 of 243
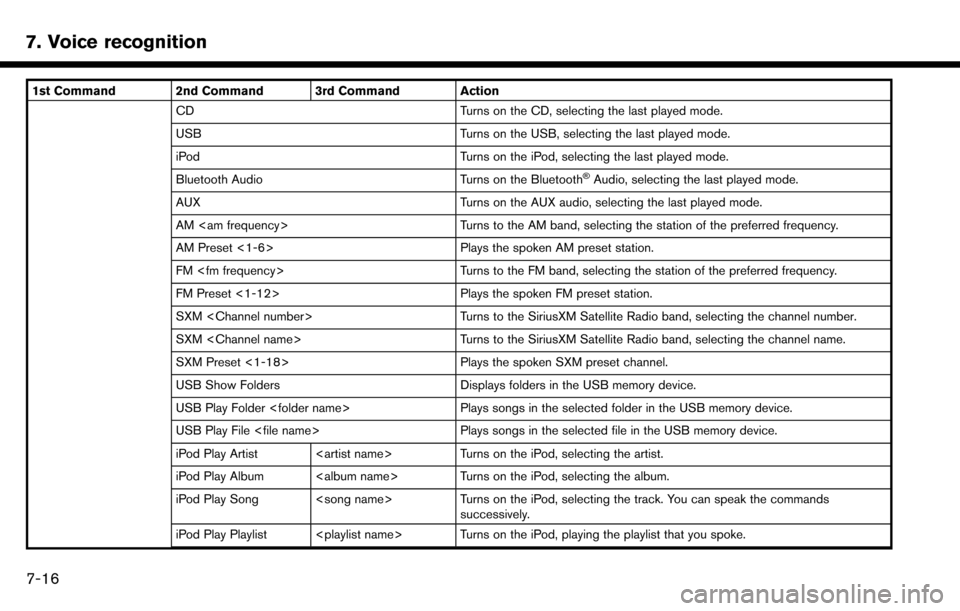
7. Voice recognition
1st Command 2nd Command 3rd Command ActionCD Turns on the CD, selecting the last played mode.
USB Turns on the USB, selecting the last played mode.
iPod Turns on the iPod, selecting the last played mode.
Bluetooth Audio Turns on the Bluetooth
�ŠAudio, selecting the last played mode.
AUX Turns on the AUX audio, selecting the last played mode.
AM
AM Preset <1-6> Plays the spoken AM preset station.
FM
FM Preset <1-12> Plays the spoken FM preset station.
SXM
SXM
SXM Preset <1-18> Plays the spoken SXM preset channel.
USB Show Folders Displays folders in the USB memory device.
USB Play Folder
USB Play File
iPod Play Artist
iPod Play Album
iPod Play Song
iPod Play Playlist
7-16
Page 200 of 243
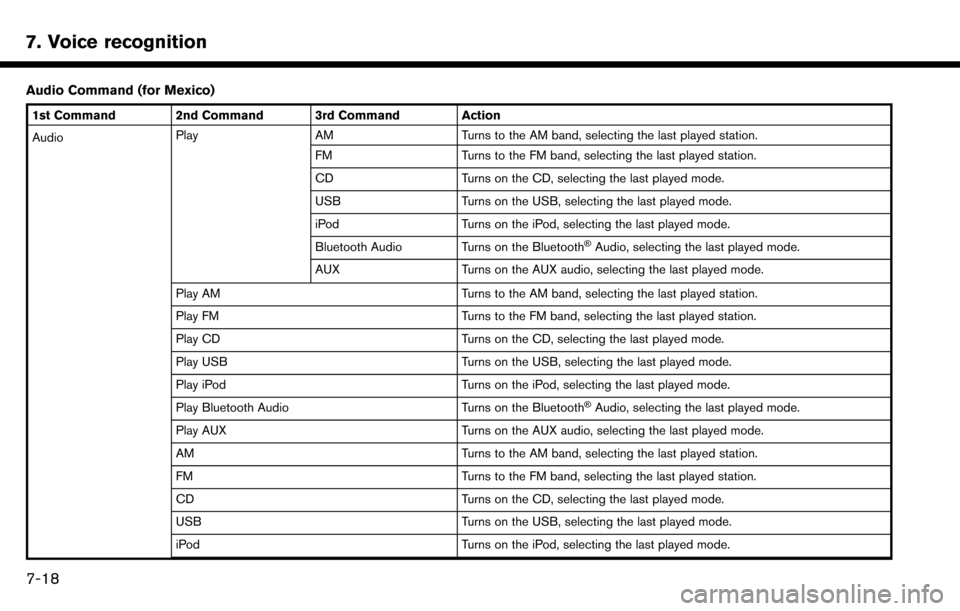
7. Voice recognition
Audio Command (for Mexico)
1st Command 2nd Command 3rd Command Action
AudioPlay
AM Turns to the AM band, selecting the last played station.
FM Turns to the FM band, selecting the last played station.
CD Turns on the CD, selecting the last played mode.
USB Turns on the USB, selecting the last played mode.
iPod Turns on the iPod, selecting the last played mode.
Bluetooth Audio Turns on the Bluetooth
�ŠAudio, selecting the last played mode.
AUX Turns on the AUX audio, selecting the last played mode.
Play AM Turns to the AM band, selecting the last played station.
Play FM Turns to the FM band, selecting the last played station.
Play CD Turns on the CD, selecting the last played mode.
Play USB Turns on the USB, selecting the last played mode.
Play iPod Turns on the iPod, selecting the last played mode.
Play Bluetooth Audio Turns on the Bluetooth
�ŠAudio, selecting the last played mode.
Play AUX Turns on the AUX audio, selecting the last played mode.
AM Turns to the AM band, selecting the last played station.
FM Turns to the FM band, selecting the last played station.
CD Turns on the CD, selecting the last played mode.
USB Turns on the USB, selecting the last played mode.
iPod Turns on the iPod, selecting the last played mode.
7-18
Page 201 of 243
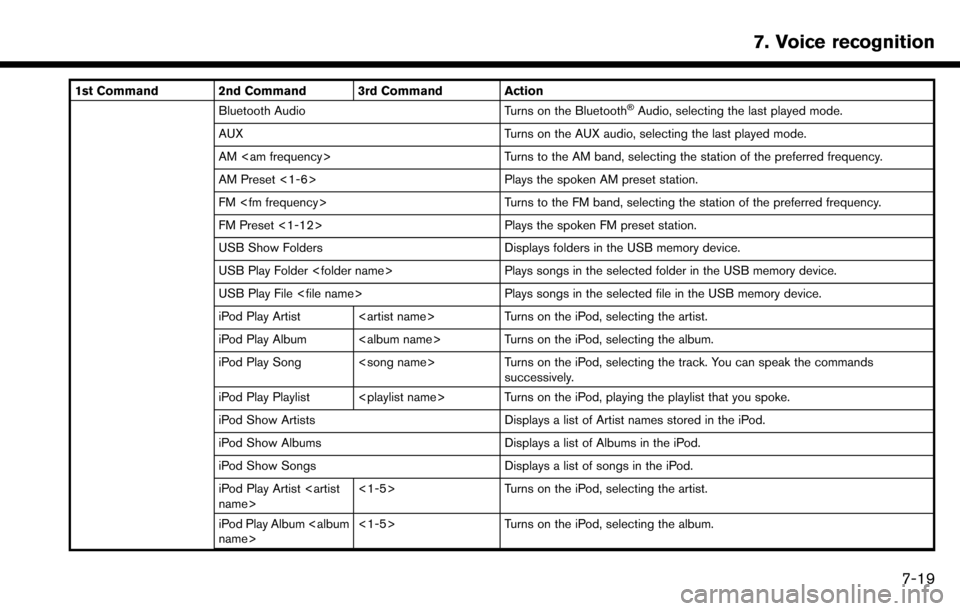
1st Command 2nd Command 3rd Command ActionBluetooth Audio Turns on the Bluetooth�ŠAudio, selecting the last played mode.
AUX Turns on the AUX audio, selecting the last played mode.
AM
AM Preset <1-6> Plays the spoken AM preset station.
FM
FM Preset <1-12> Plays the spoken FM preset station.
USB Show Folders Displays folders in the USB memory device.
USB Play Folder
USB Play File
iPod Play Artist
iPod Play Album
iPod Play Song
successively.
iPod Play Playlist
iPod Show Artists Displays a list of Artist names stored in the iPod.
iPod Show Albums Displays a list of Albums in the iPod.
iPod Show Songs Displays a list of songs in the iPod.
iPod Play Artist
Turns on the iPod, selecting the artist.
iPod Play Album
Turns on the iPod, selecting the album.
7. Voice recognition
7-19