2017 NISSAN ARMADA Passenger
[x] Cancel search: PassengerPage 192 of 614
SPA2450-A
Automatic anti-glare type
The inside mirror is designed so that it
automatically changes reflection according to
the intensity of the headlights of the following
vehicle.
The anti-glare system will be automatically
turned on when the ignition switch is placed in
the ON position.
When the anti-glare system is turned on, the
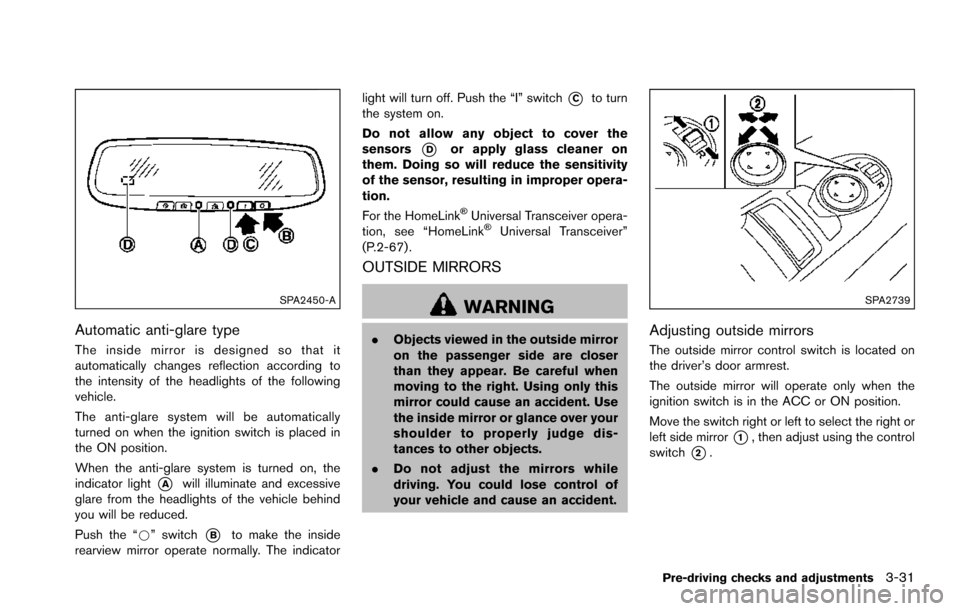
indicator light
*Awill illuminate and excessive
glare from the headlights of the vehicle behind
you will be reduced.
Push the “*” switch
*Bto make the inside
rearview mirror operate normally. The indicator light will turn off. Push the “I” switch
*Cto turn
the system on.
Do not allow any object to cover the
sensors
*Dor apply glass cleaner on
them. Doing so will reduce the sensitivity
of the sensor, resulting in improper opera-
tion.
For the HomeLink
�ŠUniversal Transceiver opera-
tion, see “HomeLink�ŠUniversal Transceiver”
(P.2-67) .
OUTSIDE MIRRORS
WARNING
. Objects viewed in the outside mirror
on the passenger side are closer
than they appear. Be careful when
moving to the right. Using only this
mirror could cause an accident. Use
the inside mirror or glance over your
shoulder to properly judge dis-
tances to other objects.
. Do not adjust the mirrors while
driving. You could lose control of
your vehicle and cause an accident.
SPA2739
Adjusting outside mirrors
The outside mirror control switch is located on
the driver’s door armrest.
The outside mirror will operate only when the
ignition switch is in the ACC or ON position.
Move the switch right or left to select the right or
left side mirror
*1, then adjust using the control
switch
*2.
Pre-driving checks and adjustments3-31
Page 214 of 614

When any mode button is pushed with the
screen off, the screen turns on for further
operation. The screen will turn off automatically
5 seconds after the operation is finished.
To turn on the screen, set this item to the ON
position, or push the
OFF button.
. Brightness/Contrast/Background Color
To adjust the brightness and contrast of the
screen, select the “Brightness” or “Contrast”
key.
Then, you can adjust the brightness and the
contrast using the multi-function controller.
For information on the “Background Color” key,
refer to the separate Navigation System Own-
er’s Manual.
Color Theme:
Choose the theme color of the menu screen.
SAA3151
Comfort settings (if so equipped)
The display as illustrated will appear when
pushing the SETTING button and selecting the
“Others” key, and then selecting the “Comfort”
key. This key does not appear on the display until
the ignition switch is pushed to the ON position.
Auto Interior Illumination:
When this item is turned to ON, the interior
lights will illuminate if any door is unlocked.
Light Sensitivity:
Adjust the sensitivity of the automatic headlights
higher (right) or lower (left) . Light Off Delay:
Choose the duration of the automatic headlight
off timer from 0, 30, 45, 60, 90, 120, 150 and
180 second periods.
Speed Sensing Wiper Interval (if so
equipped):
When this item is turned to ON, the wiper
interval is adjusted automatically according to
the vehicle speed.
Selective Door Unlock:
When this item is turned to ON, only the driver’s
door is unlocked first after the door unlock
operation. When the door handle request switch
on the driver’s or front passenger’s side door is
pushed to be unlocked, only the corresponding
door is unlocked first. All the doors can be
unlocked if the door unlock operation is per-
formed again within 60 seconds.
When this item is turned to OFF, all the doors
will be unlocked after the door unlock operation
is performed once.
Intelligent Key Lock/Unlock:
When this item is turned to ON, door lock/
unlock function by pushing the door handle
request switch will be activated.
Monitor, heater, air conditioner, audio, phone and voice recognition systems4-17
Page 227 of 614
4-30Monitor, heater, air conditioner, audio, phone and voice recognition systems
Available views:
.Front view
An approximately 150-degree view of the
front of the vehicle.
. Rear view
An approximately 150-degree view of the
rear of the vehicle.
. Bird’s-eye view
The surrounding view of the vehicle from
above.
. Front-side view
The view around and ahead of the front
passenger’s side wheel.
. Front-wide view
An approximately 180-degree view of the
front of the vehicle.
. Rear-wide view
An approximately 180-degree view of the
rear of the vehicle.
JVH1397X
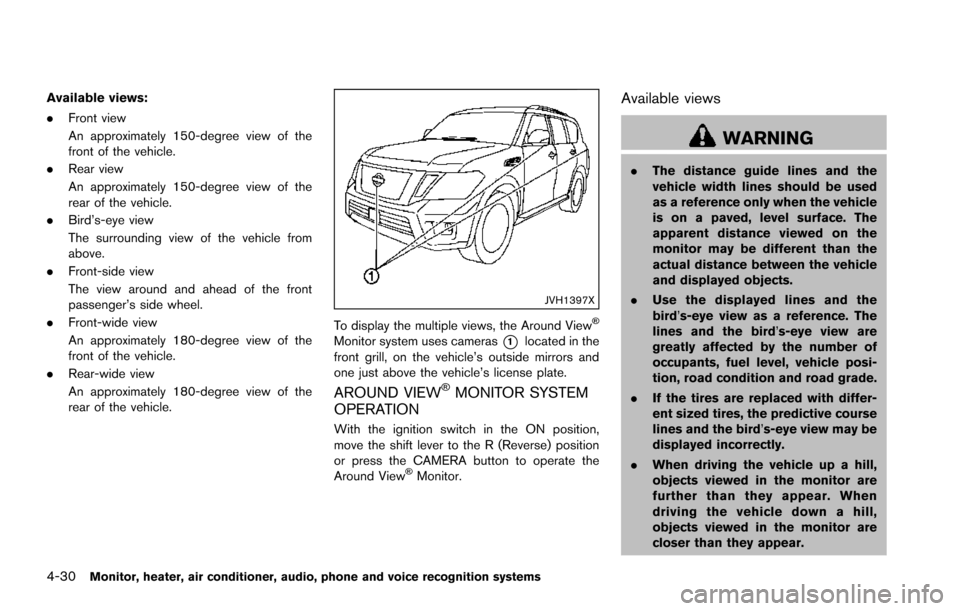
To display the multiple views, the Around View�Š
Monitor system uses cameras*1located in the
front grill, on the vehicle’s outside mirrors and
one just above the vehicle’s license plate.
AROUND VIEW�ŠMONITOR SYSTEM
OPERATION
With the ignition switch in the ON position,
move the shift lever to the R (Reverse) position
or press the CAMERA button to operate the
Around View
�ŠMonitor.
Available views
WARNING
. The distance guide lines and the
vehicle width lines should be used
as a reference only when the vehicle
is on a paved, level surface. The
apparent distance viewed on the
monitor may be different than the
actual distance between the vehicle
and displayed objects.
. Use the displayed lines and the
bird’s-eye view as a reference. The
lines and the bird’s-eye view are
greatly affected by the number of
occupants, fuel level, vehicle posi-
tion, road condition and road grade.
. If the tires are replaced with differ-
ent sized tires, the predictive course
lines and the bird’s-eye view may be
displayed incorrectly.
. When driving the vehicle up a hill,
objects viewed in the monitor are
further than they appear. When
driving the vehicle down a hill,
objects viewed in the monitor are
closer than they appear.
Page 250 of 614
NOTE:
.Odors from inside and outside the
vehicle can build up in the air condi-
tioner unit. Odor can enter the passen-
ger compartment through the vents.
. When parking, set the heater and air
conditioner controls to turn off air
recirculation to allow fresh air into the
passenger compartment. This should
help reduce odors inside the vehicle.
SAA2723
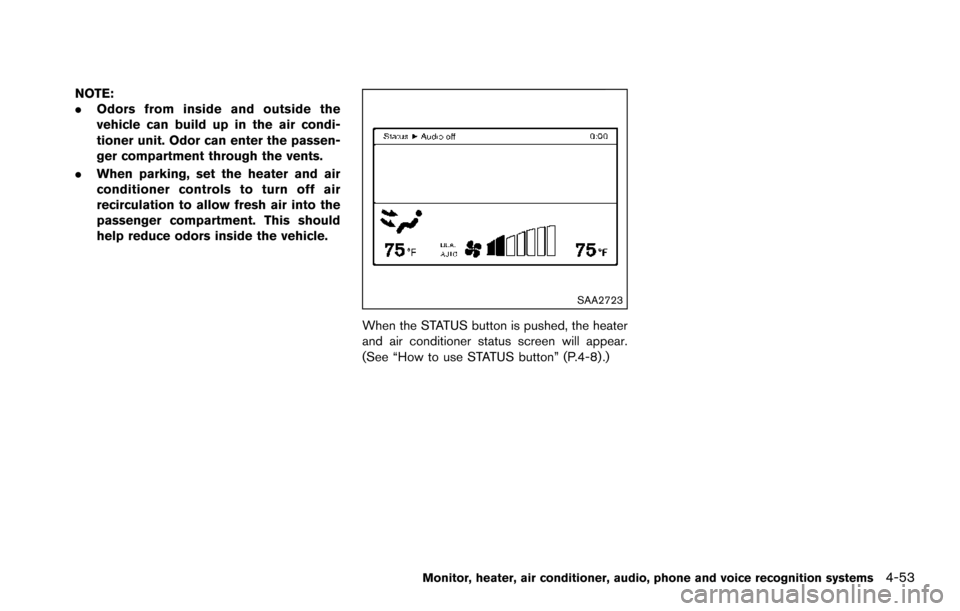
When the STATUS button is pushed, the heater
and air conditioner status screen will appear.
(See “How to use STATUS button” (P.4-8) .)
Monitor, heater, air conditioner, audio, phone and voice recognition systems4-53
Page 251 of 614
4-54Monitor, heater, air conditioner, audio, phone and voice recognition systems
SAA3059
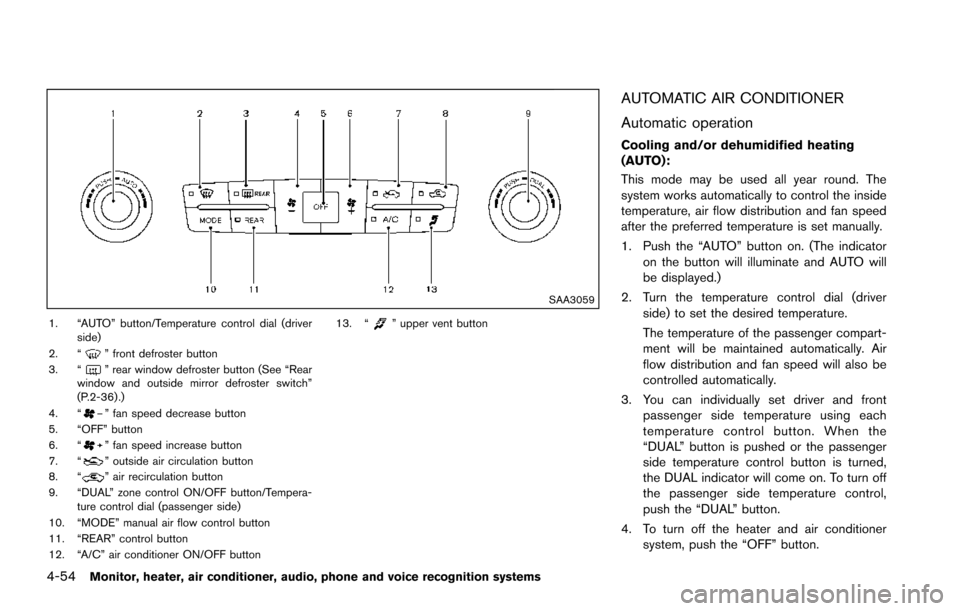
1. “AUTO” button/Temperature control dial (driverside)
2. “
” front defroster button
3. “” rear window defroster button (See “Rear
window and outside mirror defroster switch”
(P.2-36) .)
4. “
” fan speed decrease button
5. “OFF” button
6. “
” fan speed increase button
7. “” outside air circulation button
8. “” air recirculation button
9. “DUAL” zone control ON/OFF button/Tempera- ture control dial (passenger side)
10. “MODE” manual air flow control button
11. “REAR” control button
12. “A/C” air conditioner ON/OFF button 13. “
” upper vent button
AUTOMATIC AIR CONDITIONER
Automatic operation
Cooling and/or dehumidified heating
(AUTO):
This mode may be used all year round. The
system works automatically to control the inside
temperature, air flow distribution and fan speed
after the preferred temperature is set manually.
1. Push the “AUTO” button on. (The indicator
on the button will illuminate and AUTO will
be displayed.)
2. Turn the temperature control dial (driver side) to set the desired temperature.
The temperature of the passenger compart-
ment will be maintained automatically. Air
flow distribution and fan speed will also be
controlled automatically.
3. You can individually set driver and front passenger side temperature using each
temperature control button. When the
“DUAL” button is pushed or the passenger
side temperature control button is turned,
the DUAL indicator will come on. To turn off
the passenger side temperature control,
push the “DUAL” button.
4. To turn off the heater and air conditioner system, push the “OFF” button.
Page 252 of 614
A visible mist may be seen coming from the
ventilators in hot, humid conditions as the air is
cooled rapidly. This does not indicate a mal-
function.
Dehumidified defrosting or defogging:
1. Push the “
” front defroster button. (The
indicator light on the button will illuminate.)
2. Turn the temperature control dial to set the desired temperature.
. To quickly remove ice from the outside of the
windows, push the fan speed increase
button “
” and set it to the maximum
position.
. As soon as possible after the windshield is
clean, push the “AUTO” button to return to
the auto mode.
. When the “
” front defroster button is
pushed, the air conditioner will automatically
be turned on at outside temperatures above
238F( �í58C) to defog the windshield, and
the air recirculate mode will automatically be
turned off.
Outside air is drawn into the passenger
compartment to improve the defogging
performance.
Manual operation
Fan speed control:
Push the fan speed increase “
” or decrease
“” buttons to manually control the fan speed.
Push the “AUTO” button to return to automatic
control of the fan speed.
Temperature control:
Turn the temperature control dial to set the
desired temperature.
Air flow control:
Pushing the “MODE” manual air flow control
button selects the air outlet to:
: Air flows from center and side ventilators.
: Air flows from center and side ventilators and foot outlets.
: Air flows mainly from foot outlets.
: Air flows from defroster and foot outlets.
Air intake control:
. Push the “
” air recirculation button to
recirculate interior air inside the vehicle. The
“
” indicator light on the button will come
on. The air recirculation mode cannot be
activated when the air conditioner is in the
front defrosting mode “
”.
. Push the “
” outside air circulation button
to draw outside air into the passenger
compartment. The “
” indicator light on the button will come on.
. To control the air intake automatically, push
and hold either the “
” air recirculation
button or the “” outside air circulation
button (whichever indicator light is illumi-
nated) . The indicator lights (both air recir-
culation and outside air circulation buttons)
will flash twice, and then the air intake will
switch to automatic control.
Turning the system off
Push the OFF button.
Upper vent system
When the upper vent “” button is pushed,
the air flow against the driver’s or passenger’s
upper body becomes gentle. The indicator light
on the button will illuminate.
In this mode, air from the upper ventilator flows
in order to control the cabin temperature without
blowing air directly on the occupants.
Push the upper vent “
” button when you
want the air conditioner to work quickly.
To turn the system off, push the upper vent
“
” button to turn the indicator light off.
Monitor, heater, air conditioner, audio, phone and voice recognition systems4-55
Page 254 of 614
.Air flow control
Push the “MODE” button to change the air
flow mode.
: The air outlet is fixed at foot level.
: The air outlet is fixed at both the head and foot
level.
: The air outlet is fixed at the head level.
Turning the system off:
Use the following method to turn the rear
automatic air conditioning system off.
. Operating the front air conditioner control
panel:
Push the “OFF” button on the front air
conditioner control panel when the rear air
conditioner screen is displayed on the front
display.
. Operating the rear air conditioner control
panel:
Push the “OFF” button on the rear air
conditioner control panel when the rear air
conditioner screen is not displayed on the
front display.
SAA3327
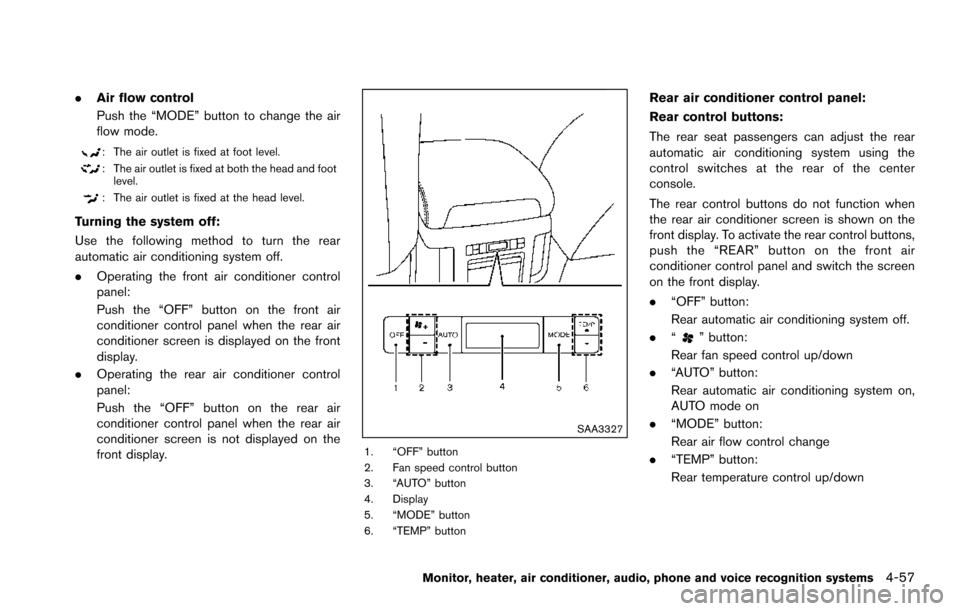
1. “OFF” button
2. Fan speed control button
3. “AUTO” button
4. Display
5. “MODE” button
6. “TEMP” button
Rear air conditioner control panel:
Rear control buttons:
The rear seat passengers can adjust the rear
automatic air conditioning system using the
control switches at the rear of the center
console.
The rear control buttons do not function when
the rear air conditioner screen is shown on the
front display. To activate the rear control buttons,
push the “REAR” button on the front air
conditioner control panel and switch the screen
on the front display.
.“OFF” button:
Rear automatic air conditioning system off.
. “
” button:
Rear fan speed control up/down
. “AUTO” button:
Rear automatic air conditioning system on,
AUTO mode on
. “MODE” button:
Rear air flow control change
. “TEMP” button:
Rear temperature control up/down
Monitor, heater, air conditioner, audio, phone and voice recognition systems4-57
Page 258 of 614
.During cold weather or rainy days, the player
may malfunction due to the humidity. If this
occurs, remove the CD and dehumidify or
ventilate the player completely.
. The player may skip while driving on rough
roads.
. The CD player sometimes cannot function
when the passenger compartment tempera-
ture is extremely high. Decrease the tem-
perature before use.
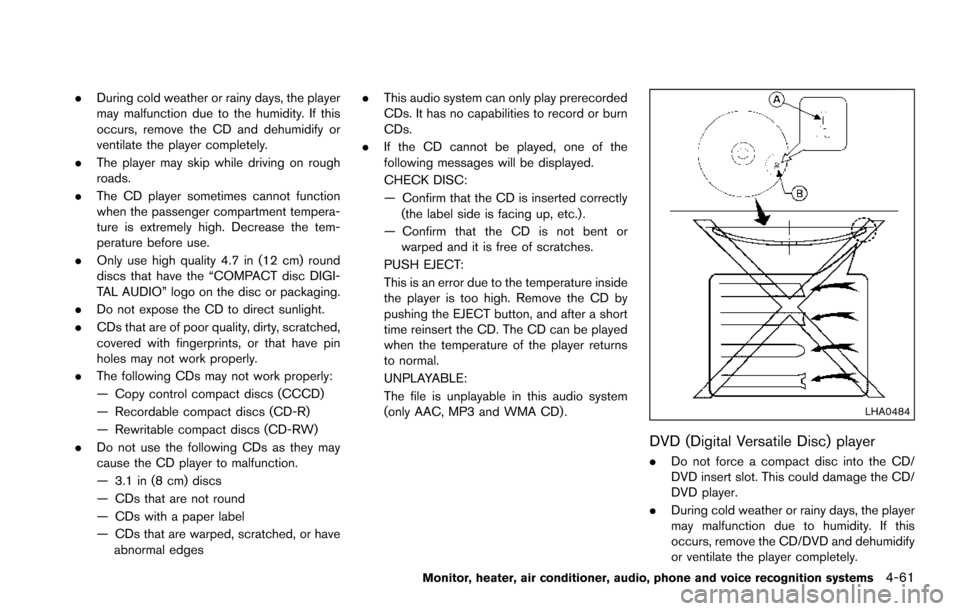
. Only use high quality 4.7 in (12 cm) round
discs that have the “COMPACT disc DIGI-
TAL AUDIO” logo on the disc or packaging.
. Do not expose the CD to direct sunlight.
. CDs that are of poor quality, dirty, scratched,
covered with fingerprints, or that have pin
holes may not work properly.
. The following CDs may not work properly:
— Copy control compact discs (CCCD)
— Recordable compact discs (CD-R)
— Rewritable compact discs (CD-RW)
. Do not use the following CDs as they may
cause the CD player to malfunction.
— 3.1 in (8 cm) discs
— CDs that are not round
— CDs with a paper label
— CDs that are warped, scratched, or have
abnormal edges .
This audio system can only play prerecorded
CDs. It has no capabilities to record or burn
CDs.
. If the CD cannot be played, one of the
following messages will be displayed.
CHECK DISC:
— Confirm that the CD is inserted correctly
(the label side is facing up, etc.) .
— Confirm that the CD is not bent or warped and it is free of scratches.
PUSH EJECT:
This is an error due to the temperature inside
the player is too high. Remove the CD by
pushing the EJECT button, and after a short
time reinsert the CD. The CD can be played
when the temperature of the player returns
to normal.
UNPLAYABLE:
The file is unplayable in this audio system
(only AAC, MP3 and WMA CD) .
LHA0484
DVD (Digital Versatile Disc) player
. Do not force a compact disc into the CD/
DVD insert slot. This could damage the CD/
DVD player.
. During cold weather or rainy days, the player
may malfunction due to humidity. If this
occurs, remove the CD/DVD and dehumidify
or ventilate the player completely.
Monitor, heater, air conditioner, audio, phone and voice recognition systems4-61