2017 NISSAN ARMADA Passenger
[x] Cancel search: PassengerPage 152 of 614
SIC3243
Sunshade
The sunshade will open automatically when the
moonroof is opened. However, it must be closed
manually.
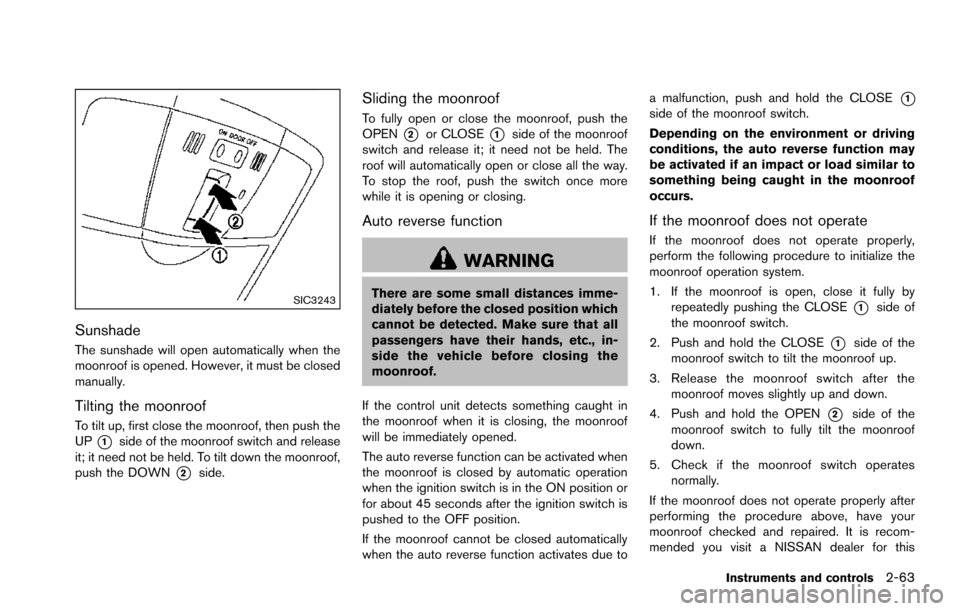
Tilting the moonroof
To tilt up, first close the moonroof, then push the
UP
*1side of the moonroof switch and release
it; it need not be held. To tilt down the moonroof,
push the DOWN
*2side.
Sliding the moonroof
To fully open or close the moonroof, push the
OPEN
*2or CLOSE*1side of the moonroof
switch and release it; it need not be held. The
roof will automatically open or close all the way.
To stop the roof, push the switch once more
while it is opening or closing.
Auto reverse function
WARNING
There are some small distances imme-
diately before the closed position which
cannot be detected. Make sure that all
passengers have their hands, etc., in-
side the vehicle before closing the
moonroof.
If the control unit detects something caught in
the moonroof when it is closing, the moonroof
will be immediately opened.
The auto reverse function can be activated when
the moonroof is closed by automatic operation
when the ignition switch is in the ON position or
for about 45 seconds after the ignition switch is
pushed to the OFF position.
If the moonroof cannot be closed automatically
when the auto reverse function activates due to a malfunction, push and hold the CLOSE
*1side of the moonroof switch.
Depending on the environment or driving
conditions, the auto reverse function may
be activated if an impact or load similar to
something being caught in the moonroof
occurs.
If the moonroof does not operate
If the moonroof does not operate properly,
perform the following procedure to initialize the
moonroof operation system.
1. If the moonroof is open, close it fully by
repeatedly pushing the CLOSE
*1side of
the moonroof switch.
2. Push and hold the CLOSE
*1side of the
moonroof switch to tilt the moonroof up.
3. Release the moonroof switch after the moonroof moves slightly up and down.
4. Push and hold the OPEN
*2side of the
moonroof switch to fully tilt the moonroof
down.
5. Check if the moonroof switch operates normally.
If the moonroof does not operate properly after
performing the procedure above, have your
moonroof checked and repaired. It is recom-
mended you visit a NISSAN dealer for this
Instruments and controls2-63
Page 153 of 614
2-64Instruments and controls
service.
SIC3642
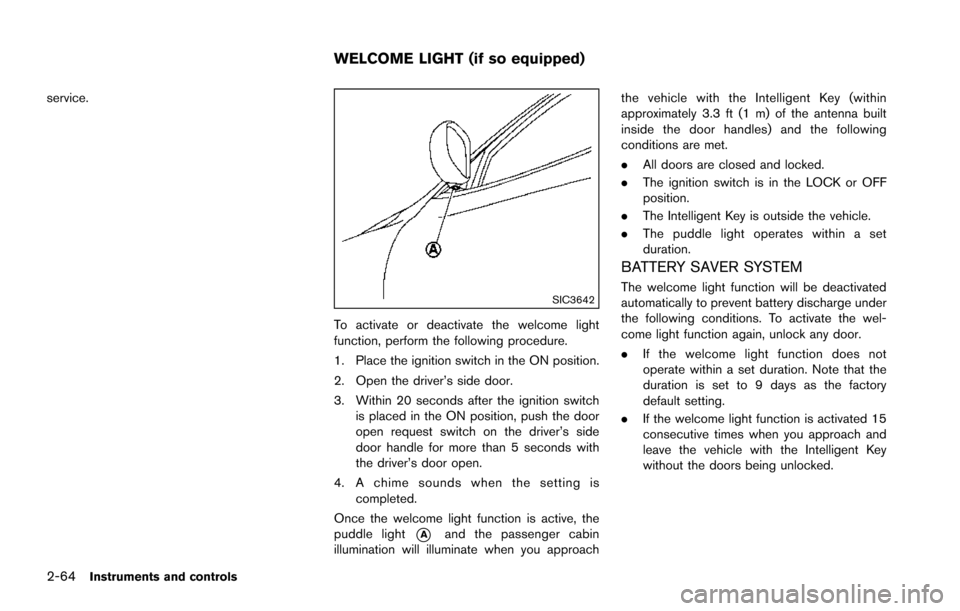
To activate or deactivate the welcome light
function, perform the following procedure.
1. Place the ignition switch in the ON position.
2. Open the driver’s side door.
3. Within 20 seconds after the ignition switchis placed in the ON position, push the door
open request switch on the driver’s side
door handle for more than 5 seconds with
the driver’s door open.
4. A chime sounds when the setting is completed.
Once the welcome light function is active, the
puddle light
*Aand the passenger cabin
illumination will illuminate when you approach the vehicle with the Intelligent Key (within
approximately 3.3 ft (1 m) of the antenna built
inside the door handles) and the following
conditions are met.
.
All doors are closed and locked.
. The ignition switch is in the LOCK or OFF
position.
. The Intelligent Key is outside the vehicle.
. The puddle light operates within a set
duration.
BATTERY SAVER SYSTEM
The welcome light function will be deactivated
automatically to prevent battery discharge under
the following conditions. To activate the wel-
come light function again, unlock any door.
.If the welcome light function does not
operate within a set duration. Note that the
duration is set to 9 days as the factory
default setting.
. If the welcome light function is activated 15
consecutive times when you approach and
leave the vehicle with the Intelligent Key
without the doors being unlocked.
WELCOME LIGHT (if so equipped)
Page 166 of 614
OPENING AND CLOSING WINDOWS
WITH THE MECHANICAL KEY
The driver’s door key operation also allows you
to open and close all door windows.
To open the windows, turn the driver’s door key
cylinder to the rear of the vehicle forlonger
than 1 second. The door is unlocked and the
window keeps opening while turning the key.
This function can also be performed by pushing
and holding the door UNLOCK button of the
Intelligent Key. (See “Remote keyless entry
system” (P.3-15) .)
To close the windows, turn the driver’s door key
cylinder to the front of the vehicle for longer
than 1 second. The door is locked and the
window keeps closing while turning the key.
SPA2744
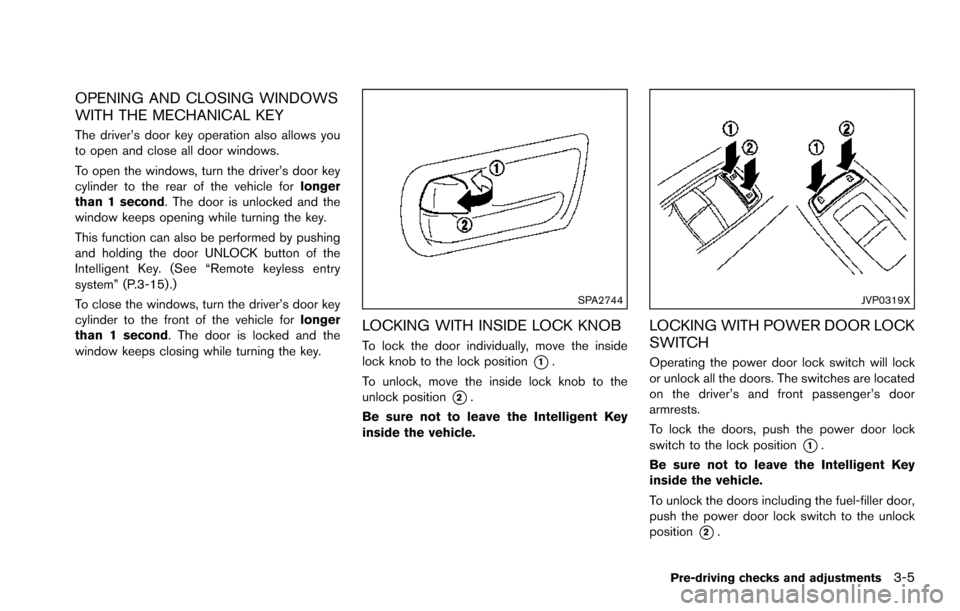
LOCKING WITH INSIDE LOCK KNOB
To lock the door individually, move the inside
lock knob to the lock position
*1.
To unlock, move the inside lock knob to the
unlock position
*2.
Be sure not to leave the Intelligent Key
inside the vehicle.
JVP0319X
LOCKING WITH POWER DOOR LOCK
SWITCH
Operating the power door lock switch will lock
or unlock all the doors. The switches are located
on the driver’s and front passenger’s door
armrests.
To lock the doors, push the power door lock
switch to the lock position
*1.
Be sure not to leave the Intelligent Key
inside the vehicle.
To unlock the doors including the fuel-filler door,
push the power door lock switch to the unlock
position
*2.
Pre-driving checks and adjustments3-5
Page 167 of 614
3-6Pre-driving checks and adjustments
Lockout protection
When the power door lock switch (driver or front
passenger) is moved to the lock position with
any door open, all doors will lock and unlock
automatically. With the Intelligent Key left in the
vehicle and any door open, all doors will unlock
automatically and a chime will sound after the
door is closed.
These functions help to prevent the Intelligent
Key from being accidentally locked inside the
vehicle.
AUTOMATIC DOOR LOCKS
.All doors lock automatically when the vehicle
speed reaches 15 MPH (24 km/h) .
. All doors unlock automatically when the
ignition switch is placed in the OFF position.
The automatic unlock function can be
deactivated or activated. To deactivate or
activate the automatic door unlock system,
perform the following procedure:
1. Close all doors.
2. Place the ignition switch in the ON position.
3. Within 20 seconds of performing Step 2, push and hold the power door lock switch to
the
position (UNLOCK) for more than 5
seconds. 4. When activated, the hazard indicator will
flash twice. When deactivated, the hazard
indicator will flash once.
5. The ignition switch must be placed in the OFF and ON position again between each
setting change.
When the automatic door unlock system is
deactivated, the doors do not unlock when the
ignition switch is placed in the OFF position. To
unlock the door manually, use the inside lock
knob or the power door lock switch (driver’s or
front passenger’s side) .
SPA2745
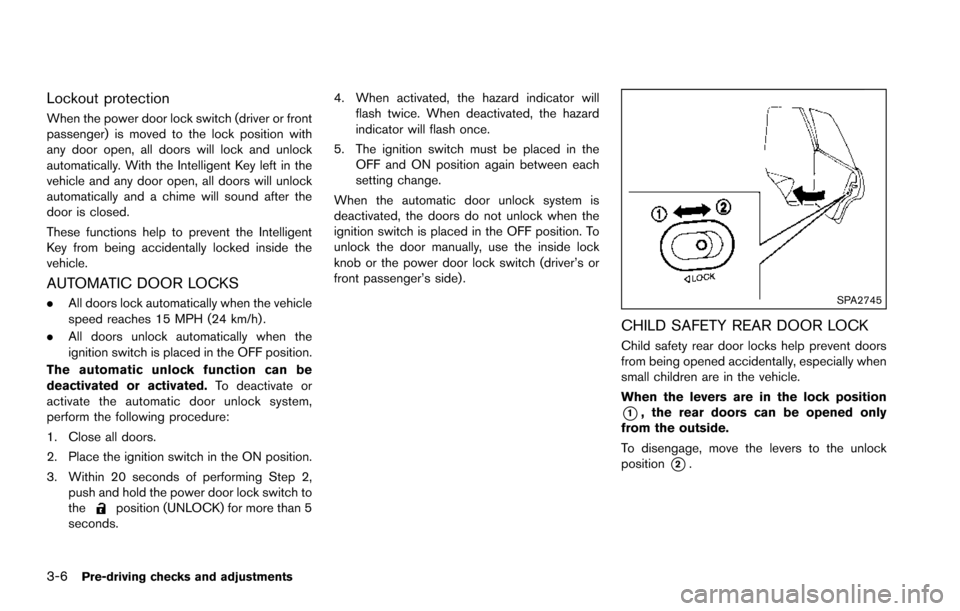
CHILD SAFETY REAR DOOR LOCK
Child safety rear door locks help prevent doors
from being opened accidentally, especially when
small children are in the vehicle.
When the levers are in the lock position
*1, the rear doors can be opened only
from the outside.
To disengage, move the levers to the unlock
position
*2.
Page 172 of 614
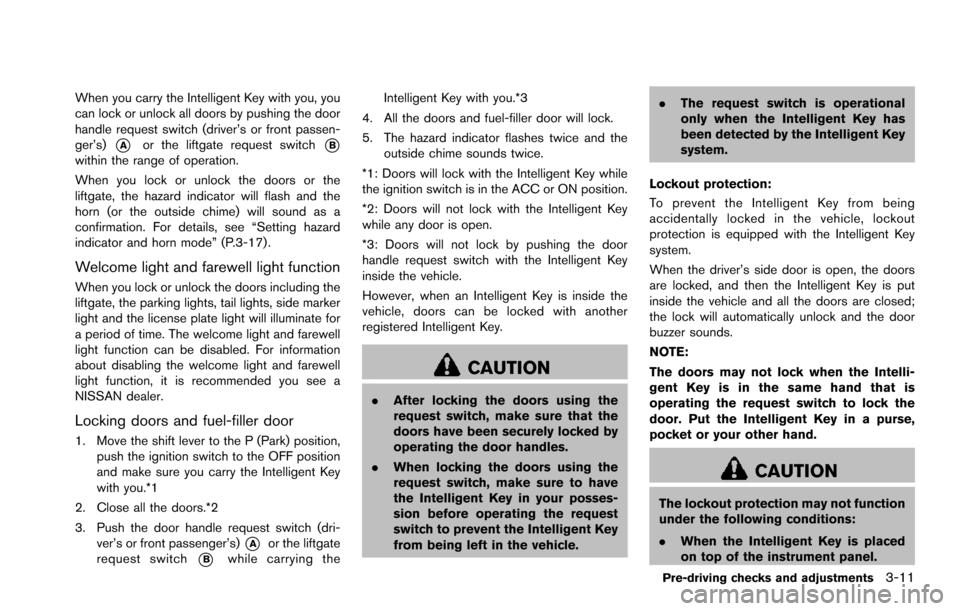
When you carry the Intelligent Key with you, you
can lock or unlock all doors by pushing the door
handle request switch (driver’s or front passen-
ger’s)
*Aor the liftgate request switch*Bwithin the range of operation.
When you lock or unlock the doors or the
liftgate, the hazard indicator will flash and the
horn (or the outside chime) will sound as a
confirmation. For details, see “Setting hazard
indicator and horn mode” (P.3-17) .
Welcome light and farewell light function
When you lock or unlock the doors including the
liftgate, the parking lights, tail lights, side marker
light and the license plate light will illuminate for
a period of time. The welcome light and farewell
light function can be disabled. For information
about disabling the welcome light and farewell
light function, it is recommended you see a
NISSAN dealer.
Locking doors and fuel-filler door
1. Move the shift lever to the P (Park) position,push the ignition switch to the OFF position
and make sure you carry the Intelligent Key
with you.*1
2. Close all the doors.*2
3. Push the door handle request switch (dri- ver’s or front passenger’s)
*Aor the liftgate
request switch
*Bwhile carrying the Intelligent Key with you.*3
4. All the doors and fuel-filler door will lock.
5. The hazard indicator flashes twice and the outside chime sounds twice.
*1: Doors will lock with the Intelligent Key while
the ignition switch is in the ACC or ON position.
*2: Doors will not lock with the Intelligent Key
while any door is open.
*3: Doors will not lock by pushing the door
handle request switch with the Intelligent Key
inside the vehicle.
However, when an Intelligent Key is inside the
vehicle, doors can be locked with another
registered Intelligent Key.
CAUTION
. After locking the doors using the
request switch, make sure that the
doors have been securely locked by
operating the door handles.
. When locking the doors using the
request switch, make sure to have
the Intelligent Key in your posses-
sion before operating the request
switch to prevent the Intelligent Key
from being left in the vehicle. .
The request switch is operational
only when the Intelligent Key has
been detected by the Intelligent Key
system.
Lockout protection:
To prevent the Intelligent Key from being
accidentally locked in the vehicle, lockout
protection is equipped with the Intelligent Key
system.
When the driver’s side door is open, the doors
are locked, and then the Intelligent Key is put
inside the vehicle and all the doors are closed;
the lock will automatically unlock and the door
buzzer sounds.
NOTE:
The doors may not lock when the Intelli-
gent Key is in the same hand that is
operating the request switch to lock the
door. Put the Intelligent Key in a purse,
pocket or your other hand.
CAUTION
The lockout protection may not function
under the following conditions:
. When the Intelligent Key is placed
on top of the instrument panel.
Pre-driving checks and adjustments3-11
Page 173 of 614
3-12Pre-driving checks and adjustments
.When the Intelligent Key is placed
inside the glove box or a storage
bin.
. When the Intelligent Key is placed
inside the door pockets.
. When the Intelligent Key is placed
inside or near metallic materials.
Unlocking doors and fuel-filler door
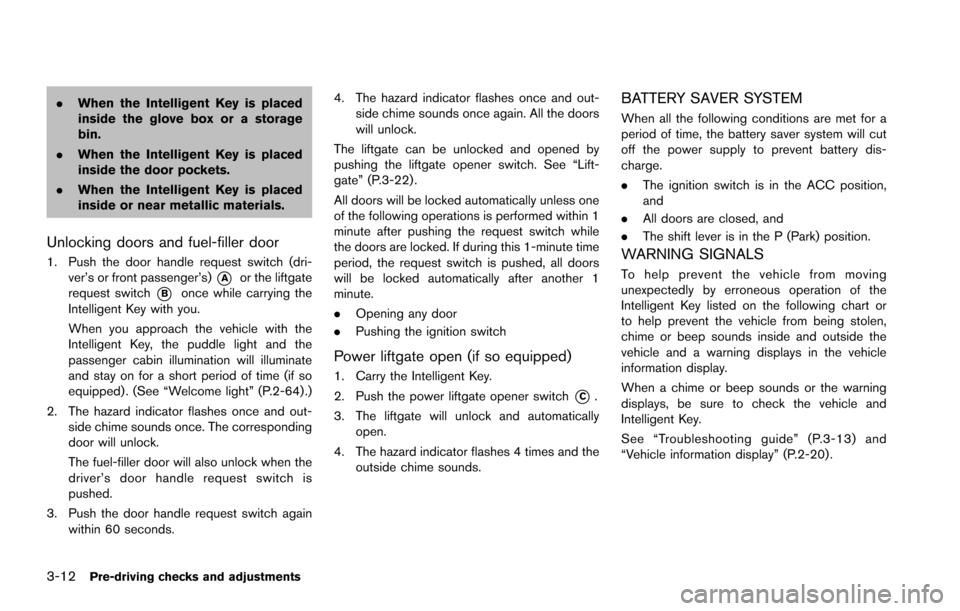
1. Push the door handle request switch (dri-
ver’s or front passenger’s)
*Aor the liftgate
request switch
*Bonce while carrying the
Intelligent Key with you.
When you approach the vehicle with the
Intelligent Key, the puddle light and the
passenger cabin illumination will illuminate
and stay on for a short period of time (if so
equipped) . (See “Welcome light” (P.2-64) .)
2. The hazard indicator flashes once and out- side chime sounds once. The corresponding
door will unlock.
The fuel-filler door will also unlock when the
driver’s door handle request switch is
pushed.
3. Push the door handle request switch again within 60 seconds. 4. The hazard indicator flashes once and out-
side chime sounds once again. All the doors
will unlock.
The liftgate can be unlocked and opened by
pushing the liftgate opener switch. See “Lift-
gate” (P.3-22) .
All doors will be locked automatically unless one
of the following operations is performed within 1
minute after pushing the request switch while
the doors are locked. If during this 1-minute time
period, the request switch is pushed, all doors
will be locked automatically after another 1
minute.
. Opening any door
. Pushing the ignition switch
Power liftgate open (if so equipped)
1. Carry the Intelligent Key.
2. Push the power liftgate opener switch
*C.
3. The liftgate will unlock and automatically open.
4. The hazard indicator flashes 4 times and the outside chime sounds.
BATTERY SAVER SYSTEM
When all the following conditions are met for a
period of time, the battery saver system will cut
off the power supply to prevent battery dis-
charge.
.The ignition switch is in the ACC position,
and
. All doors are closed, and
. The shift lever is in the P (Park) position.
WARNING SIGNALS
To help prevent the vehicle from moving
unexpectedly by erroneous operation of the
Intelligent Key listed on the following chart or
to help prevent the vehicle from being stolen,
chime or beep sounds inside and outside the
vehicle and a warning displays in the vehicle
information display.
When a chime or beep sounds or the warning
displays, be sure to check the vehicle and
Intelligent Key.
See “Troubleshooting guide” (P.3-13) and
“Vehicle information display” (P.2-20) .
Page 177 of 614
3-16Pre-driving checks and adjustments
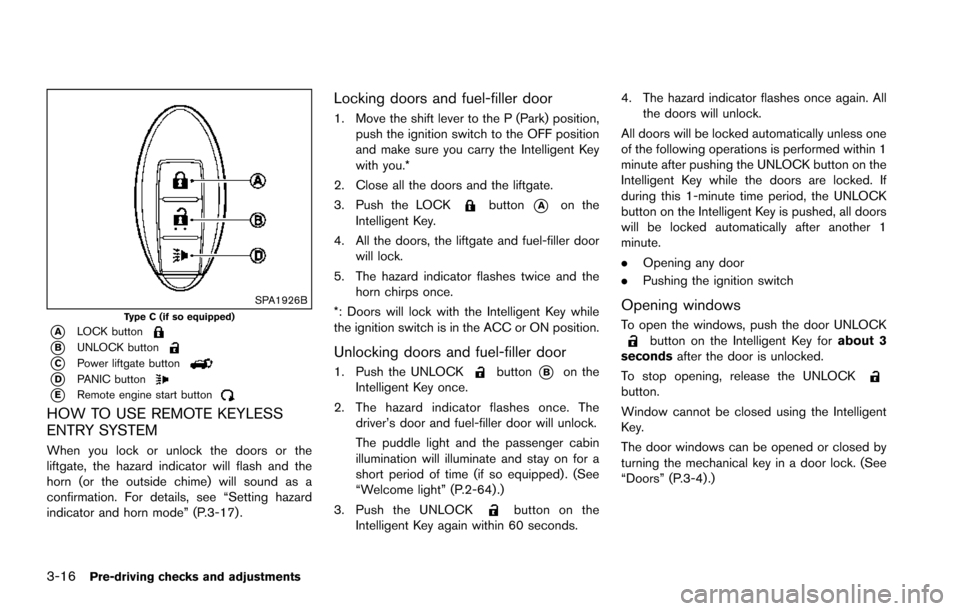
SPA1926BType C (if so equipped)
*ALOCK button
*BUNLOCK button
*CPower liftgate button
*DPANIC button
*ERemote engine start button
HOW TO USE REMOTE KEYLESS
ENTRY SYSTEM
When you lock or unlock the doors or the
liftgate, the hazard indicator will flash and the
horn (or the outside chime) will sound as a
confirmation. For details, see “Setting hazard
indicator and horn mode” (P.3-17) .
Locking doors and fuel-filler door
1. Move the shift lever to the P (Park) position,push the ignition switch to the OFF position
and make sure you carry the Intelligent Key
with you.*
2. Close all the doors and the liftgate.
3. Push the LOCK
button*Aon the
Intelligent Key.
4. All the doors, the liftgate and fuel-filler door will lock.
5. The hazard indicator flashes twice and the horn chirps once.
*: Doors will lock with the Intelligent Key while
the ignition switch is in the ACC or ON position.
Unlocking doors and fuel-filler door
1. Push the UNLOCKbutton*Bon the
Intelligent Key once.
2. The hazard indicator flashes once. The driver’s door and fuel-filler door will unlock.
The puddle light and the passenger cabin
illumination will illuminate and stay on for a
short period of time (if so equipped) . (See
“Welcome light” (P.2-64) .)
3. Push the UNLOCK
button on the
Intelligent Key again within 60 seconds. 4. The hazard indicator flashes once again. All
the doors will unlock.
All doors will be locked automatically unless one
of the following operations is performed within 1
minute after pushing the UNLOCK button on the
Intelligent Key while the doors are locked. If
during this 1-minute time period, the UNLOCK
button on the Intelligent Key is pushed, all doors
will be locked automatically after another 1
minute.
. Opening any door
. Pushing the ignition switch
Opening windows
To open the windows, push the door UNLOCKbutton on the Intelligent Key for about 3
seconds after the door is unlocked.
To stop opening, release the UNLOCK
button.
Window cannot be closed using the Intelligent
Key.
The door windows can be opened or closed by
turning the mechanical key in a door lock. (See
“Doors” (P.3-4).)
Page 187 of 614
3-26Pre-driving checks and adjustments
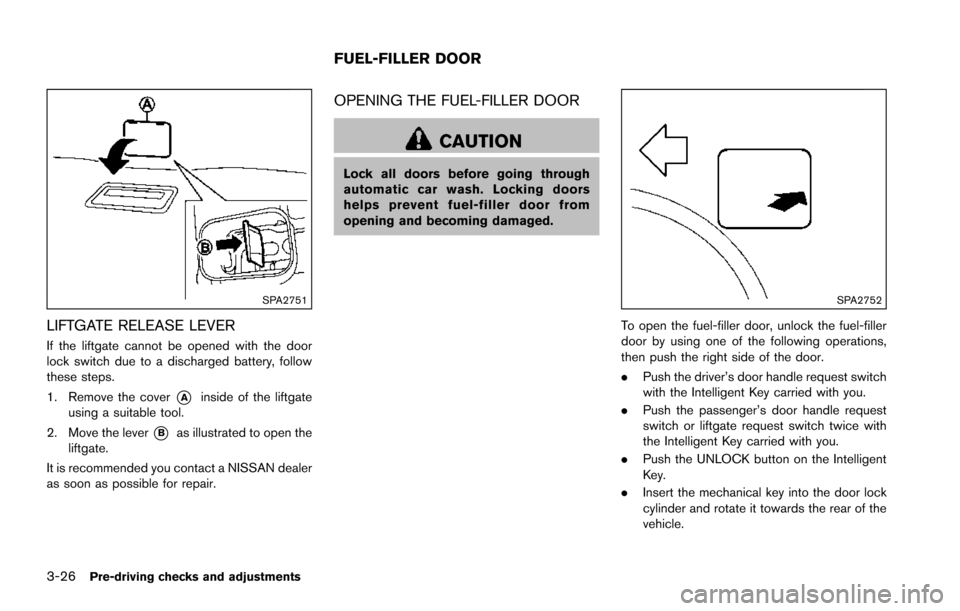
SPA2751
LIFTGATE RELEASE LEVER
If the liftgate cannot be opened with the door
lock switch due to a discharged battery, follow
these steps.
1. Remove the cover
*Ainside of the liftgate
using a suitable tool.
2. Move the lever
*Bas illustrated to open the
liftgate.
It is recommended you contact a NISSAN dealer
as soon as possible for repair.
OPENING THE FUEL-FILLER DOOR
CAUTION
Lock all doors before going through
automatic car wash. Locking doors
helps prevent fuel-filler door from
opening and becoming damaged.
SPA2752
To open the fuel-filler door, unlock the fuel-filler
door by using one of the following operations,
then push the right side of the door.
. Push the driver’s door handle request switch
with the Intelligent Key carried with you.
. Push the passenger’s door handle request
switch or liftgate request switch twice with
the Intelligent Key carried with you.
. Push the UNLOCK button on the Intelligent
Key.
. Insert the mechanical key into the door lock
cylinder and rotate it towards the rear of the
vehicle.
FUEL-FILLER DOOR