2017 NISSAN ARMADA Passenger
[x] Cancel search: PassengerPage 105 of 614
2-16Instruments and controls
and all tires are properly inflated, it
is recommended you consult a
NISSAN dealer.
. Since the spare tire is not equipped
with the TPMS, when a spare tire is
mounted or a wheel is replaced, the
TPMS will not function and the low
tire pressure warning light will flash
for approximately 1 minute. The
light will remain on after 1 minute.
Have your tires replaced and/or
TPMS system reset as soon as
possible. It is recommended you
visit a NISSAN dealer for these
services.
. Replacing tires with those not ori-
ginally specified by NISSAN could
affect the proper operation of the
TPMS.
CAUTION
.The TPMS is not a substitute for the
regular tire pressure check. Be sure
to check the tire pressure regularly.
. If the vehicle is being driven at
speeds of less than 16 MPH (25
km/h) , the TPMS may not operate correctly.
. Be sure to install the specified size
of tires to the four wheels correctly.
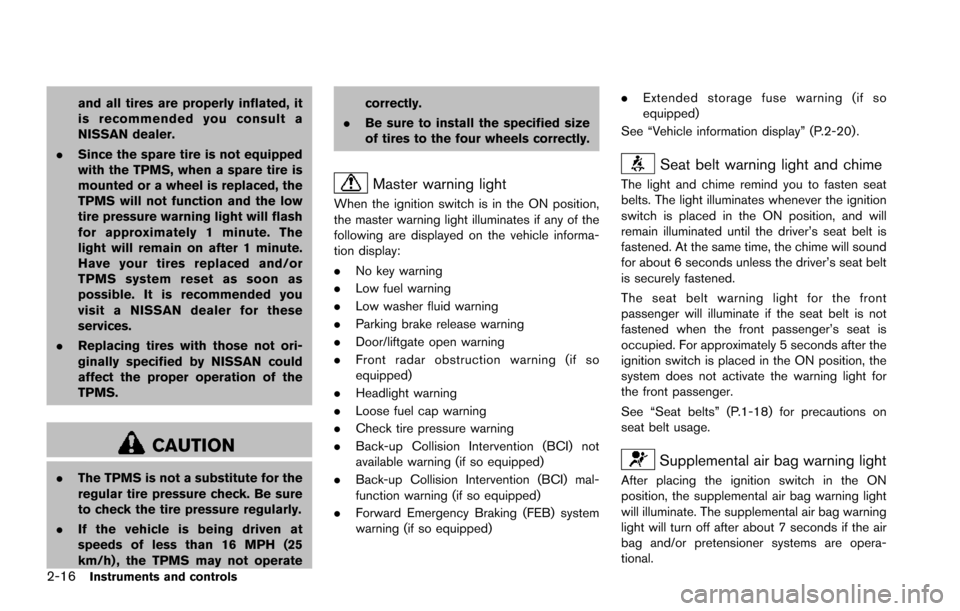
Master warning light
When the ignition switch is in the ON position,
the master warning light illuminates if any of the
following are displayed on the vehicle informa-
tion display:
.No key warning
. Low fuel warning
. Low washer fluid warning
. Parking brake release warning
. Door/liftgate open warning
. Front radar obstruction warning (if so
equipped)
. Headlight warning
. Loose fuel cap warning
. Check tire pressure warning
. Back-up Collision Intervention (BCI) not
available warning (if so equipped)
. Back-up Collision Intervention (BCI) mal-
function warning (if so equipped)
. Forward Emergency Braking (FEB) system
warning (if so equipped) .
Extended storage fuse warning (if so
equipped)
See “Vehicle information display” (P.2-20) .
Seat belt warning light and chime
The light and chime remind you to fasten seat
belts. The light illuminates whenever the ignition
switch is placed in the ON position, and will
remain illuminated until the driver’s seat belt is
fastened. At the same time, the chime will sound
for about 6 seconds unless the driver’s seat belt
is securely fastened.
The seat belt warning light for the front
passenger will illuminate if the seat belt is not
fastened when the front passenger’s seat is
occupied. For approximately 5 seconds after the
ignition switch is placed in the ON position, the
system does not activate the warning light for
the front passenger.
See “Seat belts” (P.1-18) for precautions on
seat belt usage.
Supplemental air bag warning light
After placing the ignition switch in the ON
position, the supplemental air bag warning light
will illuminate. The supplemental air bag warning
light will turn off after about 7 seconds if the air
bag and/or pretensioner systems are opera-
tional.
Page 107 of 614
2-18Instruments and controls
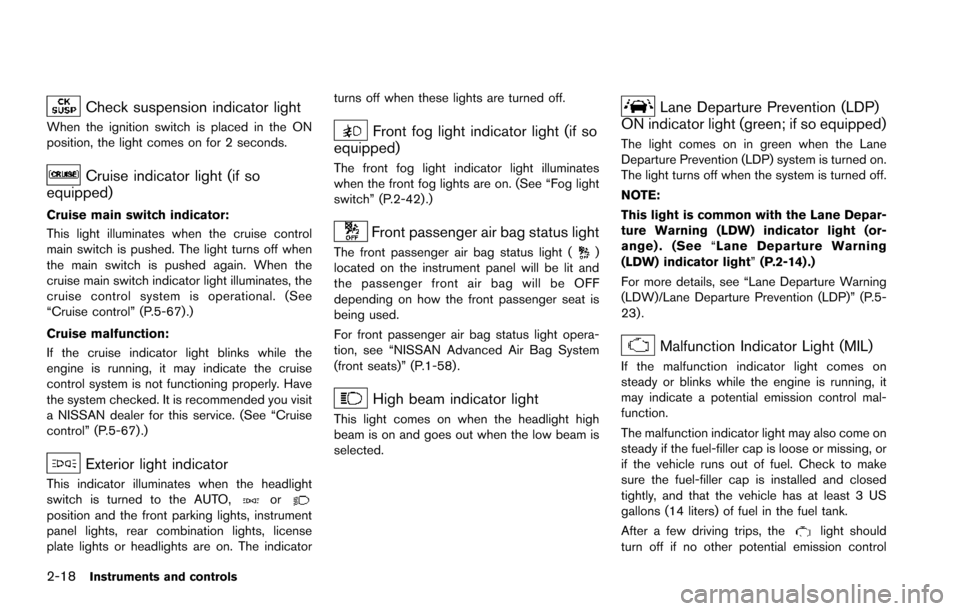
Check suspension indicator light
When the ignition switch is placed in the ON
position, the light comes on for 2 seconds.
Cruise indicator light (if so
equipped)
Cruise main switch indicator:
This light illuminates when the cruise control
main switch is pushed. The light turns off when
the main switch is pushed again. When the
cruise main switch indicator light illuminates, the
cruise control system is operational. (See
“Cruise control” (P.5-67).)
Cruise malfunction:
If the cruise indicator light blinks while the
engine is running, it may indicate the cruise
control system is not functioning properly. Have
the system checked. It is recommended you visit
a NISSAN dealer for this service. (See “Cruise
control” (P.5-67) .)
Exterior light indicator
This indicator illuminates when the headlight
switch is turned to the AUTO,orposition and the front parking lights, instrument
panel lights, rear combination lights, license
plate lights or headlights are on. The indicator turns off when these lights are turned off.
Front fog light indicator light (if so
equipped)
The front fog light indicator light illuminates
when the front fog lights are on. (See “Fog light
switch” (P.2-42) .)
Front passenger air bag status light
The front passenger air bag status light ()
located on the instrument panel will be lit and
the passenger front air bag will be OFF
depending on how the front passenger seat is
being used.
For front passenger air bag status light opera-
tion, see “NISSAN Advanced Air Bag System
(front seats)” (P.1-58) .
High beam indicator light
This light comes on when the headlight high
beam is on and goes out when the low beam is
selected.
Lane Departure Prevention (LDP)
ON indicator light (green; if so equipped)
The light comes on in green when the Lane
Departure Prevention (LDP) system is turned on.
The light turns off when the system is turned off.
NOTE:
This light is common with the Lane Depar-
ture Warning (LDW) indicator light (or-
ange) . (See “Lane Departure Warning
(LDW) indicator light” (P.2-14) .)
For more details, see “Lane Departure Warning
(LDW)/Lane Departure Prevention (LDP)” (P.5-
23) .
Malfunction Indicator Light (MIL)
If the malfunction indicator light comes on
steady or blinks while the engine is running, it
may indicate a potential emission control mal-
function.
The malfunction indicator light may also come on
steady if the fuel-filler cap is loose or missing, or
if the vehicle runs out of fuel. Check to make
sure the fuel-filler cap is installed and closed
tightly, and that the vehicle has at least 3 US
gallons (14 liters) of fuel in the fuel tank.
After a few driving trips, the
light should
turn off if no other potential emission control
Page 120 of 614
about 30 seconds the vehicle security
system automatically shifts into the armed
phase. The security light begins to flash
once every approximately 3 seconds. If,
during this 30-second pre-arm time period,
the door is unlocked, or the ignition switch is
pushed to ACC or ON, the system will not
arm.
Even when the driver and/or passengers
are in the vehicle, the system will activate
with all doors, hood, and liftgate locked
with the ignition switch in the LOCK
position. When pushing the ignition switch
to the ACC or ON position, the system will
be released.
Vehicle security system activation
The vehicle security system will give the follow-
ing alarm:
. The headlights blink and the horn sounds
intermittently.
. The alarm automatically turns off after
approximately 50 seconds. However, the
alarm reactivates if the vehicle is tampered
with again.
The alarm is activated by:
. Unlocking the door or opening the liftgate
without using the button on the Intelligent
Key, the door handle request switch or the mechanical key. (Even if the door is opened
by releasing the door inside lock knob, the
alarm will activate.)
. Opening the hood.
How to stop an activated alarm
The alarm will stop when a door is unlocked by
pushing the unlock button on the Intelligent Key,
the door handle request switch or using the
mechanical key, or when the ignition switch is
pushed to the ACC or ON position.
If the system does not operate as de-
scribed above, it is recommended you have
it checked by a NISSAN dealer.
NISSAN VEHICLE IMMOBILIZER SYS-
TEM
The NISSAN Vehicle Immobilizer System will not
allow the engine to start without the use of the
registered Intelligent Key. Never leave these
keys in the vehicle.
FCC Notice:
For USA:
This device complies with Part 15 of the
FCC Rules. Operation is subject to the
following two conditions: (1) This device
may not cause harmful interference, and
(2) this device must accept any interfer-
ence received, including interference that may cause undesired operation.
NOTE:
Changes or modifications not expressly
approved by the party responsible for
compliance could void the user’s authority
to operate the equipment.
For Canada:
This device complies with Industry Canada
licence-exempt RSS standard(s) . Opera-
tion is subject to the following two condi-
tions: (1) this device may not cause
interference, and (2) this device must
accept any interference, including interfer-
ence that may cause undesired operation
of the device.
Instruments and controls2-31
Page 139 of 614
2-50Instruments and controls
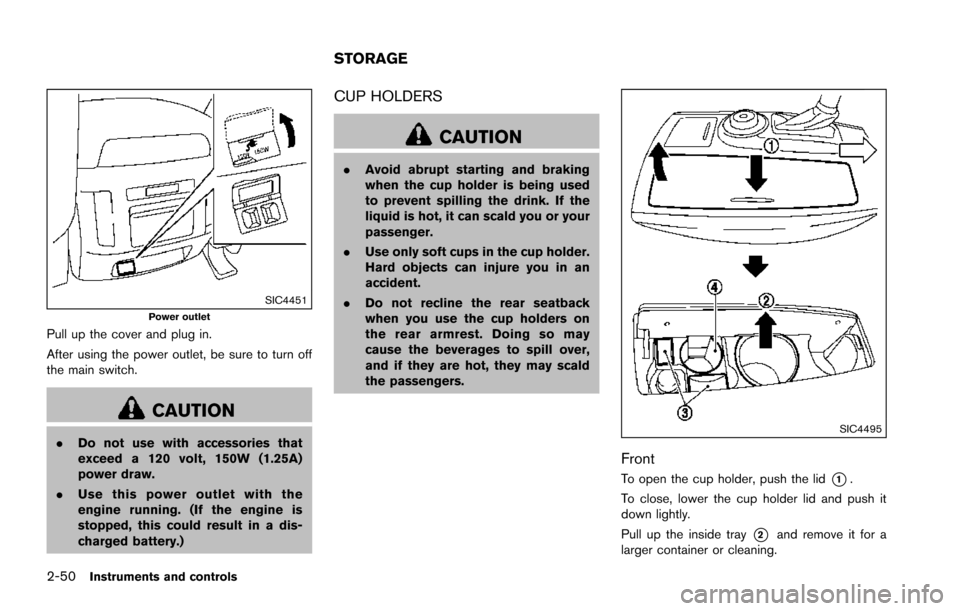
SIC4451Power outlet
Pull up the cover and plug in.
After using the power outlet, be sure to turn off
the main switch.
CAUTION
.Do not use with accessories that
exceed a 120 volt, 150W (1.25A)
power draw.
. Use this power outlet with the
engine running. (If the engine is
stopped, this could result in a dis-
charged battery.)
CUP HOLDERS
CAUTION
.Avoid abrupt starting and braking
when the cup holder is being used
to prevent spilling the drink. If the
liquid is hot, it can scald you or your
passenger.
. Use only soft cups in the cup holder.
Hard objects can injure you in an
accident.
. Do not recline the rear seatback
when you use the cup holders on
the rear armrest. Doing so may
cause the beverages to spill over,
and if they are hot, they may scald
the passengers.
SIC4495
Front
To open the cup holder, push the lid*1.
To close, lower the cup holder lid and push it
down lightly.
Pull up the inside tray
*2and remove it for a
larger container or cleaning.
STORAGE
Page 148 of 614
WARNING
.Never install the rear bumper cover
while the engine is running. The
exhaust gas could heat the rear
bumper cover and this may cause a
fire.
. Never drive with the rear bumper
cover left in place. There is a risk
that the liftgate will not close cor-
rectly, and that carbon monoxide
may enter the cabin causing serious
injury or death.
CAUTION
.Failure to follow the instructions
below could result in damage to
the rear bumper cover.
— Do not close the liftgate with the
rear bumper cover installed.
— Do not strike or apply excessive force to the rear bumper cover.
— Keep the rear bumper cover away from heat or fire. — To clean the rear bumper cover,
use a soft cloth, dampened with
a mild solution of neutral deter-
gent. Never use benzine, thinner
or any similar chemical.
— Remove any solvent such as oil or gasoline spilled on the sur-
face of the rear bumper cover as
soon as possible.
POWER WINDOWS
WARNING
. Make sure that all passengers have
their hands, etc. inside the vehicle
while it is in motion and before
closing the windows. Use the win-
dow lock switch to prevent unex-
pected use of the power windows.
. To help avoid risk of injury or death
through unintended operation of
the vehicle and or its systems,
including entrapment in windows
or inadvertent door lock activation,
do not leave children, people who
require the assistance of others or
pets unattended in your vehicle.
Additionally, the temperature inside
a closed vehicle on a warm day can
quickly become high enough to
cause a significant risk of injury or
death to people and pets.
The power windows operate when the ignition
switch is in the ON position or for about 45
seconds after the ignition switch is pushed to
the OFF position. If the driver’s or front
passenger’s door is opened during this period
Instruments and controls2-59
WINDOWS
Page 149 of 614
2-60Instruments and controls
of about 45 seconds, power to the windows is
canceled.
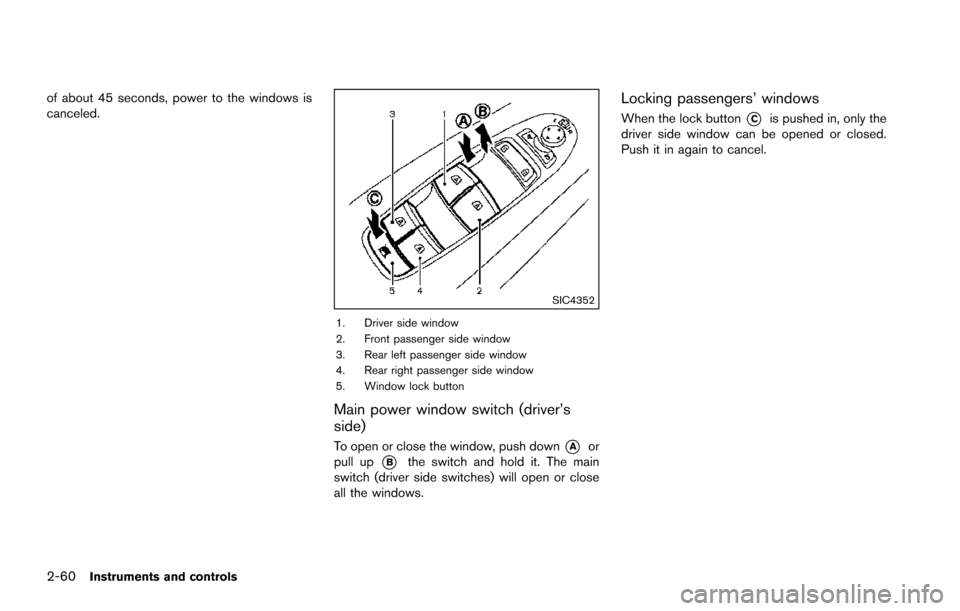
SIC4352
1. Driver side window
2. Front passenger side window
3. Rear left passenger side window
4. Rear right passenger side window
5. Window lock button
Main power window switch (driver’s
side)
To open or close the window, push down*Aor
pull up
*Bthe switch and hold it. The main
switch (driver side switches) will open or close
all the windows.
Locking passengers’ windows
When the lock button*Cis pushed in, only the
driver side window can be opened or closed.
Push it in again to cancel.
Page 150 of 614
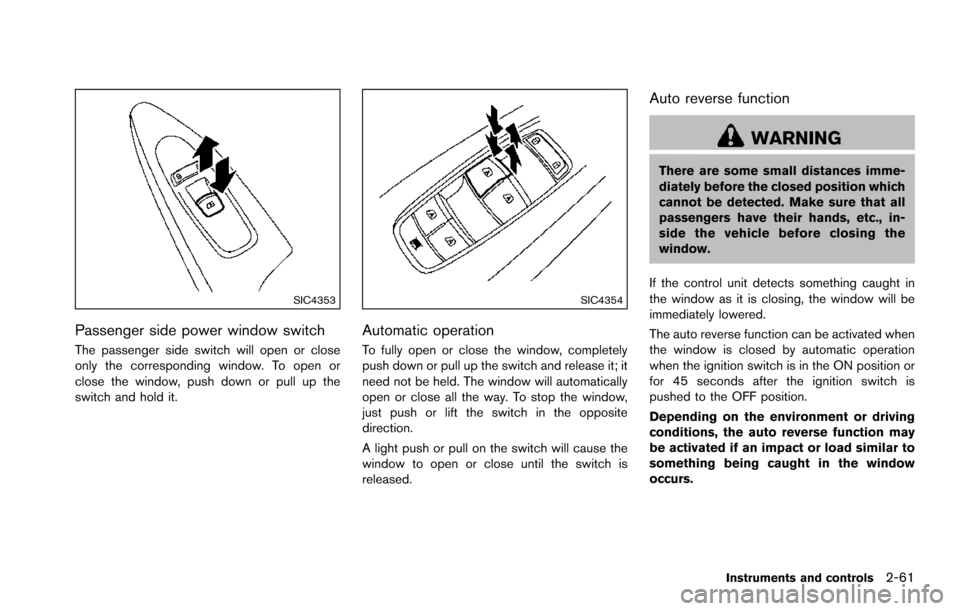
SIC4353
Passenger side power window switch
The passenger side switch will open or close
only the corresponding window. To open or
close the window, push down or pull up the
switch and hold it.
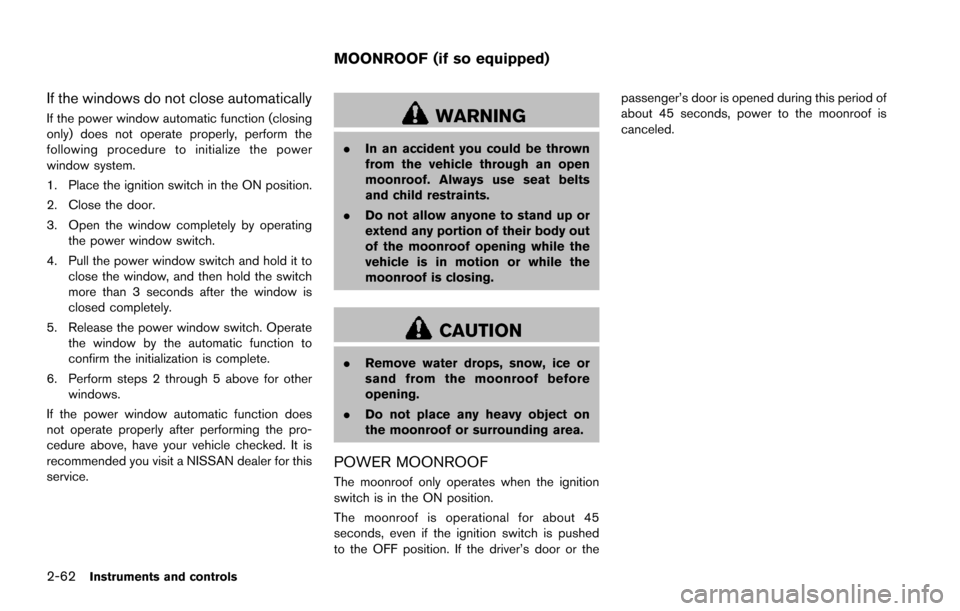
SIC4354
Automatic operation
To fully open or close the window, completely
push down or pull up the switch and release it; it
need not be held. The window will automatically
open or close all the way. To stop the window,
just push or lift the switch in the opposite
direction.
A light push or pull on the switch will cause the
window to open or close until the switch is
released.
Auto reverse function
WARNING
There are some small distances imme-
diately before the closed position which
cannot be detected. Make sure that all
passengers have their hands, etc., in-
side the vehicle before closing the
window.
If the control unit detects something caught in
the window as it is closing, the window will be
immediately lowered.
The auto reverse function can be activated when
the window is closed by automatic operation
when the ignition switch is in the ON position or
for 45 seconds after the ignition switch is
pushed to the OFF position.
Depending on the environment or driving
conditions, the auto reverse function may
be activated if an impact or load similar to
something being caught in the window
occurs.
Instruments and controls2-61
Page 151 of 614
2-62Instruments and controls
If the windows do not close automatically
If the power window automatic function (closing
only) does not operate properly, perform the
following procedure to initialize the power
window system.
1. Place the ignition switch in the ON position.
2. Close the door.
3. Open the window completely by operatingthe power window switch.
4. Pull the power window switch and hold it to close the window, and then hold the switch
more than 3 seconds after the window is
closed completely.
5. Release the power window switch. Operate the window by the automatic function to
confirm the initialization is complete.
6. Perform steps 2 through 5 above for other windows.
If the power window automatic function does
not operate properly after performing the pro-
cedure above, have your vehicle checked. It is
recommended you visit a NISSAN dealer for this
service.WARNING
. In an accident you could be thrown
from the vehicle through an open
moonroof. Always use seat belts
and child restraints.
. Do not allow anyone to stand up or
extend any portion of their body out
of the moonroof opening while the
vehicle is in motion or while the
moonroof is closing.
CAUTION
.Remove water drops, snow, ice or
sand from the moonroof before
opening.
. Do not place any heavy object on
the moonroof or surrounding area.
POWER MOONROOF
The moonroof only operates when the ignition
switch is in the ON position.
The moonroof is operational for about 45
seconds, even if the ignition switch is pushed
to the OFF position. If the driver’s door or the passenger’s door is opened during this period of
about 45 seconds, power to the moonroof is
canceled.
MOONROOF (if so equipped)