2017 NISSAN ARMADA Rear suspension
[x] Cancel search: Rear suspensionPage 83 of 614
1-64Safety — seats, seat belts and supplemental restraint system
.A child restraint or other object pressing
against the rear of the seatback.
. A rear passenger pushing or pulling on the
back of the front passenger seat.
. Forcing the front seat or seatback against an
object on the seat or floor behind it.
. An object placed under the front passenger
seat.
. An object placed between the seat cushion
and center console.
If the vehicle is moving, please come to a stop
when it is safe to do so. Check and correct any
of the above conditions. Restart the vehicle and
wait 1 minute.
NOTE:
A system check will be performed during
which the front passenger air bag status
light will remain lit for about 7 seconds
initially.
If the light is still OFF after this, the small adult,
child or child restraint should be repositioned in
the rear seat and it is recommended that the
vehicle be checked by a NISSAN dealer as soon
as possible.Other supplemental front-impact air bag
precautions
WARNING
. Do not place any objects on the
steering wheel pad or on the instru-
ment panel. Also, do not place any
objects between any occupant and
the steering wheel or instrument
panel. Such objects may become
dangerous projectiles and cause
injury if the front air bags inflate.
. Do not place objects with sharp
edges on the seat. Also, do not
place heavy objects on the seat that
will leave permanent impressions in
the seat. Such objects can damage
the seat or occupant classification
sensors (weight sensors) . This can
affect the operation of the air bag
system and result in serious perso-
nal injury.
. Do not use water or acidic cleaners
(hot steam cleaners) on the seat.
This can damage the seat or occu-
pant classification sensors. This can
also affect the operation of the air
bag system and result in serious personal injury.
. Immediately after inflation, several
front air bag system components
will be hot. Do not touch them; you
may severely burn yourself.
. No unauthorized changes should be
made to any components or wiring
of the supplemental air bag system.
This is to prevent accidental infla-
tion of the supplemental air bag or
damage to the supplemental air bag
system.
. Do not make unauthorized changes
to your vehicle’s electrical system,
suspension system or front end
structure. This could affect proper
operation of the front air bag sys-
tem.
. Tampering with the air bag system
may result in serious personal in-
jury. Tampering includes changes to
the steering wheel and the instru-
ment panel assembly by placing
material over the steering wheel
pad and above the instrument panel
or by installing additional trim ma-
terial around the air bag system.
Page 85 of 614
1-66Safety — seats, seat belts and supplemental restraint system
on the side where the vehicle is impacted. They
may not inflate in certain side collisions on the
side where the vehicle is impacted.
Curtain air bags are also designed to inflate in
certain types of rollover collisions or near
rollovers. As a result, certain vehicle movements
(for example, during severe off roading) may
cause the curtain air bags to inflate.
Vehicle damage (or lack of it) is not always an
indication of proper side air bag and curtain air
bag operation.
When side air bags and curtain air bags inflate, a
fairly loud noise may be heard, followed by
release of smoke. This smoke is not harmful and
does not indicate a fire. Care should be taken
not to inhale it, as it may cause irritation and
choking. Those with a history of a breathing
condition should get fresh air promptly.
Side air bags, along with the use of seat belts,
help to cushion the impact force on the chest
and pelvis of the front occupants. Curtain air
bags help to cushion the impact force to the
head of occupants in the front and rear (2nd and
3rd) outboard seating positions. They can help
save lives and reduce serious injuries. However,
an inflating side air bags and curtain air bags
may cause abrasions or other injuries. Side air
bags and curtain air bags do not provide
restraint to the lower body.The seat belts should be correctly worn and the
driver and passenger seated upright as far as
practical away from the side air bag. Rear seat
passengers should be seated as far away as
practical from the door finishers and side roof
rails. The side air bags and curtain air bags
inflate quickly in order to help protect the
occupants. Because of this, the force of the
side air bags and curtain air bags inflating can
increase the risk of injury if the occupant is too
close to, or is against, these air bag modules
during inflation. In a rollover, the curtain air bags
on both sides are designed to inflate. Under
both side-impact situations, the curtain air bags
will remain inflated for a short period of time.
The side air bags and curtain air bags
operate only when the ignition switch is in
the ON position.
After placing the ignition switch in the ON
position, the supplemental air bag warning
light illuminates. The air bag warning light
will turn off after about 7 seconds if the
systems are operational.
WARNING
.
Do not place any objects near the
seatback of the front seats. Also, do
not place any objects (an umbrella, bag, etc.) between the front door
finisher and the front seat. Such
objects may become dangerous
projectiles and cause injury if side
air bag inflates.
. Right after inflation, several side air
bags and curtain air bag system
components will be hot. Do not
touch them; you may severely burn
yourself.
. No unauthorized changes should be
made to any components or wiring
of side air bag and curtain air bags.
This is to prevent damage to or
accidental inflation of the side air
bag and curtain air bag systems.
. Do not make unauthorized changes
to your vehicle’s electrical system,
suspension system or side panel.
This could affect proper operation
of the side air bag and curtain air
bag systems.
. Tampering with the air bag system
may result in serious personal in-
jury. For example, do not change the
front seats by placing material near
the seatback or by installing addi-
tional trim material, such as seat
covers, around the side air bags.
Page 107 of 614
2-18Instruments and controls
Check suspension indicator light
When the ignition switch is placed in the ON
position, the light comes on for 2 seconds.
Cruise indicator light (if so
equipped)
Cruise main switch indicator:
This light illuminates when the cruise control
main switch is pushed. The light turns off when
the main switch is pushed again. When the
cruise main switch indicator light illuminates, the
cruise control system is operational. (See
“Cruise control” (P.5-67).)
Cruise malfunction:
If the cruise indicator light blinks while the
engine is running, it may indicate the cruise
control system is not functioning properly. Have
the system checked. It is recommended you visit
a NISSAN dealer for this service. (See “Cruise
control” (P.5-67) .)
Exterior light indicator
This indicator illuminates when the headlight
switch is turned to the AUTO,orposition and the front parking lights, instrument
panel lights, rear combination lights, license
plate lights or headlights are on. The indicator turns off when these lights are turned off.
Front fog light indicator light (if so
equipped)
The front fog light indicator light illuminates
when the front fog lights are on. (See “Fog light
switch” (P.2-42) .)
Front passenger air bag status light
The front passenger air bag status light ()
located on the instrument panel will be lit and
the passenger front air bag will be OFF
depending on how the front passenger seat is
being used.
For front passenger air bag status light opera-
tion, see “NISSAN Advanced Air Bag System
(front seats)” (P.1-58) .
High beam indicator light
This light comes on when the headlight high
beam is on and goes out when the low beam is
selected.
Lane Departure Prevention (LDP)
ON indicator light (green; if so equipped)
The light comes on in green when the Lane
Departure Prevention (LDP) system is turned on.
The light turns off when the system is turned off.
NOTE:
This light is common with the Lane Depar-
ture Warning (LDW) indicator light (or-
ange) . (See “Lane Departure Warning
(LDW) indicator light” (P.2-14) .)
For more details, see “Lane Departure Warning
(LDW)/Lane Departure Prevention (LDP)” (P.5-
23) .
Malfunction Indicator Light (MIL)
If the malfunction indicator light comes on
steady or blinks while the engine is running, it
may indicate a potential emission control mal-
function.
The malfunction indicator light may also come on
steady if the fuel-filler cap is loose or missing, or
if the vehicle runs out of fuel. Check to make
sure the fuel-filler cap is installed and closed
tightly, and that the vehicle has at least 3 US
gallons (14 liters) of fuel in the fuel tank.
After a few driving trips, the
light should
turn off if no other potential emission control
Page 502 of 614
JVE0350XFront
JVE0351XRear
VEHICLE RECOVERY (freeing a stuck
vehicle)
WARNING
.Stand clear of a stuck vehicle.
. Do not spin your tires at high speed.
This could cause them to explode
and result in serious injury. Parts of
your vehicle could also overheat
and be damaged.
Pulling a stuck vehicle
If your vehicle is stuck in sand, snow, mud, etc.,
use a tow strap or other device designed
specifically for vehicle recovery. Always follow
the manufacturer’s instructions for the recovery
device.
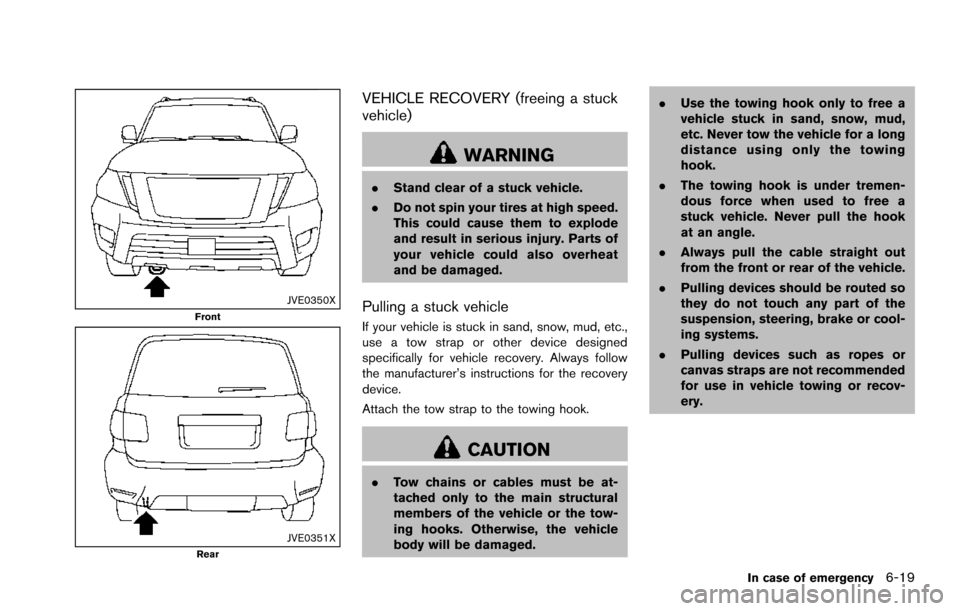
Attach the tow strap to the towing hook.
CAUTION
.Tow chains or cables must be at-
tached only to the main structural
members of the vehicle or the tow-
ing hooks. Otherwise, the vehicle
body will be damaged. .
Use the towing hook only to free a
vehicle stuck in sand, snow, mud,
etc. Never tow the vehicle for a long
distance using only the towing
hook.
. The towing hook is under tremen-
dous force when used to free a
stuck vehicle. Never pull the hook
at an angle.
. Always pull the cable straight out
from the front or rear of the vehicle.
. Pulling devices should be routed so
they do not touch any part of the
suspension, steering, brake or cool-
ing systems.
. Pulling devices such as ropes or
canvas straps are not recommended
for use in vehicle towing or recov-
ery.
In case of emergency6-19
Page 510 of 614
damage the vehicle finish.
Machine compound or aggressive polishing on a
base coat/clear coat paint finish may dull the
finish or leave swirl marks.
REMOVING SPOTS
Remove tar and oil spots, industrial dust,
insects, and tree sap as quickly as possible
from the paint surface to avoid lasting damage
or staining. Special cleaning products are
available at a NISSAN dealer or any automotive
accessory stores.
UNDERBODY
In areas where road salt is used in winter, the
underbody must be cleaned regularly. This will
prevent dirt and salt from building up and
causing the acceleration of corrosion on the
underbody and suspension. Before the winter
period and again in the spring, the underseal
must be checked and, if necessary, re-treated.
GLASS
Use glass cleaner to remove smoke and dust
film from the glass surfaces. It is normal for glass
to become coated with a film after the vehicle is
parked in the hot sun. Glass cleaner and a soft
cloth will easily remove this film.
CAUTION
When cleaning the inside of the win-
dows, do not use sharp-edged tools,
abrasive cleaners or chlorine-based
disinfectant cleaners. They could da-
mage the electrical conductors, radio
antenna elements or rear window
defroster elements.
WHEELS
Wash the wheels when washing the vehicle to
maintain their appearance.
. Clean the inner side of the wheels when the
wheel is changed or the underside of the
vehicle is washed.
. Inspect wheel rims regularly for dents or
corrosion. Such damage may cause loss of
pressure or poor seal at the tire bead.
. NISSAN recommends that the road wheels
be waxed to protect against road salt in
areas where it is used during winter.
CAUTION
Do not use abrasive cleaners when
washing the wheels.
Aluminum alloy wheels
Wash regularly with a sponge dampened in a
mild soap solution, especially during winter
months in areas where road salt is used. Salt
could discolor the wheels if not removed.
CAUTION
Follow the directions below to avoid
staining or discoloring the wheels:
.Do not use a cleaner that uses
strong acid or alkali contents to
clean the wheels.
. Do not apply wheel cleaners to the
wheels when they are hot. The
wheel temperature should be the
same as ambient temperature.
. Rinse the wheel to completely re-
move the cleaner within 15 minutes
after the cleaner is applied.
Bright wheels (if so equipped)
The bright wheels use a different coating
process than typical aluminum alloy wheel and
they are not plated wheels. These wheels are
clear-coated and require the following special
cleaning. They should be regularly washed with
a soft sponge soaked in a lot of water. After
Appearance and care7-3
Page 552 of 614
manufacturer’s suggestions.Use only SAE
Class S chains. Class “S” chains are used on
vehicles with restricted tire to vehicle clearance.
Vehicles that can use Class “S” chains are
designed to meet the SAE standard minimum
clearances between the tire and the closest
vehicle suspension or body component required
to accommodate the use of a winter traction
device (tire chains or cables) . The minimum
clearances are determined using the factory
equipped tire size. Other types may damage
your vehicle. Use chain tensioners when re-
commended by the tire chain manufacturer to
ensure a tight fit. Loose end links of the tire
chain must be secured or removed to prevent
the possibility of whipping action damage to the
fenders or underbody. If possible, avoid fully
loading your vehicle when using tire chains. In
addition, drive at a reduced speed. Otherwise,
your vehicle may be damaged and/or vehicle
handling and performance may be adversely
affected.
Tire chains must be installed only on the
rear wheels and not on the front wheels.
Do not use tire chains on dry roads. Driving with
tire chains in such conditions can cause damage
to the various mechanisms of the vehicle due to
some overstress.
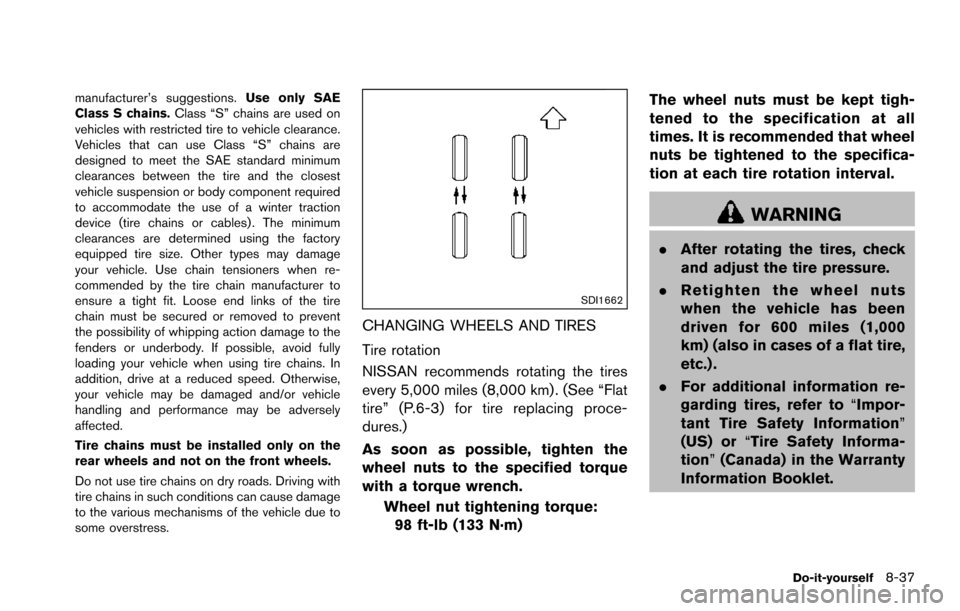
SDI1662
CHANGING WHEELS AND TIRES
Tire rotation
NISSAN recommends rotating the tires
every 5,000 miles (8,000 km) . (See “Flat
tire” (P.6-3) for tire replacing proce-
dures.)
As soon as possible, tighten the
wheel nuts to the specified torque
with a torque wrench.
Wheel nut tightening torque:98 ft-lb (133 N·m) The wheel nuts must be kept tigh-
tened to the specification at all
times. It is recommended that wheel
nuts be tightened to the specifica-
tion at each tire rotation interval.
WARNING
.
After rotating the tires, check
and adjust the tire pressure.
. Retighten the wheel nuts
when the vehicle has been
driven for 600 miles (1,000
km) (also in cases of a flat tire,
etc.) .
. For additional information re-
garding tires, refer to “Impor-
tant Tire Safety Information”
(US) or “Tire Safety Informa-
tion” (Canada) in the Warranty
Information Booklet.
Do-it-yourself8-37
Page 573 of 614
10-2Technical and consumer information
The following are approximate capacities. The actual refill capacities may be a little different. When refilling, follow the procedure
instructed in the “8. Do-it-yourself” section to determine the proper refill capacity.
Fluid typeCapacity (Approximate)
Recommended Fluids/Lubricants
Metric Measure US Measure Imperial Measure
Fuel 98.426 gal 21-5/8 gal�ÂSee “Fuel information” (P.10-4).
Engine oil*1 With oil filter change 6.56-7/8 qt 5-3/4 qt�ÂGenuine “Nissan Motor Oil 0W-20 SN” is recommended.
� If the above motor oil is not available, use an equivalent motor oil that
matches the above grade and viscosity. For additional information, see
“Engine oil and oil filter recommendation” (P.10-6).
Drain and refill
*1: For additional information, see
“Changing engine oil and filter”
(P.8-6) .
Without oil filter change
6.26-1/2 qt 5-1/2 qt
Engine coolant with reservoir 16.317-1/4 qt 14-3/8 qt �ÂPre-diluted Genuine NISSAN Long Life Antifreeze/Coolant (blue) or
equivalent
Automatic transmission fluid (ATF) —— —�ÂGenuine NISSAN Matic S ATF
� NISSAN recommends using Genuine NISSAN Matic S ATF ONLY in
NISSAN automatic transmissions. Do not mix with other fluids. Using fluids
that are not equivalent to Genuine NISSAN Matic S ATF may damage the
automatic transmission. Damage caused by the use of fluids other than as
recommended is not covered under the NISSAN’s New Vehicle Limited
Warranty.
Transfer fluid —— —�ÂGenuine NISSAN Transfer Fluid for ATX90A transfer
� Using transfer fluid other than Genuine NISSAN Transfer Fluid may damage
the transfer. Damage caused by use of other fluids is not covered by the
NISSAN new vehicle limited warranty.
Front differential gear oil —— —�ÂGenuine NISSAN Differential Oil Hypoid Super GL-5 80W-90 or equivalent
conventional (non-synthetic) oil
Rear differential gear oil —— —�ÂGenuine NISSAN Differential Oil Hypoid Super-S GL-5 synthetic 75W-90
or equivalent
Power steering fluid (PSF) Refill to the proper oil level according to the instructions in
the “8. Do-it-yourself” section. �Â
Genuine NISSAN PSF or equivalent
� DEXRON
TMVI type ATF may also be used.
Brake fluid �ÂGenuine NISSAN Super Heavy Duty Brake Fluid*4 or equivalent DOT 3
*4: Available in mainland U.S.A through a NISSAN dealer.
Suspension fluid —— —�ÂGenuine NISSAN Hydraulic Suspension Fluid
� Using Hydraulic Suspension fluid other than Genuine NISSAN Hydraulic
Suspension fluid will damage the Hydraulic Suspension, which is not
covered by the NISSAN new vehicle limited warranty. It is recommended
that you see a NISSAN dealer for recommended hydraulic suspension fluid.
Multi-purpose grease —— —�ÂNLGI No. 2 (Lithium soap base)
CAPACITIES AND RECOMMENDED
FLUIDS/LUBRICANTS
Page 597 of 614
10-26Technical and consumer information
Several types of braking systems are available.
Surge Brakes -The surge brake actuator is
mounted on the trailer tongue with a hydraulic
line running to each trailer wheel. Surge brakes
are activated by the trailer pushing against the
hitch ball when the tow vehicle is braking.
Hydraulic surge brakes are common on rental
trailers and some boat trailers. In this type of
system, there is no hydraulic or electric connec-
tion for brake operation between the tow vehicle
and the trailer.
Electric Trailer Brakes - Electric braking
systems are activated by an electronic signal
sent from a trailer brake controller (special brake
sensing module) .
Have a professional supplier of towing equip-
ment make sure the trailer brakes are properly
installed and demonstrate proper brake function
testing.
WARNING
Never connect a trailer brake system
directly to the vehicle brake system.
Pre-towing tips
. Be certain your vehicle maintains a level
position when a loaded or unloaded trailer is
hitched. Do not drive the vehicle if it has an
abnormal nose-up or nose-down condition;
check for improper tongue load, overload,
worn suspension or other possible causes
of either condition.
. Always secure items in the trailer to prevent
load shift while driving.
. Keep the cargo load as low as possible in
the trailer to keep the trailer center of gravity
low.
. Load the trailer so approximately 60% of the
trailer load is in the front half and 40% is in
the back half. Also make sure the load is
balanced side to side.
. Check your hitch, trailer tire pressure,
vehicle tire pressure, trailer light operation,
and trailer wheel lug nuts every time you
attach a trailer to the vehicle.
. Be certain your rearview mirrors conform to
all federal, state or local regulations. If not,
install any mirrors required for towing before
driving the vehicle.
. Determine the overall height of the vehicle
and trailer so the required clearance is
known.
Trailer towing tips
In order to gain skill and an understanding of the
vehicle’s behavior, you should practice turning,
stopping and backing up in an area which is free
from traffic. Steering stability, and braking
performance will be somewhat different than
under normal driving conditions.
.Always secure items in the trailer to prevent
load shift while driving.
. Lock the trailer hitch coupler with a pin or
lock to prevent the coupler from inadver-
tently becoming unlatched.
. Avoid abrupt starts, acceleration or stops.
. Avoid sharp turns or lane changes.
. Always drive your vehicle at a moderate
speed. Some states or provinces have
specific speed limits for vehicles that are
towing trailers. Obey the local speed limits.
. When backing up, hold the bottom of the
steering wheel with one hand. Move your
hand in the direction in which you want the
trailer to go. Make small corrections and
back up slowly. If possible, have someone
guide you when you are backing up.
Always block the wheels on both vehicle and
trailer when parking. Parking on a slope is not
recommended; however, if you must do so: