2017 NISSAN ARMADA air filter
[x] Cancel search: air filterPage 134 of 614
3. To turn off the heater, return the switch tothe level position. Make sure the indicator
light turns off.
The heater is controlled by a thermostat,
automatically turning the heater on and off.
The indicator light will remain on as long as
the switch is on.
When the vehicle’s interior is warmed, or
before you leave the vehicle, be sure to turn
off the switch.
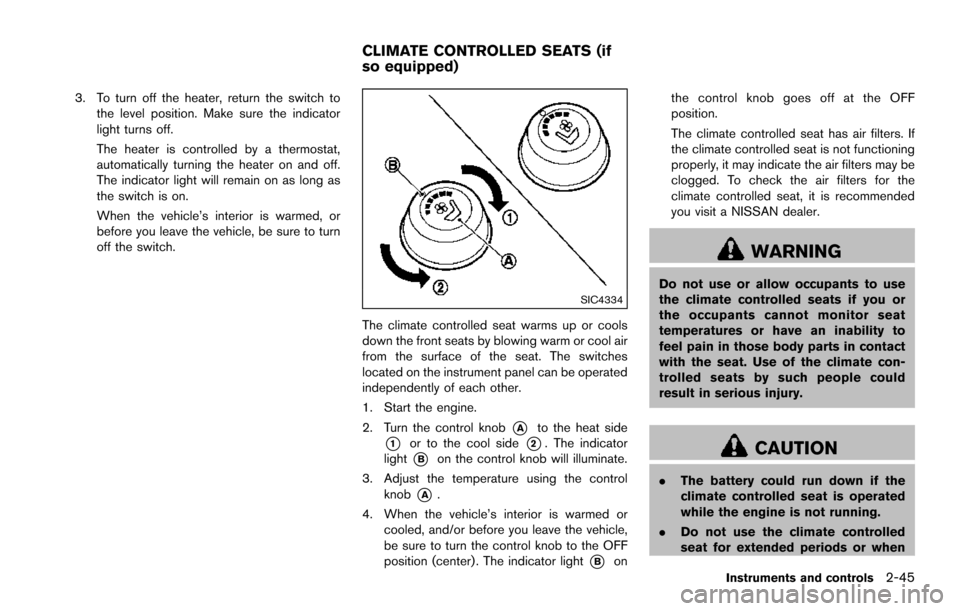
SIC4334
The climate controlled seat warms up or cools
down the front seats by blowing warm or cool air
from the surface of the seat. The switches
located on the instrument panel can be operated
independently of each other.
1. Start the engine.
2. Turn the control knob
*Ato the heat side
*1or to the cool side*2. The indicator
light
*Bon the control knob will illuminate.
3. Adjust the temperature using the control knob
*A.
4. When the vehicle’s interior is warmed or cooled, and/or before you leave the vehicle,
be sure to turn the control knob to the OFF
position (center) . The indicator light
*Bon the control knob goes off at the OFF
position.
The climate controlled seat has air filters. If
the climate controlled seat is not functioning
properly, it may indicate the air filters may be
clogged. To check the air filters for the
climate controlled seat, it is recommended
you visit a NISSAN dealer.
WARNING
Do not use or allow occupants to use
the climate controlled seats if you or
the occupants cannot monitor seat
temperatures or have an inability to
feel pain in those body parts in contact
with the seat. Use of the climate con-
trolled seats by such people could
result in serious injury.
CAUTION
.
The battery could run down if the
climate controlled seat is operated
while the engine is not running.
. Do not use the climate controlled
seat for extended periods or when
Instruments and controls2-45
CLIMATE CONTROLLED SEATS (if
so equipped)
Page 135 of 614
2-46Instruments and controls
no one is using the seat.
. Do not put anything on the seat
which insulates heat, such as a
blanket, cushion, seat cover, etc.
Otherwise, the seat may become
overheated.
. Do not place anything hard or heavy
on the seat or pierce it with a pin or
similar object. This may result in
damage to the climate controlled
seat.
. Any liquid spilled on the seat should
be removed immediately with a dry
cloth.
. The climate controlled seat has an
air filter. Do not operate climate
controlled seat without an air filter.
This may result in damage to the
system.
. When cleaning the seat, never use
gasoline, thinner, or any similar
materials.
. If any malfunctions are found or the
climate controlled seat does not
operate, turn the switch off and
have the system checked. It is
recommended you visit a NISSAN
dealer for this service.
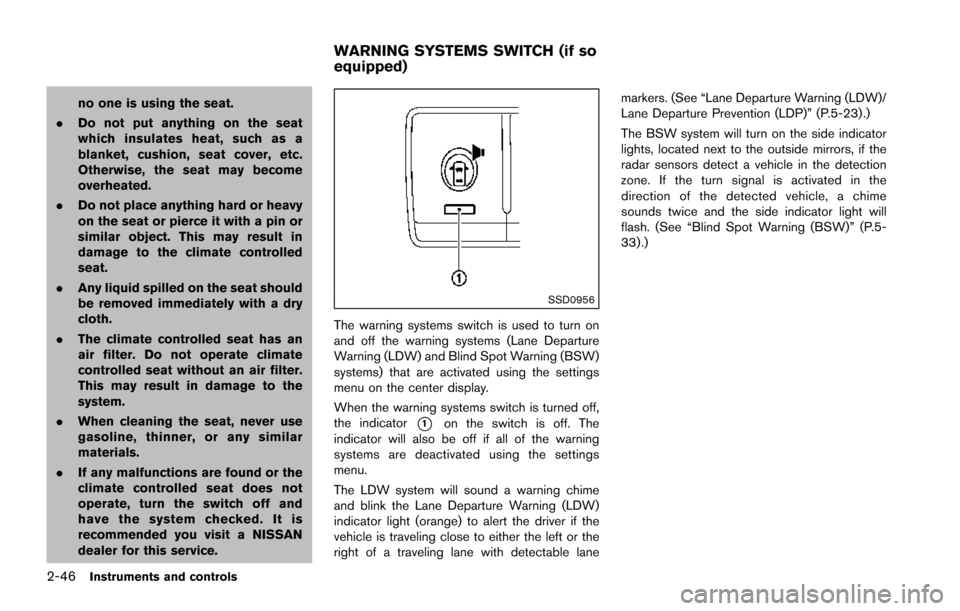
SSD0956
The warning systems switch is used to turn on
and off the warning systems (Lane Departure
Warning (LDW) and Blind Spot Warning (BSW)
systems) that are activated using the settings
menu on the center display.
When the warning systems switch is turned off,
the indicator
*1on the switch is off. The
indicator will also be off if all of the warning
systems are deactivated using the settings
menu.
The LDW system will sound a warning chime
and blink the Lane Departure Warning (LDW)
indicator light (orange) to alert the driver if the
vehicle is traveling close to either the left or the
right of a traveling lane with detectable lane markers. (See “Lane Departure Warning (LDW)/
Lane Departure Prevention (LDP)” (P.5-23).)
The BSW system will turn on the side indicator
lights, located next to the outside mirrors, if the
radar sensors detect a vehicle in the detection
zone. If the turn signal is activated in the
direction of the detected vehicle, a chime
sounds twice and the side indicator light will
flash. (See “Blind Spot Warning (BSW)” (P.5-
33) .)
WARNING SYSTEMS SWITCH (if so
equipped)
Page 199 of 614
Linking Intelligent Key (if so equipped) ...................... 4-58
In-cabin microfilter ........................................................... 4-58
Servicing air conditioner ................................................. 4-58
Audio system ........................................................................\
... 4-59
Audio operation precautions ......................................... 4-59
FM-AM-SAT radio with Compact Disc
(CD) player ........................................................................\
4-70
DVD (Digital Versatile Disc) player operation ........... 4-74
USB (Universal Serial Bus) connection port ............ 4-77
Bluetooth
�Šstreaming audio .......................................... 4-81
iPod�Šplayer operation .................................................... 4-86
Front auxiliary input jacks (if so equipped) ................ 4-88
CD/DVD/USB memory care and cleaning ................ 4-90
Steering-wheel-mounted controls for audio .............. 4-91
Antenna ........................................................................\
....... 4-92
DVD Entertainment System (if so equipped) ................. 4-92 Licenses ........................................................................\
...... 4-93
System components ........................................................ 4-93
Before operating DVD Entertainment System .......... 4-99
Playing Digital Versatile Disc (DVD)/USB .............. 4-100
Operating tips ................................................................ 4-105
Care and maintenance ................................................. 4-105 Car phone or CB radio ..................................................... 4-106
Bluetooth
�ŠHands-Free Phone System ........................ 4-106
Regulatory information ............................................... 4-108
Voice commands ......................................................... 4-108
Control buttons ............................................................ 4-108
Connecting procedure ............................................... 4-109
Phone selection ........................................................... 4-109
Quick Dial ..................................................................... 4-109
Making a call ................................................................ 4-112
Receiving a call ........................................................... 4-113
During a call ................................................................. 4-113
Phone setting ............................................................... 4-114
Troubleshooting guide ............................................... 4-116
NISSAN Voice Recognition system .............................. 4-117
NISSAN Voice Recognition Standard Mode ....... 4-117
Using the system ........................................................ 4-120
NISSAN Voice Recognition Alternate
Command Mode ......................................................... 4-130
Using the system ........................................................ 4-138
Troubleshooting guide ............................................... 4-143
Page 209 of 614
4-12Monitor, heater, air conditioner, audio, phone and voice recognition systems
Maintenance information
The maintenance intervals can be displayed for
the engine oil, oil filter, tire and other reminders.
To set a maintenance interval, select a preferred
item from the list.
You can also set to display a message to remind
you that the maintenance needs to be per-
formed.
The following example shows how to set the
engine oil maintenance information. Use the
same steps to set the other maintenance
information.
1. Set the interval (mileage) of the maintenanceschedule. To determine the recommended
maintenance interval, refer to the "9. Main-
tenance and schedules" section.
2. To display the reminder automatically when the desired distance is reached, select the
“Reminder” key.
3. Reset the driving distance to the new maintenance schedule.
4. To return to the previous screen, push the BACK button.
The unit can be converted between “US” and
“Metric”. (See “Language & Units settings” (P.4-
19) .)
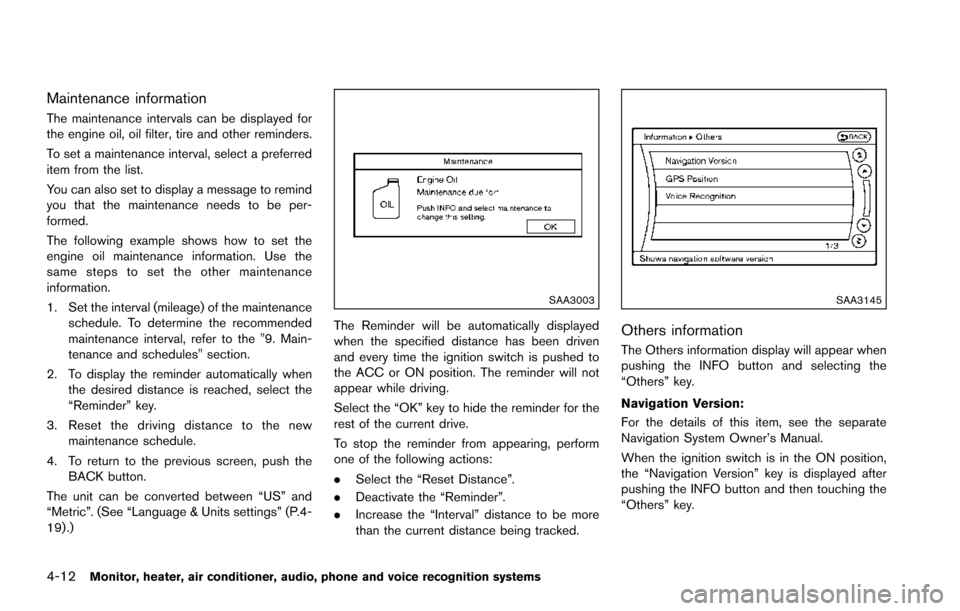
SAA3003
The Reminder will be automatically displayed
when the specified distance has been driven
and every time the ignition switch is pushed to
the ACC or ON position. The reminder will not
appear while driving.
Select the “OK” key to hide the reminder for the
rest of the current drive.
To stop the reminder from appearing, perform
one of the following actions:
. Select the “Reset Distance”.
. Deactivate the “Reminder”.
. Increase the “Interval” distance to be more
than the current distance being tracked.
SAA3145
Others information
The Others information display will appear when
pushing the INFO button and selecting the
“Others” key.
Navigation Version:
For the details of this item, see the separate
Navigation System Owner’s Manual.
When the ignition switch is in the ON position,
the “Navigation Version” key is displayed after
pushing the INFO button and then touching the
“Others” key.
Page 255 of 614
4-58Monitor, heater, air conditioner, audio, phone and voice recognition systems
SAA3088
SAA3058
OPERATING TIPS
When the engine coolant temperature and
outside air temperature are low, the air flow
from the foot outlets may not operate. However,
this is not a malfunction. After the coolant
temperature warms up, the air flow from the
foot outlets will operate normally.
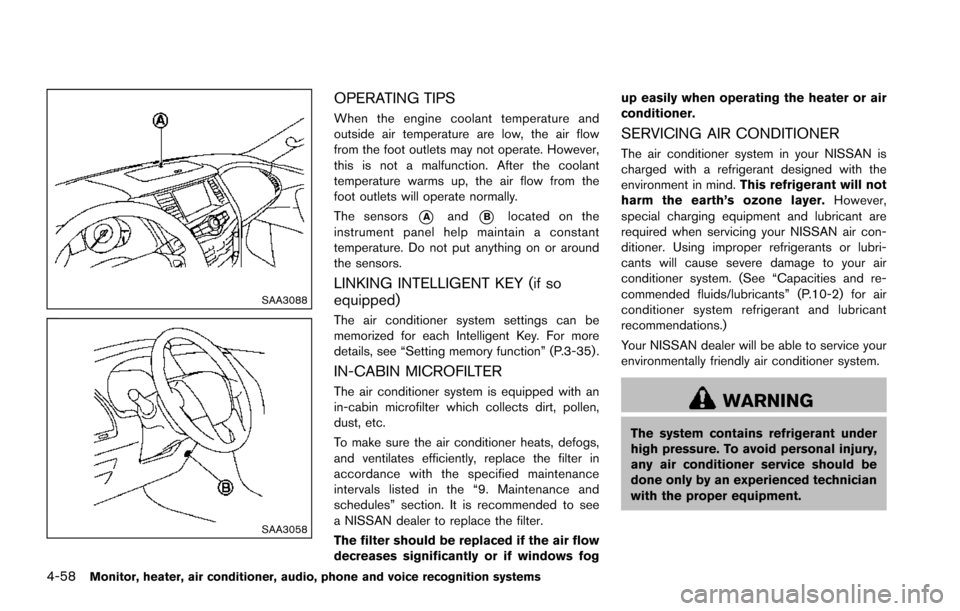
The sensors
*Aand*Blocated on the
instrument panel help maintain a constant
temperature. Do not put anything on or around
the sensors.
LINKING INTELLIGENT KEY (if so
equipped)
The air conditioner system settings can be
memorized for each Intelligent Key. For more
details, see “Setting memory function” (P.3-35) .
IN-CABIN MICROFILTER
The air conditioner system is equipped with an
in-cabin microfilter which collects dirt, pollen,
dust, etc.
To make sure the air conditioner heats, defogs,
and ventilates efficiently, replace the filter in
accordance with the specified maintenance
intervals listed in the “9. Maintenance and
schedules” section. It is recommended to see
a NISSAN dealer to replace the filter.
The filter should be replaced if the air flow
decreases significantly or if windows fog up easily when operating the heater or air
conditioner.
SERVICING AIR CONDITIONER
The air conditioner system in your NISSAN is
charged with a refrigerant designed with the
environment in mind.
This refrigerant will not
harm the earth’s ozone layer. However,
special charging equipment and lubricant are
required when servicing your NISSAN air con-
ditioner. Using improper refrigerants or lubri-
cants will cause severe damage to your air
conditioner system. (See “Capacities and re-
commended fluids/lubricants” (P.10-2) for air
conditioner system refrigerant and lubricant
recommendations.)
Your NISSAN dealer will be able to service your
environmentally friendly air conditioner system.
WARNING
The system contains refrigerant under
high pressure. To avoid personal injury,
any air conditioner service should be
done only by an experienced technician
with the proper equipment.
Page 301 of 614
4-104Monitor, heater, air conditioner, audio, phone and voice recognition systems
SETUP button:
Push the SETUP button to display the rear seat
display settings. (See “Rear display settings”
(P.4-104) .)
BACK button:
Push to go back to the previous screen or
cancel the selection.
Volume:
To adjust the speaker volume push
oron the volume control button.
This button is used to control the volume from
the vehicle speakers. To adjust the volume of the
headphones, use the volume knob that is
attached to the headphones.
Keypad:
: PLAY/PAUSE button
: STOP button
: FORWARD button
: REWIND button
: FORWARD button for commercial skip (forDVD-VIDEO and DVD-VR)
: REWIND button for commercial skip (forDVD-VIDEO and DVD-VR)
Key illumination button:
If the key illumination button is pushed, the
buttons on the remote controller will be lit up.
Rear display settings
Display mode adjustment of the rear seat
displays can be performed while a DVD or
USB movie is being played. Set the rear display
select switch on the remote controller to either L
or R according to the display you want to set,
and then push the SETUP button. It is not
possible to make display mode adjustments to
the left and right displays at the same time.
Aspect:
Select the display size from “FULL”, “NORMAL”,
“CINEMA” or “WIDE”.
Picture Mode:
Select the Picture Mode from “NORMAL”,
“DYNAMIC”, “CINEMA”, “GAME” .
To adjust the display brightness automatically,
select the “Brightness” key and then select from
“DARKER”, “NORMAL” or “BRIGHTER”. When
adjusting manually, select “OFF” and push
ENTER button on the remote controller.
To adjust tint, color or contrast, select a key
using the select button (
or) , push
ENTER on the remote controller.
Push the BACK button on the remote controller
to apply the settings and return to the previous
display.
To return the adjustment levels to the default
value, select “Execute” next to “Initialization” push the select button (
,) on the remote
controller and push the ENTER button. The
“Execute” key is deactivated when the picture
mode settings are already in the default value.
Color System:
To choose the color system, select from
“NTSC”, “PAL”, “PAL-60”, “PAL-M”, “PAL-N” or
“AUTO” .
3D Y/C filter:
Set to ON/OFF push the select button (
or) and push ENTER button on the remote
controller. When turned on, small characters
and an outline of the shapes will be displayed
more clearly than when turned off.
AUX Volume Setting:
This is only active when in the Rear AUX mode.
To set the AUX volume, select from “HIGH”,
“LOW” or “MIDDLE” .
Page 463 of 614
5-122Starting and driving
.Recirculating the cool air in the cabinwhen the A/C is on reduces cooling load.
4. Drive at economical speeds and distances.
.Observing the speed limit and not ex- ceeding 60 MPH (97 km/h) (where
legally allowed) can improve fuel effi-
ciency due to reduced aerodynamic
drag.
.Maintaining a safe following distancebehind other vehicles reduces unneces-
sary braking.
.Safely monitoring traffic to anticipatechanges in speed permits reduced brak-
ing and smooth acceleration changes.
.Select a gear range suitable to road conditions.
5. Use cruise control.
.Using cruise control during highway driving helps maintain a steady speed.
.Cruise control is particularly effective in providing fuel savings when driving on
flat terrains.
6. Plan for the shortest route.
.Utilize a map or navigation system to determine the best route to save time.
7. Avoid idling.
.Shutting off your engine when safe for stops exceeding 30-60 seconds saves fuel and reduces emissions.
8. Buy an automated pass for toll roads.
.Automated passes permit drivers to use special lanes to maintain cruising speed
through the toll and avoid stopping and
starting.
9. Winter warm up.
.Limit idling time to minimize impact to fuel economy.
.Vehicles typically need no more than 30seconds of idling at start-up to effectively
circulate the engine oil before driving.
.Your vehicle will reach its ideal operatingtemperature more quickly while driving
versus idling.
10. Keeping your vehicle cool.
.Park your vehicle in a covered parking area or in the shade whenever possible.
.When entering a hot vehicle, opening thewindows will help to reduce the inside
temperature faster, resulting in reduced
demand on your A/C system. .
Keep your engine tuned up.
. Follow the recommended scheduled main-
tenance.
. Keep the tires inflated to the correct
pressure. Low tire pressure increases tire
wear and lowers fuel economy.
. Keep the wheels in correct alignment.
Improper alignment increases tire wear and
lowers fuel economy.
. Use the recommended viscosity engine oil.
(See “Engine oil and oil filter recommenda-
tion” (P.10-6) .)
INCREASING FUEL ECONOMY
Page 516 of 614
8 Do-it-yourself
Maintenance precautions ........................................................ 8-2
Engine compartment check locations .................................. 8-3VK56VD engine ................................................................... 8-3
Engine cooling system ............................................................. 8-4 Checking engine coolant level ......................................... 8-5
Changing engine coolant .................................................. 8-5
Engine oil ........................................................................\
............ 8-6 Checking engine oil level .................................................. 8-6
Changing engine oil and filter .......................................... 8-6
Automatic Transmission Fluid (ATF) ..................................... 8-8
Power steering fluid .................................................................. 8-8
Brake fluid ........................................................................\
........... 8-9
Window washer fluid ............................................................ 8-10
Battery ........................................................................\
............... 8-11 Jump starting ..................................................................... 8-13
Variable voltage control system .......................................... 8-13
Drive belts ........................................................................\
........ 8-13
Spark plugs ........................................................................\
..... 8-14 Replacing spark plugs .................................................... 8-14
Air cleaner ........................................................................\
........ 8-15 Windshield wiper blades ..................................................... 8-16
Cleaning ........................................................................\
... 8-16
Replacing ........................................................................\
. 8-16
Rear window wiper blades ................................................. 8-17
Brakes ........................................................................\
.............. 8-17 Self-adjusting brakes .................................................... 8-17
Brake pad wear warning .............................................. 8-17
Brake booster ................................................................. 8-18
Fuses ........................................................................\
................ 8-18 Engine compartment ..................................................... 8-19
Passenger compartment .............................................. 8-20
Intelligent Key battery replacement ................................... 8-21
Lights ........................................................................\
................ 8-24
Headlights ........................................................................\
8-25
Exterior and interior lights ............................................ 8-26
Wheels and tires ................................................................... 8-30
Tire pressure ................................................................... 8-30
Tire labeling ..................................................................... 8-34
Types of tires ................................................................... 8-36
Tire chains ....................................................................... 8-36
Changing wheels and tires .......................................... 8-37