2017 NISSAN ARMADA lights
[x] Cancel search: lightsPage 214 of 614

When any mode button is pushed with the
screen off, the screen turns on for further
operation. The screen will turn off automatically
5 seconds after the operation is finished.
To turn on the screen, set this item to the ON
position, or push the
OFF button.
. Brightness/Contrast/Background Color
To adjust the brightness and contrast of the
screen, select the “Brightness” or “Contrast”
key.
Then, you can adjust the brightness and the
contrast using the multi-function controller.
For information on the “Background Color” key,
refer to the separate Navigation System Own-
er’s Manual.
Color Theme:
Choose the theme color of the menu screen.
SAA3151
Comfort settings (if so equipped)
The display as illustrated will appear when
pushing the SETTING button and selecting the
“Others” key, and then selecting the “Comfort”
key. This key does not appear on the display until
the ignition switch is pushed to the ON position.
Auto Interior Illumination:
When this item is turned to ON, the interior
lights will illuminate if any door is unlocked.
Light Sensitivity:
Adjust the sensitivity of the automatic headlights
higher (right) or lower (left) . Light Off Delay:
Choose the duration of the automatic headlight
off timer from 0, 30, 45, 60, 90, 120, 150 and
180 second periods.
Speed Sensing Wiper Interval (if so
equipped):
When this item is turned to ON, the wiper
interval is adjusted automatically according to
the vehicle speed.
Selective Door Unlock:
When this item is turned to ON, only the driver’s
door is unlocked first after the door unlock
operation. When the door handle request switch
on the driver’s or front passenger’s side door is
pushed to be unlocked, only the corresponding
door is unlocked first. All the doors can be
unlocked if the door unlock operation is per-
formed again within 60 seconds.
When this item is turned to OFF, all the doors
will be unlocked after the door unlock operation
is performed once.
Intelligent Key Lock/Unlock:
When this item is turned to ON, door lock/
unlock function by pushing the door handle
request switch will be activated.
Monitor, heater, air conditioner, audio, phone and voice recognition systems4-17
Page 252 of 614
A visible mist may be seen coming from the
ventilators in hot, humid conditions as the air is
cooled rapidly. This does not indicate a mal-
function.
Dehumidified defrosting or defogging:
1. Push the “
” front defroster button. (The
indicator light on the button will illuminate.)
2. Turn the temperature control dial to set the desired temperature.
. To quickly remove ice from the outside of the
windows, push the fan speed increase
button “
” and set it to the maximum
position.
. As soon as possible after the windshield is
clean, push the “AUTO” button to return to
the auto mode.
. When the “
” front defroster button is
pushed, the air conditioner will automatically
be turned on at outside temperatures above
238F( �í58C) to defog the windshield, and
the air recirculate mode will automatically be
turned off.
Outside air is drawn into the passenger
compartment to improve the defogging
performance.
Manual operation
Fan speed control:
Push the fan speed increase “
” or decrease
“” buttons to manually control the fan speed.
Push the “AUTO” button to return to automatic
control of the fan speed.
Temperature control:
Turn the temperature control dial to set the
desired temperature.
Air flow control:
Pushing the “MODE” manual air flow control
button selects the air outlet to:
: Air flows from center and side ventilators.
: Air flows from center and side ventilators and foot outlets.
: Air flows mainly from foot outlets.
: Air flows from defroster and foot outlets.
Air intake control:
. Push the “
” air recirculation button to
recirculate interior air inside the vehicle. The
“
” indicator light on the button will come
on. The air recirculation mode cannot be
activated when the air conditioner is in the
front defrosting mode “
”.
. Push the “
” outside air circulation button
to draw outside air into the passenger
compartment. The “
” indicator light on the button will come on.
. To control the air intake automatically, push
and hold either the “
” air recirculation
button or the “” outside air circulation
button (whichever indicator light is illumi-
nated) . The indicator lights (both air recir-
culation and outside air circulation buttons)
will flash twice, and then the air intake will
switch to automatic control.
Turning the system off
Push the OFF button.
Upper vent system
When the upper vent “” button is pushed,
the air flow against the driver’s or passenger’s
upper body becomes gentle. The indicator light
on the button will illuminate.
In this mode, air from the upper ventilator flows
in order to control the cabin temperature without
blowing air directly on the occupants.
Push the upper vent “
” button when you
want the air conditioner to work quickly.
To turn the system off, push the upper vent
“
” button to turn the indicator light off.
Monitor, heater, air conditioner, audio, phone and voice recognition systems4-55
Page 257 of 614
4-60Monitor, heater, air conditioner, audio, phone and voice recognition systems
Static and flutter: During signal interference from
buildings, large hills or due to antenna position,
usually in conjunction with increased distance
from the station transmitter, static or flutter can
be heard. This can be reduced by lowering the
treble setting to reduce the treble response.
Multipath reception: Because of the reflective
characteristics of FM signals, direct and re-
flected signals reach the receiver at the same
time. The signals may cancel each other,
resulting in momentary flutter or loss of sound.
AM radio reception:
AM signals, because of their low frequency, can
bend around objects and skip along the ground.
In addition, the signals can be bounced off the
ionosphere and bent back to earth. Because of
these characteristics. AM signals are also
subject to interference as they travel from
transmitter to receiver.
Fading: Occurs while the vehicle is passing
through freeway underpasses or in areas with
many tall buildings. It can also occur for several
seconds during ionospheric turbulence even in
areas where no obstacles exist.
Static: Caused by thunderstorms, electrical
power lines, electric signs and even traffic lights.Satellite radio reception:
When the satellite radio is used for the first time
or the battery has been replaced, the satellite
radio may not work properly. This is not a
malfunction. Wait more than 10 minutes with the
satellite radio ON and the vehicle outside of any
metal or large building for the satellite radio to
receive all of the necessary data.
The satellite radio mode requires an active
SiriusXM Satellite Radio subscription. The sa-
tellite radio is not available in Alaska, Hawaii and
Guam.
The satellite radio performance may be affected
if cargo carried on the roof blocks the satellite
radio signal.
If possible, do not put cargo near the satellite
antenna.
A build up of ice on the satellite radio antenna
can affect satellite radio performance. Remove
the ice to restore satellite radio reception.
SAA0480
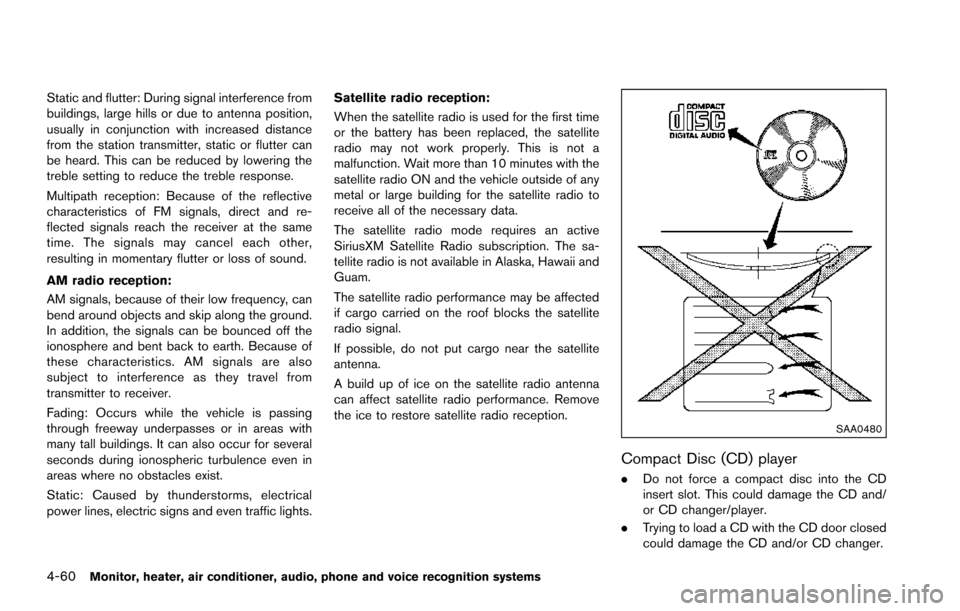
Compact Disc (CD) player
.
Do not force a compact disc into the CD
insert slot. This could damage the CD and/
or CD changer/player.
. Trying to load a CD with the CD door closed
could damage the CD and/or CD changer.
Page 355 of 614
5-14Starting and driving
PUSH-BUTTON IGNITION SWITCH
POSITIONS
LOCK (Normal parking position)
The ignition switch can only be locked in this
position.
The ignition switch will be unlocked when it is
pushed to the ACC position while carrying the
Intelligent Key.
ACC (Accessories)
This position activates electrical accessories
such as the radio, when the engine is not
running.
ACC has a battery saver feature that will turn the
ignition switch to the OFF position after a period
of time under the following conditions:
.all doors are closed.
. shift lever is in P (Park) .
. turn signal/hazard indicator lights are not
flashing.
The battery saver feature will be cancelled if any
of the following occur:
. any door is opened.
. shift lever is moved out of P (Park) .
. ignition switch changes position.
ON (Normal operating position)
This position turns on the ignition system and
electrical accessories.
ON has a battery saver feature that will turn the
ignition switch to the OFF position, if the vehicle
is not running, after some time under the
following conditions:
.all doors are closed.
. shift lever is in P (Park) .
. turn signal/hazard indicator lights are not
flashing.
The battery saver feature will be cancelled if any
of the following occur:
. any door is opened.
. shift lever is moved out of P (Park) .
. ignition switch changes position.
OFF
The engine can be turned off in the position.
The ignition lock is designed so that the ignition
switch cannot be switched to the LOCK position
until the shift lever is moved to the P (Park)
position.
CAUTION
Do not leave the vehicle with the push-
button ignition switch in ACC or ON
positions when the engine is not run-
ning for an extended period. This can
discharge the battery.
EMERGENCY ENGINE SHUT OFF
To shut off the engine in an emergency situation
while driving, perform the following procedure:
.Rapidly push the push-button ignition switch
3 consecutive times in less than 1.5
seconds, or
. Push and hold the push-button ignition
switch for more than 2 seconds.
Page 356 of 614
JVS0404X
INTELLIGENT KEY BATTERY DIS-
CHARGE
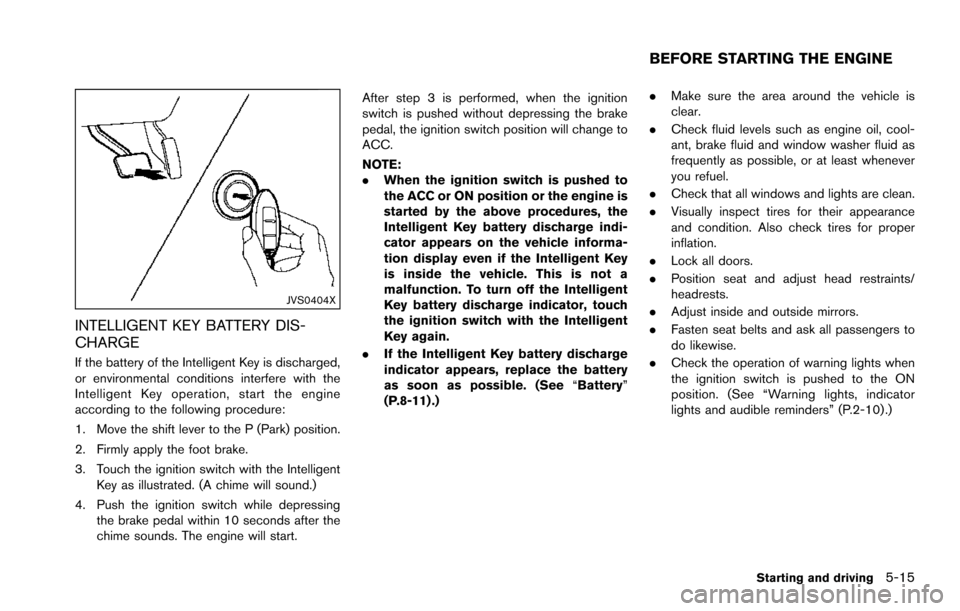
If the battery of the Intelligent Key is discharged,
or environmental conditions interfere with the
Intelligent Key operation, start the engine
according to the following procedure:
1. Move the shift lever to the P (Park) position.
2. Firmly apply the foot brake.
3. Touch the ignition switch with the IntelligentKey as illustrated. (A chime will sound.)
4. Push the ignition switch while depressing the brake pedal within 10 seconds after the
chime sounds. The engine will start. After step 3 is performed, when the ignition
switch is pushed without depressing the brake
pedal, the ignition switch position will change to
ACC.
NOTE:
.
When the ignition switch is pushed to
the ACC or ON position or the engine is
started by the above procedures, the
Intelligent Key battery discharge indi-
cator appears on the vehicle informa-
tion display even if the Intelligent Key
is inside the vehicle. This is not a
malfunction. To turn off the Intelligent
Key battery discharge indicator, touch
the ignition switch with the Intelligent
Key again.
. If the Intelligent Key battery discharge
indicator appears, replace the battery
as soon as possible. (See “Battery”
(P.8-11) .) .
Make sure the area around the vehicle is
clear.
. Check fluid levels such as engine oil, cool-
ant, brake fluid and window washer fluid as
frequently as possible, or at least whenever
you refuel.
. Check that all windows and lights are clean.
. Visually inspect tires for their appearance
and condition. Also check tires for proper
inflation.
. Lock all doors.
. Position seat and adjust head restraints/
headrests.
. Adjust inside and outside mirrors.
. Fasten seat belts and ask all passengers to
do likewise.
. Check the operation of warning lights when
the ignition switch is pushed to the ON
position. (See “Warning lights, indicator
lights and audible reminders” (P.2-10) .)
Starting and driving5-15
BEFORE STARTING THE ENGINE
Page 358 of 614
1. Make sure that the Intelligent Key is on you.
2. Depress the brake pedal.
3. Push the ignition switch once to the ONposition.
For additional information about the remote
engine start function, see “Remote engine start”
(P.3-19) .ENGINE PROTECTION MODE
The engine has an engine protection mode to
reduce the chance of damage if the coolant
temperature becomes too high (for example,
when climbing steep grades in high temperature
with heavy loads, such as when towing a trailer) .
When the engine temperature reaches a certain
level:
. The engine coolant temperature gauge will
move toward the H position.
. Engine power may be reduced.
. The air conditioning cooling function may be
automatically turned OFF for a short time
(the blower will continue to operate) .
Engine power and, under some conditions,
vehicle speed will decrease. Vehicle speed can
be controlled with the accelerator pedal, but the
vehicle may not accelerate at the desired speed.
The transmission will downshift or upshift as it
reaches prescribed shift points. You can also
shift manually.
As driving conditions change and engine cool-
ant temperature is reduced, vehicle speed can
be increased using the accelerator pedal, and
air conditioning cooling function will automati-
cally be turned back ON. If:
1. The engine coolant temperature is not
reduced.
2. The air conditioning cooling function does not turn back ON.
3. The engine oil pressure warning light
illuminates or engine coolant temperature
gauge does not return to the normal range
from the H position, this may indicate a
malfunction. Move the vehicle off the road to
a safe area and allow the engine to cool. If
after checking the oil and coolant, the
remains on or engine coolant temperature
does not return to the normal range, do not
continue to drive. It is recommended you
contact a NISSAN dealer.
The Malfunction Indicator Light (MIL)
may
also come ON. You do not need to have your
vehicle towed, unless it remains on, but have it
inspected soon. It is recommended you contact
a NISSAN dealer for this service. See “Warning
lights, indicator lights and audible reminders”
(P.2-10) .
WARNING
Overheating can result in reduced en-
gine power and vehicle speed. The
Starting and driving5-17
DRIVING THE VEHICLE
Page 371 of 614
5-30Starting and driving
after road repairs. (The LDW and
LDP systems could detect these
items as lane markers.)
— On roads where the traveling lane merges or separates.
— When the vehicle’s traveling di- rection does not align with the
lane marker.
— When traveling close to the vehicle in front of you, which
obstructs the lane camera unit
detection range.
— When rain, snow or dirt adheres to the windshield in front of the
lane camera unit.
— When the headlights are not bright due to dirt on the lens or
if the aiming is not adjusted
properly.
— When strong light enters the lane camera unit. (For example,
the light directly shines on the
front of the vehicle at sunrise or
sunset.)
— When a sudden change in brightness occurs. (For example,
when the vehicle enters or exits a tunnel or under a bridge.)
. Excessive noise will interfere with
the warning chime sound, and the
chime may not be heard.
Page 389 of 614
5-48Starting and driving
.The radar sensors may not be able
to detect and activate BSI when
certain objects are present such as:
— Pedestrians, bicycles, animals.
— Vehicles such as motorcycles,
low height vehicles, or high
ground clearance vehicles.
— Vehicles remaining in the detec- tion zone when you accelerate
from a stop.
— Oncoming vehicles.
— A vehicle merging into an adja- cent lane at a speed approxi-
mately the same as your vehicle.
— A vehicle approaching rapidly from behind.
— A vehicle which your vehicle overtakes rapidly.
— A vehicle that passes through the detection zone quickly.
. The radar sensor’s detection zone is
designed based on a standard lane
width. When driving in a wider lane,
the radar sensors may not detect
vehicles in an adjacent lane. When
driving in a narrow lane, the radar sensors may detect vehicles driving
two lanes away.
. The radar sensors are designed to
ignore most stationary objects,
however objects such as guardrails,
walls, foliage and parked vehicles
may occasionally be detected. This
is a normal operation condition.
. The camera may not detect lane
markers in the following situations
and the BSI system may not operate
properly.
— On roads where there are multi-
ple parallel lane markers; lane
markers that are faded or not
painted clearly; yellow painted
lane markers; non-standard lane
markers; lane markers covered
with water, dirt, snow, etc.
— On roads where discontinued lane markers are still detect-
able.
— On roads where there are sharp curves.
— On roads where there are shar- ply contrasting objects, such as
shadows, snow, water, wheel
ruts, seams or lines remaining after road repairs.
— On roads where the traveling lane merges or separates.
— When the vehicle’s traveling di- rection does not align with the
lane markers.
— When traveling close to the vehicle in front of you, which
obstructs the lane camera unit
detection range.
— When rain, snow or dirt adheres to the windshield in front of a
lane camera unit.
— When the headlights are not bright due to dirt on the lens or
if aiming is not adjusted prop-
erly.
— When strong light enters a lane camera unit. (For example: light
directly shines on the front of
the vehicle at sunrise or sunset.)
— When a sudden change in brightness occurs. (For example:
when the vehicle enters or exits
a tunnel or under a bridge.)