2017 NISSAN ARMADA Center display
[x] Cancel search: Center displayPage 220 of 614
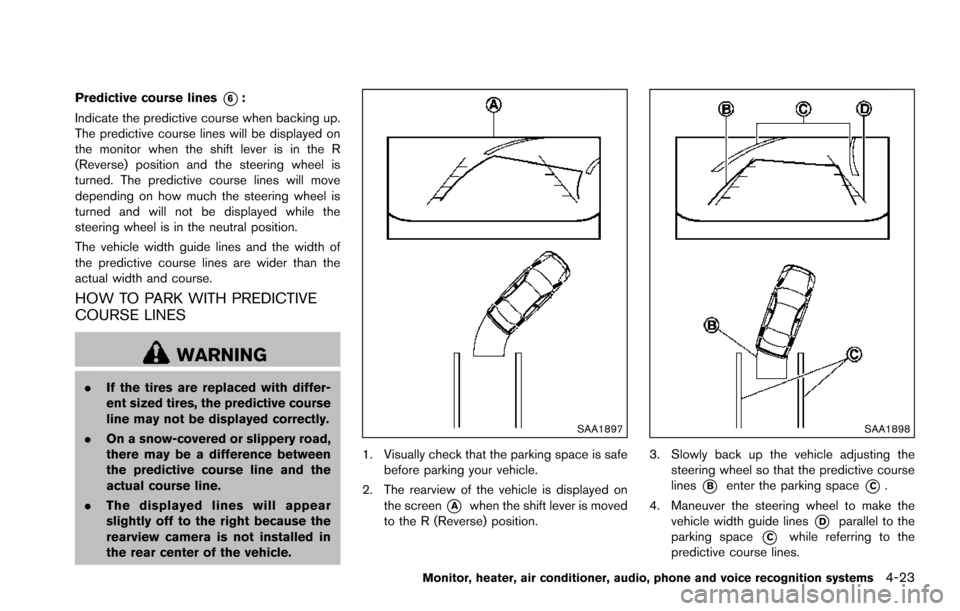
Predictive course lines*6:
Indicate the predictive course when backing up.
The predictive course lines will be displayed on
the monitor when the shift lever is in the R
(Reverse) position and the steering wheel is
turned. The predictive course lines will move
depending on how much the steering wheel is
turned and will not be displayed while the
steering wheel is in the neutral position.
The vehicle width guide lines and the width of
the predictive course lines are wider than the
actual width and course.
HOW TO PARK WITH PREDICTIVE
COURSE LINES
WARNING
. If the tires are replaced with differ-
ent sized tires, the predictive course
line may not be displayed correctly.
. On a snow-covered or slippery road,
there may be a difference between
the predictive course line and the
actual course line.
. The displayed lines will appear
slightly off to the right because the
rearview camera is not installed in
the rear center of the vehicle.
SAA1897
1. Visually check that the parking space is safe
before parking your vehicle.
2. The rearview of the vehicle is displayed on the screen
*Awhen the shift lever is moved
to the R (Reverse) position.
SAA1898
3. Slowly back up the vehicle adjusting the steering wheel so that the predictive course
lines
*Benter the parking space*C.
4. Maneuver the steering wheel to make the vehicle width guide lines
*Dparallel to the
parking space
*Cwhile referring to the
predictive course lines.
Monitor, heater, air conditioner, audio, phone and voice recognition systems4-23
Page 224 of 614
.When strong light is directly coming on the
camera, objects may not be displayed
clearly.
. Vertical lines may be seen in objects on the
screen. This is due to strong reflected light
from the bumper.
. The screen may flicker under fluorescent
light.
. The colors of objects on the RearView
Monitor may differ somewhat from the actual
color of objects.
. Objects on the monitor may not be clear in a
dark environment.
. There may be a delay when switching to the
RearView Monitor.
. If dirt, rain or snow accumulates on the
camera, the RearView Monitor may not
display object clearly. Clean the camera.
. Do not use wax on the camera window.
Wipe off any wax with a clean cloth
dampened with mild detergent diluted with
water.
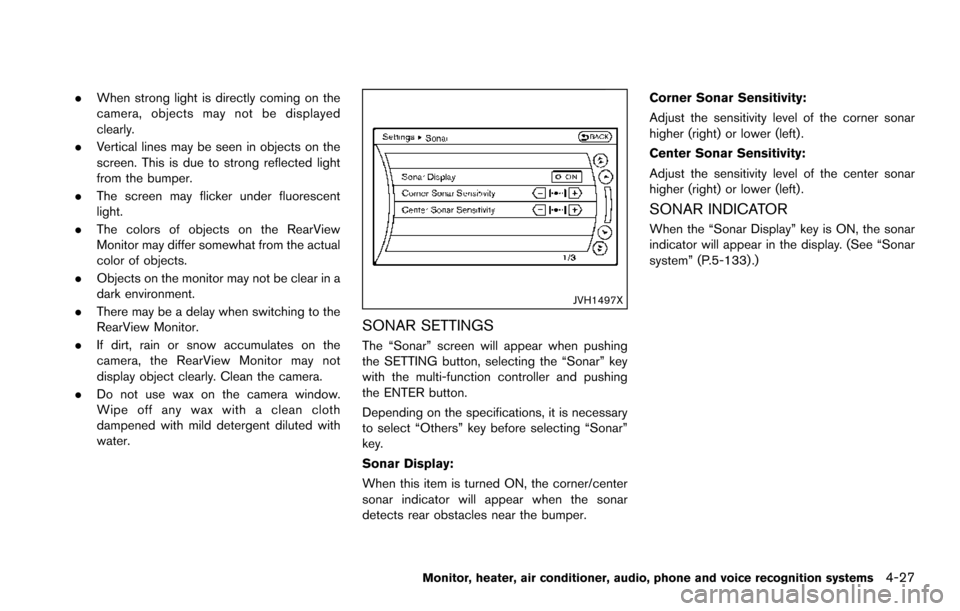
JVH1497X
SONAR SETTINGS
The “Sonar” screen will appear when pushing
the SETTING button, selecting the “Sonar” key
with the multi-function controller and pushing
the ENTER button.
Depending on the specifications, it is necessary
to select “Others” key before selecting “Sonar”
key.
Sonar Display:
When this item is turned ON, the corner/center
sonar indicator will appear when the sonar
detects rear obstacles near the bumper. Corner Sonar Sensitivity:
Adjust the sensitivity level of the corner sonar
higher (right) or lower (left) .
Center Sonar Sensitivity:
Adjust the sensitivity level of the center sonar
higher (right) or lower (left) .
SONAR INDICATOR
When the “Sonar Display” key is ON, the sonar
indicator will appear in the display. (See “Sonar
system” (P.5-133) .)
Monitor, heater, air conditioner, audio, phone and voice recognition systems4-27
Page 228 of 614
.Objects in the monitor will appear
visually opposite compared to when
viewed in the rearview and outside
mirrors.
. Use the mirrors or actually look to
properly judge distances to other
objects.
. The distance between objects
viewed in the rear view differs from
actual distance because a wide-
angle lens is used.
. On a snow-covered or slippery road,
there may be a difference between
the predictive course line and the
actual course line.
. The vehicle width and predictive
course lines are wider than the
actual width and course.
. The displayed lines on the rear view
will appear slightly off to the right
because the rearview camera is not
installed in the rear center of the
vehicle.
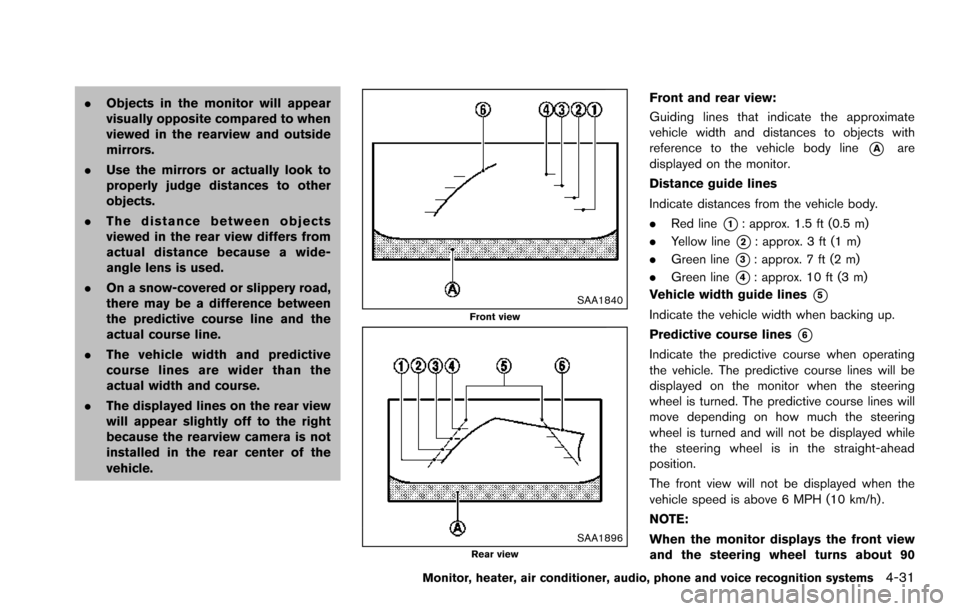
SAA1840Front view
SAA1896Rear view
Front and rear view:
Guiding lines that indicate the approximate
vehicle width and distances to objects with
reference to the vehicle body line
*Aare
displayed on the monitor.
Distance guide lines
Indicate distances from the vehicle body.
. Red line
*1: approx. 1.5 ft (0.5 m)
. Yellow line
*2: approx. 3 ft (1 m)
. Green line
*3: approx. 7 ft (2 m)
. Green line
*4: approx. 10 ft (3 m)
Vehicle width guide lines
*5
Indicate the vehicle width when backing up.
Predictive course lines
*6
Indicate the predictive course when operating
the vehicle. The predictive course lines will be
displayed on the monitor when the steering
wheel is turned. The predictive course lines will
move depending on how much the steering
wheel is turned and will not be displayed while
the steering wheel is in the straight-ahead
position.
The front view will not be displayed when the
vehicle speed is above 6 MPH (10 km/h) .
NOTE:
When the monitor displays the front view
and the steering wheel turns about 90
Monitor, heater, air conditioner, audio, phone and voice recognition systems4-31
Page 239 of 614
4-42Monitor, heater, air conditioner, audio, phone and voice recognition systems
WARNING
Failure to follow the warnings and
instructions for proper use of the sonar
function as outlined in this section
could result in serious injury or death.
.The sonar is a convenience feature.
It is not a substitute for proper
parking.
. This function is designed as an aid
to the driver in detecting large
stationary objects to help avoid
damaging the vehicle.
. The driver is always responsible for
safety during parking and other
maneuvers.
. Always look around and check that
it is safe to move before parking.
. Read and understand the limita-
tions of the sonar as contained in
this section.
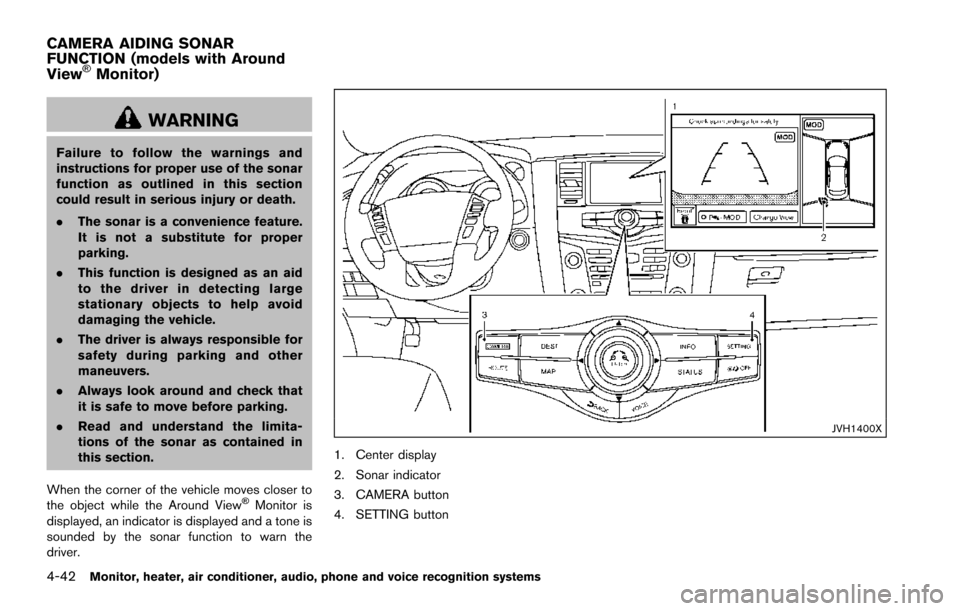
When the corner of the vehicle moves closer to
the object while the Around View
�ŠMonitor is
displayed, an indicator is displayed and a tone is
sounded by the sonar function to warn the
driver.
JVH1400X
1. Center display
2. Sonar indicator
3. CAMERA button
4. SETTING button
CAMERA AIDING SONAR
FUNCTION (models with Around
View
�ŠMonitor)
Page 240 of 614
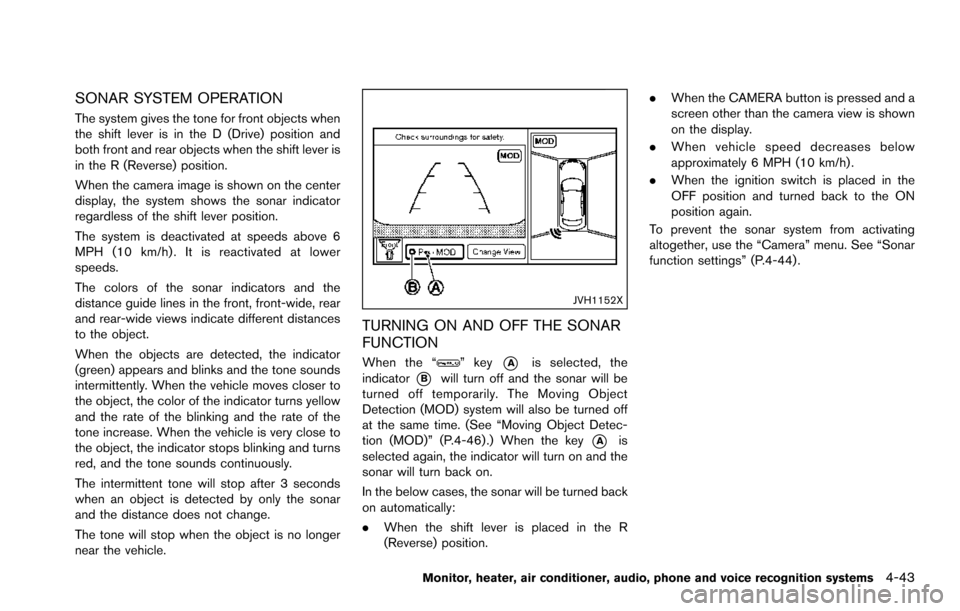
SONAR SYSTEM OPERATION
The system gives the tone for front objects when
the shift lever is in the D (Drive) position and
both front and rear objects when the shift lever is
in the R (Reverse) position.
When the camera image is shown on the center
display, the system shows the sonar indicator
regardless of the shift lever position.
The system is deactivated at speeds above 6
MPH (10 km/h) . It is reactivated at lower
speeds.
The colors of the sonar indicators and the
distance guide lines in the front, front-wide, rear
and rear-wide views indicate different distances
to the object.
When the objects are detected, the indicator
(green) appears and blinks and the tone sounds
intermittently. When the vehicle moves closer to
the object, the color of the indicator turns yellow
and the rate of the blinking and the rate of the
tone increase. When the vehicle is very close to
the object, the indicator stops blinking and turns
red, and the tone sounds continuously.
The intermittent tone will stop after 3 seconds
when an object is detected by only the sonar
and the distance does not change.
The tone will stop when the object is no longer
near the vehicle.
JVH1152X
TURNING ON AND OFF THE SONAR
FUNCTION
When the “” key*Ais selected, the
indicator
*Bwill turn off and the sonar will be
turned off temporarily. The Moving Object
Detection (MOD) system will also be turned off
at the same time. (See “Moving Object Detec-
tion (MOD)” (P.4-46) .) When the key
*Ais
selected again, the indicator will turn on and the
sonar will turn back on.
In the below cases, the sonar will be turned back
on automatically:
. When the shift lever is placed in the R
(Reverse) position. .
When the CAMERA button is pressed and a
screen other than the camera view is shown
on the display.
. When vehicle speed decreases below
approximately 6 MPH (10 km/h) .
. When the ignition switch is placed in the
OFF position and turned back to the ON
position again.
To prevent the sonar system from activating
altogether, use the “Camera” menu. See “Sonar
function settings” (P.4-44) .
Monitor, heater, air conditioner, audio, phone and voice recognition systems4-43
Page 241 of 614
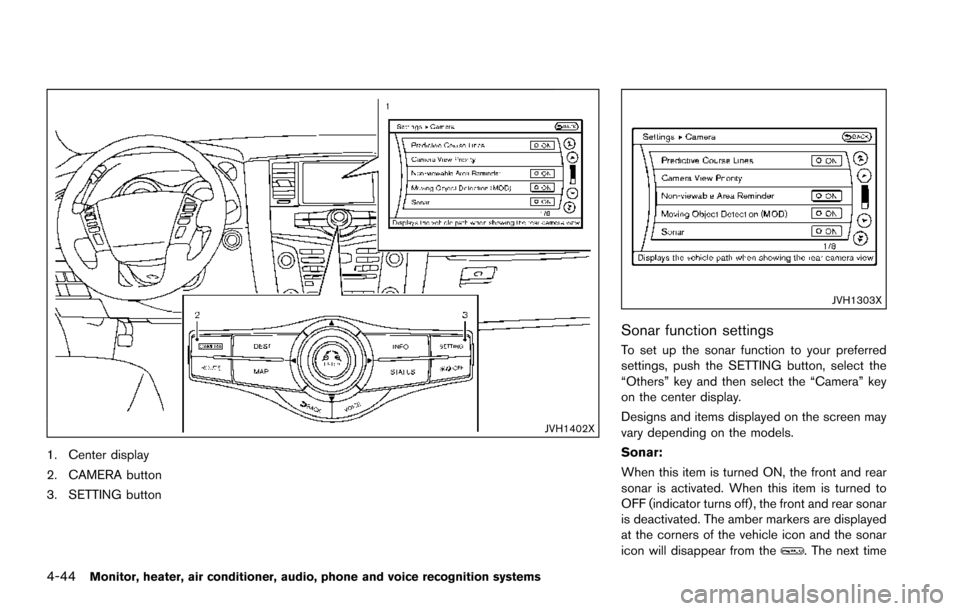
4-44Monitor, heater, air conditioner, audio, phone and voice recognition systems
JVH1402X
1. Center display
2. CAMERA button
3. SETTING button
JVH1303X
Sonar function settings
To set up the sonar function to your preferred
settings, push the SETTING button, select the
“Others” key and then select the “Camera” key
on the center display.
Designs and items displayed on the screen may
vary depending on the models.
Sonar:
When this item is turned ON, the front and rear
sonar is activated. When this item is turned to
OFF (indicator turns off) , the front and rear sonar
is deactivated. The amber markers are displayed
at the corners of the vehicle icon and the sonar
icon will disappear from the
. The next time
Page 246 of 614
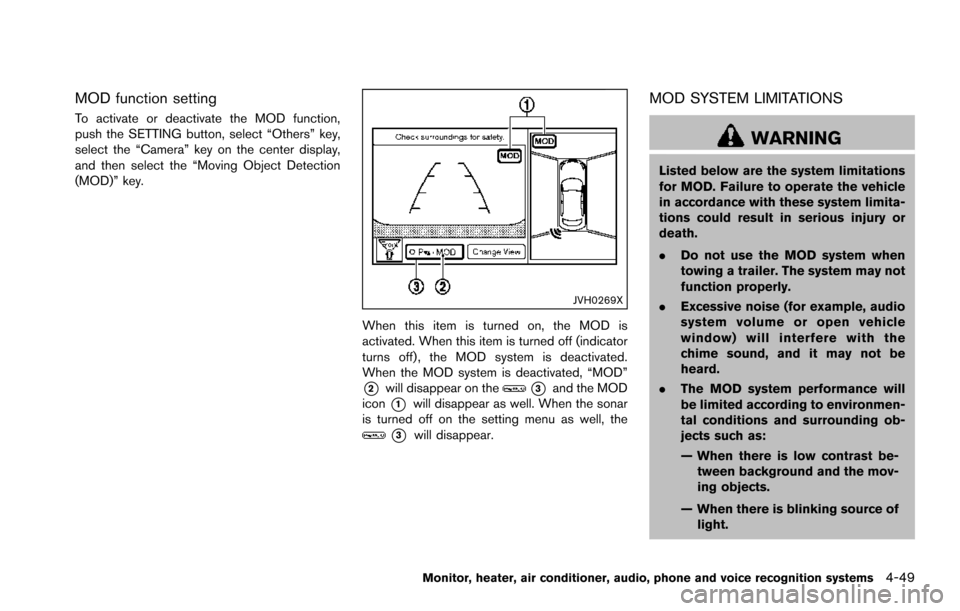
MOD function setting
To activate or deactivate the MOD function,
push the SETTING button, select “Others” key,
select the “Camera” key on the center display,
and then select the “Moving Object Detection
(MOD)” key.
JVH0269X
When this item is turned on, the MOD is
activated. When this item is turned off (indicator
turns off) , the MOD system is deactivated.
When the MOD system is deactivated, “MOD”
*2will disappear on the*3and the MOD
icon
*1will disappear as well. When the sonar
is turned off on the setting menu as well, the
*3will disappear.
MOD SYSTEM LIMITATIONS
WARNING
Listed below are the system limitations
for MOD. Failure to operate the vehicle
in accordance with these system limita-
tions could result in serious injury or
death.
. Do not use the MOD system when
towing a trailer. The system may not
function properly.
. Excessive noise (for example, audio
system volume or open vehicle
window) will interfere with the
chime sound, and it may not be
heard.
. The MOD system performance will
be limited according to environmen-
tal conditions and surrounding ob-
jects such as:
— When there is low contrast be-
tween background and the mov-
ing objects.
— When there is blinking source of light.
Monitor, heater, air conditioner, audio, phone and voice recognition systems4-49
Page 253 of 614
4-56Monitor, heater, air conditioner, audio, phone and voice recognition systems
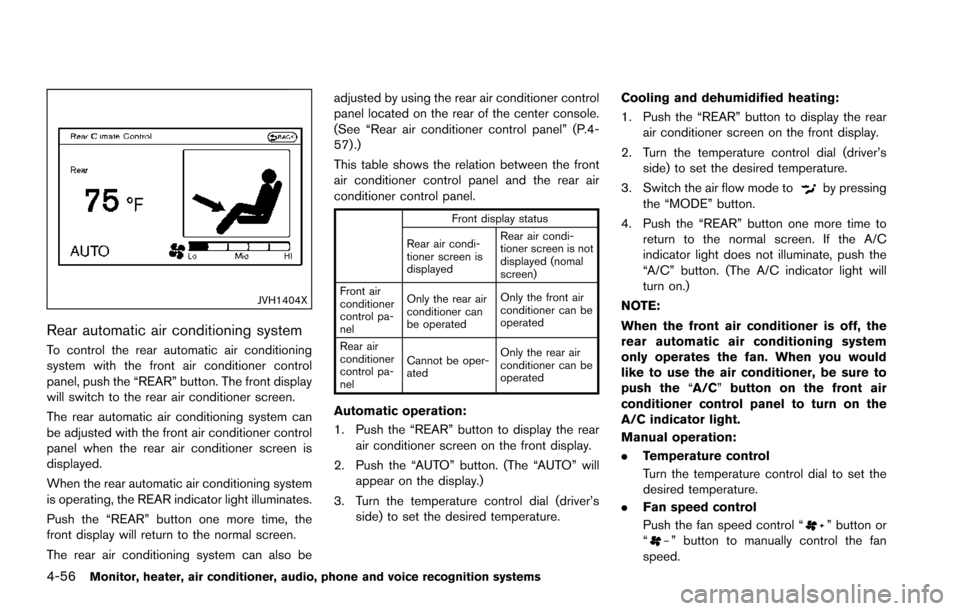
JVH1404X
Rear automatic air conditioning system
To control the rear automatic air conditioning
system with the front air conditioner control
panel, push the “REAR” button. The front display
will switch to the rear air conditioner screen.
The rear automatic air conditioning system can
be adjusted with the front air conditioner control
panel when the rear air conditioner screen is
displayed.
When the rear automatic air conditioning system
is operating, the REAR indicator light illuminates.
Push the “REAR” button one more time, the
front display will return to the normal screen.
The rear air conditioning system can also beadjusted by using the rear air conditioner control
panel located on the rear of the center console.
(See “Rear air conditioner control panel” (P.4-
57) .)
This table shows the relation between the front
air conditioner control panel and the rear air
conditioner control panel.
Front display status
Rear air condi-
tioner screen is
displayed Rear air condi-
tioner screen is not
displayed (nomal
screen)
Front air
conditioner
control pa-
nel Only the rear air
conditioner can
be operated
Only the front air
conditioner can be
operated
Rear air
conditioner
control pa-
nel Cannot be oper-
ated
Only the rear air
conditioner can be
operated
Automatic operation:
1. Push the “REAR” button to display the rear
air conditioner screen on the front display.
2. Push the “AUTO” button. (The “AUTO” will appear on the display.)
3. Turn the temperature control dial (driver’s side) to set the desired temperature. Cooling and dehumidified heating:
1. Push the “REAR” button to display the rear
air conditioner screen on the front display.
2. Turn the temperature control dial (driver’s side) to set the desired temperature.
3. Switch the air flow mode to
by pressing
the “MODE” button.
4. Push the “REAR” button one more time to return to the normal screen. If the A/C
indicator light does not illuminate, push the
“A/C” button. (The A/C indicator light will
turn on.)
NOTE:
When the front air conditioner is off, the
rear automatic air conditioning system
only operates the fan. When you would
like to use the air conditioner, be sure to
push the “A/C” button on the front air
conditioner control panel to turn on the
A/C indicator light.
Manual operation:
. Temperature control
Turn the temperature control dial to set the
desired temperature.
. Fan speed control
Push the fan speed control “
” button or
“” button to manually control the fan
speed.