Page 437 of 614

5-96Starting and driving
JVS0891X
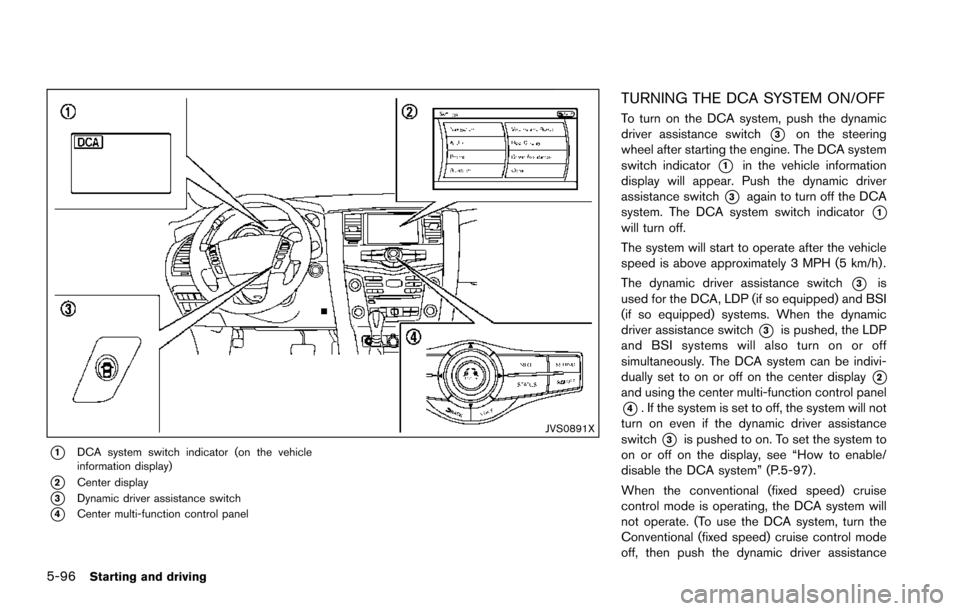
*1DCA system switch indicator (on the vehicle
information display)
*2Center display
*3Dynamic driver assistance switch
*4Center multi-function control panel
TURNING THE DCA SYSTEM ON/OFF
To turn on the DCA system, push the dynamic
driver assistance switch
*3on the steering
wheel after starting the engine. The DCA system
switch indicator
*1in the vehicle information
display will appear. Push the dynamic driver
assistance switch
*3again to turn off the DCA
system. The DCA system switch indicator
*1will turn off.
The system will start to operate after the vehicle
speed is above approximately 3 MPH (5 km/h) .
The dynamic driver assistance switch
*3is
used for the DCA, LDP (if so equipped) and BSI
(if so equipped) systems. When the dynamic
driver assistance switch
*3is pushed, the LDP
and BSI systems will also turn on or off
simultaneously. The DCA system can be indivi-
dually set to on or off on the center display
*2and using the center multi-function control panel
*4. If the system is set to off, the system will not
turn on even if the dynamic driver assistance
switch
*3is pushed to on. To set the system to
on or off on the display, see “How to enable/
disable the DCA system” (P.5-97) .
When the conventional (fixed speed) cruise
control mode is operating, the DCA system will
not operate. (To use the DCA system, turn the
Conventional (fixed speed) cruise control mode
off, then push the dynamic driver assistance
Page 447 of 614
5-106Starting and driving
JVS0913X
The FEB system uses a sensor*Alocated
below the front bumper to measure the distance
to the vehicle ahead in the traveling lane.
JVS0893X
*1Indicators and warnings (on the vehicle informa-
tion display)
*2Center display
*3FEB system warning light (on the instrument
panel)
*4Center multi-function control panel
Page 449 of 614
5-108Starting and driving
JVS0894X
*1FEB system warning light (on the instrument
panel)
*2Center display
*3Center multi-function control panel
*ASETTING button
*BENTER button
Perform the following steps to turn the FEB
system on or off.
SSD1102
TURNING THE FEB SYSTEM ON/OFF
1. Push the SETTING button*Aand highlight
the “Driver Assistance” key on the display
using the multi-function controller. Then
push the ENTER button
*B.
Page 454 of 614
JVS0895X
*1Vehicle ahead detection indicator (on the vehicle
information display)
*2Center display
*3FEB system warning light (on the instrument
panel)
*4Center multi-function control panel
Starting and driving5-113
Page 456 of 614
JVS0894X
*1FEB system warning light (on the instrument
panel)
*2Center display
*3Center multi-function control panel
*ASETTING button
*BENTER button
Perform the following steps to turn the PFCW
system on or off.
SSD1102
TURNING THE PFCW SYSTEM ON/
OFF
1. Push the SETTING button*Aand highlight
the “Driver Assistance” key on the display
using the multi-function controller. Then
push the ENTER button
*B.
Starting and driving5-115
Page 474 of 614

SSD0622
WARNING
.The sonar system is a convenience
but it is not a substitute for proper
parking. Always look around and
check that it is safe to do so before
parking. Always move slowly.
. Read and understand the limita-
tions of the sonar system as con-
tained in this section. Inclement
weather may affect the function of
the sonar system; this may include
reduced performance or a false
activation. .
This system is not designed to
prevent contact with small or mov-
ing objects.
. The system is designed as an aid to
the driver in detecting large station-
ary objects to help avoid damaging
the vehicle. The system will not
detect small objects below the
bumper, and may not detect objects
that are too close to the bumper or
on the ground.
. If your vehicle sustains damage to
the bumper fascia, leaving it mis-
aligned or bent, the sensing zone may be altered causing inaccurate
measurement of obstacles or false
alarms.
CAUTION
Keep the interior of the vehicle as quiet
as possible to hear the tone clearly.
The sonar system sounds a tone to warn the
driver of obstacles near the bumper. When the
“Sonar Display” key is ON, the sonar indicator
will also appear in the center display. (See
“Sonar indicator” (P.5-134) .) The system de-
tects front obstacles when the shift lever is in the
D (Drive) position or N (Neutral) position. The
system detects both front and rear obstacles
when the shift lever is in the R (Reverse)
position.
The system may not detect objects at speeds
above 6 MPH (10 km/h) and may not detect
certain angular or moving objects.
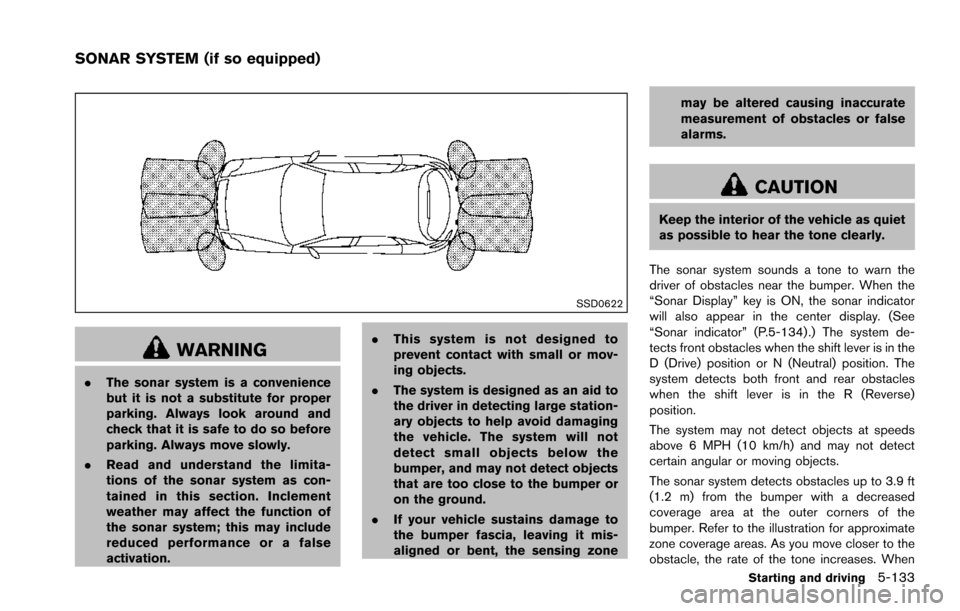
The sonar system detects obstacles up to 3.9 ft
(1.2 m) from the bumper with a decreased
coverage area at the outer corners of the
bumper. Refer to the illustration for approximate
zone coverage areas. As you move closer to the
obstacle, the rate of the tone increases. When
Starting and driving5-133
SONAR SYSTEM (if so equipped)
Page 475 of 614

5-134Starting and driving
the obstacle is less than 11.8 in (30 cm) away,
the tone will sound continuously.
Keep the corner/center sensors (located on the
bumper fascia) free from snow, ice and large
accumulations of dirt (do not clean the sensors
with sharp objects) . If the sensors are covered, it
will affect the accuracy of the sonar system.
The sensitivity level of the corner/center sensors
can be adjusted (higher or lower) in the Sonar
setting display. (See “Sonar settings” (P.4-27) .)
The intermittent tone will stop in 3 seconds
when an obstacle is detected by only the corner
sensor and the distance does not change.
JVS0897X
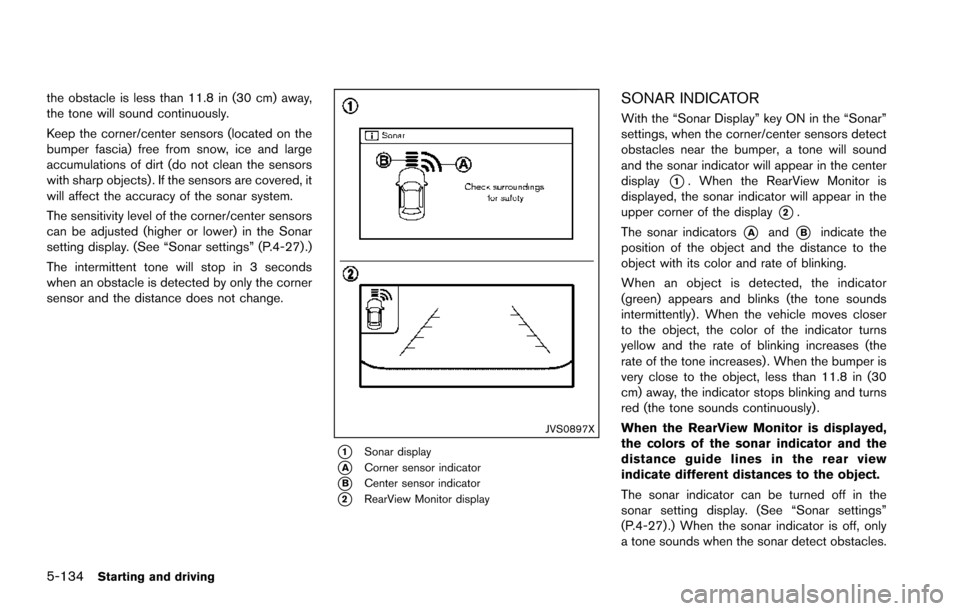
*1Sonar display
*ACorner sensor indicator
*BCenter sensor indicator
*2RearView Monitor display
SONAR INDICATOR
With the “Sonar Display” key ON in the “Sonar”
settings, when the corner/center sensors detect
obstacles near the bumper, a tone will sound
and the sonar indicator will appear in the center
display
*1. When the RearView Monitor is
displayed, the sonar indicator will appear in the
upper corner of the display
*2.
The sonar indicators
*Aand*Bindicate the
position of the object and the distance to the
object with its color and rate of blinking.
When an object is detected, the indicator
(green) appears and blinks (the tone sounds
intermittently) . When the vehicle moves closer
to the object, the color of the indicator turns
yellow and the rate of blinking increases (the
rate of the tone increases) . When the bumper is
very close to the object, less than 11.8 in (30
cm) away, the indicator stops blinking and turns
red (the tone sounds continuously) .
When the RearView Monitor is displayed,
the colors of the sonar indicator and the
distance guide lines in the rear view
indicate different distances to the object.
The sonar indicator can be turned off in the
sonar setting display. (See “Sonar settings”
(P.4-27) .) When the sonar indicator is off, only
a tone sounds when the sonar detect obstacles.
Page 494 of 614
COLD pressure:
After the vehicle has been parked
for three hours or more or driven
less than 1 mile (1.6 km) .
COLD tire pressures are shown on
the Tire and Loading Information
label affixed to the driver side center
pillar.
After adjusting tire pressure to the COLD tire
pressure, the display of the tire pressure
information may show higher pressure than the
COLD tire pressure after the vehicle has been
driven more than 1 mile (1.6 km). This is
because the tire pressurizes as the tire tem-
perature rises. This does not indicate a system
malfunction.
Stowing the damaged tire and tools
1. Securely store the damaged tire, jack and tools in the storage area.
2. Close the cargo floor cover.
3. Replace the cargo floor board.
4. Close the liftgate.
WARNING
Always make sure that the spare tire
and jacking equipment are properly
secured after use. Such items can
become dangerous projectiles in an
accident or sudden stop.
In case of emergency6-11