2017 MITSUBISHI OUTLANDER page 6
[x] Cancel search: page 6Page 292 of 521
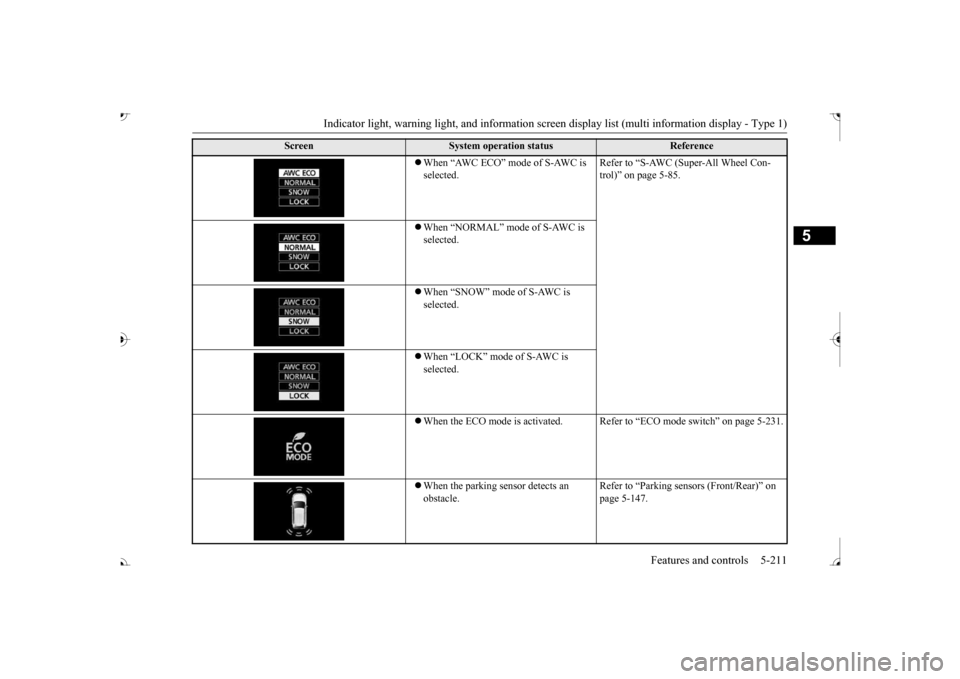
Indicator light, warning light, and information screen display list (multi information display - Type 1)
Features and controls 5-211
5
When “AWC ECO” mode of S-AWC is selected.
Refer to “S-AWC (Super-All Wheel Con- trol)” on page 5-85.
When “NORMAL” mode of S-AWC is selected. When “SNOW” mode of S-AWC is selected. When “LOCK” mode of S-AWC is selected. When the ECO mode is activated. Refer
to “ECO mode switch” on page 5-231.
When the parking se
nsor detects an
obstacle.
Refer to “Parking sens
ors (Front/Rear)” on
page 5-147.
Screen
System operation status
Reference
BK0239700US.book 211 ページ 2016年6月16日 木曜日 午前10時58分
Page 293 of 521
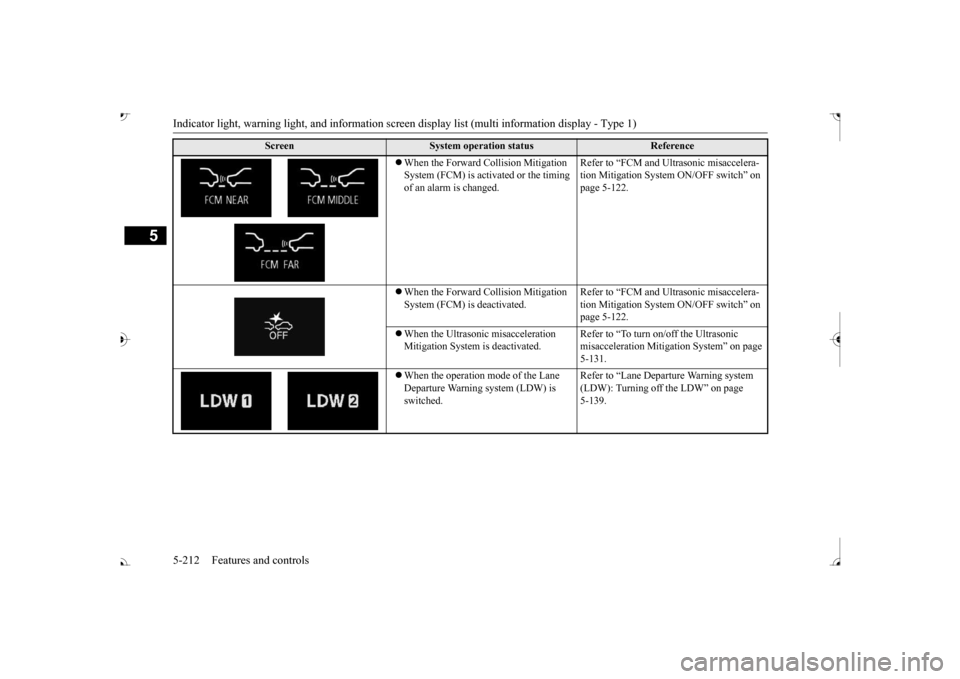
Indicator light, warning light, and information screen display list (multi information display - Type 1)
5
When the Forward Collision Mitigation System (FCM) is activated or the timing of an alarm is changed.
Refer to “FCM and Ultrasonic misaccelera- tion Mitigation System ON/OFF switch” on page 5-122.
When the Forward Collision Mitigation System (FCM) is
deactivated.
Refer to “FCM and Ultrasonic misaccelera- tion Mitigation System ON/OFF switch” on page 5-122.
When the Ultrasonic misacceleration Mitigation System
is deactivated.
Refer to “To turn on/off the Ultrasonic misacceleration Mitiga
tion System” on page
5-131.
When the operation mode of the Lane Departure Warning system (LDW) is switched.
Refer to “Lane Depart
ure Warning system
(LDW): Turning off
the LDW” on page
5-139.
Screen
System operation status
Reference
BK0239700US.book 212 ページ 2016年6月16日 木曜日 午前10時58分
Page 294 of 521

Indicator light, warning light, and information screen display list (multi information display - Type 1)
Features and controls 5-213
5
This informs you that a periodic inspection is due. The rest time can be set.
Screen
Do this
Have an inspection made by an authorized Mi
tsubishi Motors dealer
. For further details,
refer to “Service remin
der” on page 5-173.
Screen
Do this
Park the vehicle in a safe place, turn off the engine, and take a rest. Use this display as rough guide fo
r taking rests during a long drive.
The interval from the start of your trip un
til this message is
displayed can be set.
Refer to “Changing the func
tion settings” on page 5-177.
The display and buzzer alert the driver when the
set time is reached. If
you continue to drive
without having a rest
, the buzzer sounds about every 5 mi
nutes to encourage you to take a
rest. In the following cases, the time driven is re
set and the display returns to the previous
display screen. After this, when the set time
is reached again, the display and buzzer
encourage you to take a rest. • The buzzer
sounds 3 times.
• The ignition switch is turn
ed to the “OFF” or “LOCK”
position or the
operation mode
is put in OFF. • The multi information disp
lay switch is held (for
about 2 seconds or more).
BK0239700US.book 213 ページ 2016年6月16日 木曜日 午前10時58分
Page 295 of 521
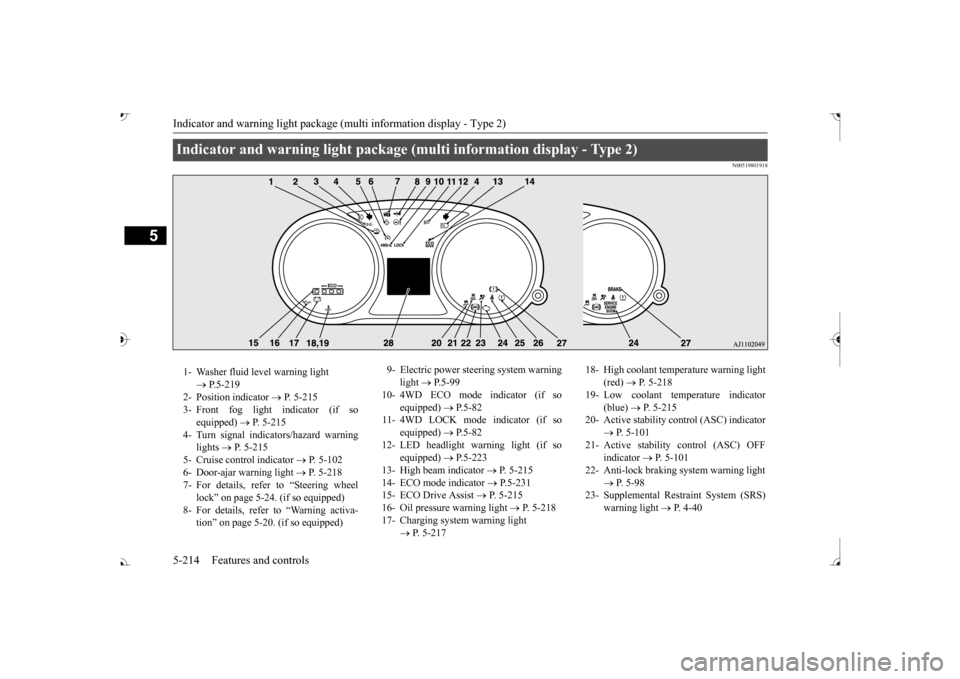
Indicator and warning light package (multi information display - Type 2) 5-214 Features and controls
5
N00519801918
Indicator and warning light package (multi information display - Type 2) 1- Washer fluid level warning light
P.5-219
2- Position indicator
P. 5-215
3- Front fog light indicator (if so
equipped)
P. 5-215
4- Turn signal indicators/hazard warning
lights
P. 5-215
5- Cruise control indicator
P. 5-102
6- Door-ajar warning light
P. 5-218
7- For details, refer to “Steering wheel
lock” on page 5-24. (if so equipped)
8- For details, refer
to “Warning activa-
tion
Page 300 of 521
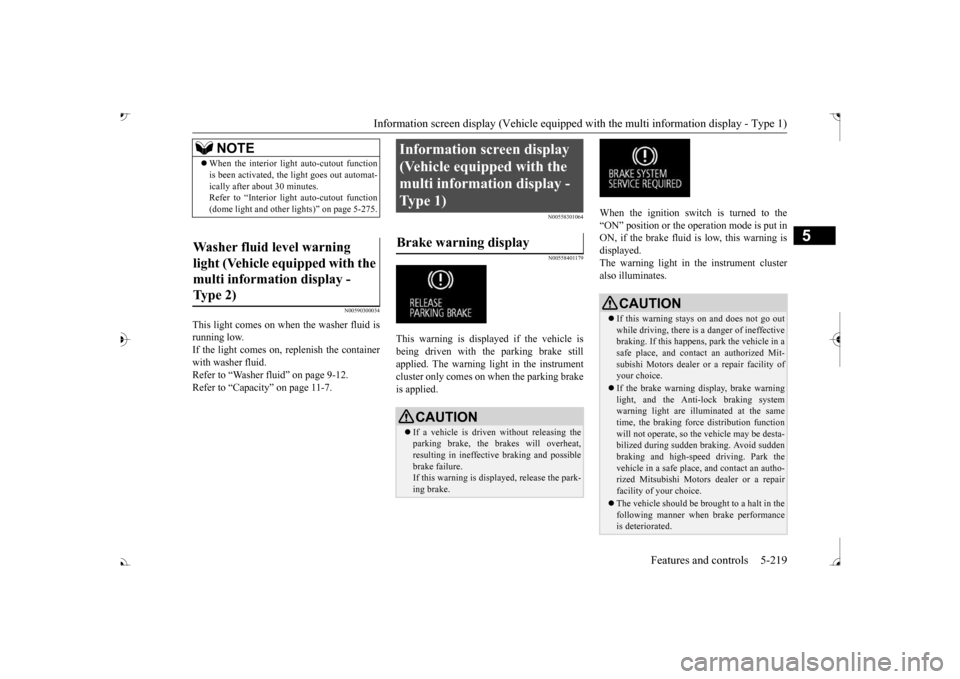
Information screen display (Vehicle equipped with the multi information display - Type 1)
Features and controls 5-219
5
N00590300034
This light comes on when the washer fluid is running low.If the light comes on, replenish the container with washer fluid. Refer to “Washer fluid” on page 9-12.Refer to “Capacity” on page 11-7.
N00558301064 N00558401179
This warning is displayed if the vehicle is being driven with the parking brake stillapplied. The warning light in the instrument cluster only comes on when the parking brake is applied.
When the ignition switch is turned to the “ON” position or the operation mode is put inON, if the brake fluid is low, this warning is displayed. The warning light in the instrument cluster also illuminates.
NOTE
When the interior light
auto-cutout function
is been activated, th
e light goes out automat-
ically after about 30 minutes.Refer to “Interior light
auto-cutout function
(dome light and other
lights)” on page 5-275.
Washer fluid level warning light (Vehicle equipped with the multi information display - Type 2)
Information screen display (Vehicle equipped with the multi information display - Type 1) Brake warning display
CAUTION If a vehicle is driven
without releasing the
parking brake, the brakes will overheat, resulting in ineffectiv
e braking and possible
brake failure. If this warning is displayed, release the park- ing brake.
CAUTION If this warning stays on and does not go out while driving, there is
a danger of ineffective
braking. If this happens, park the vehicle in a safe place, and contac
t an authorized Mit-
subishi Motors dealer or
a repair facility of
your choice. If the brake warning display, brake warning light, and the Anti-lock braking system warning light are illuminated at the same time, the braking forc
e distribution function
will not operate, so the
vehicle may be desta-
bilized during sudden braking. Avoid sudden braking and high-speed driving. Park thevehicle in a safe place, and contact an autho- rized Mitsubishi Motors dealer or a repair facility of your choice. The vehicle should be br
ought to a halt in the
following manner when
brake performance
is deteriorated.
BK0239700US.book 219 ページ 2016年6月16日 木曜日 午前10時58分
Page 305 of 521

Combination headlights and dimmer switch 5-224 Features and controls
5
light in the instrument cluster indicates when the headlights are on high beam.
N00550001209
You can flash the high beams by pulling the lever gently toward you (2). The lights will go back to normal when you let go. While thehigh beam is on, you will
see a blue light on
the instrument panel.
N00591300028
The automatic high beam system turns the high beam light on
or off automatically
according to surrounding light conditions. The sensor (A) detects lights, such as thelights of an oncoming vehicle, a vehicle ahead or street lights.
N00593600038
1. Rotate the light switch to “ ” position or “AUTO” position when the engine isrunning. 2. Press the automatic high beam system switch. The automatic high beam system is acti-vated and the indicator is illuminated. If the automatic high beam system switch is pressed again, the automatic high beamsystem will be deactivated and automatic high beam system indicator will go off.
Headlight flasher
NOTE
You can flash the high beams by pulling the lever toward you, even if the light switch isoff.
If you turn the lights off with the head lights set to high-beam illumi
nation, the headlights
are automatically returned to their low-beamsetting when the light
switch is next turned
to the “ ” position.
Automatic high beam system
(if
so equipped)
WA R N I N G Do not rely solely on the Automatic High Beam. Always observe
surrounding traffic
and light conditions. If necessary, manu-ally turn the high beams on or off. Refer to “Dimmer (high/low beam change)” on page 5-223.
How to use the automatic high beam system
NOTE
If the headlights are on when the light switch is in the “AUTO” position, the automatic high beam system works.
BK0239700US.book 224 ページ 2016年6月16日 木曜日 午前10時58分
Page 306 of 521
Combination headlights and dimmer switch
Features and controls 5-225
5
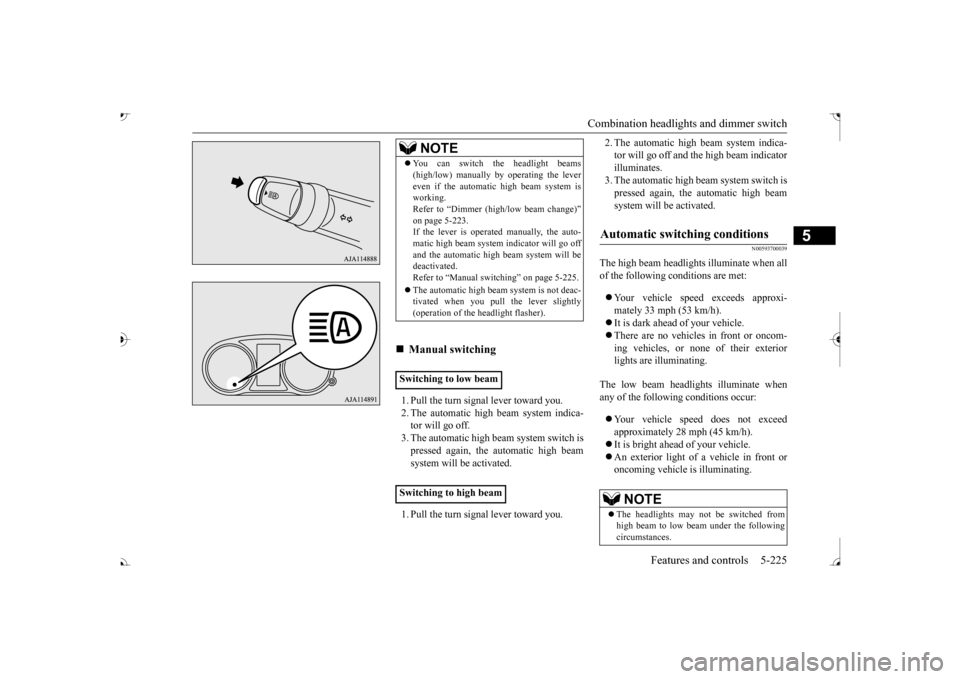
1. Pull the turn signal lever toward you. 2. The automatic high beam system indica-tor will go off. 3. The automatic high beam system switch is pressed again, the
automatic high beam
system will be activated. 1. Pull the turn signal lever toward you.
2. The automatic high beam system indica- tor will go off and the high beam indicatorilluminates. 3. The automatic high beam system switch is pressed again, the
automatic high beam
system will be activated.
N00593700039
The high beam headlight
s illuminate when all
of the following
conditions are met:
Your vehicle speed exceeds approxi- mately 33 mph (53 km/h). It is dark ahead of your vehicle. There are no vehicles in front or oncom- ing vehicles, or none
of their exterior
lights are illuminating.
The low beam headlights illuminate when any of the followi
ng conditions occur:
Your vehicle speed does not exceed approximately 28 mph (45 km/h). It is bright ahead of your vehicle. An exterior light of a vehicle in front or oncoming vehicle is illuminating.
NOTE
You can switch the headlight beams (high/low) manually
by operating the lever
even if the automatic high beam system isworking. Refer to “Dimmer (high/low beam change)” on page 5-223.If the lever is operated manually, the auto- matic high beam system
indicator will go off
and the automatic high beam system will bedeactivated. Refer to “Manual swit
ching” on page 5-225.
The automatic high beam
system is not deac-
tivated when you pull
the lever slightly
(operation of the he
adlight flasher).
Manual switching
Switching to low beam Switching to high beam
Automatic switching conditions
NOTE
The headlights may not be switched from high beam to low beam under the following circumstances.
BK0239700US.book 225 ページ 2016年6月16日 木曜日 午前10時58分
Page 307 of 521

Combination headlights and dimmer switch 5-226 Features and controls
5
The sensitivity of the se
nsor can be temporar-
ily lowering in the following ways. 1. Park your vehicle in a safe place and the ignition switch is turned to the “OFF” or “LOCK” position or the operation mode is put in OFF.2. Press the automatic high beam system switch more than 15 times within 5 sec- onds after operation mode is turned on.
• A vehicle in front
or oncoming vehicle is
hindered by any object
such as continuous
bends, elevated median/i
sland, traffic signs,
roadside trees. • Your vehicle passes
an oncoming vehicle
suddenly on a bend with poor visibility. • Another vehicle crosse
s ahead of your vehi-
cle.
The headlights may remain at low beam (or be switched from high beam to low beam) when a reflective object (e.g. street light, traffic signal, noticeboard and signboard) Any of the following factors may influence the headlight beam switching timing: • How brightly the exteri
or lights of a vehicle
in front or oncoming
vehicle il
luminate.
• Movement or direction
of a vehicle in front
or oncoming vehicle. • Only right or left exte
rior light of a vehicle
in front or oncoming
vehicle is illuminat-
ing. • A vehicle in front or
oncoming vehicle is a
motorcycle. • Road conditions (gradient, bends and road surface). • The number of occupa
nts and luggage load.
The automatic high beam
system recognises
environmental conditi
ons by sensing a light
source ahead of your ve
hicle. Therefore, you
may feel like someth
ing is not quite right
when the headlight beams are switched auto- matically.NOTE
The system may not de
tect a light vehicle
such as a bicycle. The system may not detect an ambient brightness precisely. Th
is causes the traffic
to be dazzled by high beam or the low beamto be maintained. In such cases, you should switch the headli
ght beams manually.
• In bad weather (heavy
rain, fog, snow or
sandstorm). • The windshield is dirty or fogged up. • The windshield is cracked or broken.• The sensor is deformed or dirty. • A light, which is simila
r to the headlights or
tail lights, is shining around your vehicle. • A vehicle in front
or oncoming vehicle is
driven without lights, the exterior lights are dirty or discoloured, or the direction of theheadlight beams is adjusted improperly. • It becomes dark and bright suddenly and continuously around your vehicle. • Your vehicle is driven on uneven surfaces.• Your vehicle is driven on a winding road. • A reflective object such as a noticeboard or a mirror reflects a li
ght ahead of your vehi-
cle. • When lights of the vehicle in front or head- lights of an oncoming ve
hicle blend into the
other lights. • The rear end of a vehicle in front (such as a container truck) re
flect a strong light.
• Your vehicle's headlight
is broken or dirty.
NOTE
• Your vehicle is inclined due to a flat tire or towing. • The warning display appears. (Refer to “System
problem warning” on
page 5-227.)
Observe the precautions below to maintain good usage conditions: • Do not attempt to di
sassemble the sensor.
• Do not affix a sticker or label on the wind- shield near the sensor. • Avoid overload. • Do not modify your vehicle.• When the windshield is replaced, use the Mitsubishi Motors
genuine parts.
To adjust the sensitivity of the sensor
NOTE
BK0239700US.book 226 ページ 2016年6月16日 木曜日 午前10時58分