Page 265 of 294
,
should be checke datleast once amonth
when cold and inflated to th epressur erec-
ommended by th evehicl emanufacturer on")
Important safety notes
GWARNING
Eac htire, includin gthe spar e(if provided),
should be checke datleast once amonth
when cold and inflated to th epressur erec-
ommended by th evehicl emanufacturer on
th eT irea nd Loading Information placard on
th ed river' sdoor B-pillar or th etirep ressur e
label on th einside of th efuel filler flap .Ifyour
vehicl ehas tires of adifferen tsizet hant he
siz eindicated on th eTirea nd Loading Infor -
mation placard or th etirep ressur elabel, you
should determine th eproper tire pressur efor
those tires .
As an added safet yfeature, your vehicl ehas
been equipped wit hatirep ressur emonitoring
system (TPMS) that illuminate salow tire pres-
sur etelltale when on eormoreofy our tires
are significantly underinflated. Accordingly,
when th elow tire pressur etelltale illuminates,
you should stop and chec kyour tires as soo n
as possible ,and inflat ethemtot heproper
pressure. Drivin gonasignificantly underin-
flated tire causes th etiretoo verheat and can
lead to tire failure. Underinflation also
reduce sfuel efficiency and tire tread life ,and
may affec tthe vehicle's handlin gand stop-
pin gability.
Pleas enotet hatthe TPM Sisn otas ubstitut e
for proper tire maintenance ,and it is th edriv-
er' sre
sponsibilit ytom aintai ncorrect tire
pressure, eve nifunderinflation has no t
reached th elevel to trigge rillumination of th e
TPM Slow tire pressur etelltale.
Your vehicl ehas also been equipped wit ha
TPM Smalfunction indicator to indicat eifthe
system is no toperating properly. The TPM S
malfunction indicator is combined wit hthe
low tire pressur etelltale. When th esystem
detects amalfunction ,the warning lamp will
flas hfor approximately aminute and then
remain continuously illuminated. This
sequenc ewill be repeated every time th evehi-
cle is started as lon gasthemalfunction
exists.
When th emalfunction indicator is illuminated,
th es ystem may no tbeable to detec torsignal
low tire pressur easintended. TPM Smalfunc -
tion smay occur for avariet yofr easons,
includin gthe installation of incompatible
replacemen toralternate tires or wheels on
th ev ehicl ethatp reven tthe TPM Sfromf unc-
tioning properly. Always chec kthe TPM Smal-
function telltale after replacing on eormore
tires or wheels on your vehicl etoensuret hat
th er eplacemen toralternate tires and wheels
allow th eTPM Stoc ontinue to function prop-
erly.
It is th edriver' sresponsibilit ytos et th etire
pressur etothatrecommended for cold tires
whic hiss uitable for th eoperating situation
(
Ypage 258). Not etha tthe correc ttirep ressur e
for th ecurren toperating situation must first be
taught-in to th etirep ressur emonitor. If there is
as ubstantial loss of pressure, th ewarning
threshold for th ewarning message is aligned to
th er eferenc evalue staught-in .Restart th etire
pressur emonitor after adjusting th epressur eof
th ec oldt ires (
Ypage 264). The curren tpres-
sures are saved as ne wreferenc evalues. As a
result ,awarning message will appear if th etire
pressur edrops sign ifica
ntly.
The tire pressur emonitor does no twarn you of
an incorrectl yset tire pressure. Observ ethe
note sont herecommended tire pressur e
(
Ypage 258).
The tire pressur emonitor is no table to warn you
of as udde nloss of pressure, e.g. if th etirei s
penetrated by aforeign object. In th eevent of a
sudde nloss of pressure, brin gthe vehicl etoa
halt by braking carefully. Avoid abrup tsteering
movements.
The tire pressur emonitor has ayellow warning
lamp in th einstrumen tcluste rfor indicating
pressur eloss or amalfunction .Whether th e
warning lamp flashes or lights up indicates
whether atirep ressur eistoolow or th etire
pressur emonitor is malfunctioning :
Rif thewarning lamp is lit continuously, th etire
pressur eononeor mor etires is significantly
to ol ow. The tire pressur emonitor is no tmal-
functioning .
Rif thewarning lamp flashes for aroun da
minute and then remain slit constantly, th e
tire pressur emonitor is malfunctioning .
Tire pressure263
Wheels and tires
Z
Page 266 of 294
.
It may take up to ten minutes for amalfunction
of the tire pres")
In addition to the warning lamp,amessage
appears in the multifunction display. Observe
the information on display messages
(
Ypage 196).
It may take up to ten minutes for amalfunction
of the tire pressure monitor to be indicated .A
malfunction wil lbeindicated by the tire pres-
sure warning lamp flashing for approximately
one minute and then remaining lit. When the
malfunction has been rectified, the tire pressure
warning lamp goes out after afew minutes of
driving.
The tire pressure values indicated by the on-
board computer may differ from those meas-
ured at agas station with apressure gauge. The
tire pressures shown by the on-board computer
refer to those measured at sea level.Ath igh
altitudes, the tire pressure values indicated by a
pressure gauge are higher than those shown by the on-board computer. In this case, do not
reduce the tire pressures.
The operation of the tire pressure monitor can
be affected by interference from radi otransmit-
ting equipment (e.g. radi oheadphones, two-way
radios) that may be being operated in or near the vehicle.
Checking the tire pressure electroni-
cally
XMake sure that the SmartKey is in position 2
in the ignition lock (Ypage 115).
XPress the =or; button on the steering
wheel to select the Serv.menu.
XPress the9or: button to select
Tire Pressure.
XPress the abutton.
The current tire pressure of each tire is shown
in the multifunction display.
If the vehicle has been parked for over
20 minutes, the Tire pressure will be
displayed after driving afew minutesmessag eappears.
After ateach-in process, the tire pressure mon-
itor automatically detects new wheelsorn ew
sensors. As long as aclear allocation of the tire
pressure valu etothe individual wheel sisnot
possible, the Tire
PressureMonitorActivedisplay messag eisshown instead of the tire
pressure display. The tire pressures are already
being monitored.
If an emergency spare wheel is mounted, the
system may continue to show the tire pressure of the wheel that has been removed for
afew
minutes. If this occurs, note that the valu edis-
played for the positionw here the spare wheel is
mounted is not the same as the current tire
pressure of the emergency spare wheel.
Tire pressure monitor warning mes-
sages
If the tire pressure monitor detects apressure
loss in one or more tires, awarning messag eis
shown in the multifunction display. The yellow
tire pressure warning lamp then lights up.
RIf the Please Correct Tire Pressuremessag eappears in the multifunction display,
the tire pressure in at least one tire is too low.
The tire pressure must be corrected when the
opportunity arises.
RIf the Check Tiresmessag eappears in the
multifunction display, the tire pressure in at
least one tire has droppeds ignificantly. The
tires must be checked.
RIf the WarningTireMalfunctionmessage
appears in the multifunction display, the tire
pressure in at least one tire has droppeds ud-
denly.T he tires must be checked.
Observe the instructions and safety notes in the
display messages in the "Tires" section
(
Ypage 196).
If the wheel positions on the vehicle are rotated,
the tire pressures may be displaye dfor the
wrong positions for ashort time. This is rectified
after afew minutes of driving, and the tire pres-
sures are displaye dfor the correct positions.
Restarting the tire pressure monitor
When you restart the tire pressure monitor, all
existing warning messages are deleted and the
warning lamp sgoout. The monitor uses the cur-
rently set tire pressures as the reference values for monitoring. In most cases, the tire pressure
monitor wil lautomatically detect the new refer-
ence values after you have changed the tire
pressure. However, you can also define refer-
ence values manually as describedh ere. The tire
pressure monitor then monitors the new tire
pressure values.
XSet the tire pressure to the valu erecommen-
ded for the corresponding driving situation on
the Tire and Loading Information placard on
the driver's side B-pillar(
Ypage 258).
264Tire pressure
Wheelsa nd tires
Page 267 of 294
.
XMake sure thatt he tire pressure is correct on
al lf")
Additionaltire pressure values for different
load scan also be found on the tire pressure
table on the insid eofthe fuel fille rflap
(
Ypage 258).
XMake sure thatt he tire pressure is correct on
al lf ou rw heels.
XMake sure thatt he SmartKeyisinp osition2
in the ignition lock.
XPress the =or; button on the steering
whee ltoselect the Serv.menu.
XPress the 9or: button to select
Tir ePressure.
XPress the abutton.
The multifunctio ndisplay shows the current
tire pressure for the individual tire sorthe
Tir epressure wil lbedisplayed
after drivin gafew minutesmessage.
XPress the :button.
The UseCurrentPressuresasNewRef‐erenceValuesmessage appear sinthe mul-
tifunctio ndisplay.
If youw ishtoc onfirm the restart:
XPress the abutton.
The TirePress.MonitorRestartedmes-
sage appear sinthe multifunctio ndisplay.
After driving for afew minutes, the system
checks whethe rthe current tire pressures are
withint he specified range.T he new tire pres-
sures ar ethen accepte dasreference values
and monitored.
If youw ishtoc ancelthe restart:
XPress the %button.
The tire pressure values stored at the last
restart will continue to be monitored.
Radio type approval fort he tire pres-
sure monitor
CountryRadio type approval number
USAFCC ID: MRXMW2433A
FCC ID: MRXGG4
FCC ID: MRXMC34MA4
CanadaIC:2 546A-MW2433A
IC:2 546A-GG4
IC:2 546A-MC34MA4
Loadin gthe vehicle
Instructio nlabel sfor tiresa nd loads
GWARNING
Overloaded tire scan overheat, causing a
blowout. Overloaded tire scan also impai rthe
steering and driving characteristics and lead
to brake failure. There is ariskofa ccident.
Observ ethe load rating of the tires. The load
rating must be at leas thalfoft he GAW Rof
your vehicle. Never overload the tire sby
exceeding the maximu mload.
Twoi nstructio nlabel sony ourvehicl eshowt he
maximu mpossibl eload.
(1) The Tire and Loading Informatio nplacard is
on the B-pillar on the driver's side .The Tire
and Loading Informatio nplacard shows the
maximu mpermissibl enumbe rofoccu-
pants and the maximu mpermissibl evehicle
load .Italsoc ontains details of the tire sizes
and corresponding pressures for tires
mounted at the factory.
(2) The vehicl eide ntificatio nplate is on the
B-pillar on the driver's side .The vehicle
identificatio nplate informs yo uofthe gross
vehicl eweigh trating .Iti smadeupoft he
vehicl eweigh t, allvehicl eoccupants, the
fuel and the cargo. Yo ucan also find infor-
matio nabout the maximu mgross axle
weight rating on the front and rea raxle.
The maximu mgross axl eweigh trating is
the maximu mweigh tthatc an be carrie dby
one axl e(
fro
nt or rea raxle) .Never exceed
the maximu mloadort he maximu mgross
axl ew eigh trating for the front or rea raxle.
:B-pillar, driver's side
Loadin gthe vehicle265
Wheel sand tires
Z
Page 268 of 294

Maximum permissible gross vehicle
weight rating
XSpecification for maximumgross vehicle
weight :is listed in the Tire and Loading
Informatio nplacard: "The combined weight of
occupants and cargo should never exceed
XXX kilograms or XXX lbs."
The gross weight of all vehicleo ccupants, load
and luggage must not exceed the specified
value.
iThe specifications shownont he Tire and
Loading Informatio nplacard in the illustration
are examples. The maximu mpermissible
gross vehiclew eight rating is vehicle-specific
and may diffe rfrom that in the illustration.
You can find the vali dmaximu mpermissible
gross vehiclew eight rating for you rvehicl eon
the Tire and Loading Informatio nplacard.
Number of seats
Maximu mnumber of seats :indicates the
maximu mnumber of occupants allowe dto
travel in the vehicle. This information can be
found on the Tire and Loading Informatio nplac-
ard.
iThe specifications shownont he Tire and
Loading Informatio nplacard in the illustration
are examples. The number of seats is vehicle-
specific and can diffe rfrom the details shown.
The number of seats in you rvehicl ecan be
found on the Tire and Loading Information
placard.
Determinin gthe correct load limit
Step-by-ste pinstructions
The following steps have been developed as
required of all manufacturers under Title 49,
Cod eofU .S. FederalR egulations, Part 575 pur-
suant to the "National Traffi cand Motor Vehicle
Safety Act of 1966".
XStep 1: Locate the statement "The combined
weight of occupants and cargo should never
exceed XXX kg or XXX lbs." on you rvehicle’s
Tire and Loading Informatio nplacard.
XStep 2: Determine the combined weight of
the drivera nd passengers that wil lberiding in
you rvehicle.
XStep 3: Subtract the combined weight of the
drive rand passengers from XXX kilograms or
XXX lbs.
XStep 4: The resulting figure equals the avail-
abl eamount of cargo and luggage loa dcapa-
city. For example, if the "XXX "amount equals
1400 lbs and there wil lbefive 150-lb pas-
sengers in you rvehicle, the amount of avail-
abl ecargo and luggage loa dcapacity is
650 lbs (1400 -750 (5 x150) = 650 lbs).
XStep 5: Determine the combined weight of
luggage and cargo being loaded on the vehi-
cle. That weight may not safel yexceed the
available cargo and luggage loa dcapacity cal-
culated in step 4.
Example :steps 1to3
The following table showse xamples on how to
calculate total and cargo loa dcapacities with
varying seating configurations and number and
size of occupants. The following examples use a
loa dlimi tof1 500 lbs (680 kg). This is for illus-
tration purposes only. Make sure you are
using the actua lloadl imitfor you rvehicl estated
on you rvehicle's Tire and Loading Information
placard (
Ypag e265).
266Loading the vehicle
Wheels and tires
Page 269 of 294

The greater the combined weight of the occu-
pants, the lower the maximum luggage load.
Step 1
Example 1Example 2
Combined max-
imum weight of
occupants and
cargo (data
from the Tire
and Loading
Information
placard)1500 lbs
(680 kg)1500 lbs
(680 kg)
Step 2
Example 1Example 2
Number of peo-
ple in the vehi-
cle (driver and
occupants)12
Weight of the
occupantsOccu-
pant 1:
175 lbs
(80 kg)Occu-
pant 1:
175 lbs
(80 kg)
Occu-
pant 2:
195 lbs
(88 kg)
Gross weight
of all occupants175 lbs
(80 kg)370 lbs
(168 kg)
Step 3
Example 1Example 2
Permissible
load (maxi-
mum gross
vehicle weight
rating from the
Tire and Load-
ing Information
placardminus
the gross
weight of all
occupants)1500 lbs
(680 kg) Ò
175 lbs
(80 kg) =
1325 lbs
(600 kg)1500 lbs
(680 kg) Ò
370 lbs
(168 kg) =
1130 lbs
(512 kg)
Vehicle identification plate
Even if you have calculated the total cargo care-
fully, you should still make sure that the gross
vehicle weight rating and the gross axle weight
rating are not exceeded. Details can be found on
the vehicle identification plate on the B-pillar on
the driver's side of the vehicle (
Ypage 265).
Permissible gross vehicle weight: the gross
weight of the vehicle, all passengers and the
load must not exceed the permissible gross
vehicle weight.
Gross Axle Weight Rating (GAWR): the maxi-
mum permissible weight that can be carried by
one axle (front or rear axle).
To ensure that your vehicle does not exceed the
maximum permissible values (gross vehicle
weight and maximum gross axle weight rating),
have your loaded vehicle (including driver, occu-
pants and the load) weighed on asuitable vehi-
cle weighbridge.
All about wheels and tires
Uniform Tire Quality Grading Stand-
ards
Overview of Tire Quality Grading Stand-
ards
Uniform Tire Quality Grading Standards are U.S. government specifications. Their purpose is to
provide drivers with uniform reliable information
on tire performance data. Tire manufacturers
have to grade tires using three performance fac-
tors: :tread wear grade, ;traction grade and
= temperature grade. These regulations do not
apply to Canada. Nevertheless, all tires sold in
North Americaa re provided with the corre-
sponding quality grading markings on the side-
wall of the tire.
All about wheelsa nd tires267
Wheels and tires
Z
Page 270 of 294

Quality grades can be found,where applicable,
on the tire sidewall between tread shoulde rand
maximum sectio nwidth.
Example:
RTreadwear grade: 200
RTractiongrade: AA
RTemperature grade: A
All passengerc ar tires must conform to the stat-
utory safety requirements in additio ntothese
grades.
iThe actua lvalues for tires are vehicle-spe-
cific and may deviate from the values in the
illustration.
Treadwear
The treadwea rgrad eisac omparativ erating
based on the wea rrate of the tire whe ntested
unde rcontrolled conditions on aspecified U.S.
government course. For example, atire graded
150 would wea rone and one-half times as well
on the government test track as atire graded
100.
The relative performance of tires depends upon
the actua lconditions of their use ,however, and
may depart significantly from the norm duet o
variations in driving habits, service practices
and differences in road characteristics and cli-
mate.
Traction
GWARNING
The tractio ngrad eassigne dtothis tire is
based on straight-ahead braking traction
tests, and doesn ot include acceleration, cor-
nering, hydroplaning ,orpeaktractio nchar-
acteristics.
!Avoid wheelspin. Thisc an leadtodamage to
the driv etrain.
The tractio ngrades –from highest to lowest –
are AA, A, Band C. Thoseg rades represent the
tire's ability to stop on wet pavement as meas-
ure dunde rcontrolled conditions on specified
government test surfaces of asphal tand con-
crete. Atire marked Cmay have poort raction
performance.
The safe speedonaw et, snow coveredoricy
road is always lower than on dry road surfaces. You should pay speciala
ttentiontoroadc ondi-
tions whe ntemperatures are around freezing
point.
Mercedes-Benz recommends aminimum tread
depth of ãin (4 mm )onallfour winter tires.
Observe the legally required minimum tire tread
depth (
Ypag e256). Winter tires can reduce the
braking distance on snow-covered surfaces in
compariso nwiths ummer tires. The braking dis-
tance is stil lmuch furthe rthan on surfaces that
are not icy or coveredw iths now. Take appro-
priate care whe ndriving.
Temperature
GWARNING
The temperature grad efor this tire is estab-
lished for atire that is properly inflated and
not overloaded. Excessiv espeed, underinfla-
tion, or excessive loading ,eithe rseparately or
in combination, can cause excessive heat
build-up and possibl etire failure.
The temperature grades are A(the highest),B ,
and C, representing the tire's resistance to the
generation of heata nd its ability to dissipate
heatw hent ested unde rcontrolled conditions
on aspecified indoor laboratory test wheel. Sus-
taine dhight emperature can cause the material
of the tire to degenerate and reduce tire life, and
excessive temperature can lea dtosudden tire
failure. The grad eCcorresponds to aleve lof
performance which al lpassengerc ar tires must
meet unde rthe Federal Motor Vehicle Safety
Standard No. 109. Grades BandArepresent
higher levels of performance on the laboratory
test wheel than the minimum required by law.
268Al la bout wheelsa nd tires
Wheels and tires
Page 271 of 294

;DOT, Tire Identification Number
(Ypage 271)
=Maximum tire load (Ypage 271)
?Maximum tire pressure (Ypage 261)
AManufacturer
B")
Tire labeling
Overview
:Unifor mTireQ ualit yGradin gStandard
(Ypage 272)
;DOT, Tire Identification Number
(Ypage 271)
=Maximum tire load (Ypage 271)
?Maximum tire pressure (Ypage 261)
AManufacturer
BTire material (Ypage 272)
CTire size designation, load-bearing capacity
and spee drating (Ypage 269)
DLoa dindex (Ypage 271)
ETire name
The markings describe dabove ar eont he tire in
additio ntothe tire nam e(sales designation) and
the manufacturer's name.
iTire data is vehicle-specific and mayd eviate
fromt he data in the example.
Tire size designation ,loa d-bearing
capacity and speed rating
GWARNING
Exceeding the stated tire load-bearing capa-
city and the approved maximum spee dcould
lead to tire damage or the tire bursting. There is ar iskofa ccident.
Therefore ,onlyu setire types and sizes
approved for your vehicl emodel .Observe the
tire load rating and spee drating required for
your vehicle.
:Tire width
;Nomina laspec tratio in %
=Tire code
?Rimd iame ter
ALoadbeari ng index
BSpeed rating
General: depending on the manufacturer's
standards ,the size imprinted in the tire wall may
not contain any letters or mayc ontain one letter
thatp recedes the size description.
If there is no letter preceding the size descrip-
tio n(as shown above): these ar epassenger
vehicl etiresa ccording to Europea nmanufac-
turing standards.
If "P "precedes the size description: these are
passenge rvehicl etiresa ccording to U.S. man-
ufacturin gstandards.
If "LT" precedes the size description: these are
light truck tire saccording to U.S. manufacturing
standards.
If "T "precedes the size description: compact
emergency wheels with high tire pressure that
ar eo nlyd esig nedf or temporary us einanemer-
gency.
Tire width: tire width:shows the nominal tire
width in millimeters.
Height-width ratio: aspect ratio;is the size
ratio between the tire height and tire width and
is shown in percent. The aspect ratio is calcula-
ted by dividing the tire width by the tire height.
Tire code: tire code=specifie sthe tire type.
"R "r epresents radial tires; "D" represents diag-
ona ltire s; "
B" represents diagona
lradial tires.
Optionally ,tire sw itham aximum spee dofover
149 mph (24 0km/h )mayhave "ZR" in the size
Alla bout wheels an dtires269
Wheel sand tires
Z
Page 272 of 294
.
Rim diameter: rim diameter?is the diameter
of the bead seat, not the diameter of the rim
flange. The rim diameter is specified in
inches (")
description, dependingonthe manufacturer
(e.g. 245/40 ZR 18).
Rim diameter: rim diameter?is the diameter
of the bead seat, not the diameter of the rim
flange. The rim diameter is specified in
inches (in).
Load-bearing index: load-bearing indexAis a
numerical code that specifies the maximum
load-bearing capacityofat ire.
Do not overload the tires by exceeding the
specified load limit. The maximum permissible
load can be found on the vehicle's Tire and
Loading Information placard on the B-pillar on
the driver'ss ide (
Ypage 265).
Example:
Load-bearin gindex 91 indicates amaximum
load of 1,356lb( 615 kg) that the tires can bear.
For further information on the maximum tire
load in kilograms and lbs, see (
Ypage 271).
For further information on the load bearing
index ,see "Load index "(
Ypage 271).
Speed rating: speed ratingBspecifies the
approved maximum speed of the tire.
iTire data is vehicle-specific and may deviate
from the data in the example.
Regardless of the speed rating, always observe
the speed limits. Driv ecarefully and adapt your
driving style to the traffic conditions.
Summer
tires
IndexSpeed rating
Qup to 100 mph (160 km/h)
Rup to 106 mph (170 km/h)
Sup to 112 mph (180 km/h)
Tup to 118 mph (190 km/h)
Hup to 130 mph (210 km/h)
Vup to 149 mph (240 km/h)
Wup to 168 mph (270 km/h)
Yup to 186 mph (300 km/h)
ZR...Yup to 186 mph (300 km/h)
ZR...(..Y)over 186 mph (300 km/ h)
ZRover 149 mph (240 km/h)
ROptionally, tires withamaximum speed of
over 149 mph (240k m/h) may have "ZR" in
the sized escription, depending on the man-
ufacturer (e.g .245/4 0ZR18).
The service specification is made up of load-
bearingi ndexAand speed rating B.
RIf the sizedescription of your tir eincludes
"ZR" and there are no service specifications,
ask the tir emanufacturer in order to findo ut
the maximum speed.
If as ervice specification is available, the max-
imum speed is limited accordingtot he speed
rating in the service specification .Example:
245/4 0ZR18 97 Y. In this example, "97 Y" is
the service specification .The letter "Y" rep-
resent sthe speed rating. The maximum
speed of the tir eislimited to 186 mph
(300k m/h).
RThe sized escription for all tires with maxi-
mum speeds of over 186 mph (300k m/h)
must include "ZR", andthe service specifica-
tion must be given in parentheses. Example:
275/4 0ZR18( 99 Y). Spee drating "(Y)" indi-
cates that the maximum speed of the tir eis
over 186 mph (300k m/h).A sk the tir eman-
ufacturer about the maximum speed.
All-
weather
tires and
winter
tires
IndexSpeed rating
QM +S1up to 100 mph (160k m/h)
TM +S1up to 118 mph (190k m/h)
HM +S1up to 130 mph (210k m/h)
VM +S1up to 149 mph (240k m/h)
iNot all tires with the M+S marking provide
the driving characteristics of winter tires. In
additio ntothe M+S marking, winter tires also
have the isnowflakes ymbol on the tire
wall. Tires with this marking fulfill the require-
ments of the Rubber Manufacturers Associa-
tion (RMA) and the Rubber Association of
Canada (RAC) regarding the tir etraction on
snow. They have been especially developed
for driving on snow.
1Or M+S ifor winter tires.
270All about wheels and tires
Wheels and tires
 1
1 2
2 3
3 4
4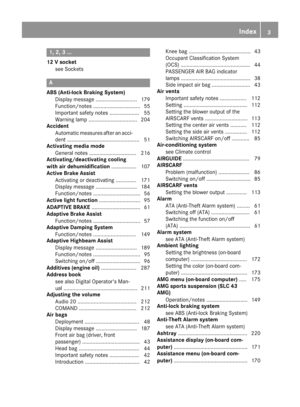 5
5 6
6 7
7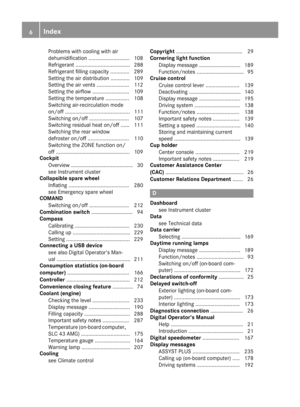 8
8 9
9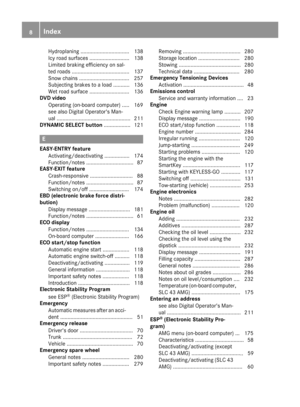 10
10 11
11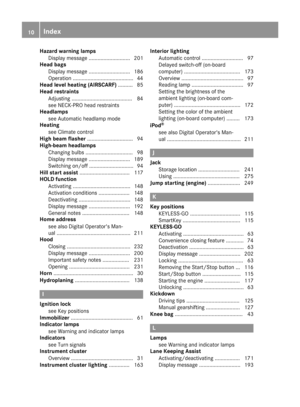 12
12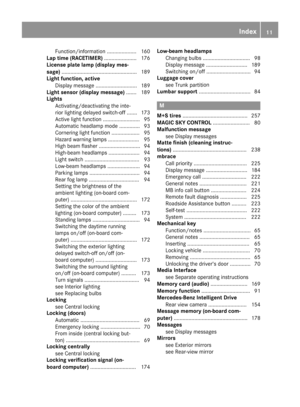 13
13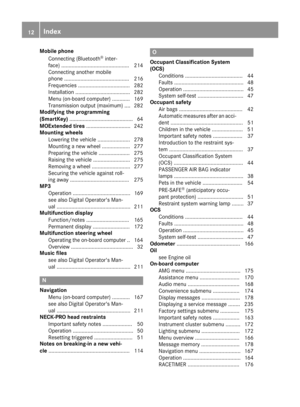 14
14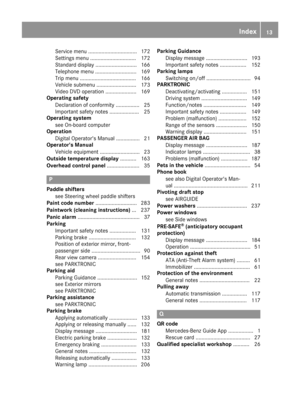 15
15 16
16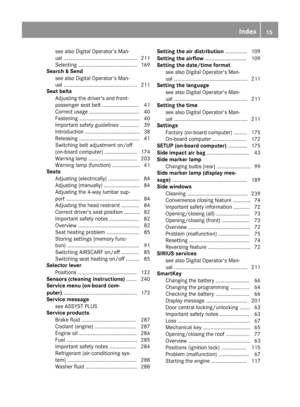 17
17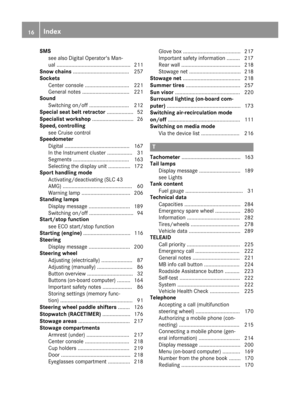 18
18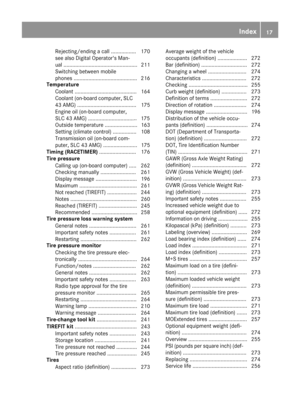 19
19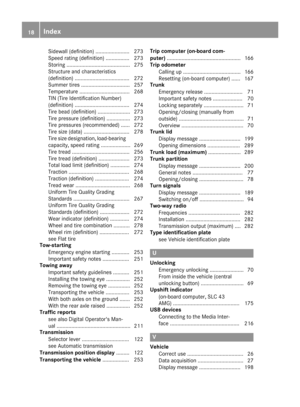 20
20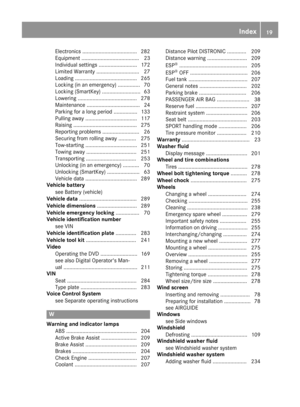 21
21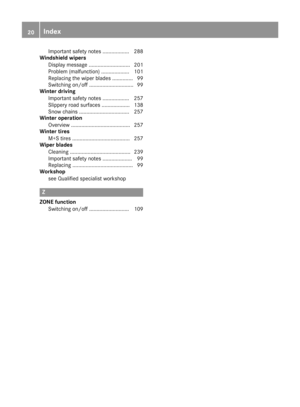 22
22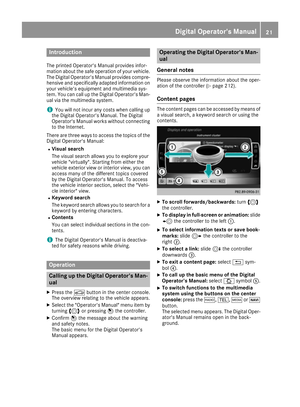 23
23 24
24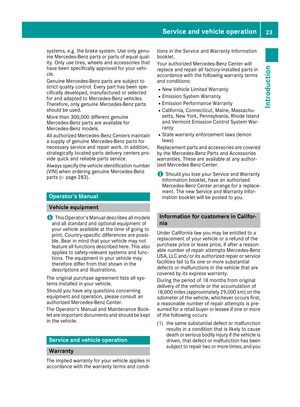 25
25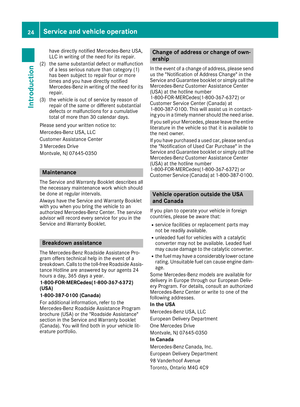 26
26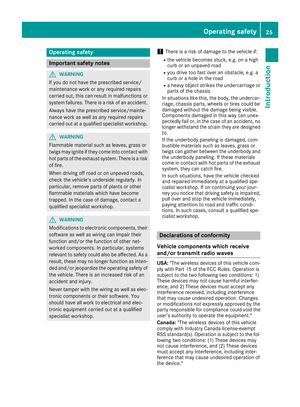 27
27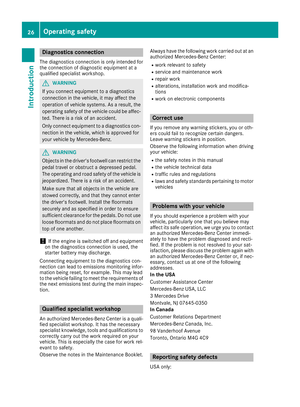 28
28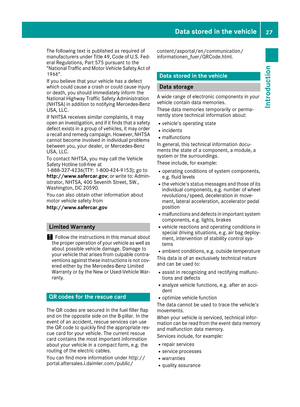 29
29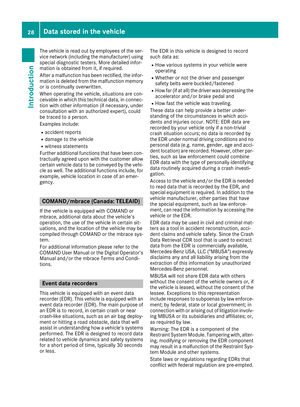 30
30 31
31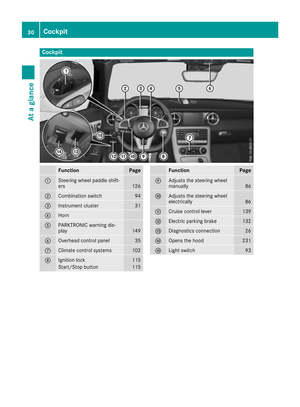 32
32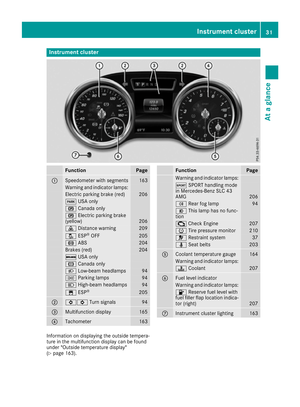 33
33 34
34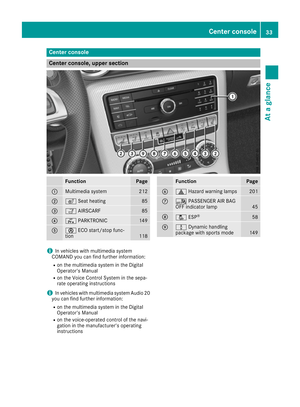 35
35 36
36 37
37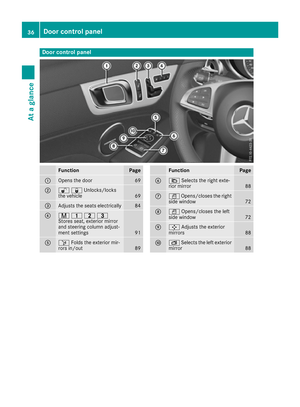 38
38 39
39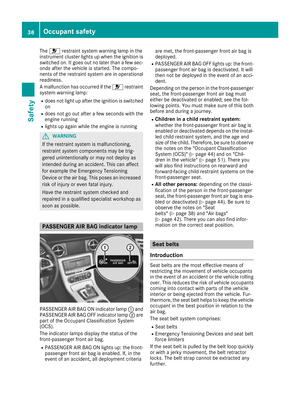 40
40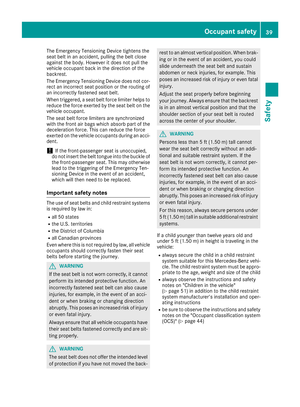 41
41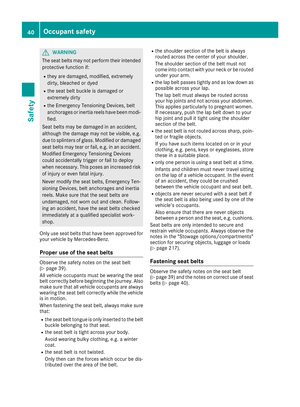 42
42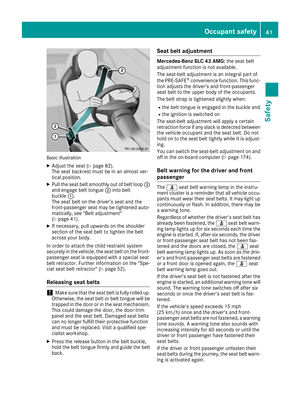 43
43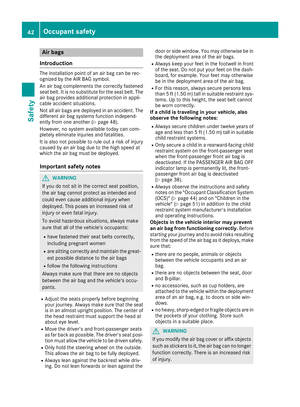 44
44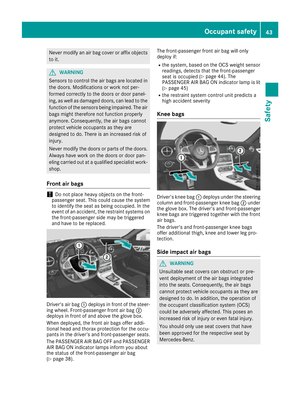 45
45 46
46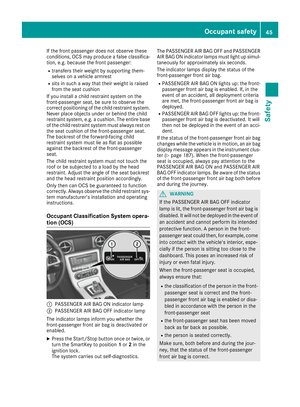 47
47 48
48 49
49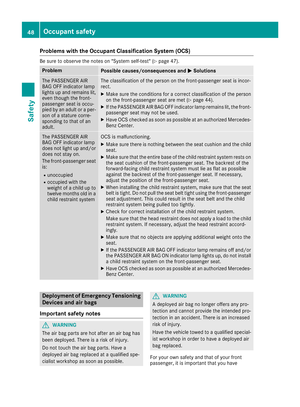 50
50 51
51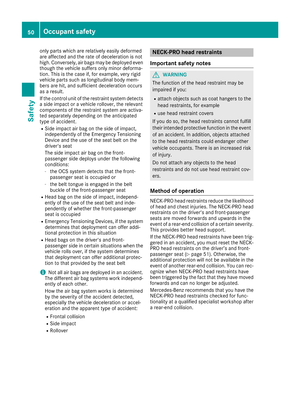 52
52 53
53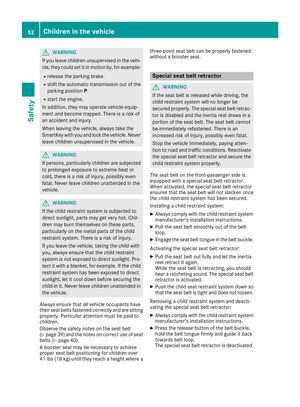 54
54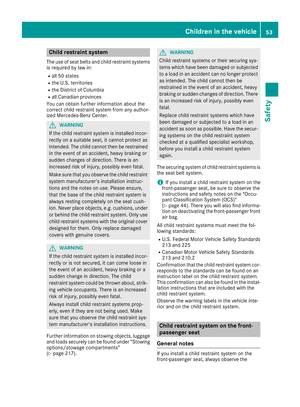 55
55 56
56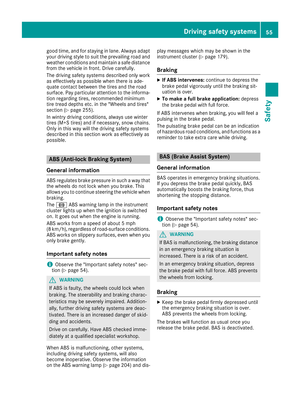 57
57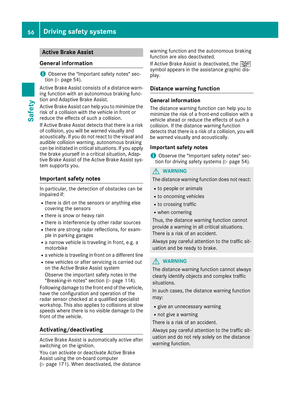 58
58 59
59 60
60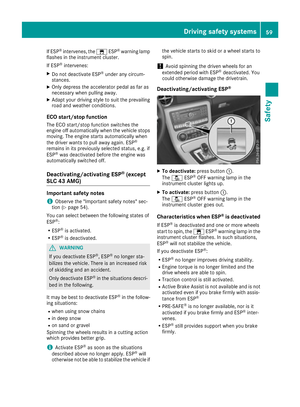 61
61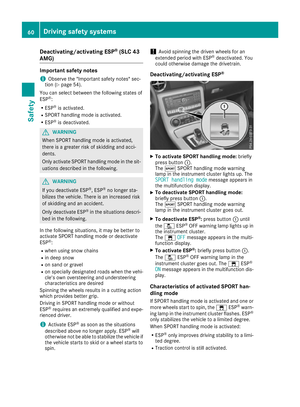 62
62 63
63 64
64 65
65 66
66 67
67 68
68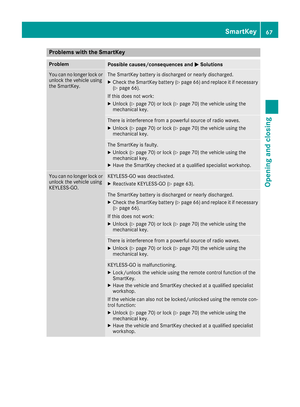 69
69 70
70 71
71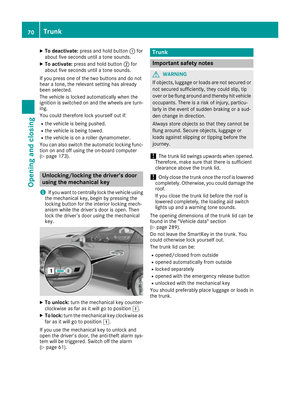 72
72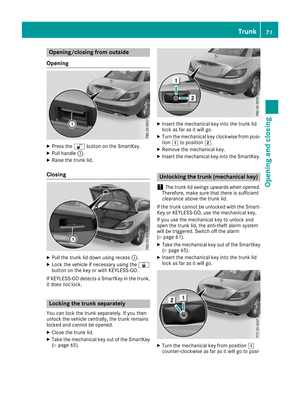 73
73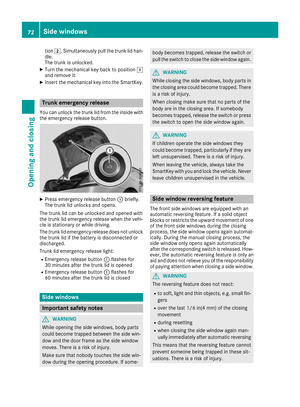 74
74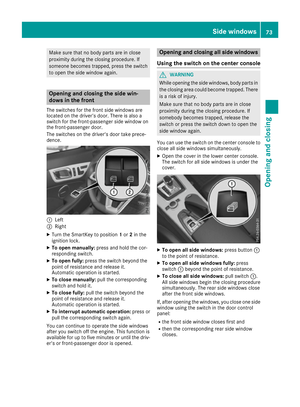 75
75 76
76 77
77 78
78 79
79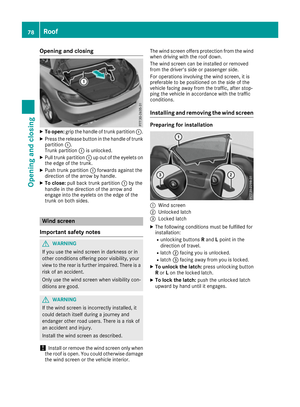 80
80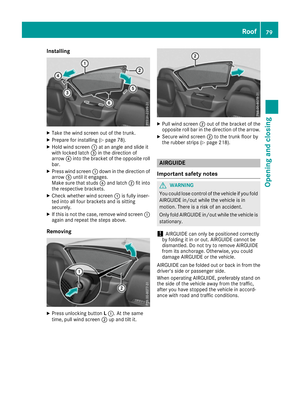 81
81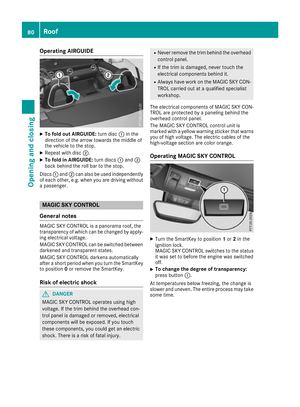 82
82 83
83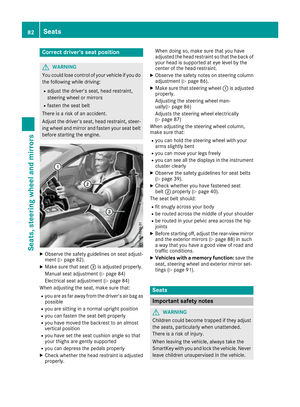 84
84 85
85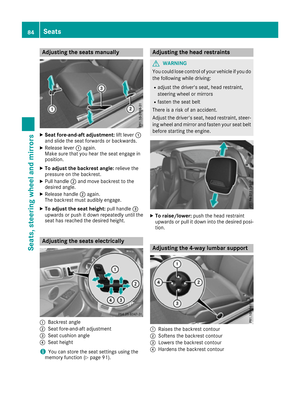 86
86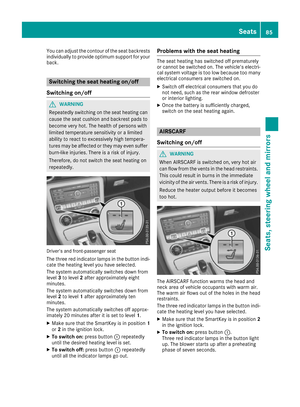 87
87 88
88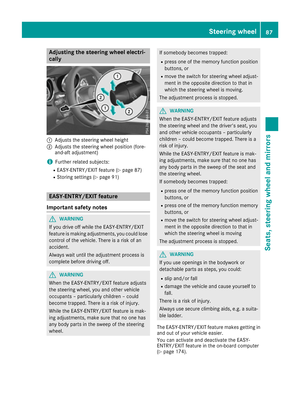 89
89 90
90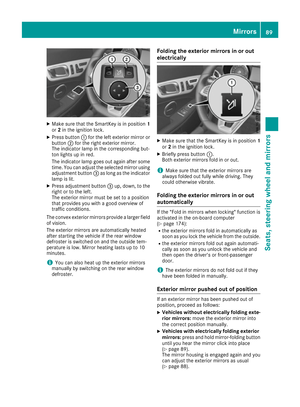 91
91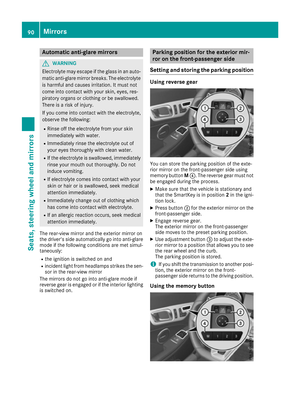 92
92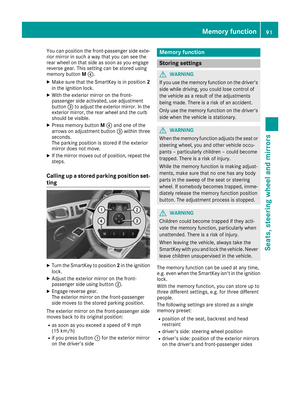 93
93 94
94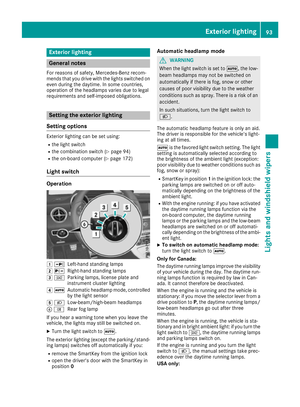 95
95 96
96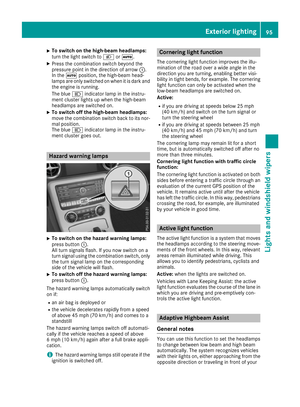 97
97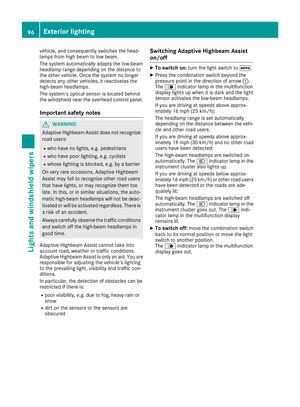 98
98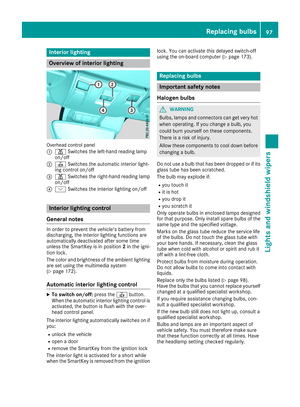 99
99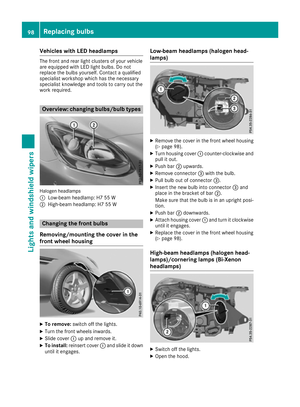 100
100 101
101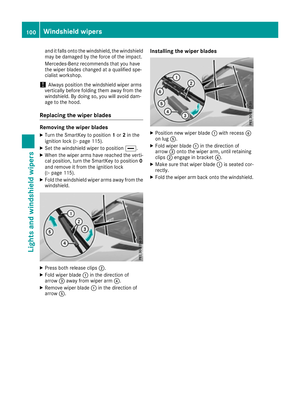 102
102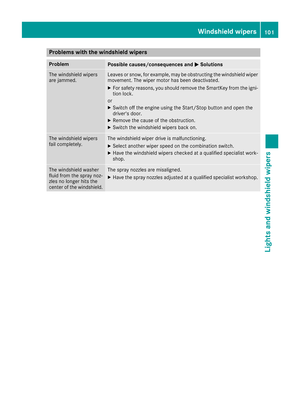 103
103 104
104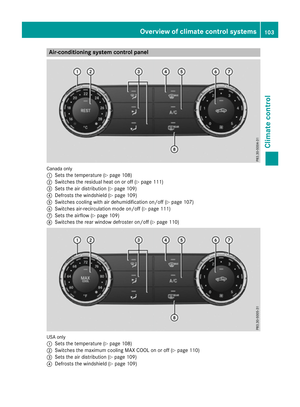 105
105 106
106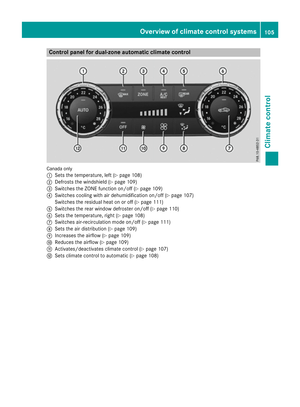 107
107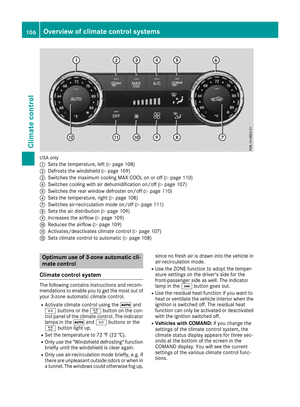 108
108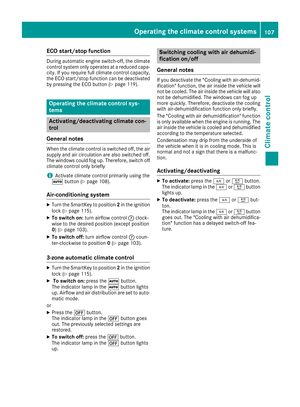 109
109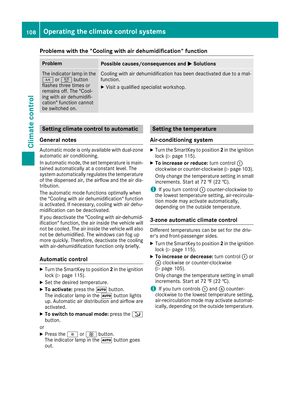 110
110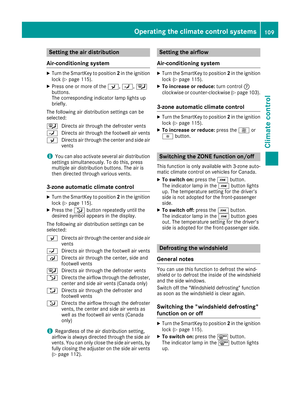 111
111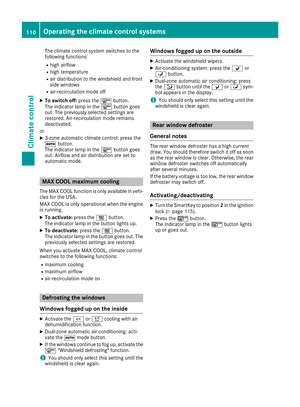 112
112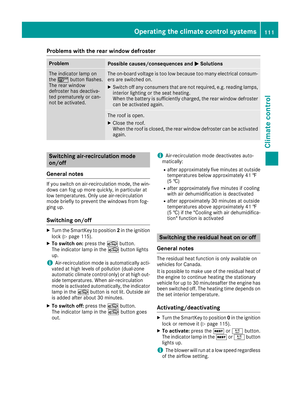 113
113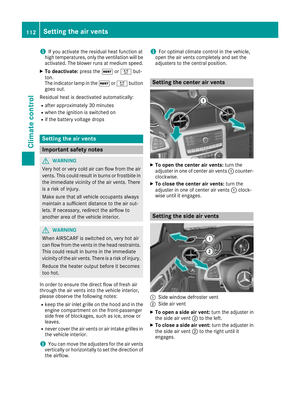 114
114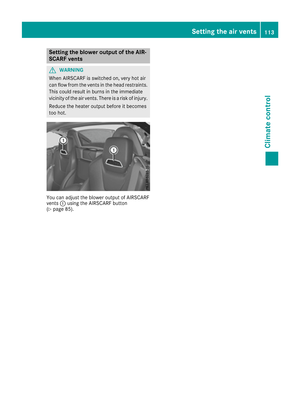 115
115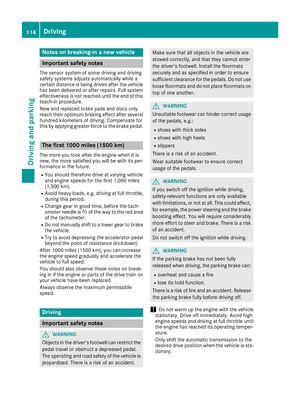 116
116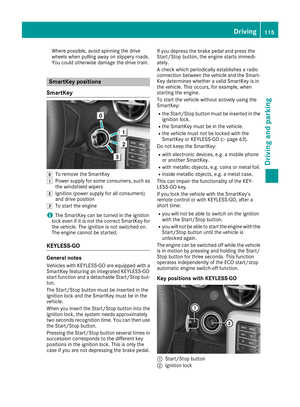 117
117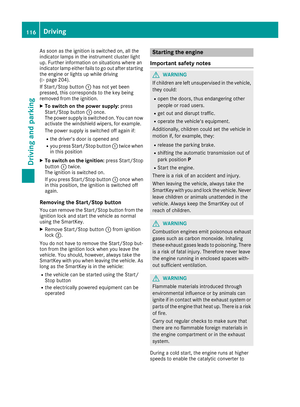 118
118 119
119 120
120 121
121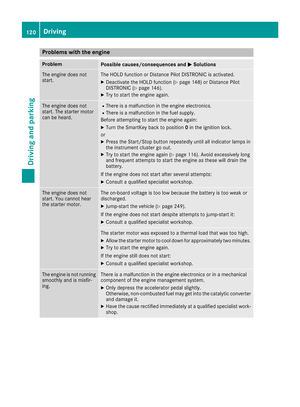 122
122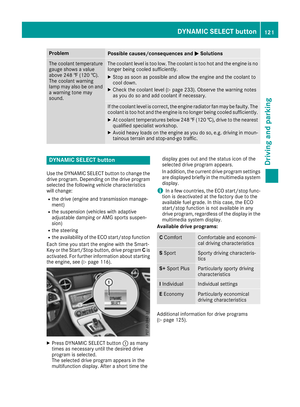 123
123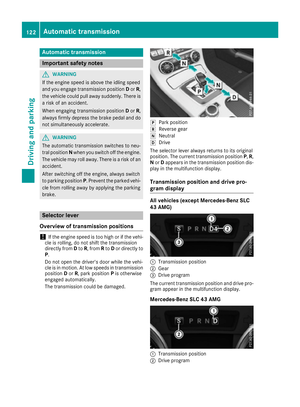 124
124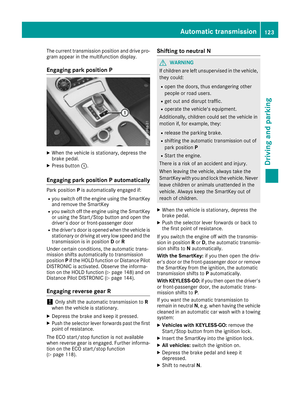 125
125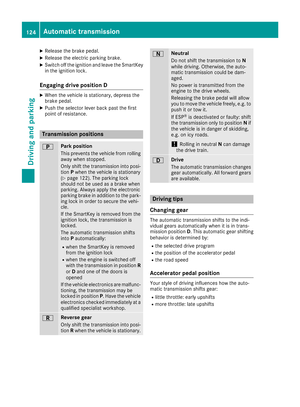 126
126 127
127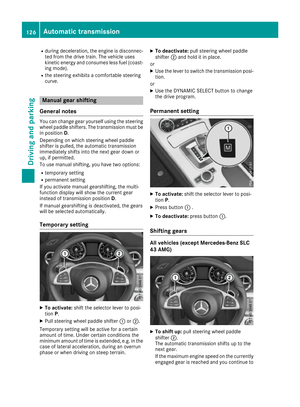 128
128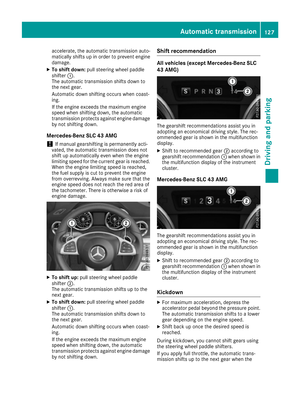 129
129 130
130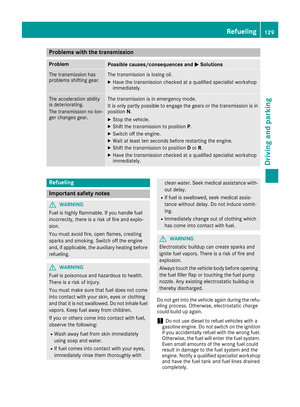 131
131 132
132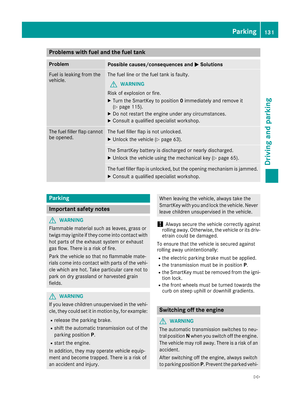 133
133 134
134 135
135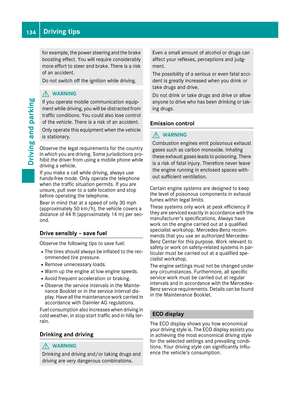 136
136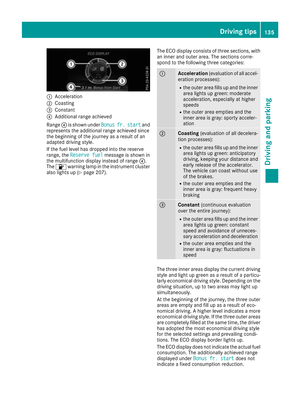 137
137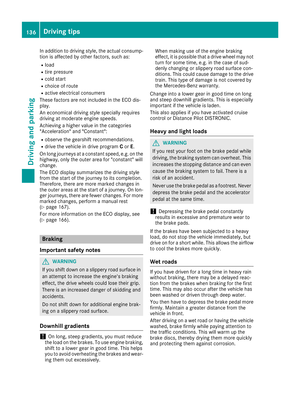 138
138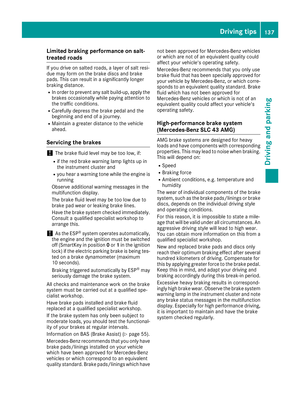 139
139 140
140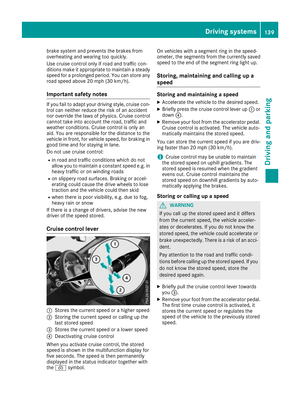 141
141 142
142 143
143 144
144 145
145 146
146 147
147 148
148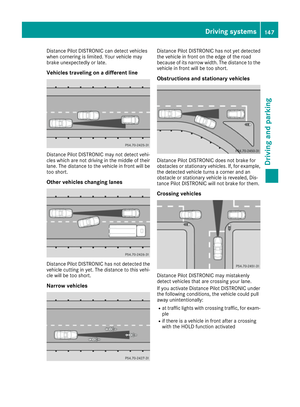 149
149 150
150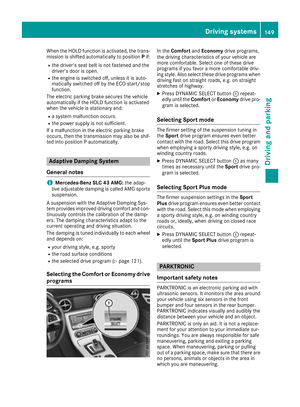 151
151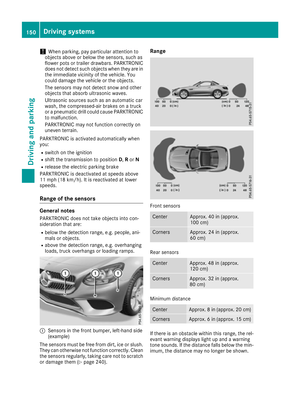 152
152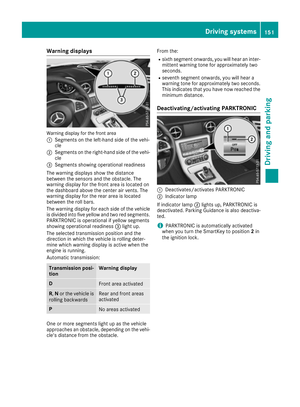 153
153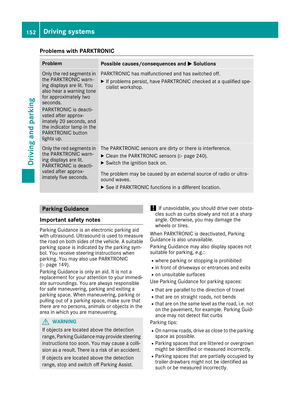 154
154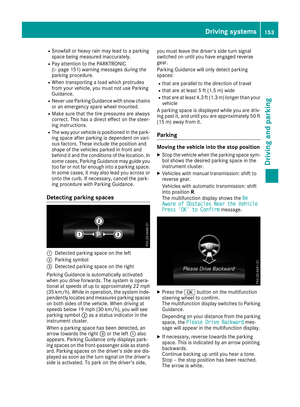 155
155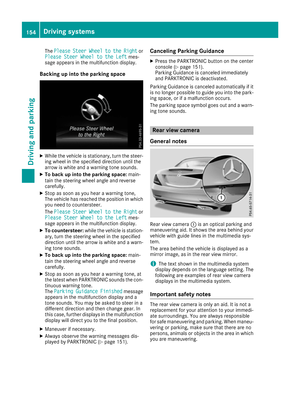 156
156 157
157 158
158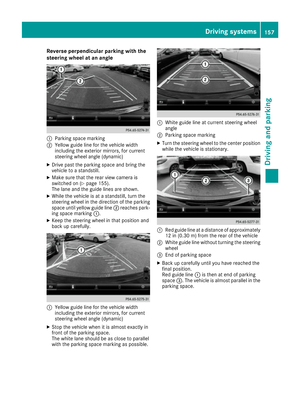 159
159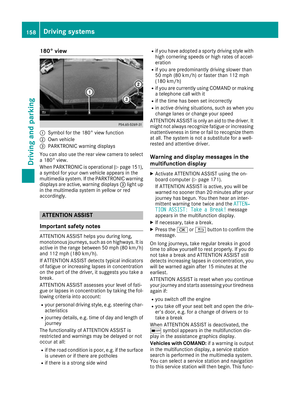 160
160 161
161 162
162 163
163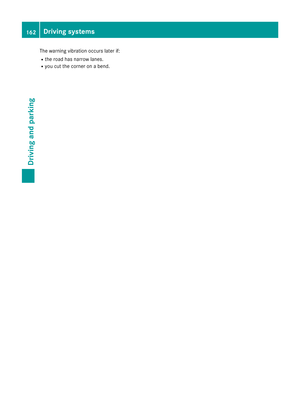 164
164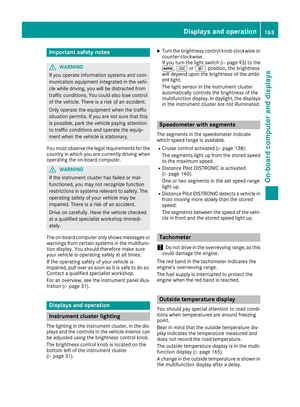 165
165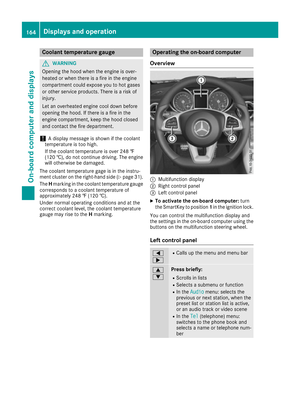 166
166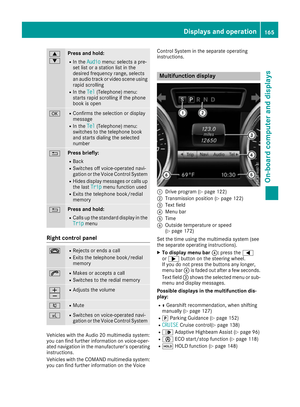 167
167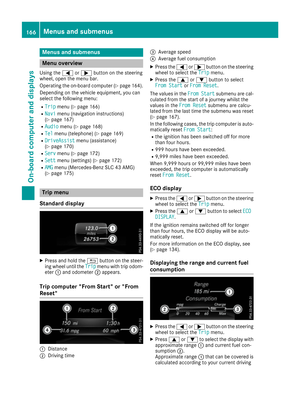 168
168 169
169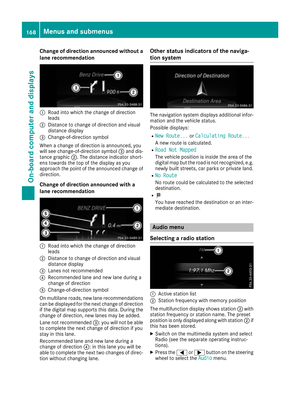 170
170 171
171 172
172 173
173 174
174 175
175 176
176 177
177 178
178 179
179 180
180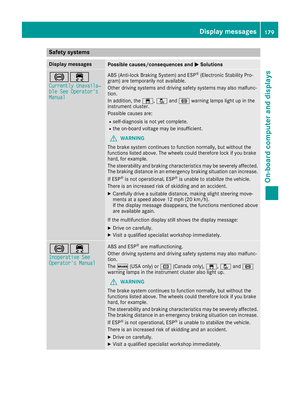 181
181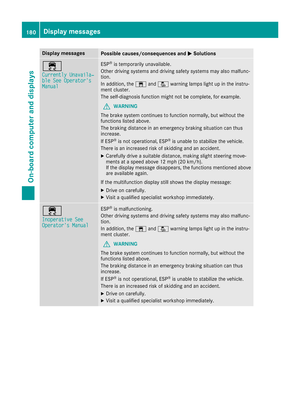 182
182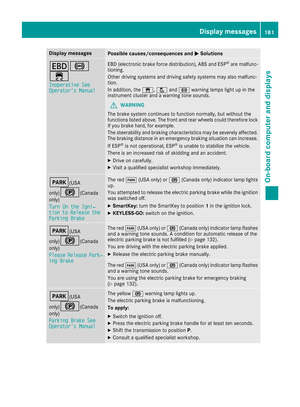 183
183 184
184 185
185 186
186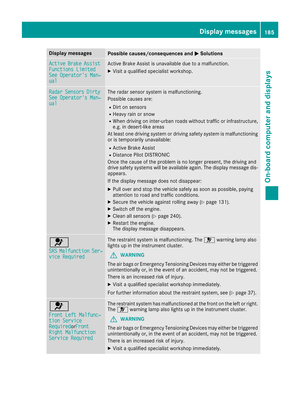 187
187 188
188 189
189 190
190 191
191 192
192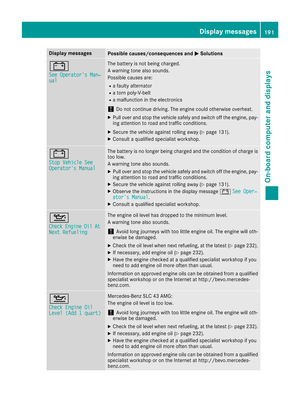 193
193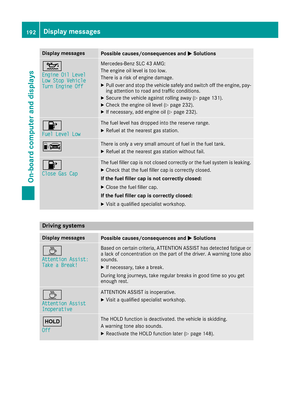 194
194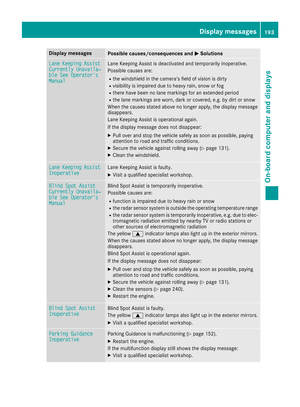 195
195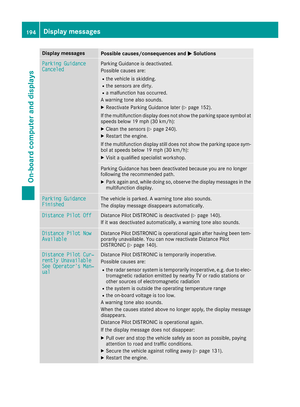 196
196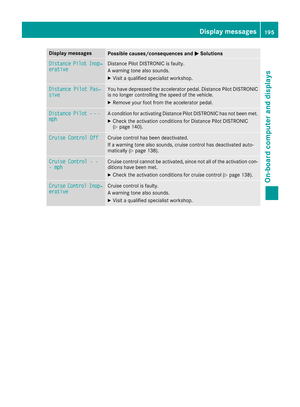 197
197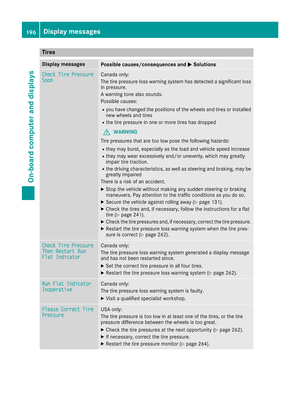 198
198 199
199 200
200 201
201 202
202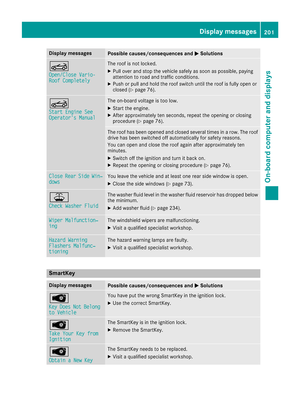 203
203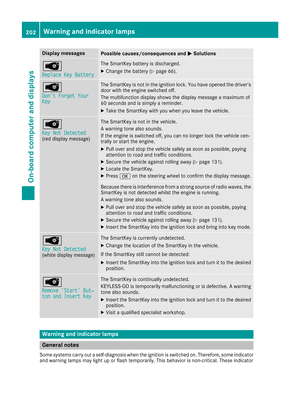 204
204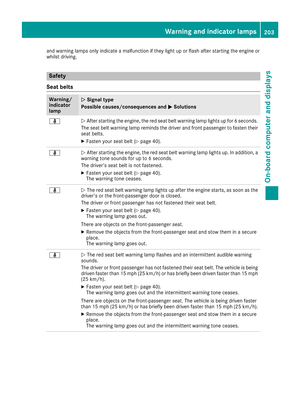 205
205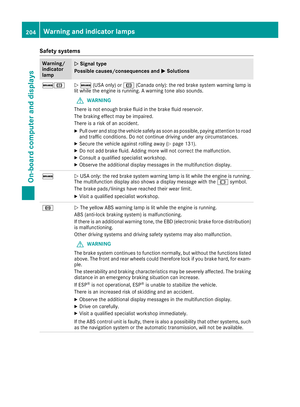 206
206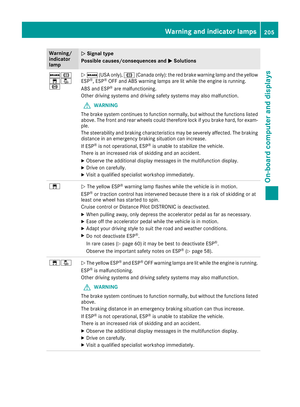 207
207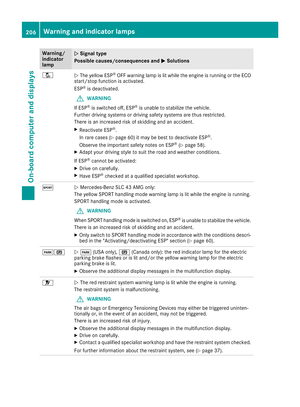 208
208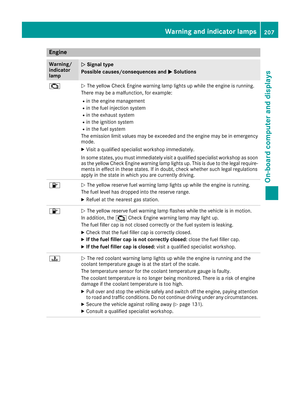 209
209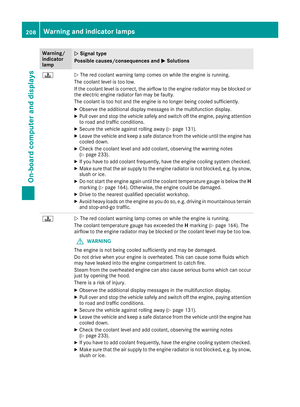 210
210 211
211 212
212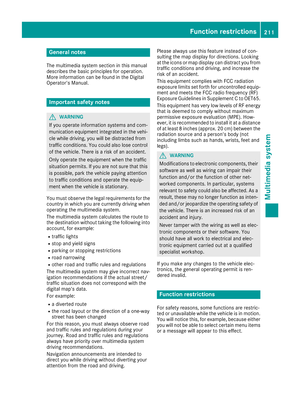 213
213 214
214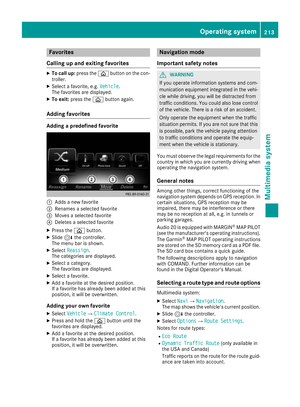 215
215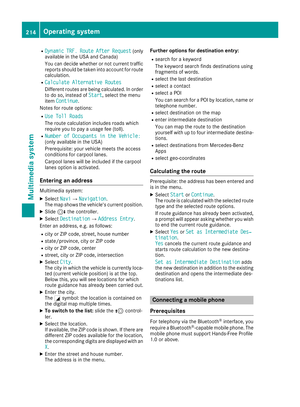 216
216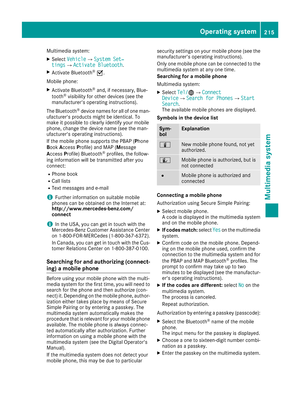 217
217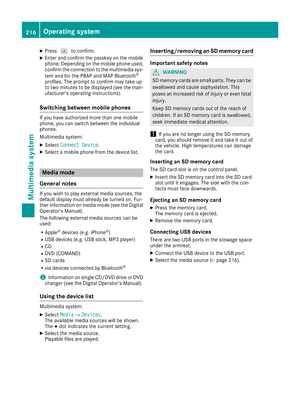 218
218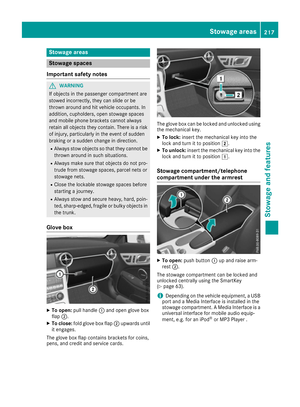 219
219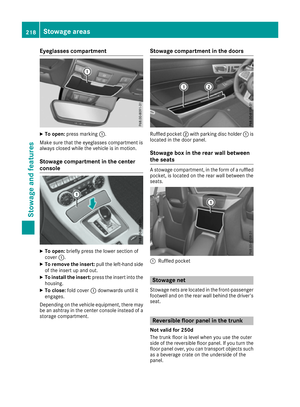 220
220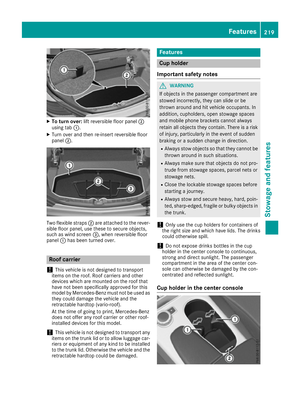 221
221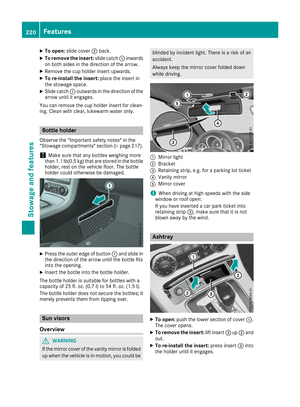 222
222 223
223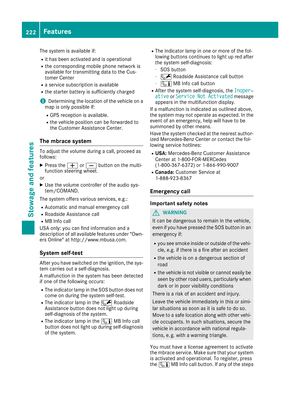 224
224 225
225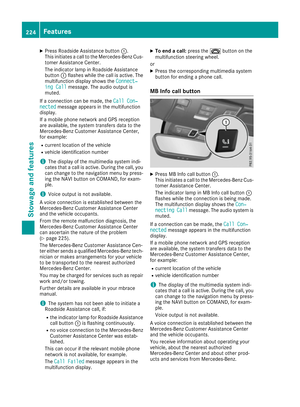 226
226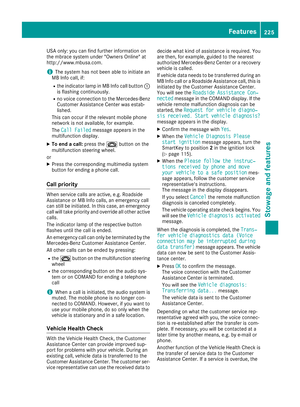 227
227 228
228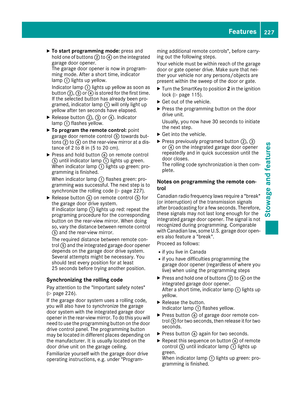 229
229 230
230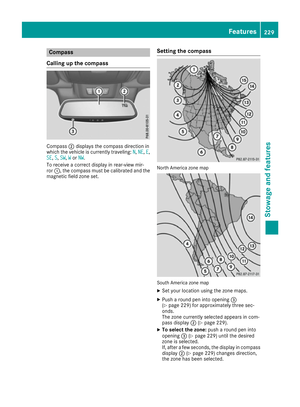 231
231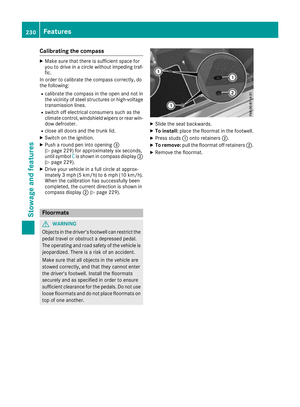 232
232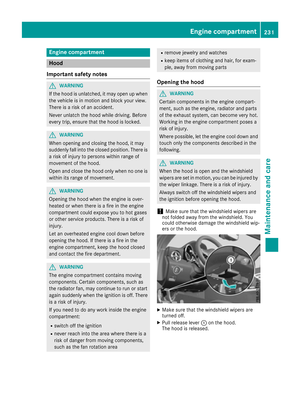 233
233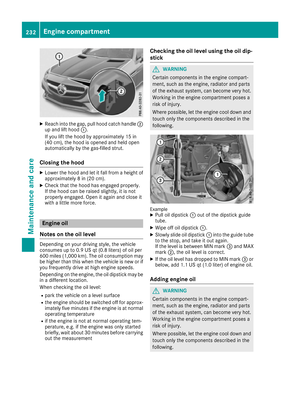 234
234 235
235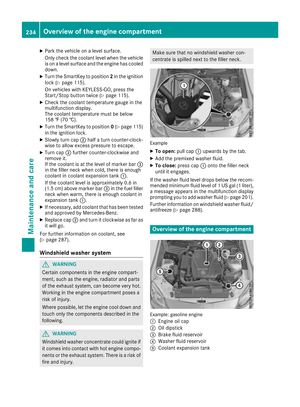 236
236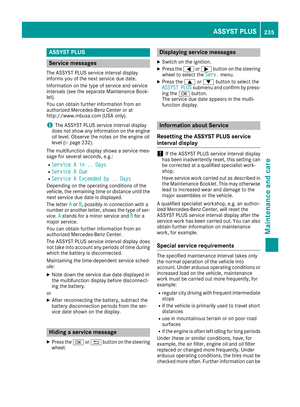 237
237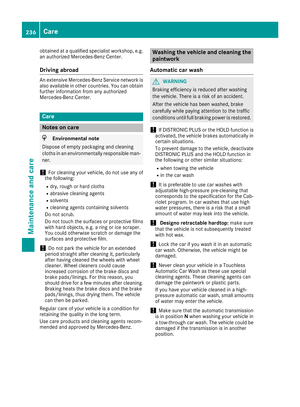 238
238 239
239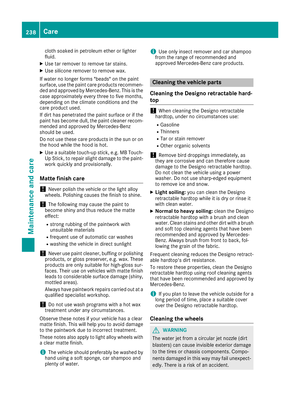 240
240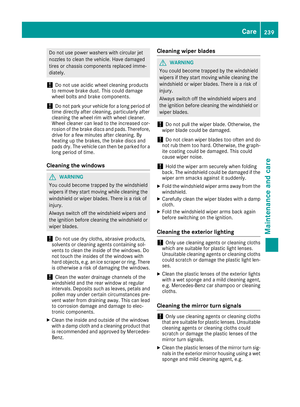 241
241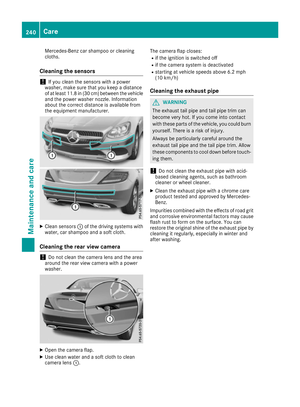 242
242 243
243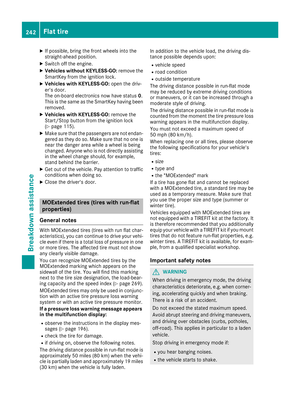 244
244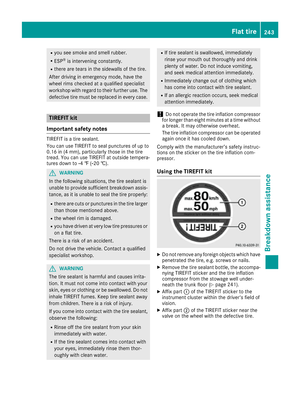 245
245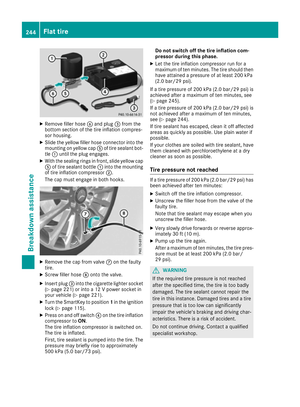 246
246 247
247 248
248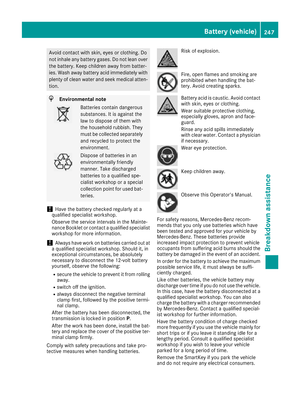 249
249 250
250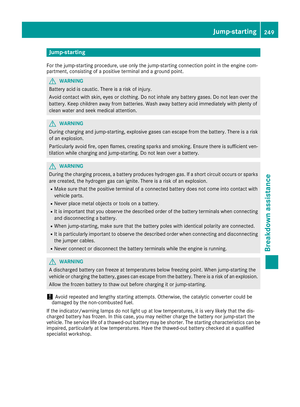 251
251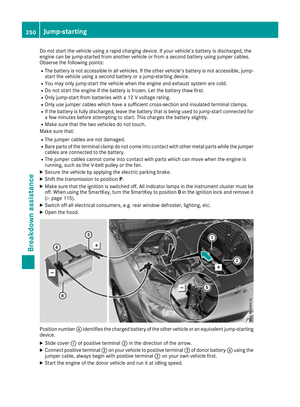 252
252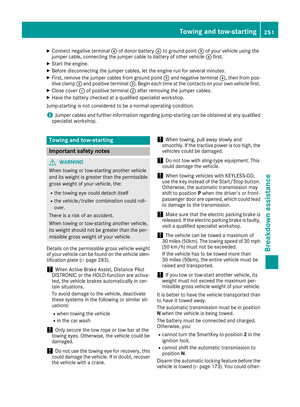 253
253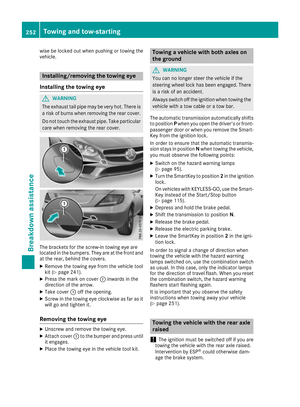 254
254 255
255 256
256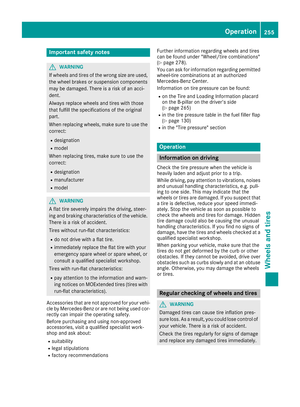 257
257 258
258 259
259 260
260 261
261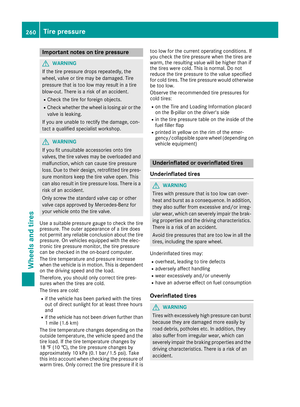 262
262 263
263 264
264 265
265 266
266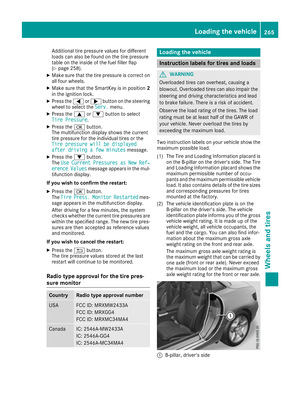 267
267 268
268 269
269 270
270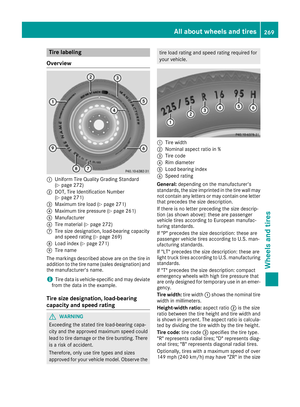 271
271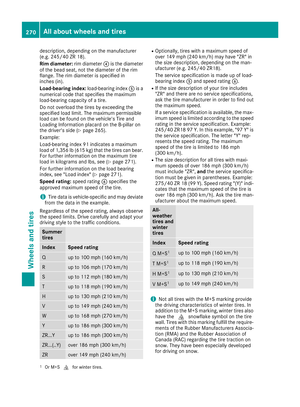 272
272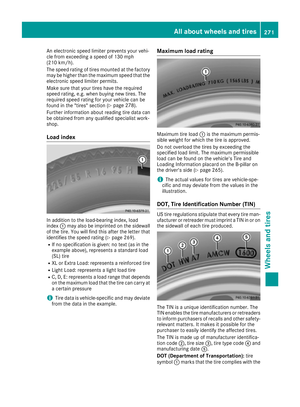 273
273 274
274 275
275 276
276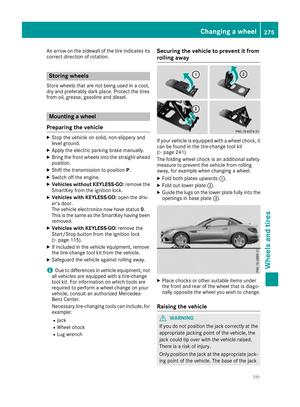 277
277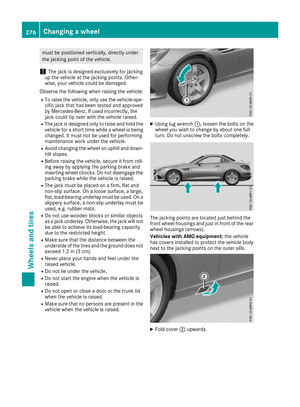 278
278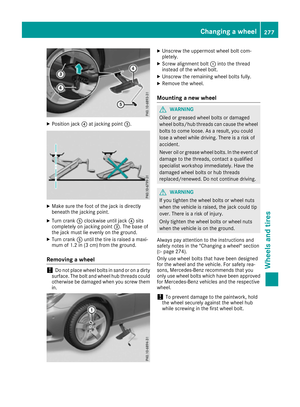 279
279 280
280 281
281 282
282 283
283 284
284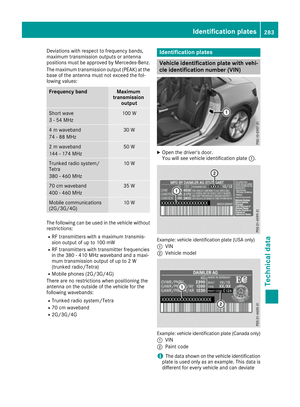 285
285 286
286 287
287 288
288 289
289 290
290 291
291 292
292 293
293