2017 MERCEDES-BENZ S-Class MAYBACH trunk
[x] Cancel search: trunkPage 198 of 382
Ra split screen with top view and the image
from the front camera or
Ra split screen with top view and the image
from the rear view camera
Activating the 360° camera using
reverse gear
The 360° camera images can be automatically
displayed by engaging reverse gear.
XMake sure that theActivation by R gearfunction is selected in the multimedia system
(see the Digital Operator's Manual).
XTo show the 360° camera image: engage
reverse gear.
The multimedia system shows the area
behind the vehicle in split-screen mode. You
see the top view of the vehicle and the image
from the rear view camera.
Selecting the split-screen view and full
screen mode
Switching between split screen views:
XTo switch to the line with the vehicle icons:
slide 5the controller.
XTo select a vehicle icon: turn the controller.
Switching to full screen mode:
XTurn and press 180°Viewwith the controller.
The 180° option is only available in the following
views:
RTop view with picture from the rear view cam-
era
RTop view with picture from the front camera
Displays in the multimedia system
Important safety notes
The camera system may show a distorted view
of obstacles, show them incorrectly or not at all.
Obstacles are not shown by the system in the
following locations:
Runder the front and rear bumpers
Rvery close to the front and rear bumpers
Rin close range above the handle on the trunk
lid
Rvery close to the exterior mirrors
Rin the transitional areas between the various
cameras in the virtual top view
!Objects not at ground level may appear to
be further away than they actually are, e.g.:
Rthe bumper of a parked vehicle
Rthe drawbar of a trailer
Rthe ball coupling of a trailer tow hitch
Rthe rear section of an HGV
Ra slanted post
Use the guidelines only for orientation.
Approach objects no further than the bottom-
most guideline.
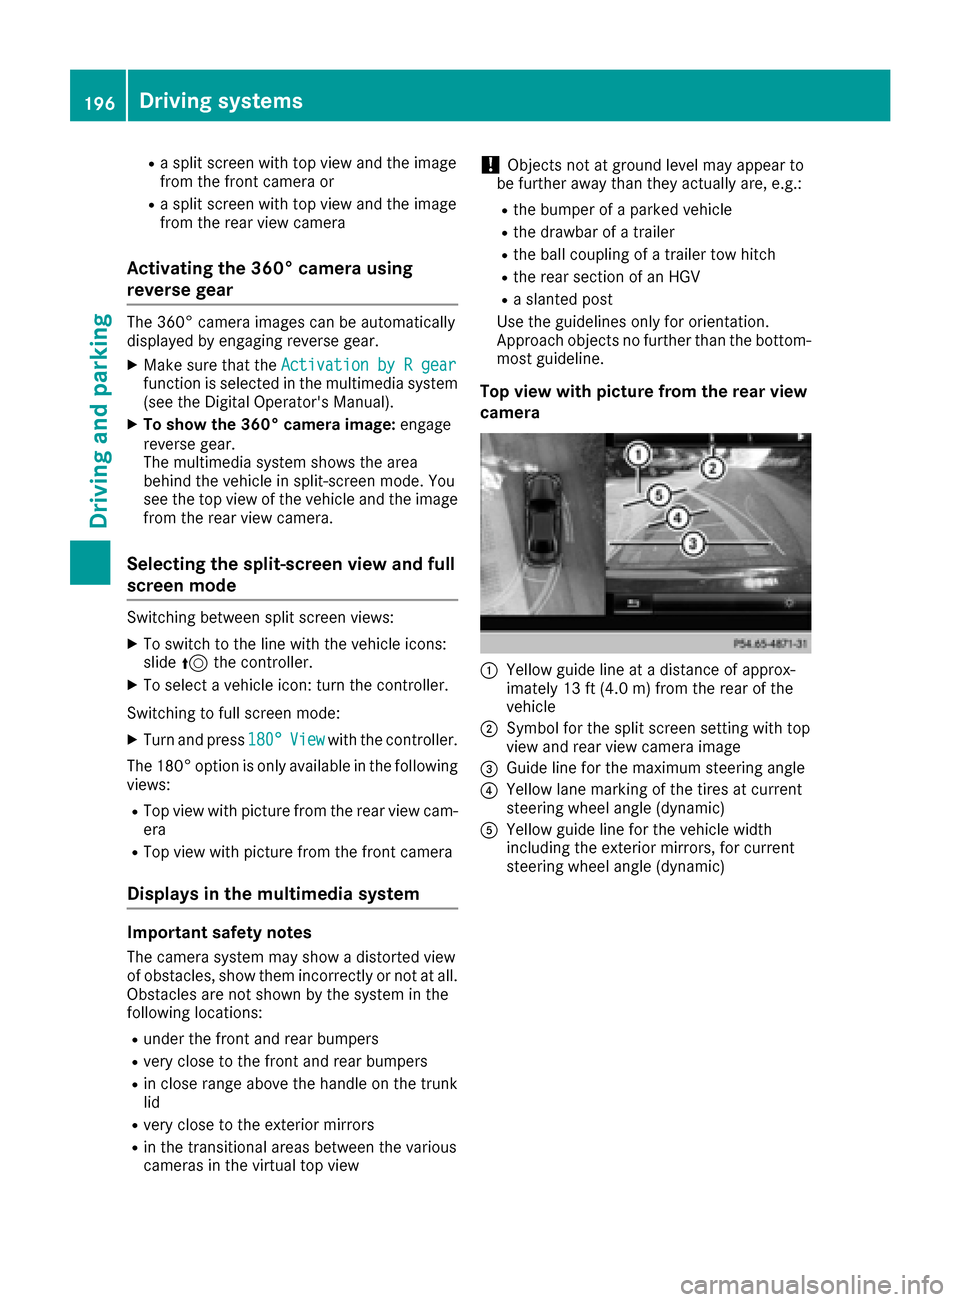
Top view with picture from the rear view
camera
:Yellow guide line at a distance of approx-
imately 13 ft (4.0 m) from the rear of the
vehicle
;Symbol for the split screen setting with top
view and rear view camera image
=Guide line for the maximum steering angle
?Yellow lane marking of the tires at current
steering wheel angle (dynamic)
AYellow guide line for the vehicle width
including the exterior mirrors, for current
steering wheel angle (dynamic)
196Driving systems
Driving and parking
Page 257 of 382
Display messagesPossible causes/consequences andMSolutions
ServiceRequiredDoNot Shift GearsVisit Dealer
You canno tchang eth etransmission position due to amalfunction .
A warning tone also sounds.
If transmission position Dis selected:
XDrive to aqualified specialist workshop without shifting th etrans -
mission from position D.
If transmission position R,N or Pis selected:
XSecur eth evehicl eagainst rollin gaway (Ypage 162).
XNotify aqualified specialist workshop or breakdown service.
ReversingNotPossi‐bleServic eRequiredYou canno tshift int oth etransmission position Rdue to amalfunction .
The transmission position sP,N or Dcontinu eto be available.
A warning tone also sounds.
XVisit aqualified specialist workshop .
Transmission Mal‐function StopAmalfunction has occurred in th emechanical transmission compo -
nents.
A warning tone also sounds. The gearbox automatically shift sto posi-
tion N.
XPull ove rand stop th evehicl esafely as soo nas possible, payin g
attention to roa dand traffic conditions.
XShift th etransmission to position P.
XSecureth evehicl eagainst rollin gaway (Ypage 162).
XNotify aqualified specialist workshop or breakdown service.
Sto pVehicl eLeaveEngineRunnin gWaitTransmission Cool‐ing
The transmission has overheated. Pullin gaway can be temporarily
impaire dor no tpossible.
XPull ove rand stop th evehicl esafely as soo nas possible, payin g
attention to roa dand traffic conditions. Do no tcontinu edrivin g
under any circumstances.
XWait until th edisplay message disappear sbefore pullin gaway.
Auxiliary Batter yMalfunctionThe auxiliary battery for th etransmission is no longer bein gcharged.
XVisit aqualified specialist workshop .
XUntilthen ,set th etransmission to position Pbefore you switch off
th eengine.
XBefor eleaving th evehicle, apply th eelectric parking brake.
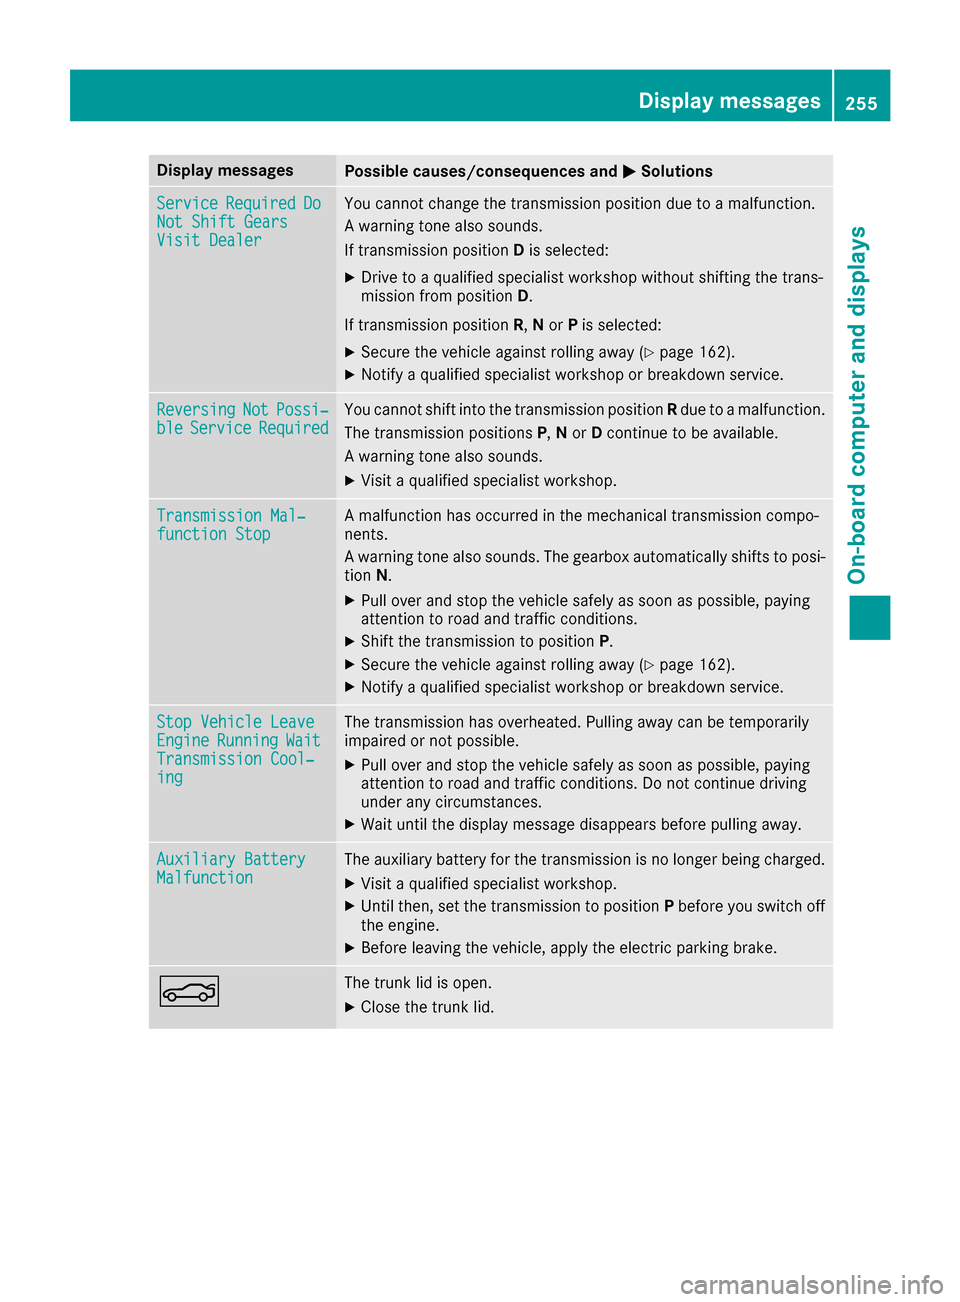
NThe trunk lid is open .
XCloseth etrunk lid.
Display messages25 5
On-board computer and displays
Z
Page 283 of 382
Stowage areas
Loading guidelines
GWARNING
Combustion engines emit poisonous exhaust
gases such as carbon monoxide. Exhaust
gases can enter the vehicle interior if the
trunk lid is open when the engine is running,
especially if the vehicle is in motion. There is a
risk of poisoning.
Always switch off the engine before opening
the trunk lid. Never drive with the trunk lid
open.
GWARNING
If objects, luggage or loads are not secured or
not secured sufficiently, they could slip, tip
over or be flung around and thereby hit vehicle
occupants. There is a risk of injury, particu-
larly in the event of sudden braking or a sud-
den change in direction.
Always store objects so that they cannot be
flung around. Secure objects, luggage or
loads against slipping or tipping before the
journey.
GWARNING
The exhaust tail pipe and tail pipe trim can
become very hot. If you come into contact
with these parts of the vehicle, you could burn
yourself. There is a risk of injury.
Always be particularly careful around the
exhaust tail pipe and the tail pipe trim. Allow
these components to cool down before touch-
ing them.
The handling characteristics of a laden vehicle
are dependent on the distribution of the load
within the vehicle. For this reason, you should
observe the following notes when transporting a
load:
RNever exceed the maximum permissible
gross vehicle mass or the gross axle weight
rating for the vehicle (including occupants).
The values are specified on the vehicle iden- tification plate on the B-pillar of the driver's
door.
RThe trunk is the preferred place to carry
objects.
RPosition heavy loads as far forwards as pos-
sible and as low down in the trunk as possible.
RThe load must not protrude above the upper
edge of the seat backrests.
RAlways place the load behind unoccupied
seats if possible.
RSecure the load with sufficiently strong and
wear-resistant tie-downs. Pad sharp edges for
protection.
Stowage spaces
Important safety notes
GWARNING
If objects in the passenger compartment are
stowed incorrectly, they can slide or be
thrown around and hit vehicle occupants. In
addition, cupholders, open stowage spaces
and mobile phone brackets cannot always
retain all objects they contain. There is a risk of injury, particularly in the event of sudden
braking or a sudden change in direction.
RAlways stow objects so that they cannot be
thrown around in such situations.
RAlways make sure that objects do not pro-
trude from stowage spaces, parcel nets or
stowage nets.
RClose the lockable stowage spaces before
starting a journey.
RAlways stow and secure heavy, hard, poin-
ted, sharp-edged, fragile or bulky objects in
the trunk.
Observe the loading guidelines (
Ypage 281).
Stowage areas281
Stowage and features
Z
Page 287 of 382
Stowage nets
Stowage nets are located:
Rin the front-passenger footwell
Ron the back of the driver's and front-
passenger seat
Ron the left and right-hand side in the trunk
Observe the loading guidelines (
Ypage 281)
and the safety notes regarding stowage spaces
(
Ypage 281).
Skibag
Important safety notes
GWARNING
The skibag in conjunction with the lashing
straps cannot restrain any objects other than
skis.
Vehicle occupants could be struck in the
event of sudden braking or an accident, for
instance, if you:
Rtransport other heavy or sharp-edged
objects in the skibag
Rdo not secure the skibag with the lashing
straps
There is a risk of accident and injury.
Store only skis in the skibag. Always secure
the skibag with the lashing straps so that it
cannot move around.
Observe the following points when using the
skibag:
Rdo not transport more than three pairs of skis
in the skibag.
Rwhen carefully sliding the skis into or remov-
ing them from the skibag, mind the sharp
edges and corners of the skis.
Rstow the skis as described in the following:
-when sliding the skis in, position the run-
ning surfaces of the respective pair of skis
together.
-position one pair of skis at the bottom with the tips of the skis pointing to the outside.
-position the two additional pairs of skis on
the left and right-hand sides above the
lower pair of skis. The tips of the skis being
offset by 90° to the tips of the skis below.
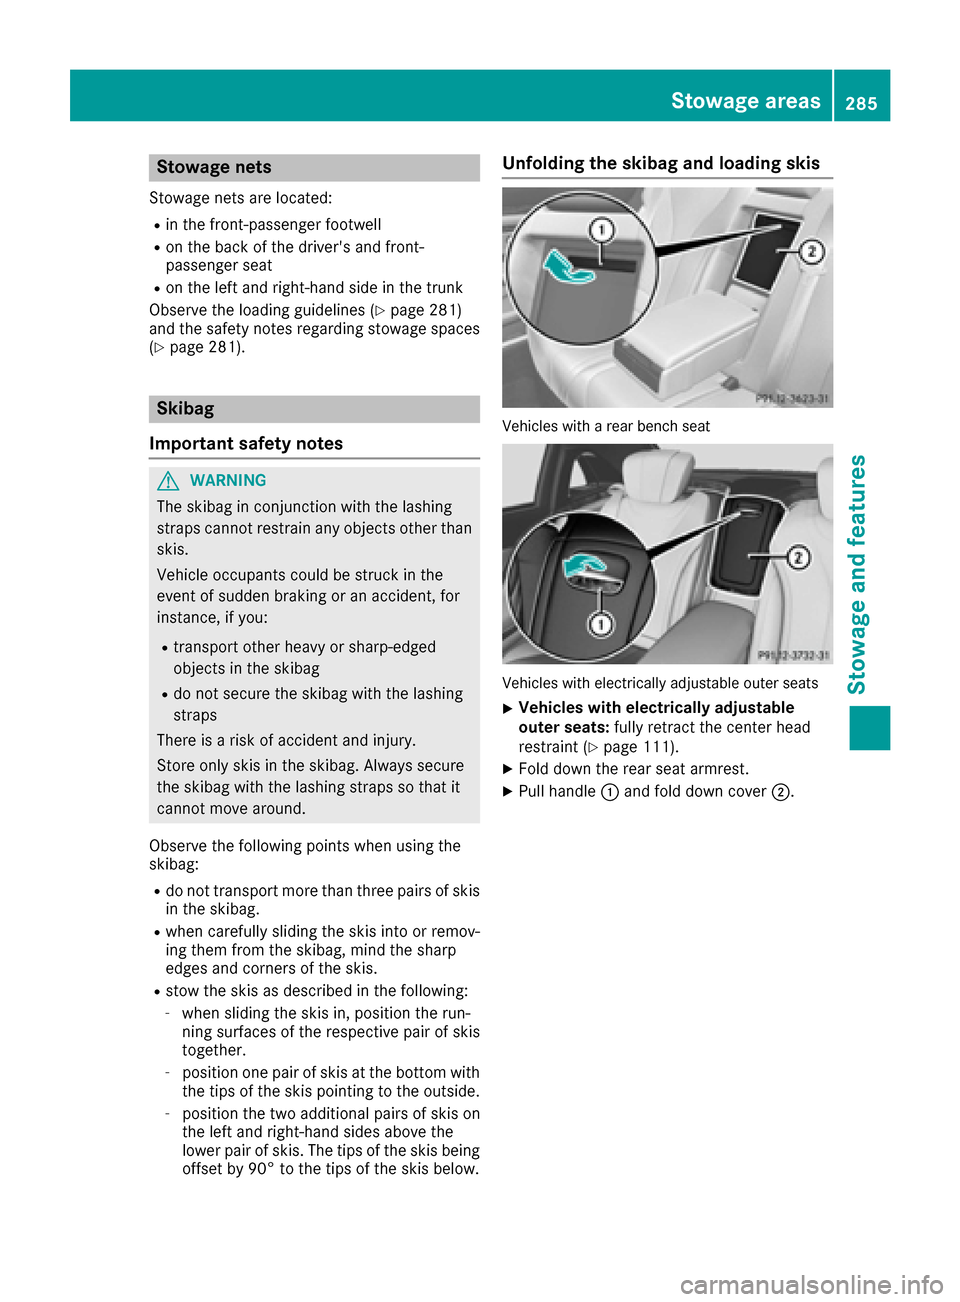
Unfolding the skibag and loading skis
Vehicles with a rear bench seat
Vehicles with electrically adjustable outer seats
XVehicles with electrically adjustable
outer seats: fully retract the center head
restraint (
Ypage 111).
XFold down the rear seat armrest.
XPull handle :and fold down cover ;.
Stowage areas285
Stowage and features
Z
Page 288 of 382
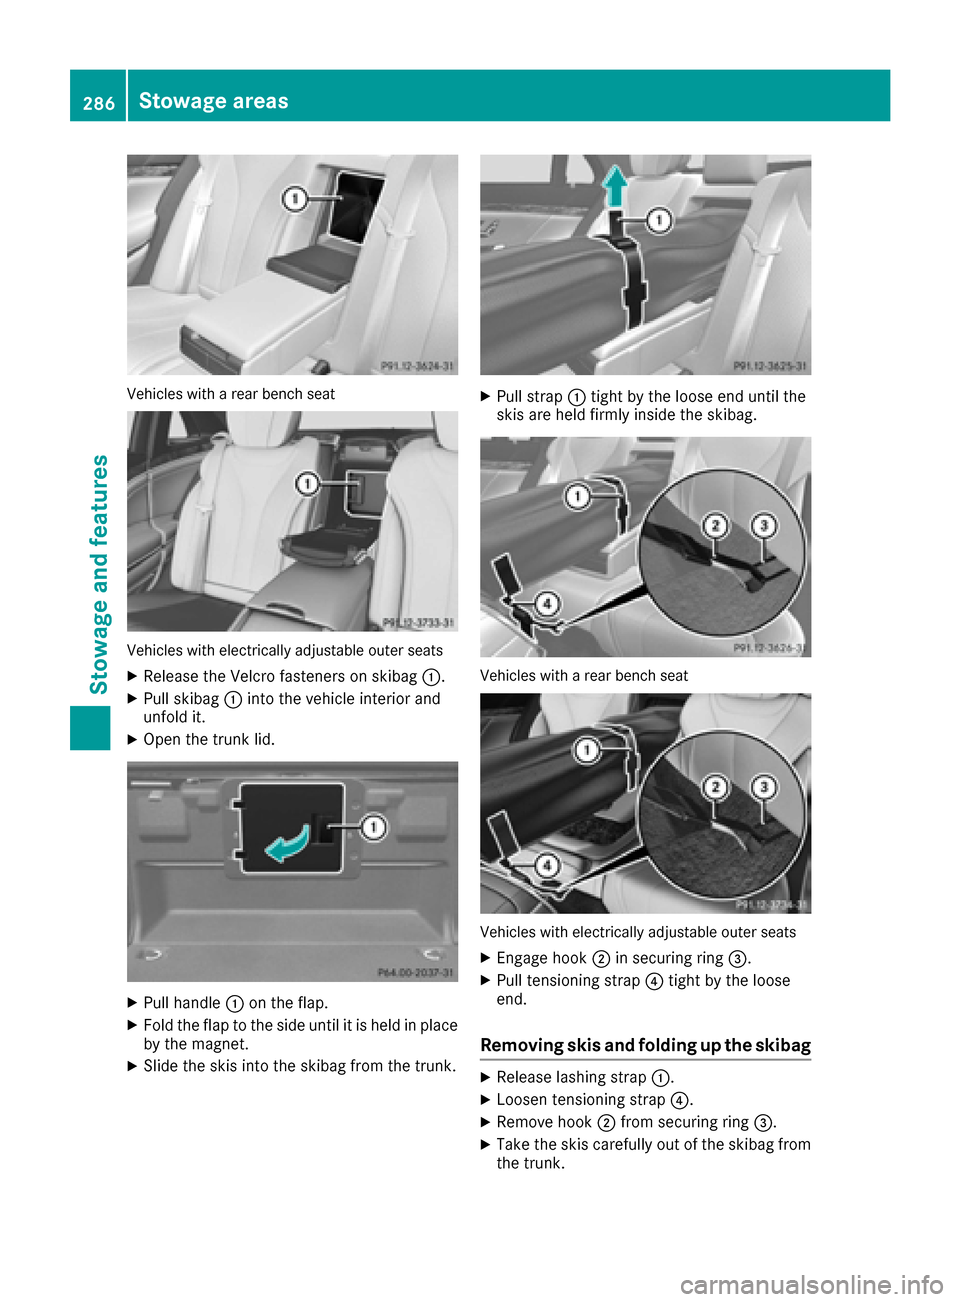
Vehicles with a rear bench seat
Vehicles with electrically adjustable outer seats
XRelease the Velcro fasteners on skibag:.
XPull skibag:into the vehicle interior and
unfold it.
XOpen the trunk lid.
XPull handle :on the flap.
XFold the flap to the side until it is held in place
by the magnet.
XSlide the skis into the skibag from the trunk.
XPull strap :tight by the loose end until the
skis are held firmly inside the skibag.
Vehicles with a rear bench seat
Vehicles with electrically adjustable outer seats
XEngage hook ;in securing ring =.
XPull tensioning strap ?tight by the loose
end.
Removing skis and folding up the skibag
XRelease lashing strap :.
XLoosen tensioning strap ?.
XRemove hook;from securing ring =.
XTake the skis carefully out of the skibag from
the trunk.
286Stowage areas
Stowage and features
Page 289 of 382
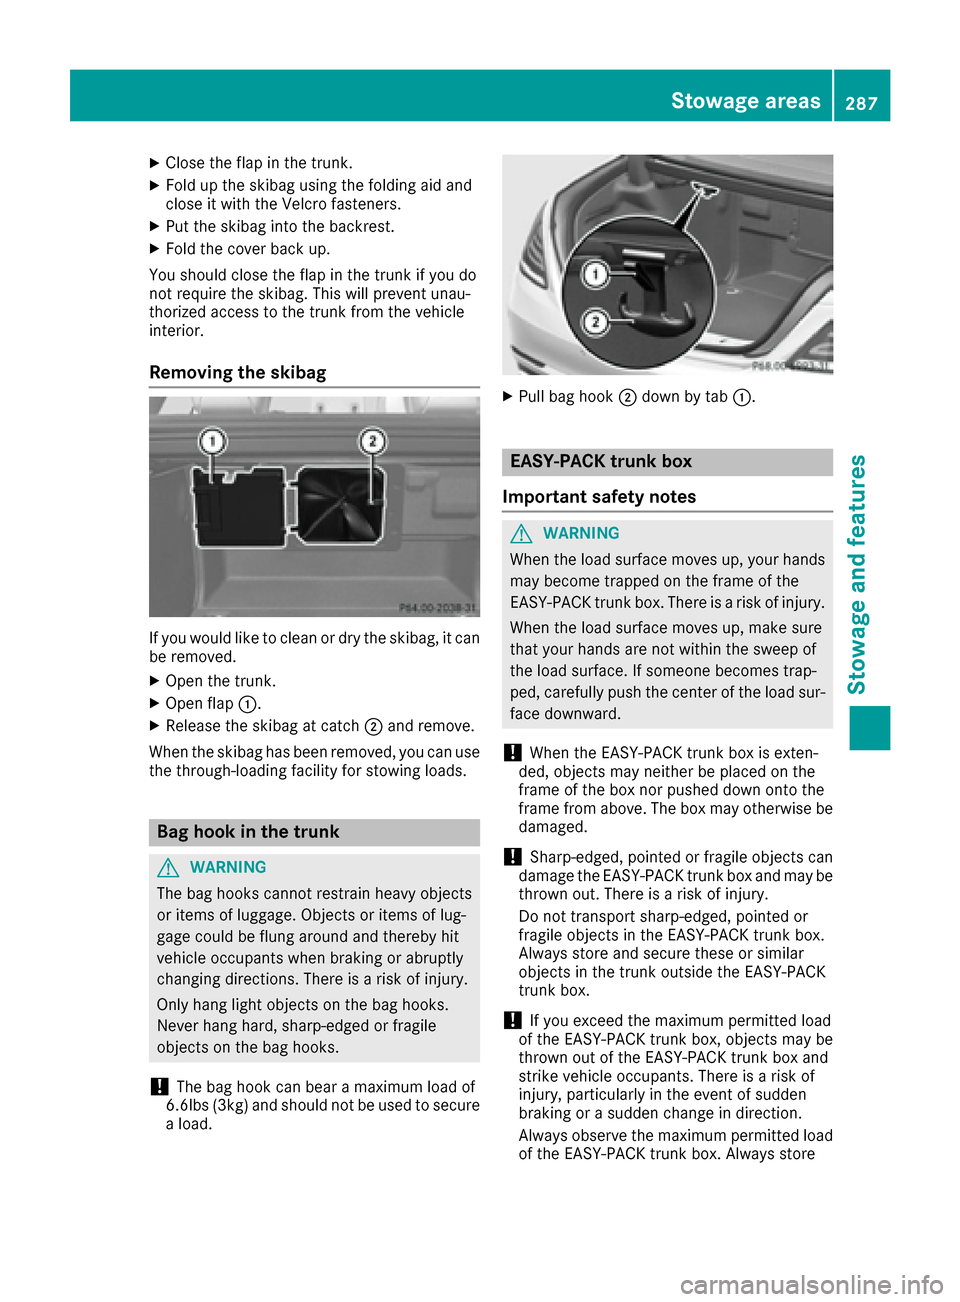
XClose the flapinthe trunk.
XFold up the skibag using the folding aid and
close it with the Velcro fasteners.
XPut the skibag into the backrest.
XFold the cover back up.
You should close the flap inthe trunk ifyou do
not require the skibag. This willprevent unau-
thorized access to the trunk from the veh icle
interior.
Removing the skibag
If you would like to clean or dry the skibag, itcan
be remove d.
XOpen the trunk.
XOpen flap :.
XRelease the skibag at catch;and remove.
When the skibag has been remove d,you can use
the through-loadin g facility for stowin g loads.
Bag hook in the trunk
GWARNING
The bag hooks cannot restrain heavy objects
or items of luggage. Objects or items of lug-
gage could beflung around and there byhit
veh icle occupants when braking or abrupt ly
changing directions. There isa risk of injury.
Only hang light objects on the bag hooks.
Never hang hard, sharp-edged or fragile
objects on the bag hooks.
!The bag hook can bear a maximum load of
6. 6lbs (3kg) and should not beused to secure
a load.
XPull bag hook ;down bytab :.
EASY-PACK trunk box
Important safety notes
GWARNING
When the load surface moves up, your hands may become trapped on the frame of the
EASY-PACK trunk box. There is a risk of injury.
When the load surface moves up, make sure
that your hands are not within the sweep of
the load surface. If someone becomes trap-
ped, carefully push the center of the load sur-
face down ward.
!When the EASY-PACK trunk box isexten-
ded, objects may neither beplaced on the
frame of the box nor pushed down onto the
frame from above. The box may otherwise be
damaged.
!Sharp-edged, pointed or fragile objects can
damage the EASY-PACK trunk box and may be
thrown out. There is a risk of injury.
Do not transport sharp-edged, pointed or
fragile objects in the EASY-PACK trunk box.
Always store and secure these or similar
objects in the trunk outside the EASY-PACK
trunk box.
!If you exceed the maximum permitted load
of the EASY-PACK trunk box, objects may be
thrown out of the EASY-PACK trunk box and
strike vehicle occupants. There is a risk of
injury, particularly in the event of sudden
braking or a sudden change indirection.
Alwa ys observe the maximum permitted load
of the EASY-PACK trunk box.Always store
Stowage areas287
Stowage and features
Z
Page 290 of 382
and secure heavy objects in the trunk outside
the EASY-PACK trunk box.
The maximum permitted load of the EASY-PACK
trunk box is 22 lbs (10 kg). With a load of above
approximately 11 lbs (5 kg), the bottom of the
box moves downwards until it rests on the mat
of the trunk floor. Thus, overloading of the box is avoided.
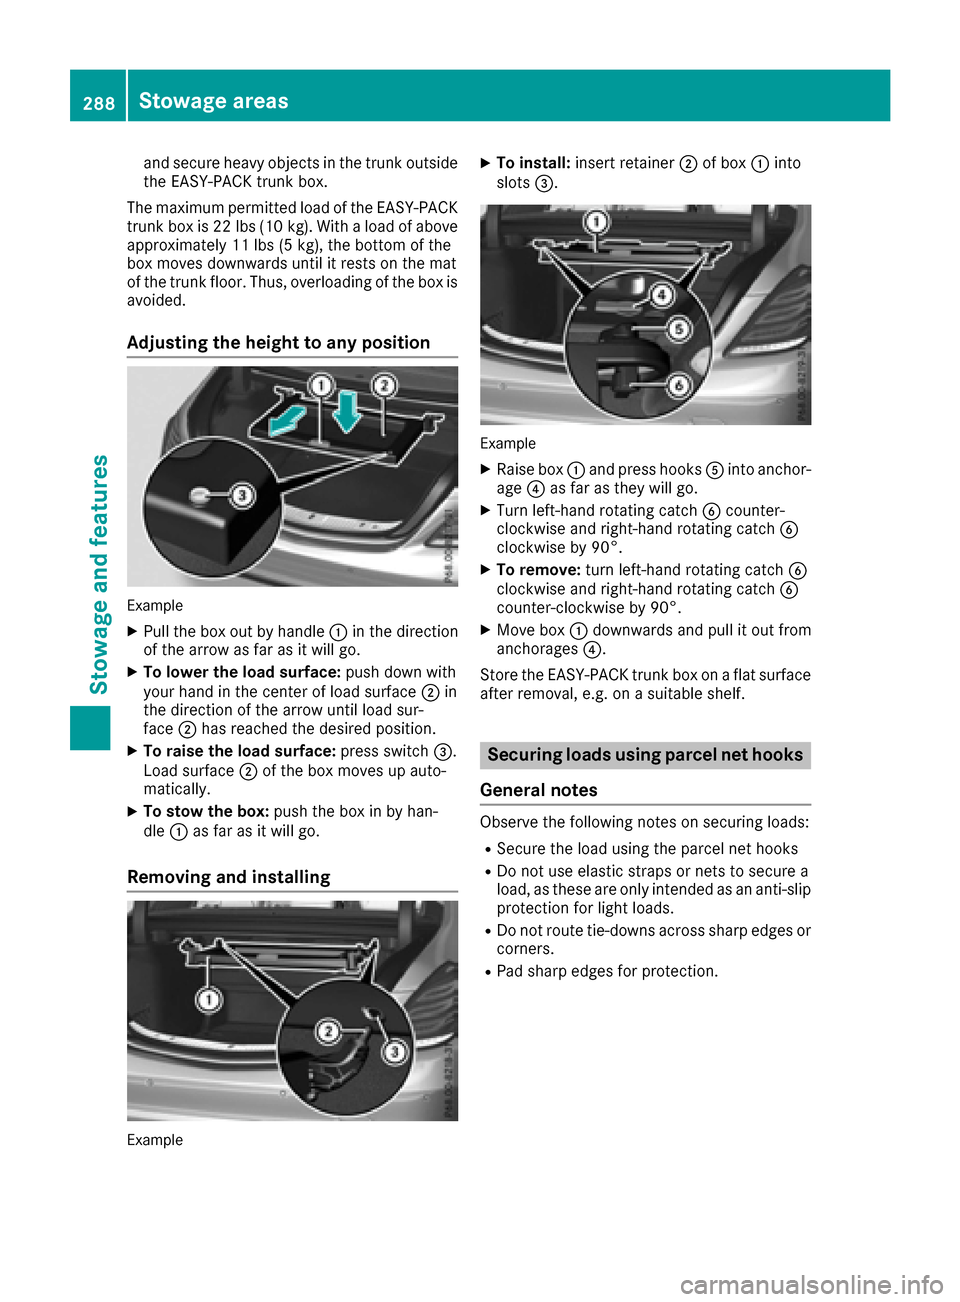
Adjusting the height to any position
Example
XPull the box out by handle :in the direction
of the arrow as far as it will go.
XTo lower the load surface: push down with
your hand in the center of load surface ;in
the direction of the arrow until load sur-
face ;has reached the desired position.
XTo raise the load surface: press switch=.
Load surface ;of the box moves up auto-
matically.
XTo stow the box: push the box in by han-
dle :as far as it will go.
Removing and installing
Example
XTo install: insert retainer ;of box :into
slots =.
Example
XRaise box :and press hooks Ainto anchor-
age ?as far as they will go.
XTurn left-hand rotating catch Bcounter-
clockwise and right-hand rotating catch B
clockwise by 90°.
XTo remove: turn left-hand rotating catch B
clockwise and right-hand rotating catch B
counter-clockwise by 90°.
XMove box :downwards and pull it out from
anchorages ?.
Store the EASY-PACK trunk box on a flat surface
after removal, e.g. on a suitable shelf.
Securing loads using parcel net hooks
General notes
Observe the following notes on securing loads:
RSecure the load using the parcel net hooks
RDo not use elastic straps or nets to secure a
load, as these are only intended as an anti-slip
protection for light loads.
RDo not route tie-downs across sharp edges or
corners.
RPad sharp edges for protection.
288Stowage areas
Stowage and features
Page 291 of 382

Trunk
There are up to four parcel net hooks in the trunk
depending on the equipment installed.
Stowage well under the trunk floor
XTo open:open the trunk lid.
XPress handle ;on the ribbing downwards.
Handle ;folds upwards.
XSwing trunk floor :upwards using handle ;
until it rests against the trunk partition.
XFold out hook =on the underside of the
trunk floor.
XClip hook =into groove ?.
XTo close:unclip hook =from groove ?.
XFasten hook =to the bracket on the under-
side of the trunk floor.
XFold the trunk floor down.
Roof carrier
Important safety notes
GWARNING
When you load the roof, the center of gravity
of the vehicle rises and the driving character-
istics change. If you exceed the maximum roof
load, the driving characteristics, as well as
steering and braking, will be greatly impaired.
There is a risk of an accident.
Never exceed the maximum roof load and
adjust your driving style.
You will find information on the maximum roof
load in the "Technical data" section
(
Ypage 376).
!Mercedes-Benz recommends that you only
use roof carriers that have been tested and
approved for Mercedes-Benz vehicles. This
helps to avoid damage to the vehicle.
Position the load on the roof carrier in such a
way that the vehicle will not sustain damage
even when it is in motion.
Ensure that, depending on the vehicle's
equipment, you can raise the panorama roof
with power tilt/sliding panel fully and open
the trunk lid fully when the roof carrier is
installed.
Stowag earea s289
Stowag ean d features
Z