2017 MERCEDES-BENZ S-Class MAYBACH fuel fill door release
[x] Cancel search: fuel fill door releasePage 12 of 382

Driving on flooded roads ................ 168
Driving on wet roads ...................... 168
Exhaust check ............................... 165
Fuel ................................................ 165
General .......................................... 164
Hydroplaning ................................. 168
Icy road surfaces ........................... 168
Important safety notes .................. 144
Limited braking efficiency on sal-
ted roads ....................................... 167
Snow chains .................................. 345
Subjecting brakes to a load ........... 166
The first 1000 miles (1500 km) ..... 144
Wet road surface ........................... 167
DVD video
Operating (on-board computer) ..... 219
see also Digital Operator's Man-
ual .................................................. 269
E
EASY-ENTRY featureFunction/notes ............................. 116
EASY-EXIT feature
Crash-responsive ........................... 117
Function/notes ............................. 116
EASY-PACK trunk box ....................... 287
EBD (electronic brake force distri-
bution)
Display message ............................ 230
Function/notes ................................ 73
ECO display
Function/notes ............................. 165
On-board computer ....................... 214
ECO start/stop function
Automatic engine start .................. 149
Automatic engine switch-off .......... 149
Deactivating/activating ................. 150
General information ....................... 149
Important safety notes .................. 149
Introduction ................................... 148
Electronic Stability Program
see ESP
®(Electronic Stability Program)
Emergency
Automatic measures after an acci-
dent ................................................. 58
Emergency release
Driver's door .................................... 84 Trunk ............................................... 90
Vehicle ............................................. 84
Emergency Tensioning Devices
Activation ......................................... 55
Emissions control
Service and warranty information .... 27
Engine
Check Engine warning lamp ........... 264
Display message ............................ 242
ECO start/stop function ................ 148
Engine number ............................... 371
Irregular running ............................ 151
Jump-starting ................................. 335
Starting (important safety notes) ... 146
Starting problems .......................... 151
Starting the engine with the
SmartKey ....................................... 147
Starting via smartphone ................ 147
Starting with the Start/Stop but-
ton ................................................. 147
Switching off .................................. 162
Tow-starting (vehicle) ..................... 340
Engine electronics
Problem (malfunction) ................... 151
Engine oil
Adding ........................................... 315
Additives ........................................ 374
Checking the oil level ..................... 314
Checking the oil level using the
dipstick .......................................... 314
Checki ng the o
il level using the
on-board computer ........................ 314
Display message ............................ 244
Filling capacity ............................... 374
General notes ................................ 373
Notes about oil grades ................... 373
Notes on oil level/consumption .... 314
Temperature (on-board computer,
Mercedes-AMG vehicles) ............... 226
Entering an address
see also Digital Operator's Man-
ual .................................................. 269
ESP
®(Electronic Stability Pro-
gram)
AMG menu (on-board computer) ... 226
Characteristics ................................. 71
Deactivating/activating ................. 221
Deactivating/activating (notes) ....... 71
10Index
Page 79 of 382

SmartKey
Important safety notes
GWARNING
If children are left unsupervised in the vehicle,
they could:
Ropen the doors, thus endangering other
people or road users.
Rget out and disrupt traffic.
Roperate the vehicle's equipment.
Additionally, children could set the vehicle in
motion if, for example, they:
Rrelease the parking brake.
Rshifting the automatic transmission out of
park position P
RStart the engine.
There is a risk of an accident and injury.
When leaving the vehicle, always take the
SmartKey with you and lock the vehicle. Never
leave children or animals unattended in the
vehicle. Always keep the SmartKey out of
reach of children.
GWARNING
If you attach heavy or large objects to the
SmartKey, the SmartKey could be uninten-
tionally turned in the ignition lock. This could
cause the engine to be switched off. There is a risk of an accident.
Do not attach any heavy or large objects to the
SmartKey. Remove any bulky key rings before
inserting the SmartKey into the ignition lock.
!Keep the SmartKey away from strong mag-
netic fields. Otherwise, the remote control
function could be affected.
Strong magnetic fields can occur in the vicin-
ity of powerful electrical installations.
Do not keep the SmartKey:
Rwith electronic devices, e.g. a mobile phone
or another SmartKey.
Rwith metallic objects, e.g. coins or metal foil.
Rinside metallic objects, e.g. a metal case.
This can affect the functionality of the Smart- Key. Do not keep the SmartKey in the temperature-
controlled cup holder (
Ypage 292). On vehicles
with the KEYLESS-GO start function, do not
keep it on the parcel shelf or in the trunk. Oth-
erwise, the SmartKey may not be detected, e.g.
when starting the engine using the Start/Stop
button.
A brief radio connection between the vehicle
and the SmartKey determines whether a valid
SmartKey is in, or in the direct vicinity of, the
vehicle. This occurs, for example:
Rwhen starting the engine
Rwhile driving
Rwhen using HANDS-FREE ACCESS
Rwhen the external door handles are touched
Rduring convenience closing
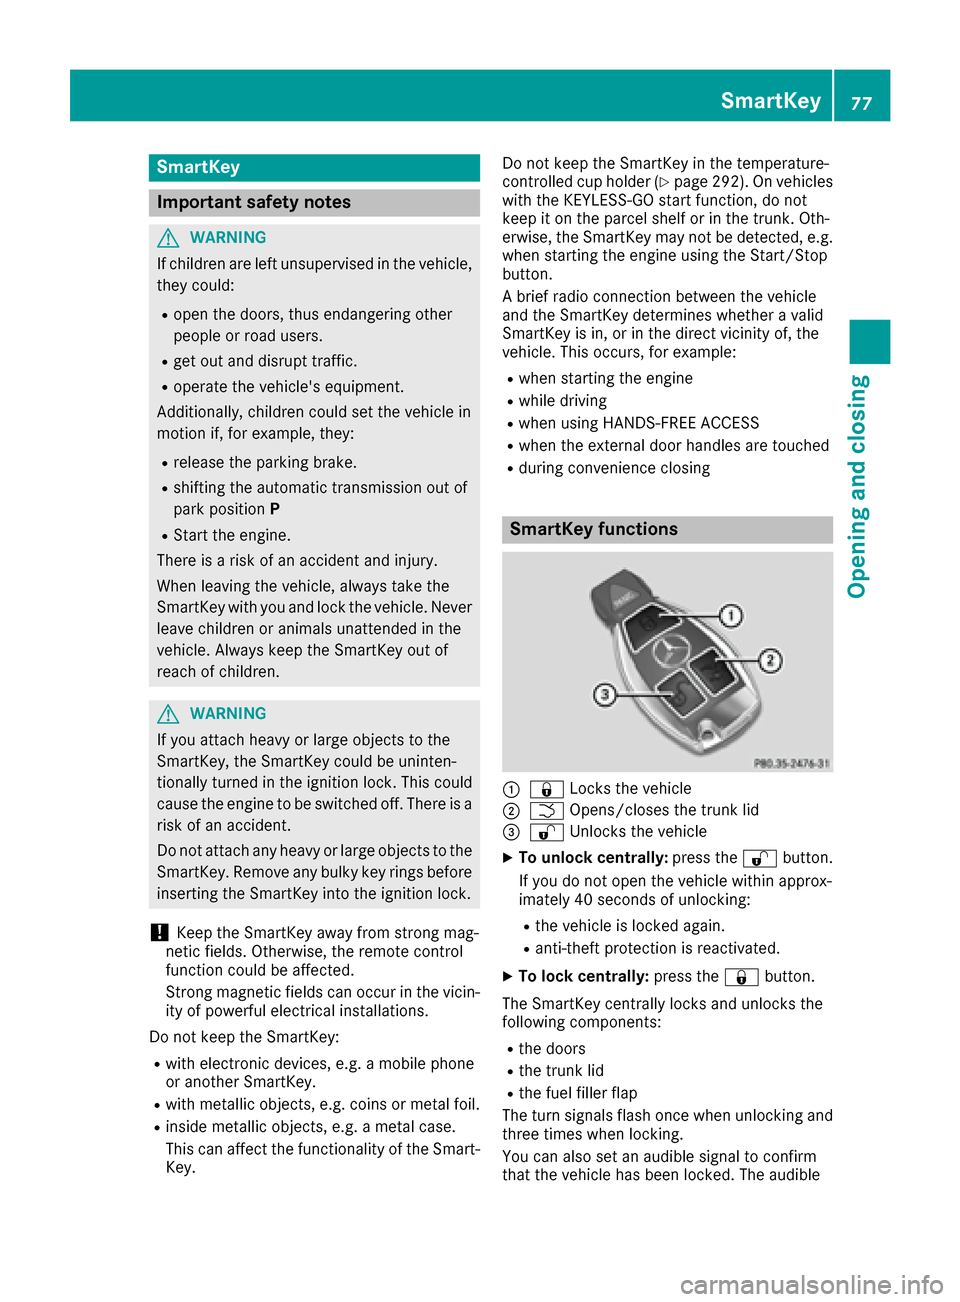
SmartKey functions
:& Locks the vehicle
;FOpens/closes the trunk lid
=%Unlocks the vehicle
XTo unlock centrally: press the%button.
If you do not open the vehicle within approx-
imately 40 seconds of unlocking:
Rthe vehicle is locked again.
Ranti-theft protection is reactivated.
XTo lock centrally: press the&button.
The SmartKey centrally locks and unlocks the
following components:
Rthe doors
Rthe trunk lid
Rthe fuel filler flap
The turn signals flash once when unlocking and
three times when locking.
You can also set an audible signal to confirm
that the vehicle has been locked. The audible
SmartKey77
Opening and closing
Z
Page 81 of 382

KEYLESS-GOstart function
Gene ral notes
Bear in min dthat th eengin ecan be started by
any of th evehicl eoccupant sif there is aSmart -
Key in th evehicl e (
Ypage 147).
Changing the settings ofthe locking
system
You can chang eth esetting sof th elocking sys-
tem. This mean sthat only th edriver's door and
th efuel filler flap are unlocke dwhen th evehicl e
is unlocked. This is useful if you frequentl ytravel
on your own .
XTo change th esetting: press and hold down
th e% and& buttons simultaneousl y
for approximately six seconds until th ebat -
tery chec klamp (
Ypage 80 )flashes twice .
If th esetting of th elocking system is changed
within th esignal range of th evehicle, pressing
th e& or% button:
Rlocks or
Runlocks th evehicl e
The SmartKey no wfunction sas follows :
XTo unlock: press the% buttononce .
XTo unlock centrally: press the% button
twice .
XTo lock: press the& button.
The KEYLESS-GO function scan be changed as
follows :
XTo unlock th edriver's door :touch th einner
surfac eof th edoor handle on th edriver's
door .
XTo unlock centrally: touch theinner surfac e
of th edoor handle on th efront-passenger
door or th erear door .
XTo lock centrally: touch theouter sensor
surfac eon on eof th edoor handles .
XTo restoreth efactory settings: press and
hold th e% and& buttons simultane -
ousl yfor approximately six seconds until th e
battery chec klamp (
Ypage 80) flashes
twice .
Mechanical key
Gene ral notes
If th evehicl ecan no longer be locke dor
unlocke dwit hth eSmartKey or KEYLESS-GO ,
use th emechanical key.
If you use th emechanical ke yto unloc kand
open th edriver's door ,th eanti-thef talarm sys-
te m will be triggered .Switc hoff th ealarm
(
Ypage 76) .
If you unloc kth evehicl eusin gth emechanical
key, th efuel filler flap will no tbe unlocke dauto -
matically.
XTo unlock th efuel filler flap: insert the
SmartKey int oth eignition lock.
Removing the mechanical key
XPush release catch :in th edirection of th e
arrow and at th esam etime remove mechan -
ical ke y; from th eSmartKey.
Fo rfurther information about :
RLocking/unlocking thedriver's door
(Ypage 84 )
RUnlocking th etrunk (Ypage 90 )
Inserting the mechanical key
XPush mechanical ke y; completely int oth e
SmartKey until it engage sand release
catch :is bac kin it sbasic position .
SmartKey79
Opening and closing
Z
Page 150 of 382

Rthe panic alarm is not activated
Rthe hazard warning lamps are switched off
Rthe hood is closed.
Rthe doors are closed and locked
Rthe windows and sliding sunroof are closed
Also make sure that:
Rthe fuel tank is sufficiently filled
Rthe starter battery is sufficiently charged
GWARNING
Limbs could be crushed or trapped if the
engine is started unintentionally during ser-
vice or maintenance work. There is a risk of
injury.
Always secure the engine against uninten-
tional starting before carrying out mainte-
nance or repair work.
Make sure that the engine cannot be started via
your smartphone before carrying out mainte-
nance or repairs. You can prevent an engine
start via your smartphone, for example, if you:
Rswitch on the hazard warning lamps
Rdo not lock the doors
Ropen the hood
Pulling away
General notes
GWARNING
If the engine speed is above the idling speed
and you engage transmission position Dor R,
the vehicle could pull away suddenly. There is
a risk of an accident.
When engaging transmission position Dor R,
always firmly depress the brake pedal and do not simultaneously accelerate.
Depress the accelerator carefully when pulling
away.
The vehicle locks centrally once you have pulled
away. The locking knobs in the doors drop down.
You can open the doors from the inside at any
time.
You can also deactivate the automatic locking
feature (
Ypage 84). It is only possible to shift the transmission from
position
Pto the desired position if you depress
the brake pedal. Only then is the parking lock
released.
If you do not depress the brake pedal, the
DIRECT SELECT lever can still be moved but the
parking lock remains engaged.
iUpshifts take place at higher engine speeds
after a cold start. This helps the catalytic con-
verter to reach its operating temperature
more quickly.
Information on the automatic release of the
electric parking brake (
Ypage 164).
Hill start assist
Hill start assist helps you when pulling away for-
wards or in reverse on an uphill gradient. It holds
the vehicle for a short time after you have
removed your foot from the brake pedal. This
gives you enough time to move your foot from
the brake pedal to the accelerator pedal and to
depress it before the vehicle begins to roll.
GWARNING
After a short time, hill start assist will no lon-
ger brake your vehicle and it could roll away.
There is a risk of an accident and injury.
Therefore, quickly move your foot from the
brake pedal to the accelerator pedal. Never
leave the vehicle when it is held by hill start
assist.
Hill start assist is not active if:
Ryou are pulling away on a level road or on a
downhill gradient.
Rthe transmission is in position i.
Rthe electric parking brake is applied.
RESP®is malfunctioning.
ECO start/stop function
Introduction
Hybrid vehicles: observe the notes on the ECO
start/stop function in the separate operating
instructions.
The ECO start/stop function switches the
engine off automatically if the vehicle is stopped
under certain conditions.
148Driving
Dr iving an d parking
Page 351 of 382

Checking the tire pressures
Important safety notes
Observe the notes on tire pressure
(Ypage 346).
Information on air pressure for the tires on your
vehicle can be found:
Ron the vehicle's Tire and Loading Information
placard on the B-pillar (Ypage 353)
Rin the tire pressure table in the fuel filler flap
(Ypage 162)
Rin the "Tire pressure" section
Checking tire pressures manually
To determine and set the correct tire pressure,
proceed as follows:
XRemove the valve cap of the tire that is to be
checked.
XPress the tire pressure gage securely onto the
valve.
XRead the tire pressure and compare it to the
recommended value on the Tire and Loading
Information placard or the tire pressure table (
Ypage 346).
XIf the tire pressure is too low, increase the tire
pressure to the recommended value.
XIf the tire pressure is too high, release air. To
do so, press down the metal pin in the valve,
using the tip of a pen for example. Then check
the tire pressure again using the tire pressure
checker.
XScrew the valve cap onto the valve.
XRepeat these steps for the other tires.
Tire pressure monitor
General notes
If a tire pressure monitor is installed, the vehi-
cle's wheels have sensors that monitor the tire
pressures in all four tires. The tire pressure mon-
itor warns you if the pressure drops in one or
more of the tires. The tire pressure monitor only
functions if the corresponding sensors are
installed in all wheels.
Information on tire pressures is displayed in the
multifunction display. After a few minutes of
driving, the current tire pressure of each tire is shown in the
Service
menu of the multifunction
display; see illustration (example).
For information on the message display, refer to
the "Checking the tire pressure electronically"
section (
Ypage 350).
Important safety notes
GWARNING
Each tire, including the spare (if provided),
should be checked at least once every two
weeks when cold and inflated to the pressure recommended by the vehicle manufacturer
on the Tire and Loading Information placard
on the driver's door B-pillar or the tire pres-
sure label on the inside of the fuel filler flap. If
your vehicle has tires of a different size than
the size indicated on the Tire and Loading
Information placard or, if available, the tire
pressure label, you should determine the
proper tire pressure for those tires.
As an added safety feature, your vehicle has
been equipped with a tire pressure monitoring
system (TPMS) that illuminates a low tire pres-
sure telltale when one or more of your tires
are significantly underinflated. Accordingly,
when the low tire pressure telltale lights up,
you should stop and check your tires as soon
as possible, and inflate them to the proper
pressure. Driving on a significantly underin-
flated tire causes the tire to overheat and can
lead to tire failure.
Underinflation also reduces fuel efficiency
and tire tread life, and may affect the vehicle's
handling and stopping ability. Please note thatthe TPMS is not a substitute for proper tire
maintenance, and it is the driver's responsi-
bility to maintain correct tire pressure, eve n if
un
derinflation has not reached the level to
Tire pressure349
Wheels and tires
Z