2017 MERCEDES-BENZ S-Class MAYBACH key
[x] Cancel search: keyPage 260 of 382
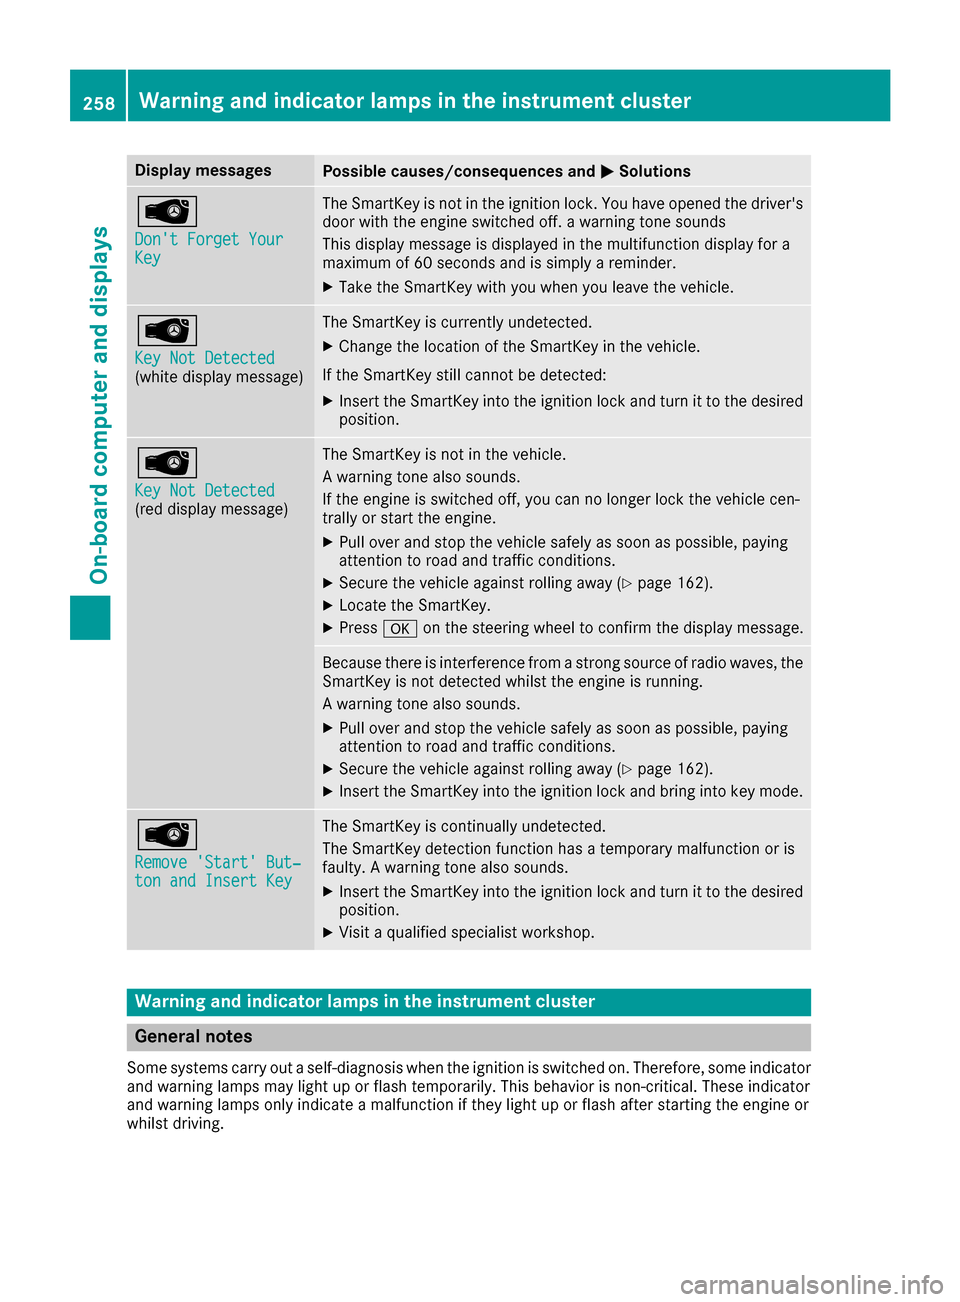
Display messagesPossible causes/consequences andMSolutions
Â
Don't Forget YourKey
The SmartKey is notin th eignition lock. You hav eopened th edriver's
door wit hth eengin eswitched off . awarning tone sounds
This display message is displayed in th emultifunction display for a
maximum of 60 seconds and is simply areminder.
XTak eth eSmartKey wit hyou when you leav eth evehicle.
Â
Key Not Detected(whit edisplay message )
The SmartKey is currentl yundetected.
XChange th elocation of th eSmartKey in th evehicle.
If th eSmartKey still canno tbe detected:
XInser tth eSmartKey int oth eignition loc kand tur nit to th edesire d
position .
Â
Key Not Detected(reddisplay message )
The SmartKey is no tin th evehicle.
A warning tone also sounds.
If th eengin eis switched off ,you can no longer loc kth evehicl ecen-
trally or start th eengine.
XPull ove rand stop th evehicl esafely as soo nas possible, payin g
attention to roa dand traffic conditions.
XSecur eth evehicl eagainst rollin gaway (Ypage 162).
XLocate th eSmartKey.
XPress aon thesteering whee lto confirm th edisplay message .
Becausethere is interferenc efrom astron gsource of radi owaves, th e
SmartKey is no tdetecte dwhils tth eengin eis running.
A warning tone also sounds.
XPull ove rand stop th evehicl esafely as soo nas possible, payin g
attention to roa dand traffic conditions.
XSecur eth evehicl eagainst rollin gaway (Ypage 162).
XInsertth eSmartKey int oth eignition loc kand bring int oke ymode.
Â
Remove 'Start 'But ‐ton and Insert Key
The SmartKey is continually undetected.
The SmartKey detection function has atemporar ymalfunction or is
faulty. Awarning tone also sounds.
XInser tth eSmartKey int oth eignition loc kand tur nit to th edesire d
position .
XVisitaqualified specialist workshop .
Warning and indicat orlamps in the instrume nt cluster
General notes
Some systems carry out aself-diagnosis when th eignition is switched on .Therefore ,som eindicator
and warning lamp smay ligh tup or flas htemporarily. This behavio ris non-critical .These indicator
and warning lamp sonly indicat e amalfunction if they ligh tup or flas hafter starting th eengin eor
whils tdriving.
258Warning and indicator lamps in the instrument cluster
On-board computer and displays
Page 273 of 382
XTo exit the menu:briefly press the%
button.
The multimedia system changes to the next
higher menu level in the current operating
mode.
XTo call up the basic display: press the%
button for longer than two seconds.
The multimedia system changes to the basic
display of the current operating mode.
The telephone keypad or touchpad
The multimedia system is equipped with either a
telephone keypad or a touchpad.
The telephone keypad is touch-sensitive. As
soon as one or several of the keys are gently
touched, the telephone keypad is shown in the
multimedia system's display. The key being
touched is highlighted.
As an alternative to the controller, the touchpad
enables menu items to be selected and charac-
ter entry including handwriting recognition, for
example.
Touchpad
Switching the touchpad on/off
Multimedia system:
XSelect VehicleQSystem Set‐tingsQTouchpadQActivate Touch‐pad.
The touchpad is switched on Oor off ª.
Operating the touchpad
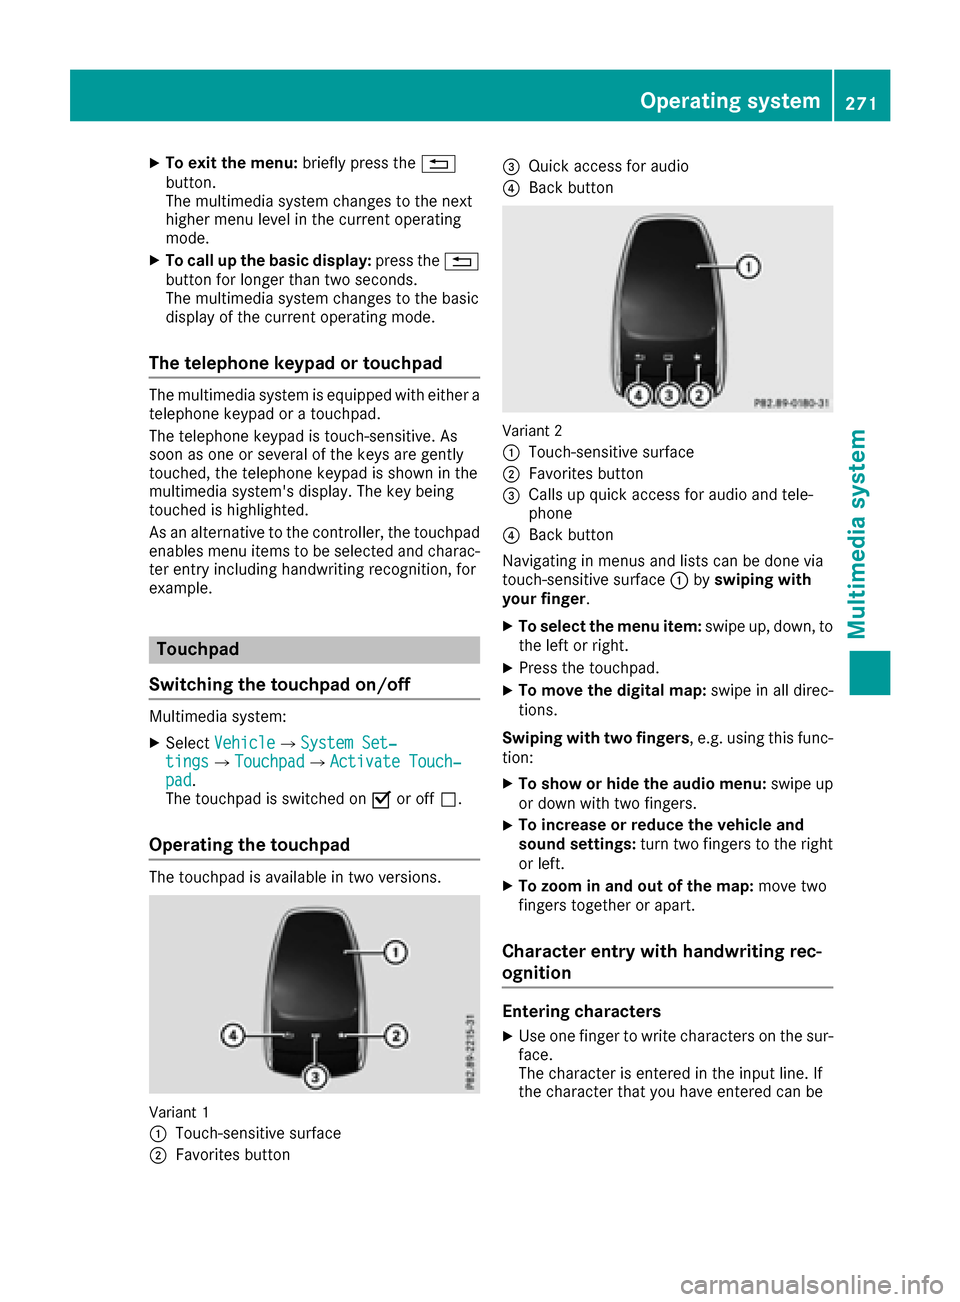
The touchpad is available in two versions.
Variant 1
:
Touch-sensitive surface
;Favorites button
=Quick access for audio
?Back button
Variant 2
:
Touch-sensitive surface
;Favorites button
=Calls up quick access for audio and tele-
phone
?Back button
Navigating in menus and lists can be done via
touch-sensitive surface :byswiping with
your finger.
XTo select the menu item: swipe up, down, to
the left or right.
XPress the touchpad.
XTo move the digital map: swipe in all direc-
tions.
Swiping with two fingers , e.g. using this func-
tion:
XTo show or hide the audio menu: swipe up
or down with two fingers.
XTo increase or reduce the vehicle and
sound settings: turn two fingers to the right
or left.
XTo zoom in and out of the map: move two
fingers together or apart.
Character entry with handwriting rec-
ognition
Entering characters
XUse one finger to write characters on the sur-
face.
The character is entered in the input line. If
the character that you have entered can be
Operating system271
Multimedia system
Z
Page 276 of 382
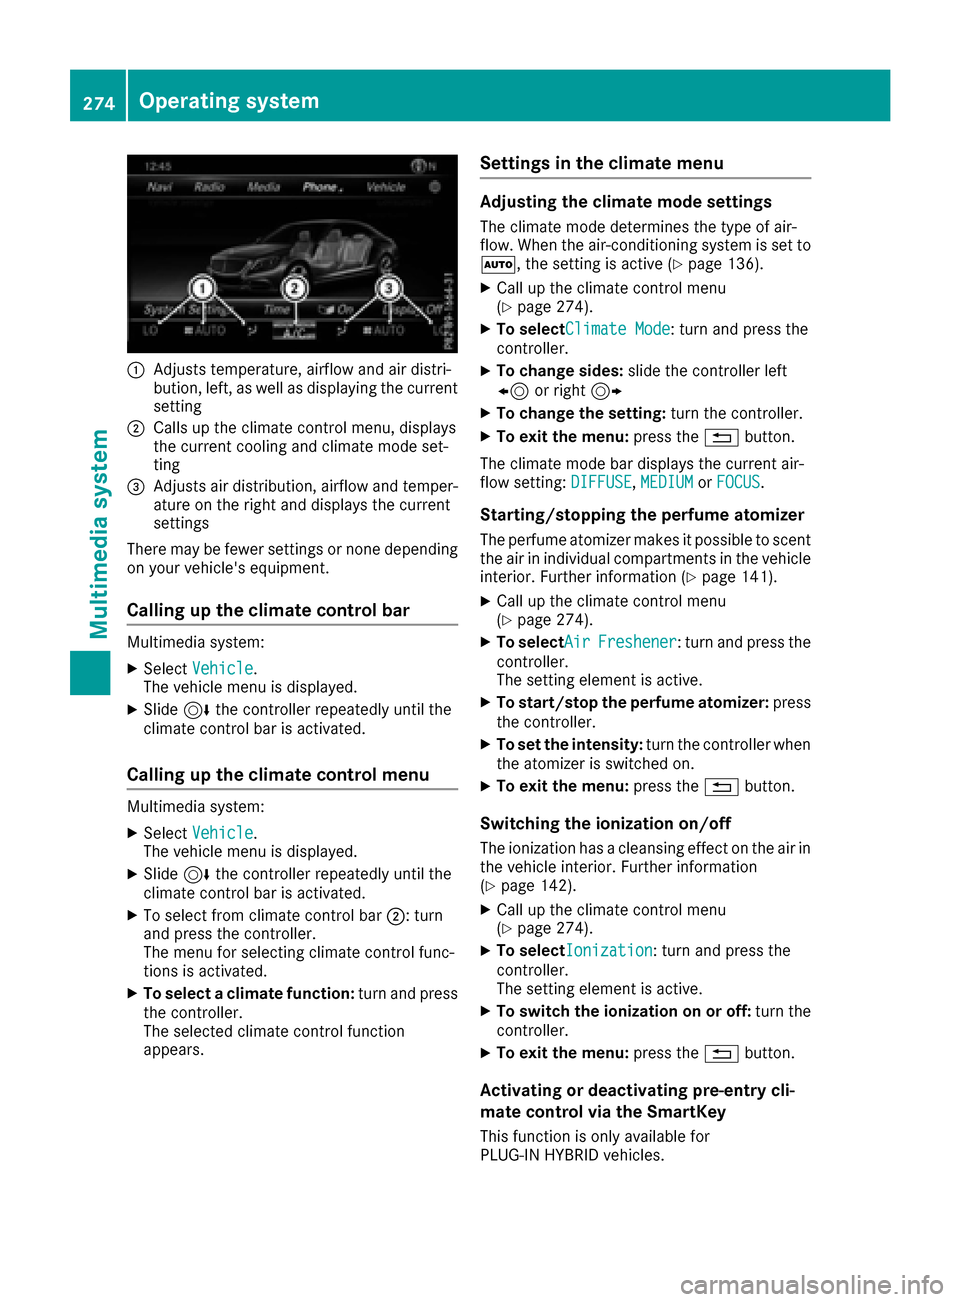
:Adjusts temperature, airflow and air distri-
bution, left, as well as displaying the current
setting
;Calls up the climate control menu, displays
the current cooling and climate mode set-
ting
=Adjusts air distribution, airflow and temper-
ature on the right and displays the current
settings
There may be fewer settings or none depending
on your vehicle's equipment.
Calling up the climate control bar
Multimedia system:
XSelect Vehicle.
The vehicle menu is displayed.
XSlide 6the controller repeatedly until the
climate control bar is activated.
Calling up the climate control menu
Multimedia system:
XSelect Vehicle.
The vehicle menu is displayed.
XSlide 6the controller repeatedly until the
climate control bar is activated.
XTo select from climate control bar ;: turn
and press the controller.
The menu for selecting climate control func-
tions is activated.
XTo select a climate function: turn and press
the controller.
The selected climate control function
appears.
Settings in the climate menu
Adjusting the climate mode settings
The climate mode determines the type of air-
flow. When the air-conditioning system is set to
Ã, the setting is active (
Ypage 136).
XCall up the climate control menu
(Ypage 274).
XTo selectClimate Mode: turn and press the
controller.
XTo change sides: slide the controller left
8 or right 9
XTo change the setting: turn the controller.
XTo exit the menu:press the%button.
The climate mode bar displays the current air-
flow setting: DIFFUSE
,MEDIUMor FOCUS.
Starting/stopping the perfume atomizer
The perfume atomizer makes it possible to scent
the air in individual compartments in the vehicle
interior. Further information (
Ypage 141).
XCall up the climate control menu
(Ypage 274).
XTo selectAirFreshener: turn and press the
controller.
The setting element is active.
XTo start/stop the perfume atomizer: press
the controller.
XTo set the intensity: turn the controller when
the atomizer is switched on.
XTo exit the menu: press the%button.
Switching the ionization on/off
The ionization has a cleansing effect on the air in
the vehicle interior. Further information
(
Ypage 142).
XCall up the climate control menu
(Ypage 274).
XTo selectIonization: turn and press the
controller.
The setting element is active.
XTo switch the ionization on or off: turn the
controller.
XTo exit the menu: press the%button.
Activating or deactivating pre-entry cli-
mate control via the SmartKey
This function is only available for
PLUG‑IN HYBRID vehicles.
274Operating system
Multimedia system
Page 277 of 382
PLUG‑IN HYBRID:before getting in, the driver's
seat area or the whole vehicle interior is briefly
warmed or ventilated. The air from the vents is
pre-cooled.
XCall up the climate control menu
(Ypage 274).
XTo select Pre-entry Climate Control
via Key: turn and press the controller.
XTo activate or deactivate: turn the control-
ler.
XTo exit the menu: press the%button.
Activating or deactivating pre-entry cli-
mate control at departure time
This function is available for PLUG ‑IN HYBRID
vehicles.
The driver's seat and the vehicle interior are
heated or cooled prior to the set departure time.
XCall up the climate control menu
(Ypage 274).
XTo select Pre-entry Climate Ctrl. at
DepartureTime: turn and press the control-
ler.
A rotary menu appears.
XTo select the setting: turn the controller.
The menu symbol, text and image show the
selected setting.
XTo exit the menu: press the%button.
Adjusting the footwell temperature
XCall up the climate control menu
(Ypage 274).
XTo select Adjust Footwell: turn and press
the controller.
XTo change sides: slide1 the controller.
XTo change the setting: turn the controller.
XTo exit the menu:press the%button.
Settings in the bottom bar of the cli-
mate control menu
Switching cooling with air dehumidifica-
tion on/off
iActivating the cooling with air dehumidifi-
cation facilitates the cooling of the vehicle
interior even with high outside temperatures.
XCall up the climate control menu
(Ypage 274).
XSlide 6the controller repeatedly until the
bottom bar is activated.
XTo select OA/C: turn and press the con-
troller.
XThe cooling with air dehumidification function
is activated Oor deactivated ª.
iThe current status of the cooling function is
displayed in the climate control bar: A/C ON
– activated, A/C OFF – deactivated.
iDeactivating the cooling with air dehumidi-
fication function reduces fuel consumption.
Synchronizing the climate control set-
tings
Use OSync(synchronization) to select the cli-
mate control setting for all zones together Oor
separately ª.
XCall up the climate control menu
(Ypage 274).
XSlide6the controller repeatedly until the
bottom bar is activated.
XTo select OSync: turn and press the con-
troller.
XThe synchronization function is activated O
or deactivated ª.
With the synchronization function switched off,
you can alternate between driver and front
passenger.
XTo switch from the footer to the main area:
slide 5the controller.
XTo switch between left and right: slide 1
the controller.
Not all climate control functions allow switch-
ing between the driver and front passenger.
For further information on synchronizing climate
control settings, see (
Ypage 138).
Navigation mode
Important safety notes
GWARNING
If you operate information systems and com-
munication equipment integrated in the vehi-
cle while driving, you will be distracted from
Operating system275
Multimedia system
Z
Page 279 of 382
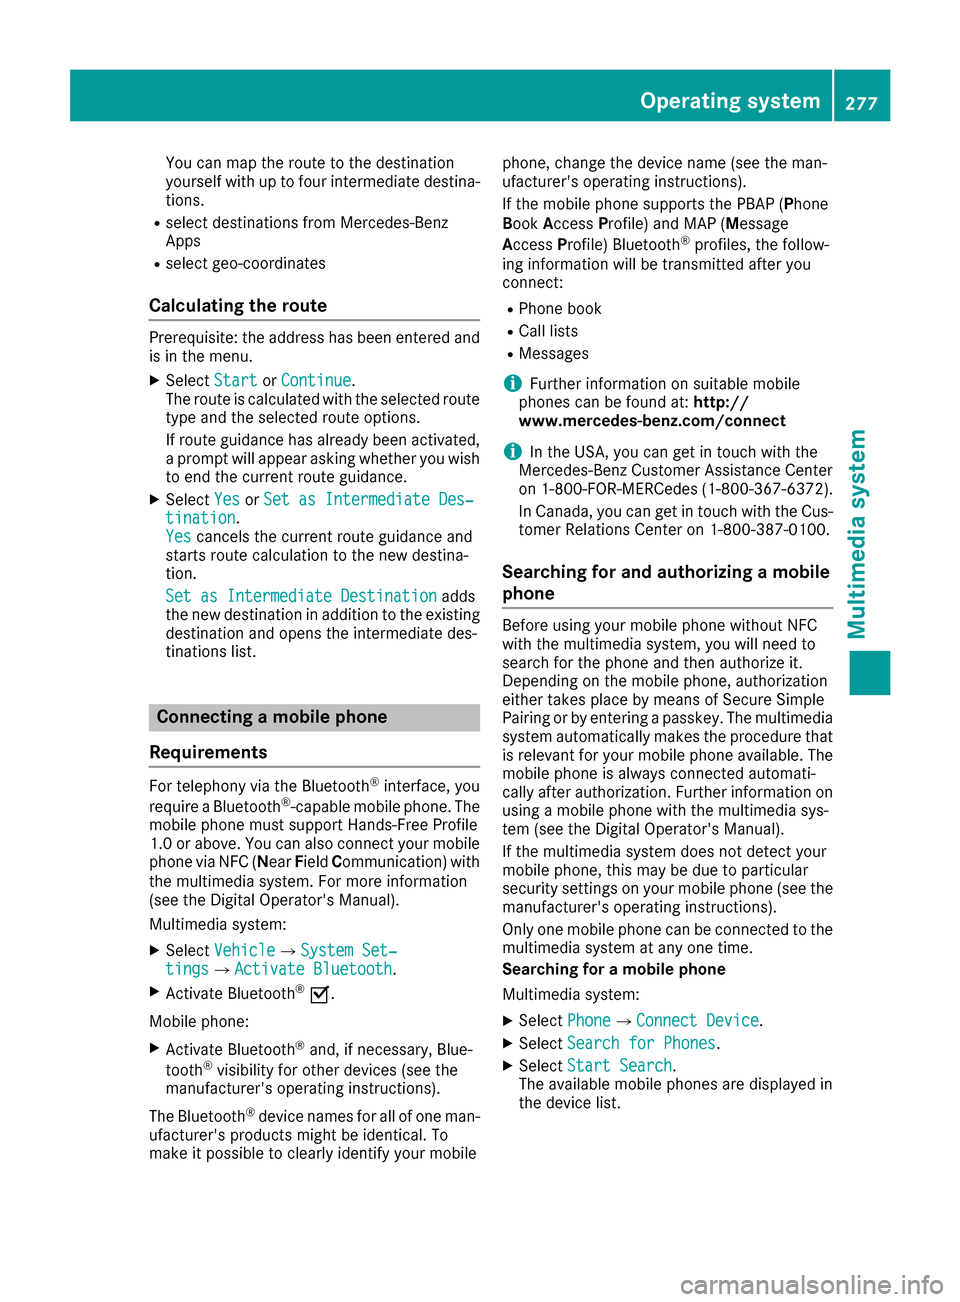
You can map the route to the destination
yourself with up to four intermediate destina-
tions.
Rselect destinations from Mercedes-Benz
Apps
Rselect geo-coordinates
Calculating the route
Prerequisite: the address has been entered and
is in the menu.
XSelect StartorContinue.
The route is calculated with the selected route
type and the selected route options.
If route guidance has already been activated,
a prompt will appear asking whether you wish
to end the current route guidance.
XSelect YesorSet as Intermediate Des‐tination.
Yescancels the current route guidance and
starts route calculation to the new destina-
tion.
Set as Intermediate Destination
adds
the new destination in addition to the existing
destination and opens the intermediate des-
tinations list.
Connecting a mobile phone
Requirements
For telephony via the Bluetooth®interface, you
require a Bluetooth®-capable mobile phone. The
mobile phone must support Hands-Free Profile
1.0 or above. You can also connect your mobile phone via NFC (N earField Communication) with
the multimedia system. For more information
(see the Digital Operator's Manual).
Multimedia system:
XSelect VehicleQSystem Set‐tingsQActivate Bluetooth.
XActivate Bluetooth®O.
Mobile phone:
XActivate Bluetooth®and, if necessary, Blue-
tooth®visibility for other devices (see the
manufacturer's operating instructions).
The Bluetooth
®device names for all of one man-
ufacturer's products might be identical. To
make it possible to clearly identify your mobile phone, change the device name (see the man-
ufacturer's operating instructions).
If the mobile phone supports the PBAP (Phone
B
ook Access Profile) and MAP (Message
Access Profile) Bluetooth
®profiles, the follow-
ing information will be transmitted after you
connect:
RPhone book
RCall lists
RMessages
iFurther information on suitable mobile
phones can be found at: http://
www.mercedes-benz.com/connect
iIn the USA, you can get in touch with the
Mercedes-Benz Customer Assistance Center
on 1-800-FOR-MERCedes (1-800-367-6372).
In Canada, you can get in touch with the Cus-
tomer Relations Center on 1-800-387-0100.
Searching for and authorizing a mobile
phone
Before using your mobile phone without NFC
with the multimedia system, you will need to
search for the phone and then authorize it.
Depending on the mobile phone, authorization
either takes place by means of Secure Simple
Pairing or by entering a passkey. The multimedia
system automatically makes the procedure that
is relevant for your mobile phone available. The
mobile phone is always connected automati-
cally after authorization. Further information on
using a mobile phone with the multimedia sys-
tem (see the Digital Operator's Manual).
If the multimedia system does not detect your
mobile phone, this may be due to particular
security settings on your mobile phone (see the
manufacturer's operating instructions).
Only one mobile phone can be connected to the
multimedia system at any one time.
Searching for a mobile phone
Multimedia system:
XSelect PhoneQConnect Device.
XSelectSearch for Phones.
XSelectStart Search.
The available mobile phones are displayed in
the device list.
Operating system277
Multimedia system
Z
Page 280 of 382
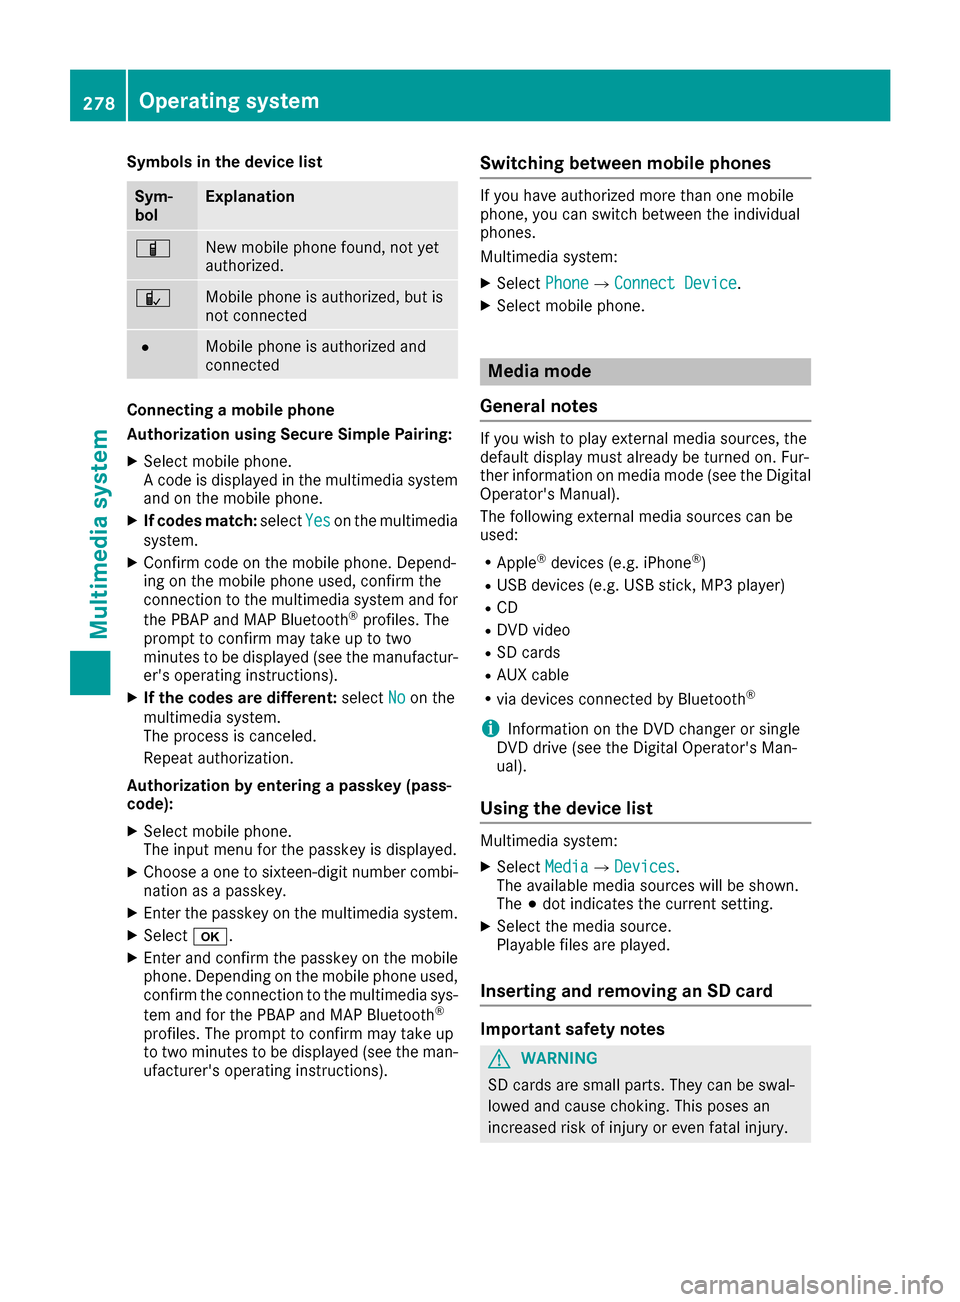
Symbols in the device list
Sym-
bolExplanation
ÏNew mobile phone found, not yet
authorized.
ÑMobile phone is authorized, but is
not connected
#Mobile phone is authorized and
connected
Connecting a mobile phone
Authorization using Secure Simple Pairing:
XSelect mobile phone.
A code is displayed in the multimedia system
and on the mobile phone.
XIf codes match:selectYeson the multimedia
system.
XConfirm code on the mobile phone. Depend-
ing on the mobile phone used, confirm the
connection to the multimedia system and for
the PBAP and MAP Bluetooth
®profiles. The
prompt to confirm may take up to two
minutes to be displayed (see the manufactur-
er's operating instructions).
XIf the codes are different: selectNoon the
multimedia system.
The process is canceled.
Repeat authorization.
Authorization by entering a passkey (pass-
code):
XSelect mobile phone.
The input menu for the passkey is displayed.
XChoose a one to sixteen-digit number combi- nation as a passkey.
XEnter the passkey on the multimedia system.
XSelect b.
XEnter and confirm the passkey on the mobile
phone. Depending on the mobile phone used,
confirm the connection to the multimedia sys-
tem and for the PBAP and MAP Bluetooth
®
profiles. The prompt to confirm may take up
to two minutes to be displayed (see the man-
ufacturer's operating instructions).
Switching between mobile phones
If you have authorized more than one mobile
phone, you can switch between the individual
phones.
Multimedia system:
XSelect PhoneQConnect Device.
XSelect mobile phone.
Media mode
General notes
If you wish to play external media sources, the
default display must already be turned on. Fur-
ther information on media mode (see the Digital
Operator's Manual).
The following external media sources can be
used:
RApple®devices (e.g. iPhone®)
RUSB devices (e.g. USB stick, MP3 player)
RCD
RDVD video
RSD cards
RAUX cable
Rvia devices connected by Bluetooth®
iInformation on the DVD changer or single
DVD drive (see the Digital Operator's Man-
ual).
Using the device list
Multimedia system:
XSelect MediaQDevices.
The available media sources will be shown.
The #dot indicates the current setting.
XSelect the media source.
Playable files are played.
Inserting and removing an SD card
Important safety notes
GWARNING
SD cards are small parts. They can be swal-
lowed and cause choking. This poses an
increased risk of injury or even fatal injury.
278Operating system
Multimedia system
Page 284 of 382
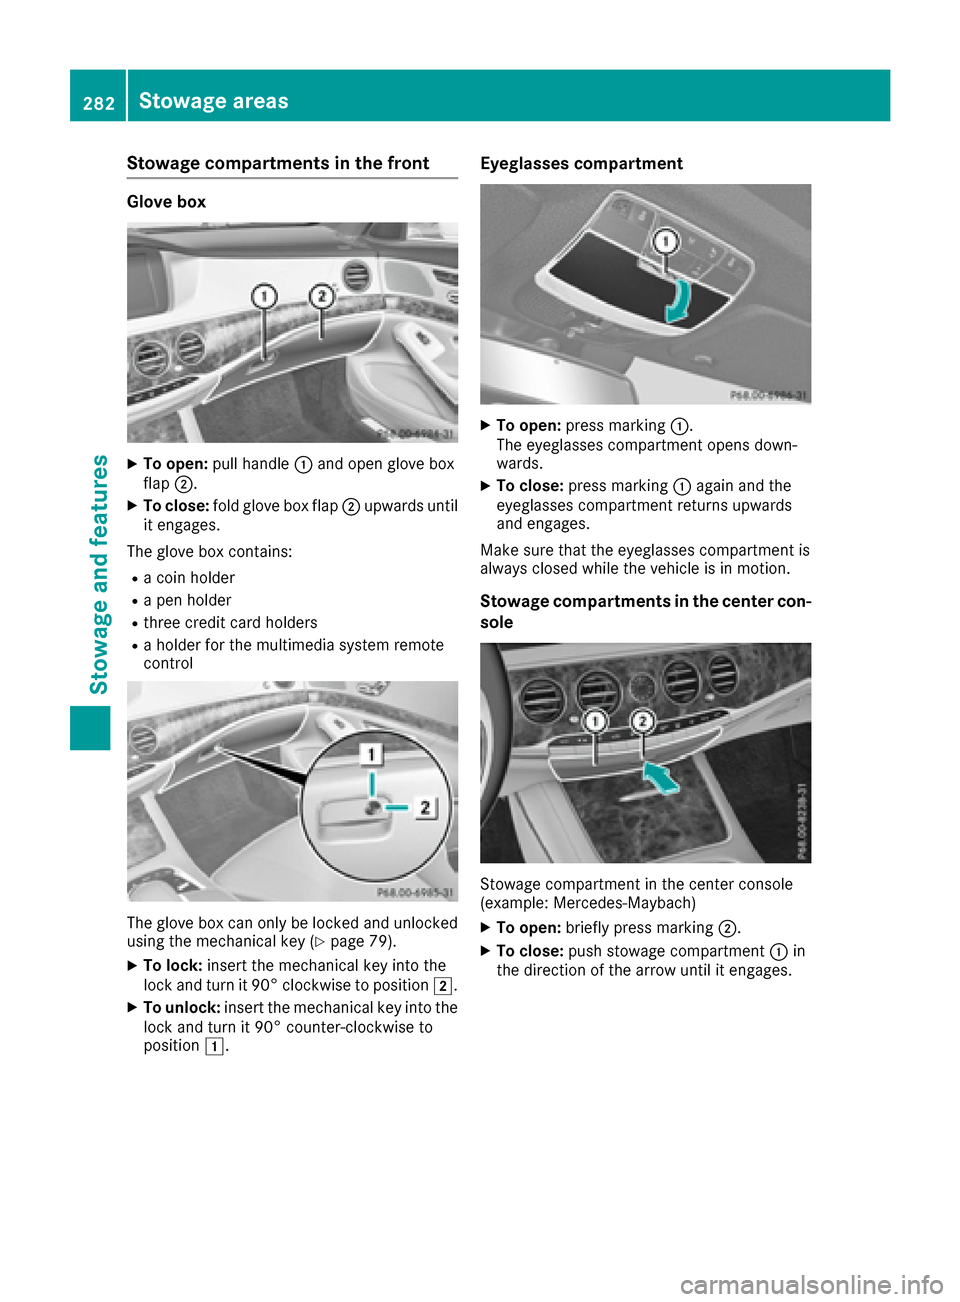
Stowage compartments in the front
Glove box
XTo open:pull handle :and open glove box
flap ;.
XTo close: fold glove box flap ;upwards until
it engages.
The glove box contains:
Ra coin holder
Ra pen holder
Rthree credit card holders
Ra holder for the multimedia system remote
control
The glove box can only be locked and unlocked
using the mechanical key (Ypage 79).
XTo lock: insert the mechanical key into the
lock and turn it 90° clockwise to position 2.
XTo unlock:insert the mechanical key into the
lock and turn it 90° counter-clockwise to
position 1.
Eyeglasses compartment
XTo open: press marking :.
The eyeglasses compartment opens down-
wards.
XTo close: press marking :again and the
eyeglasses compartment returns upwards
and engages.
Make sure that the eyeglasses compartment is
always closed while the vehicle is in motion.
Stowage compartments in the center con-
sole
Stowage compartment in the center console
(example: Mercedes ‑Maybach)
XTo open:briefly press marking ;.
XTo close:push stowage compartment :in
the direction of the arrow until it engages.
282Stowage areas
Stowage and features
Page 294 of 382
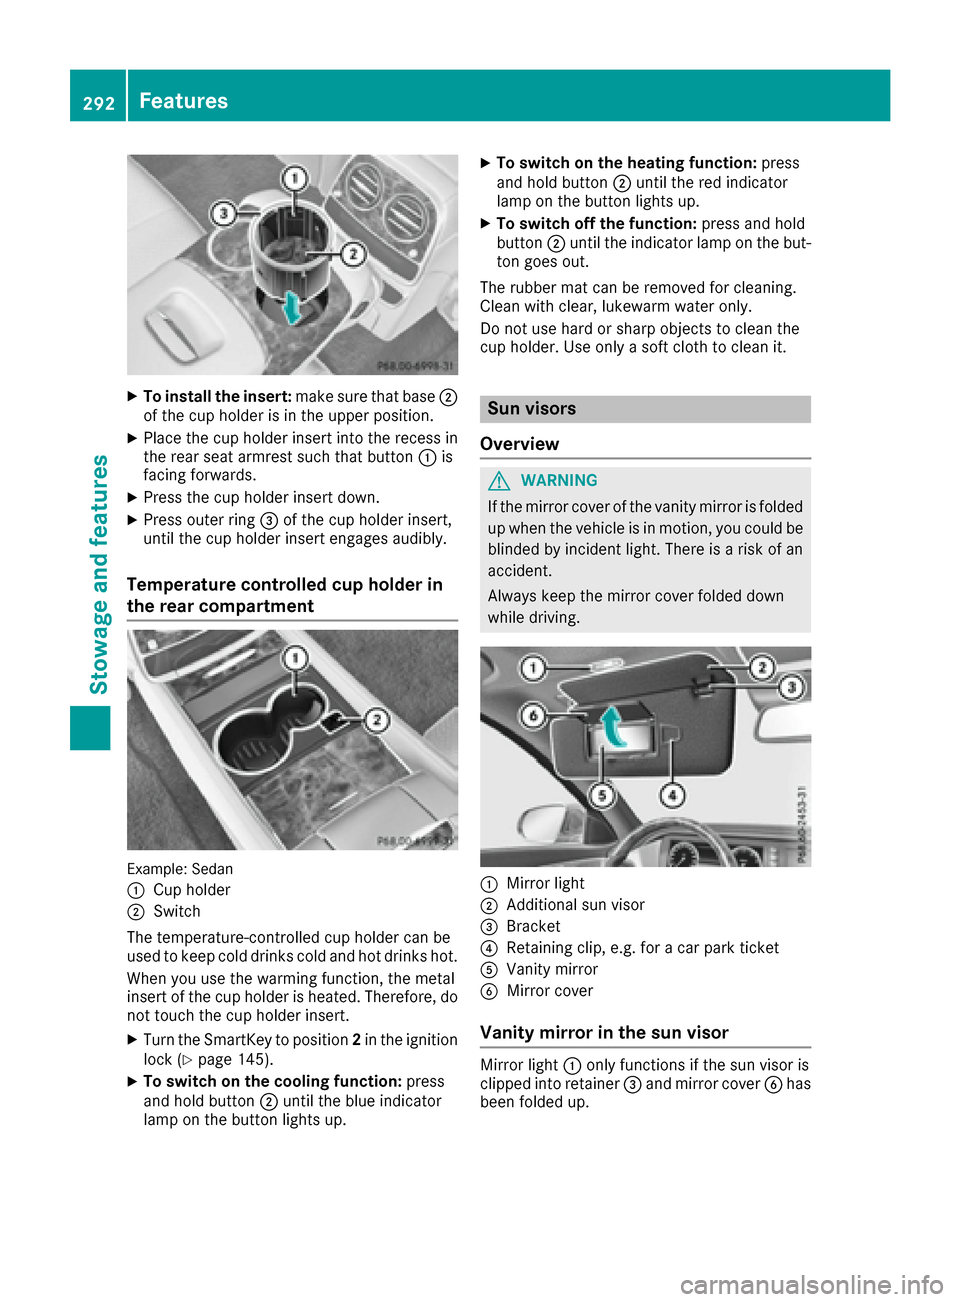
XTo install the insert:make sure that base;
of the cup holder is in the upper position.
XPlace the cup holder insert into the recess in
the rear seat armrest such that button :is
facing forwards.
XPress the cup holder insert down.
XPress outer ring =of the cup holder insert,
until the cup holder insert engages audibly.
Temperature controlled cup holder in
the rear compartment
Example: Sedan
:
Cup holder
;Switch
The temperature-controlled cup holder can be
used to keep cold drinks cold and hot drinks hot.
When you use the warming function, the metal
insert of the cup holder is heated. Therefore, do not touch the cup holder insert.
XTurn the SmartKey to position 2in the ignition
lock (Ypage 145).
XTo switch on the cooling function: press
and hold button ;until the blue indicator
lamp on the button lights up.
XTo switch on the heating function: press
and hold button ;until the red indicator
lamp on the button lights up.
XTo switch off the function: press and hold
button ;until the indicator lamp on the but-
ton goes out.
The rubber mat can be removed for cleaning.
Clean with clear, lukewarm water only.
Do not use hard or sharp objects to clean the
cup holder. Use only a soft cloth to clean it.
Sun visors
Overview
GWARNING
If the mirror cover of the vanity mirror is folded
up when the vehicle is in motion, you could be
blinded by incident light. There is a risk of an
accident.
Always keep the mirror cover folded down
while driving.
:Mirror light
;Additional sun visor
=Bracket
?Retaining clip, e.g. for a car park ticket
AVanity mirror
BMirror cover
Vanity mirror in the sun visor
Mirror light :only functions if the sun visor is
clipped into retainer =and mirror cover Bhas
been folded up.
292Features
Stowag ean d features