2017 MERCEDES-BENZ S-Class MAYBACH key
[x] Cancel search: keyPage 138 of 382
Activating/deactivating
XTo activate:press theÁ rockerswitch up
or down .
The indicator lamp abov eth erocke rswitch
lights up.
XTo deactivate: press theÁ rockerswitch
up or down .
The indicator lamp abov eth erocke rswitch
goe sout .
Problems with the "Cooling with air dehumidification" function
ProblemPossible causes/consequences and MSolutions
The indicator lamp in the
Á buttonflashes
three times or remain s
off .Cooling wit hair
dehumidification can
also no longer be activa-
te dusin gth emultimedia
system; see th eDigital
Operator' sManual.Cooling wit hair dehumidification has been deactivated due to amal-
function .
XVisitaqualified specialis tworkshop .
Setting climate control to automatic
Gene ral notes
In automatic mode, th eset temperature is main -
taine dautomatically at aconstan tlevel. The
system automatically regulates th etemperature
of th edispensed air, th eairflow and th eair dis-
tribution .
During automatic controlling, th e"Cooling wit h
air dehumidification "function is activated.
Control ling front climate control auto-
ma tically using the front control panel
XTurn theSmartKey to position 2in th eignition
loc k (Ypage 145).
XSetth edesired temperature usin gth ew
rocke rswitch on th efron tcontrol unit.
XTo activate: press theà rockerswitch up
or down .
The indicator lamp in th eà rockerswitch
lights up.
XTo switch to manua loperation: press the
K rockerswitch up or down .
The indicator lamp in th eà rockerswitch
goe sout . In automatic mode, if you adjust th
eairflow or
air distribution manually, th eindicator lamp on
th eà rockerswitch goe sout .The function
whic hhas no tbeen changed manually, however ,
continues to be controlled automatically. When
th emanually set function switches bac kto auto -
matic mode, th eindicator lamp on th eÃ
rocke rswitch lights up again .
Controlling rear climate control auto-
ma tically using the rear control panel
XTurn theSmartKey to position 2in th eignition
loc k (Ypage 145).
XSetth edesired temperature usin grocke r
switches Hand N(Ypage 133).
XTo activate: press rockerswitch Jup or
down (Ypage 133).
The indicator lamp in rocke rswitch Jlights
up.
XTo deactivate: press rockerswitch Jup or
down (Ypage 133).
The indicator lamp in rocke rswitch Jgoes
out .
If you adjust th eairflow or air distribution man -
ually when in automatic mode, th eAUT Odisplay
in th erear-compartmen tdisplay goe sout .The
136Operating the climate control systems
Climate control
Page 139 of 382

function which has not been changed manually,
however, continues to be controlled automati-
cally. When the manually set function switches
back to automatic mode, theAUTOdisplay
reappears in the rear-compartment display.
Adjusting the climate mode settings
In automatic mode you can select the following
airflow settings for the driver's and front-
passenger areas:
FOCUS high airflow, slightly cooler setting
MEDIUM medium airflow, standard setting
DIFFUSE low airflow, slightly warmer and draft- free setting
XTo set:set the climate mode using the mul-
timedia system (Ypage 274).
Setting the temperature
General notes
You can set the temperature separately for the
following areas on vehicles without rear-com-
partment climate control:
Rfront footwells, left and right
Rdriver and front passenger area
You can set the temperature separately for the
following areas on vehicles with rear-compart-
ment climate control:
Rfront footwells, left and right
Rdriver and front passenger area
Rrear compartment, left and right
Setting the temperature in the front
compartment using the front control
panel
XTurn the SmartKey to position 2in the ignition
lock (Ypage 145).
XTo increase or reduce: press thew
rocker switch up or down.
XOnly change the temperature setting in small
increments. Start at 72 ‡ (22 †).
Setting the temperature in the rear
compartment using the rear control
panel
XTurn the SmartKey to position 2in the ignition
lock (Ypage 145).
XTo increase or reduce: press rocker switch
H orN up or down (Ypage 133).
Only change the temperature setting in small
increments. Start at 72 ‡ (22 †).
Setting the footwell temperature
The footwell temperature for the driver and front
passenger can be set separately using the mul-
timedia system (see the Digital Operator's Man-
ual).
Operating the climate control systems137
Climate control
Page 140 of 382
Setting the air distribution
Air distribution settings
¯ Directs air through the defroster vents
P Directs air through the center and side air
vents
O Directs air through the footwell air vents
S Directs air through the center, side and
footwell vents
a Directs air through the defroster and
footwell vents
W Sets the air distribution to automatic
Setting the air distribution in the front
compartment
The air distribution for the left and right sides of
the front and rear compartment can be adjusted
using the multimedia system (see the Digital
Operator's Manual).
Setting the air distribution in the rear
compartment using the rear control
panel
XTurn the SmartKey to position 2in the ignition
lock (Ypage 145).
XPress rocker switch IorM up or down
repeatedly (Ypage 133) until the desired air
distribution symbol is shown in the display.
iYou can also set the air distribution in the
rear compartment using the multimedia sys-
tem (see the Digital Operator's Manual).
Setting the airflow
General notes
You can select different airflow settings for the
driver's and front-passenger sides as well as for
the rear compartment (only vehicles with rear
compartment climate control).
Observe the notes on controlling the rear-com-
partment climate control using the front control
panel (
Ypage 134).
Setting the front-compartment airflow
using the front control panel
XTurn the SmartKey to position 2in the ignition
lock (Ypage 145).
XTo increase or reduce: press theK
rocker switch up or down.
iYou can also set the front-compartment air-
flow using the multimedia system (see the
Digital Operator's Manual).
Setting the rear compartment airflow
using the rear control panel
XTurn the SmartKey to position 2in the ignition
lock (Ypage 145).
XTo increase or reduce: press rocker switch
K up or down (Ypage 133).
iYou can also set the front-compartment air-
flow using the multimedia system (see the
Digital Operator's Manual).
Activating or deactivating the syn-
chronization function
Climate control can be set centrally using the
synchronization function. The settings for tem-
perature, air distribution and airflow on the driv-
er's side are adopted for the front-passenger
side and the rear compartment (vehicles with
rear-compartment air conditioning).
XTo activate or deactivate: activate or deac-
tivate the "Synchronization" function via the
multimedia system (see the Digital Operator's
Manual).
Vehicles with rear-compartment air condi-
tioning: the SYNCdisplay appears on the
rear-compartment display.
The synchronization function is deactivated:
Rif the settings for the front-passenger side are
changed
Rin vehicles with rear-compartment air condi-
tioning: the settings for the rear compartment
are changed
138Operating the climate control systems
Climate control
Page 141 of 382
Defrosting thewindshield
General notes
You can use this function to defrost th ewind-
shield or to clear afogge dup windshield or fron t
sid ewindows on th einside.
Switc hof fth e"Windshield defrosting" function
as soo nas th ewindshield is clear again .
Switchingth e"Windshield defrosting"
function on or off
XTur nth eSmartKey to position 2in th eignition
loc k (Ypage 145).
XTo activate :press th e¬ rocker switch on
th efron tcontro lpanel up or down .
The indicator lamp in th e¬ rocker switch
lights up.
The climat econtro lsyste mswitches to th e
followin gfunctions:
Rhig hairflow
Rhig htemperature
Rair distribution to th ewindshield and fron t
sid ewindows
Rair-recirculation mode of f
Rwindshield heatingon
Rcoolin gwit hair dehumidification on
XTo deactivate :press th e¬ rocker switch
up or down .
The indicator lamp in th e¬ rocker switch
goe sout .The previously selecte dsetting sare
restored .Air-recirculation mode remain s
deactivated.
Defrosting th ewindows
Windows fogged up on th einside
XActivat eth e"Coolin gwit hair dehumidifica-
tion "function wit hth eÁ rocker switch .
or
XActivat eth e"Coolin gwit hair dehumidifica-
tion "function via th emultimedia system; see
th eDigital Operator's Manual.
XSwitc hon automatic mode usin gth eÃ
rocker switch .
XIf thewindows continue to fo gup: activat eth e
"Windshield defrosting" function usin gth e
¬ rocker switch .The windshield heatin gis
switched on .
iYou should only selec tthis setting until th e
windshield is clear again .
Windows fogged up on th eoutsid e
XActivat eth ewindshield wipers .
XSwitchon automatic mode usin gth eÃ
rocker switch .
iIf you clean th ewindows regularly, they do
no tfo gup so quickly.
Rea rwindow defroster
General notes
The rea rwindow defroster has ahig hcurren t
draw. You should therefore switch it of fas soo n
as th erea rwindow is clear .Otherwise ,th erea r
window defroster switches of fautomatically
after severa lminutes.
If th ebattery voltage is to olow, th erea rwindow
defroster may switch off.
Activating or deactivating
XTur nth eSmartKey to position 2in th eignition
loc k (Ypage 145).
XPress th e¤ rocker switch up or down .
The indicator lamp in th e¤ rocker switch
lights up or goe sout .
Operating the climate control systems139
Climate control
Page 142 of 382
Problems with the rear window defroster
ProblemPossible causes/consequences andMSolutions
The rear window
defroster has deactiva-
ted prematurely or can-
not be activated.The battery has not been sufficiently charged.
XSwitch off any consumers that are not required, e.g. reading lamps,
interior lighting or the seat heating.
When the battery is sufficiently charged, the rear window defroster
can be activated again.
Switching air-recirculation mode
on/off
General notes
You can also temporarily deactivate the flow of
fresh air manually if unpleasant odors are enter-
ing the vehicle from outside. The air already
inside the vehicle will then be recirculated.
If you switch on air-recirculation mode, the win-
dows can fog up more quickly, in particular at
low temperatures. Only use air-recirculation
mode briefly to prevent the windows from fog-
ging up.
Activating/deactivating
XTurn the SmartKey to position 2in the ignition
lock (Ypage 145).
XTo activate: press thegrocker switch up
or down.
The indicator lamp in the grocker switch
lights up.
Air-recirculation mode switches on automati-
cally:
Rat high outside temperatures
Rat high levels of pollution
Rin a tunnel
The indicator lamp in the grocker switch is
not lit when automatic air-recirculation mode is
activated. Outside air is added after about
30 minutes.
XTo deactivate: press thegrocker switch
up or down.
The indicator lamp in the grocker switch
goes out. Air-recirculation mode deactivates automati-
cally:
Rafter approximately five minutes at outside
temperatures below approximately 41 ‡
(5 †)
Rafter approximately five minutes if cooling
with air dehumidification is deactivated
Rafter approximately 30 minutes at outside
temperatures above approximately 41 ‡
(5 †) if the "Cooling with air dehumidifica-
tion" function is activated
Switching the residual heat on or off
General notes
Vehicles with rear-compartment climate
control: once the engine is switched off, it is
possible to make use of the residual heat of the
engine to continue heating or ventilating the
rear and front compartment of the vehicle for
approximately 15 minutes. If the "Residual heat"
function is set for only the front or only the rear compartment, it is possible to continue heating
or ventilating for approximately 30 minutes.
Vehicles without rear-compartment climate
control: once the engine is switched off, it is
possible to make use of the residual heat of the
engine to continue heating or ventilating the
front compartment of the vehicle for approx-
imately 30 minutes.
The heating or ventilation time depends on the
temperature that has been set.
140Operating the climate control systems
Climate control
Page 143 of 382
Front control panel
XTurn theSmartKey to position 0in th eignition
loc kor remove it (Ypage 145).
XTo activate: press the! orÁ rocker
switch up or down .
The indicator lamp in th e! orÁ rocke r
switch lights up.
The blowe rwill run at alow spee dregardless of
th eairflow setting .
If you activat eth eresidual heat function at high
temperatures ,only th eventilation will be acti-
vated. The blowe rrun sat medium speed.
XTo deactivate: press the! orÁ
rocke rswitch up or down .
The indicator lamp in th e! orÁ rocke r
switch goes out .
Rear control panel
XTurn theSmartKey to position 0in th eignition
loc kor remove it (Ypage 145).
The RESTdisplay appear son th erear com-
partmen tdisplay.
XTo activate: press rockerswitch Lup or
down (Ypage 133).
The indicator lamp in rocke rswitch Llights
up.
XTo deactivate: press rockerswitch Lup or
down (Ypage 133).
The indicator lamp in rocke rswitch Lgoes
out .RES Tgoes out on th erear compartmen t
display.
iIf you do no tactivat eth eresidual heat func-
tion ,RES Tgoes out automatically after fiv e
minute son th erear compartmen tdisplay.
Residual heat is deactivated automatically:
Rafter approximately 30 minute sif the residual
heat function is activated in the front or rear
compartment
Rafter approximately 15 minutes if the residual
heat function is activated in the front and rear
compartments
Rwhen the ignition is switched on
Rif the battery voltage drops
Perfume atomizer
Operating the perfume atomizer
GWARNING
If children open the vial, they could drink the
perfume or it could come into contact with
their eyes. There is a risk of injury. Do not
leave children unsupervised in the vehicle.
If the perfume liquid has been drunk, consult
a doctor. If perfume comes into contact with
your eyes or skin, rinse the eyes with clean
water. If you continue to experience difficul-
ties, consult a doctor.
HEnvironmental note
Full vials must not be dis-
posed of with household
waste. They must be collec-
ted separately and recycled
to protect the environment.
Dispose of full vials in an
environmentally responsible
manner and take them to a
harmful substance collec-
tion point.
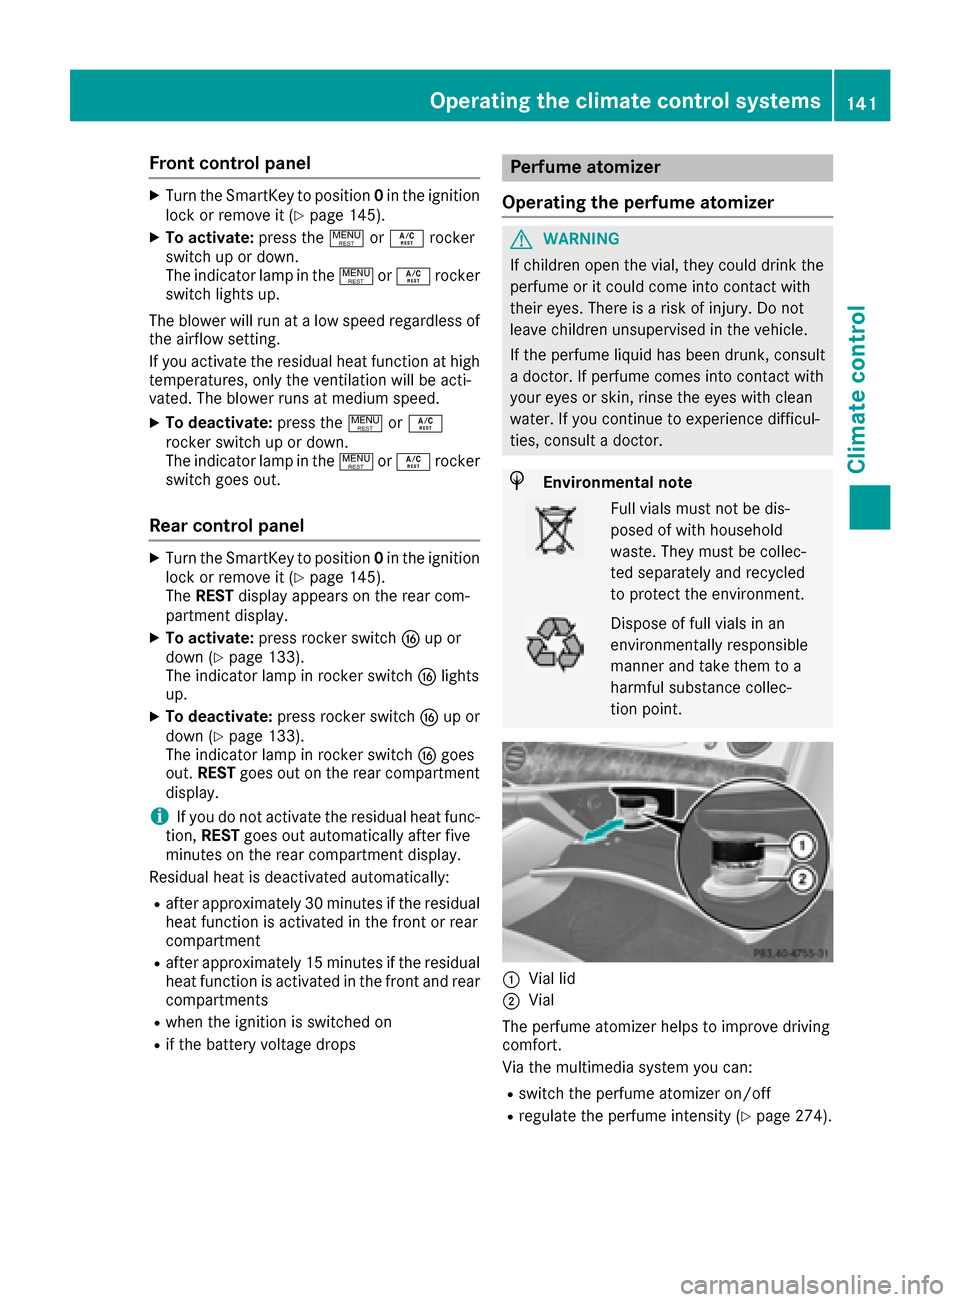
:Vial lid
;Vial
The perfume atomizer helps to improve driving
comfort.
Via the multimedia system you can:
Rswitch the perfume atomizer on/off
Rregulate the perfume intensity (Ypage 274).
Operating the climate control systems141
Climate control
Z
Page 147 of 382
There is a risk of fire and an accident. Releasethe parking brake fully before driving off.
!Do not warm up the engine with the vehicle
stationary. Drive off immediately. Avoid high
engine speeds and driving at full throttle until
the engine has reached its operating temper-
ature.
Only shift the automatic transmission to the
desired drive position when the vehicle is sta-
tionary.
Where possible, avoid spinning the drive
wheels when pulling away on slippery roads.
You could otherwise damage the drive train.
!At low engine oil temperatures under 68 ‡
(+20 †), the maximum engine speed is limi-
ted in order to protect the engine. To protect
the engine and maintain smooth engine oper-
ation, avoid driving at full throttle when the
engine is cold.
Hybrid vehicles: make sure that you read the
separate operating instructions. Otherwise, you
may not recognize dangers.
SmartKey positions
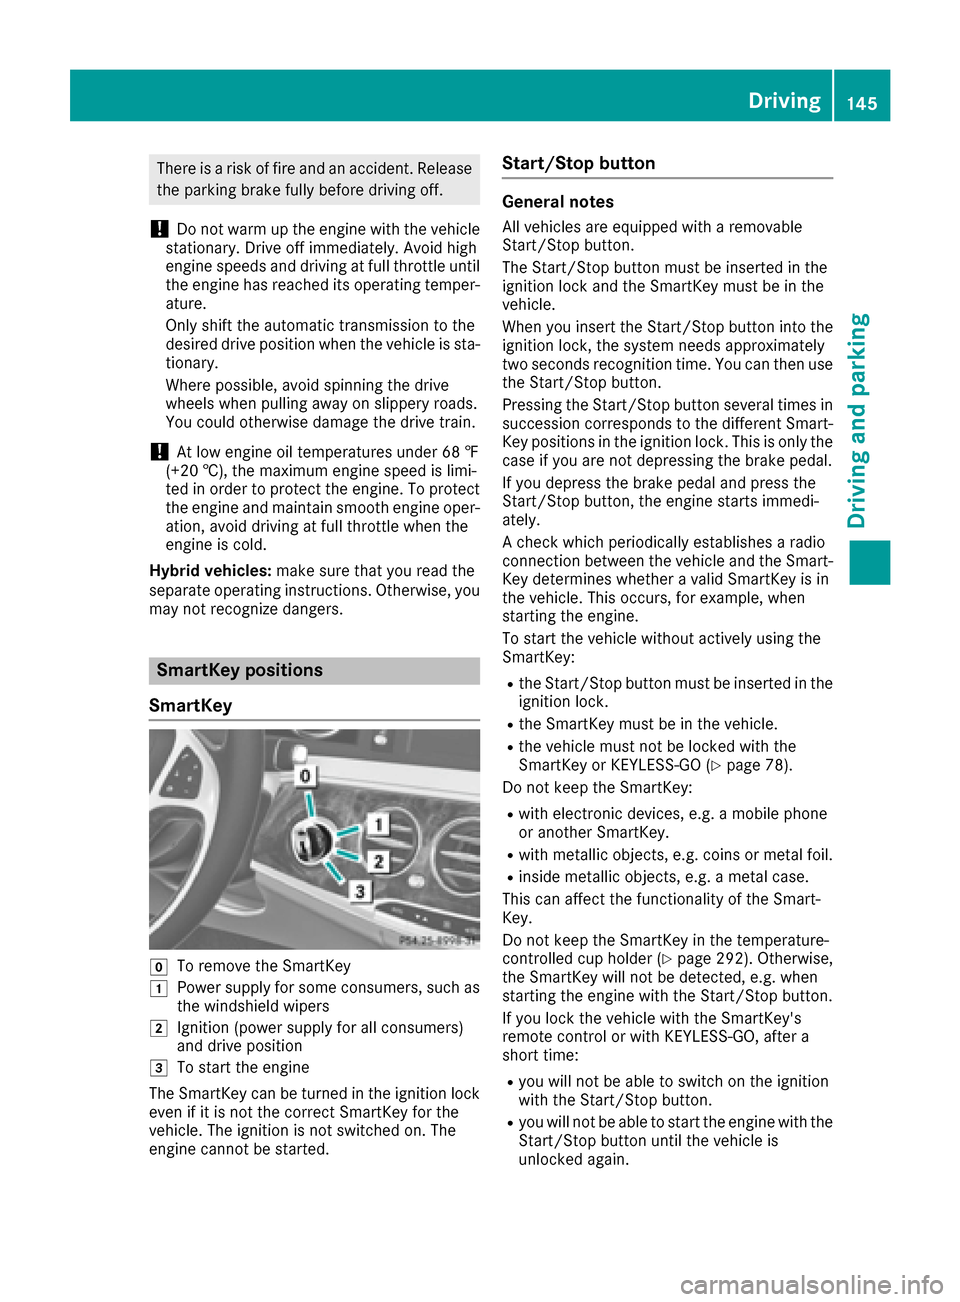
SmartKey
gTo remove the SmartKey
1Power supply for some consumers, such as
the windshield wipers
2Ignition (power supply for all consumers)
and drive position
3To start the engine
The SmartKey can be turned in the ignition lock
even if it is not the correct SmartKey for the
vehicle. The ignition is not switched on. The
engine cannot be started.
Start/Stop button
General notes
All vehicles are equipped with a removable
Start/Stop button.
The Start/Stop button must be inserted in the
ignition lock and the SmartKey must be in the
vehicle.
When you insert the Start/Stop button into the
ignition lock, the system needs approximately
two seconds recognition time. You can then use
the Start/Stop button.
Pressing the Start/Stop button several times in
succession corresponds to the different Smart-
Key positions in the ignition lock. This is only the
case if you are not depressing the brake pedal.
If you depress the brake pedal and press the
Start/Stop button, the engine starts immedi-
ately.
A check which periodically establishes a radio
connection between the vehicle and the Smart-
Key determines whether a valid SmartKey is in
the vehicle. This occurs, for example, when
starting the engine.
To start the vehicle without actively using the
SmartKey:
Rthe Start/Stop button must be inserted in the
ignition lock.
Rthe SmartKey must be in the vehicle.
Rthe vehicle must not be locked with the
SmartKey or KEYLESS-GO (Ypage 78).
Do not keep the SmartKey:
Rwith electronic devices, e.g. a mobile phone
or another SmartKey.
Rwith metallic objects, e.g. coins or metal foil.
Rinside metallic objects, e.g. a metal case.
This can affect the functionality of the Smart-
Key.
Do not keep the SmartKey in the temperature-
controlled cup holder (
Ypage 292). Otherwise,
the SmartKey will not be detected, e.g. when
starting the engine with the Start/Stop button.
If you lock the vehicle with the SmartKey's
remote control or with KEYLESS-GO, after a
short time:
Ryou will not be able to switch on the ignition
with the Start/Stop button.
Ryou will not be able to start the engine with the
Start/Stop button until the vehicle is
unlocked again.
Driving145
Driving and parking
Z
Page 148 of 382
If you lock the vehicle centrally using the button
on the front door (Ypage 83), you can continue
to start the engine with the Start/Stop button.
The engine can be switched off while the vehicle
is in motion by pressing and holding the Start/
Stop button for three seconds. This function
operates independently of the ECO start/stop
automatic engine switch-off function.
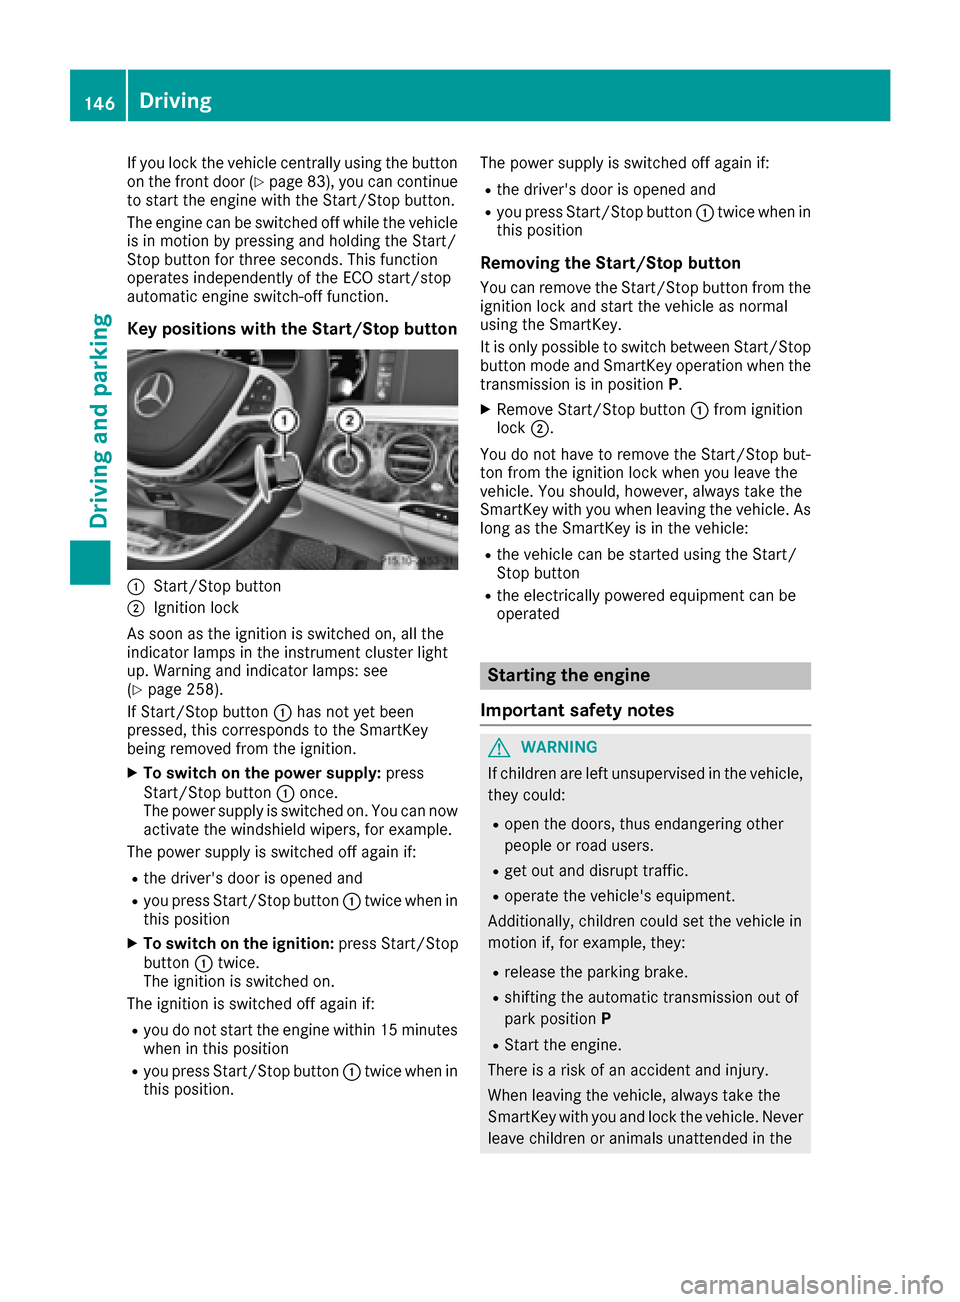
Key positions with the Start/Stop button
:Start/Stop button
;Ignition lock
As soon as the ignition is switched on, all the
indicator lamps in the instrument cluster light
up. Warning and indicator lamps: see
(
Ypage 258).
If Start/Stop button :has not yet been
pressed, this corresponds to the SmartKey
being removed from the ignition.
XTo switch on the power supply: press
Start/Stop button :once.
The power supply is switched on. You can now activate the windshield wipers, for example.
The power supply is switched off again if:
Rthe driver's door is opened and
Ryou press Start/Stop button :twice when in
this position
XTo switch on the ignition: press Start/Stop
button :twice.
The ignition is switched on.
The ignition is switched off again if:
Ryou do not start the engine within 15 minutes when in this position
Ryou press Start/Stop button :twice when in
this position. The power supply is switched off again if:
Rthe driver's door is opened and
Ryou press Start/Stop button
:twice when in
this position
Removing the Start/Stop button
You can remove the Start/Stop button from the
ignition lock and start the vehicle as normal
using the SmartKey.
It is only possible to switch between Start/Stop button mode and SmartKey operation when the
transmission is in position P.
XRemove Start/Stop button :from ignition
lock ;.
You do not have to remove the Start/Stop but-
ton from the ignition lock when you leave the
vehicle. You should, however, always take the
SmartKey with you when leaving the vehicle. As
long as the SmartKey is in the vehicle:
Rthe vehicle can be started using the Start/
Stop button
Rthe electrically powered equipment can be
operated
Starting the engine
Important safety notes
GWARNING
If children are left unsupervised in the vehicle,
they could:
Ropen the doors, thus endangering other
people or road users.
Rget out and disrupt traffic.
Roperate the vehicle's equipment.
Additionally, children could set the vehicle in
motion if, for example, they:
Rrelease the parking brake.
Rshifting the automatic transmission out of
park position P
RStart the engine.
There is a risk of an accident and injury.
When leaving the vehicle, always take the
SmartKey with you and lock the vehicle. Never
leave children or animals unattended in the
146Driving
Driving and parking