2017 MERCEDES-BENZ GLC COUPE width
[x] Cancel search: widthPage 158 of 370

For safety reasons, Mercedes-Benz recom-
mends only installing the following brake disks
and brake pads/linings:
Rbrake disks that have been approved by
Mercedes-Benz
Rbrake pads/linings that have been approved
by Mercedes-Benz or that are of an equivalent
standard of quality
Other brake disks or brake pads/linings can
compromise the safety of your vehicle.
Always replace all brake disks and brake pads/
linings on an axle at the same time. Always
install new brake pads/linings when replacing
brake disks.
The vehicle is equipped with lightweight brake
disks to which the wheel assembly with rim and
threaded connection is matched.
The use of brake disks other than those
approved by Mercedes-Benz can change the
track width and is subject to approval, if appli-
cable.
Shock-type loads when handling the brake
discs, such as when changing wheels, can lead
to a reduction in comfort when driving with light-
weight brake discs. Avoid shock-type loads on
the lightweight brake disks, particularly on the
brake plate.
Mercedes-Benz recommends that you only use
brake fluid that has been specially approved for
your vehicle by Mercedes-Benz, or which corre-
sponds to an equivalent quality standard. Brake
fluid which has not been approved for
Mercedes-Benz vehicles or which is not of an
equivalent quality could affect your vehicle's
operating safety.
Driving on wet roads
Hydroplaning
If water has accumulated to a certain depth on
the road surface, there is a danger of hydro-
planing occurring, even if:
Ryou drive at low speeds
Rthe tires have adequate tread depth
For this reason, in the event of heavy rain or in
conditions in which hydroplaning may occur,
you must drive in the following manner:
Rlower your speed
Ravoid ruts
Ravoid sudden steering movements
Rbrake carefully
Driving on flooded roads
!Bear in mind that vehicles traveling in front
or in the opposite direction create waves. This
may cause the maximum permissible water
depth to be exceeded.
Failure to observe these notes may result in
damage to the engine, electrical systems and
transmission.
If you have to drive on stretches of road on which
water has collected, please bear in mind that:
Rin the case of standing water, the water level may be no higher than the lower edge of the
vehicle body
Ryou should drive no faster than walking pace
Winter driving
GWARNING
If you shift down on a slippery road surface in an attempt to increase the engine's braking
effect, the drive wheels could lose their grip.
There is an increased danger of skidding and
accidents.
Do not shift down for additional engine brak-
ing on a slippery road surface.
GDANGER
If the exhaust pipe is blocked or adequate
ventilation is not possible, poisonous gases
such as carbon monoxide (CO) may enter the vehicle. This is the case, e.g. if the vehicle
becomes trapped in snow. There is a risk of
fatal injury.
If you leave the engine or the auxiliary heating
running, make sure the exhaust pipe and area
around the vehicle are clear of snow. To
ensure an adequate supply of fresh air, open a
window on the side of the vehicle that is not
facing into the wind.
Have your vehicle winter-proofed at a qualified
specialist workshop at the onset of winter.
Drive particularly carefully on slippery road sur-
faces. Avoid sudden acceleration, steering and
156Driving tips
Driving and parking
Page 166 of 370

Deactivating DISTRONICPLUS
There are severa lways to deactivat e
DISTRONIC PLUS:
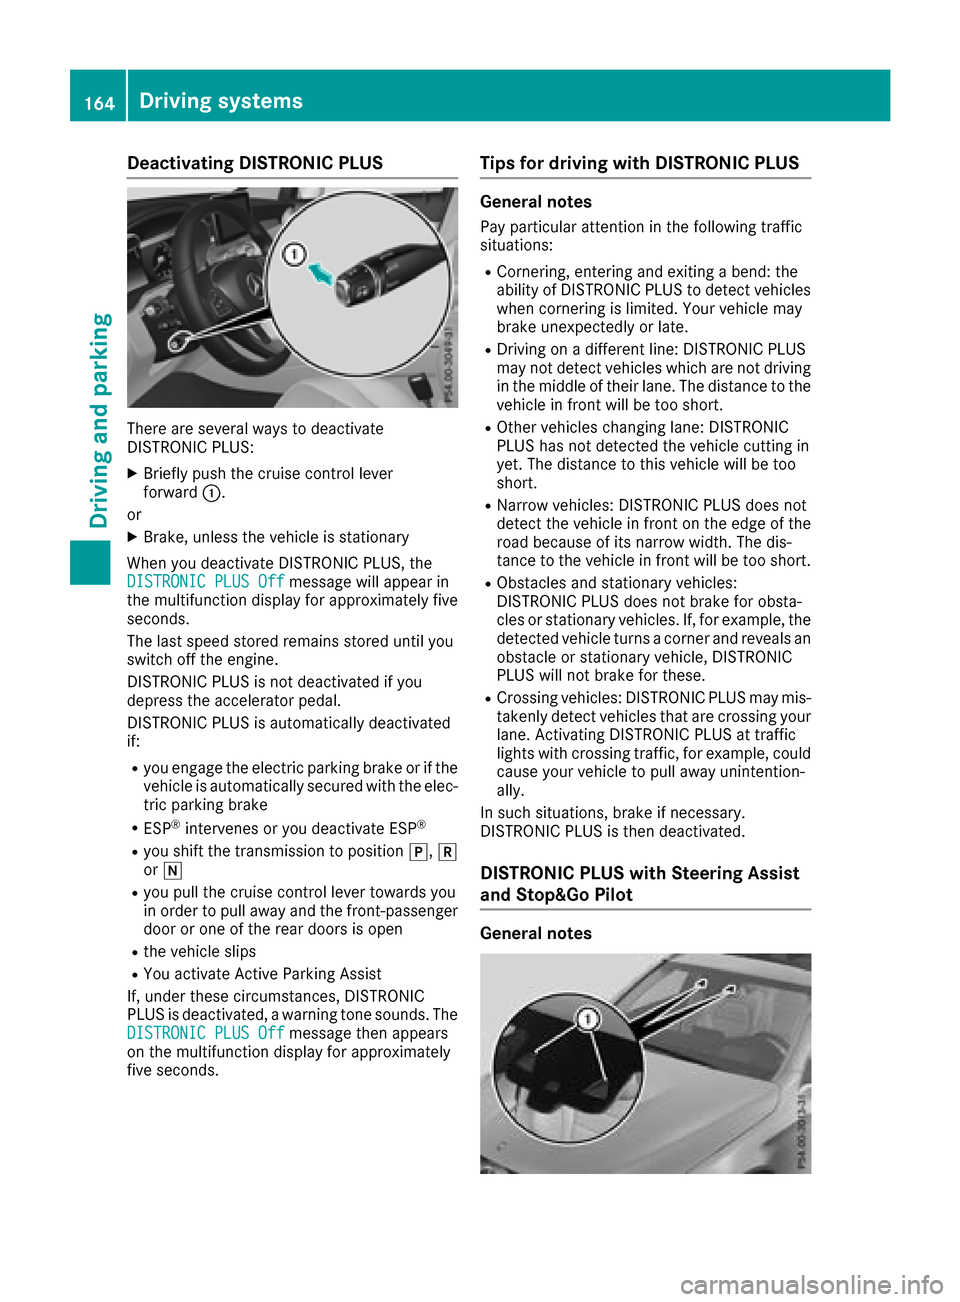
XBriefly push th ecruise contro llever
forwar d:.
or
XBrake, unless th evehicle is stationary
Whe nyou deactivat eDISTRONIC PLUS, th e
DISTRONIC PLU SOff
messag ewill appear in
th emultifunction display fo rapproximately fiv e
seconds.
The last speed stored remain sstored until you
switch of fth eengine.
DISTRONIC PLU Sis no tdeactivated if you
depress th eaccelerator pedal.
DISTRONIC PLU Sis automatically deactivated
if:
Ryou engage th eelectric parking brake or if th e
vehicle is automatically secure dwit hth eelec -
tric parking brake
RES P®intervenes or you deactivat eES P®
Ryou shift th etransmissio nto position j,k
or i
Ryou pull th ecruise contro llever toward syou
in order to pull away and th efront-passenger
doo ror on eof th erea rdoors is ope n
Rthevehicle slip s
RYou activat eActive Parking Assis t
If ,under these circumstances, DISTRONIC
PLU Sis deactivated, awarnin gtone sounds. The
DISTRONIC PLU SOff
messag ethen appears
on th emultifunction display fo rapproximately
fiv eseconds.
Tips for drivin gwit hDISTRONI CPLUS
General notes
Pay particular attention in th efollowin gtraffic
situations:
RCornering, enterin gand exitin g abend: th e
ability of DISTRONIC PLU Sto detec tvehicles
when cornering is limited. Your vehicle may
brake unexpectedly or late.
RDriving on adifferen tline: DISTRONIC PLU S
may no tdetec tvehicles whic hare no tdrivin g
in th emiddle of their lane. The distanc eto th e
vehicle in fron twill be to oshort .
ROther vehicles changin glane: DISTRONIC
PLU Shas no tdetecte dth evehicle cutting in
yet .The distanc eto this vehicle will be to o
short .
RNarro wvehicles :DISTRONIC PLU Sdoe sno t
detec tth evehicle in fron ton th eedg eof th e
road because of it snarro wwidth. The dis -
tanc eto th evehicle in fron twill be to oshort .
RObstacles and stationary vehicles :
DISTRONIC PLU Sdoe sno tbrake fo robsta -
cles or stationary vehicles .If ,fo rexample, th e
detecte dvehicle turn s acorner and reveals an
obstacl eor stationary vehicle, DISTRONIC
PLU Swill no tbrake fo rthese .
RCrossing vehicles :DISTRONIC PLU Smay mis -
takenl ydet ectvehicles that are crossin gyour
lane. Activatin gDISTRONIC PLU Sat traffic
lights wit hcrossin gtraffic ,fo rexample, could
cause your vehicle to pull away unintention -
ally.
In suc hsituations, brake if necessary.
DISTRONIC PLU Sis then deactivated.
DISTRONI CPLUS wit hSteering Assis t
an dStop&Go Pilo t
General notes
164Driving systems
Driving and parking
Page 181 of 370

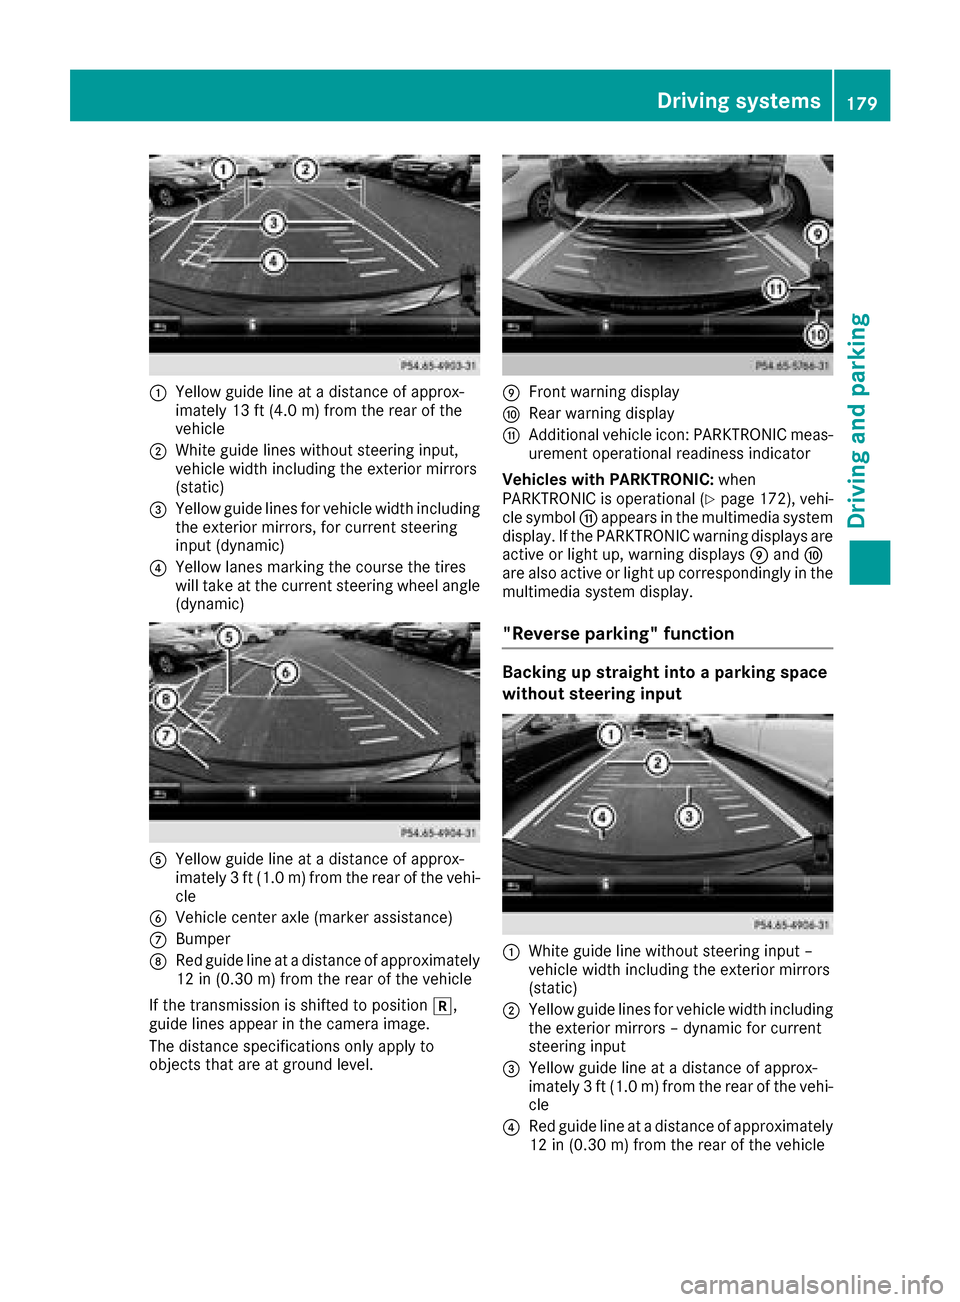
:Yellow guide line at a distance of approx-
imately 13 ft (4.0 m) from the rear of the
vehicle
;White guide lines without steering input,
vehicle width including the exterior mirrors
(static)
=Yellow guide lines for vehicle width including
the exterior mirrors, for current steering
input (dynamic)
?Yellow lanes marking the course the tires
will take at the current steering wheel angle
(dynamic)
AYellow guide line at a distance of approx-
imately 3 ft (1.0 m) from the rear of the vehi-
cle
BVehicle center axle (marker assistance)
CBumper
DRed guide line at a distance of approximately
12 in (0.30 m) from the rear of the vehicle
If the transmission is shifted to position k,
guide lines appear in the camera image.
The distance specifications only apply to
objects that are at ground level.
EFront warning display
FRear warning display
GAdditional vehicle icon: PARKTRONIC meas-
urement operational readiness indicator
Vehicles with PARKTRONIC: when
PARKTRONIC is operational (
Ypage 172), vehi-
cle symbol Gappears in the multimedia system
display. If the PARKTRONIC warning displays are
active or light up, warning displays Eand F
are also active or light up correspondingly in the
multimedia system display.
"Reverse parking" function
Backing up straight into a parking space
without steering input
:White guide line without steering input –
vehicle width including the exterior mirrors
(static)
;Yellow guide lines for vehicle width including
the exterior mirrors – dynamic for current
steering input
=Yellow guide line at a distance of approx-
imately 3 ft (1.0 m) from the rear of the vehi-
cle
?Red guide line at a distance of approximately
12 in (0.30 m)from the rear of the vehicle
Driving systems179
Driving and parking
Z
Page 186 of 370

Rvery close to the exterior mirrors
Rin the transitional areas between the various
cameras in the virtual top view
!Objects not at ground level may appear to
be further away than they actually are, e.g.:
Rthe bumper of a parked vehicle
Rthe drawbar of a trailer
Rthe ball coupling of a trailer tow hitch
Rthe rear section of an HGV
Ra slanted post
Use the guidelines only for orientation.
Approach objects no further than the bottom-
most guideline.
Top view with picture from the rear view
camera
:Yellow guide line at a distance of approx-
imately 13 ft (4.0 m) from the rear of the
vehicle
;Symbol for the split screen setting with top
view and rear view camera image
=Guide lines for the maximum steering input
?Yellow lanes marking the course the tires
will take at the current steering wheel angle
(dynamic)
AYellow guide lines for vehicle width including
the exterior mirrors – dynamic for current
steering input
BVehicle center axis (locating aids)
CYellow guide line at a distance of approx-
imately 3 ft (1.0 m) from the rear of the vehi-
cle
DBumper
ERed guide line at a distance of approximately
12 in (0.30 m) from the rear of the vehicle
If the transmission is shifted to position k,
guide lines appear in the camera image.
The distance specifications only apply to
objects that are at ground level.
Top view with picture from the front cam-
era
:Symbol for the split screen setting with top
view and front camera image
;Yellow guide line at a distance of approx-
imately 13 ft (4.0 m) from the front of the
vehicle
=Yellow guide lines for vehicle width including
the exterior mirrors, for current steering
input (dynamic)
?Yellow lanes marking the course the tires
will take at the current steering wheel angle
(dynamic)
184Driving systems
Driving and parking
Page 187 of 370

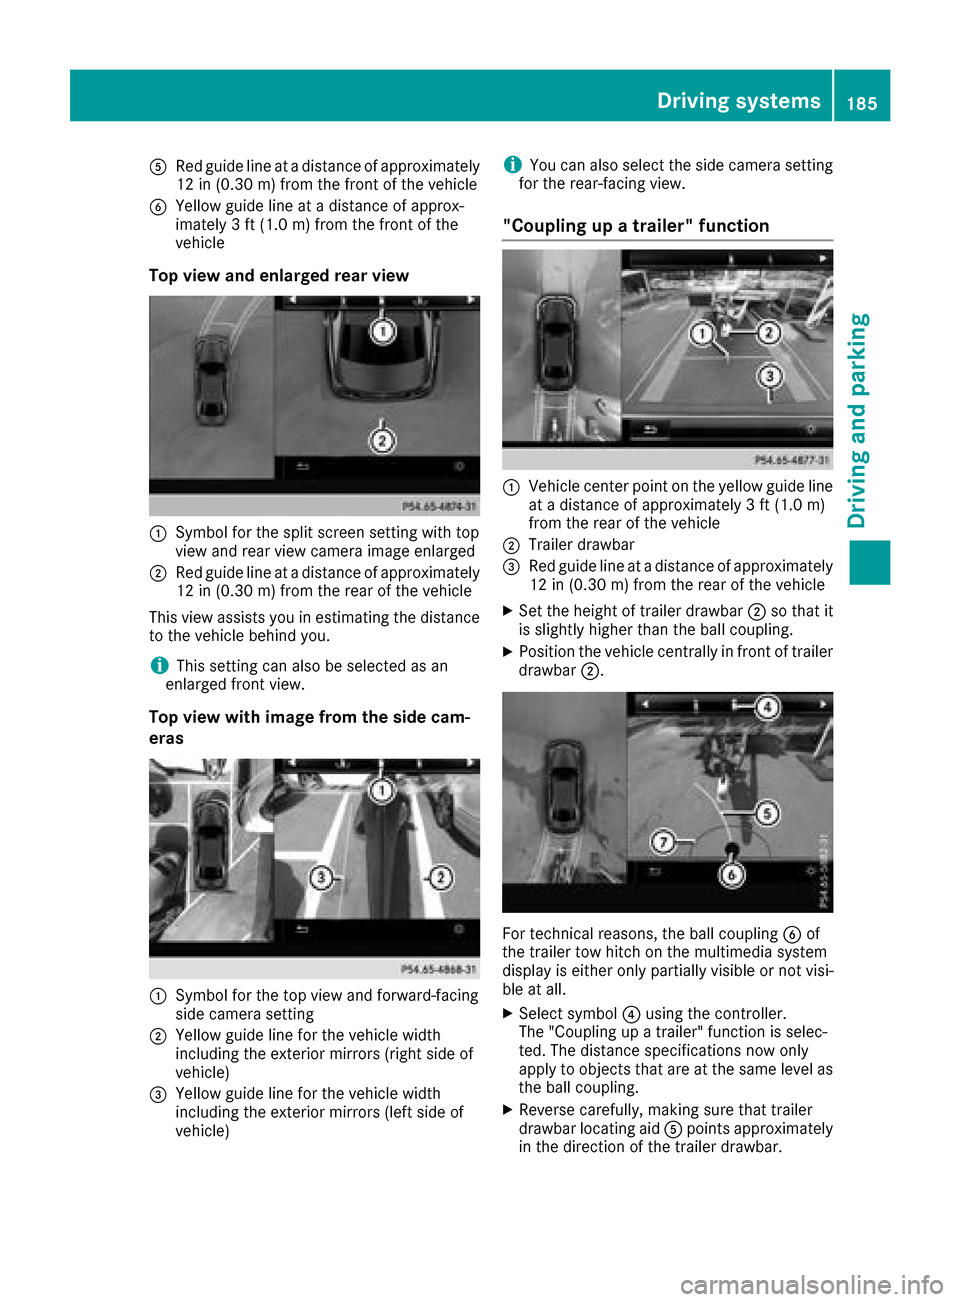
ARed guide lineat adistanc eof approximately
12 in (0.30m) from the front of the vehicle
BYellow guide line at a distance of approx-
imately 3 ft (1.0 m) fromthe front of the
vehicle
Top view and enlarged rear view
:Symbol for the split screen setting with top
view and rear view camera image enlarged
;Red guide line at a distance of approximately
12 in (0.30 m)from the rear of the vehicle
This view assists you in estimating the distance
to the vehicle behind you.
iThis setting can also be selected as an
enlarged front view.
Top view with image from the side cam-
eras
:Symbol for the top view and forward-facing
side camera setting
;Yellow guide line for the vehicle width
including the exterior mirrors (right side of
vehicle)
=Yellow guide line for the vehicle width
including the exterior mirrors (left side of
vehicle)
iYou can also select the side camera setting
for the rear-facing view.
"Coupling up a trailer" function
:Vehicle center point on the yellow guide line
at a distance of approximately 3 ft (1.0 m)
from the rear of the vehicle
;Trailer drawbar
=Red guide line at a distance of approximately
12 in (0.30 m) from the rear of the vehicle
XSet the height of trailer drawbar ;so that it
is slightly higher than the ball coupling.
XPosition the vehicle centrally in front of trailer
drawbar ;.
For technical reasons, the ball coupling Bof
the trailer tow hitch on the multimedia system
display is either only partially visible or not visi-
ble at all.
XSelect symbol ?using the controller.
The "Coupling up a trailer" function is selec-
ted. The distance specifications now only
apply to objects that are at the same level as
the ball coupling.
XReverse carefully, making sure that trailer
drawbar locating aid Apoints approximately
in the direction of the trailer drawbar.
Driving systems185
Driving and parking
Z
Page 202 of 370

XSwitch off the engine.
XClose the doors and tailgate.
XCouple up the trailer.
XEstablish the electrical connection between
the vehicle and the trailer.
XCheck that the trailer lighting system is work-
ing.
XPush the combination switch upwards/down-wards and check whether the corresponding
turn signal on the trailer flashes.
A trailer that is connected is recognized only
when the electrical connection is established
correctly and when the lighting system is work-
ing properly. The function of other systems also
depends on this, for example:
RESP®
RPARKTRONIC
RActive Parking Assist
RActive Blind Spot Assist
RActive Lane Keeping Assist
Vehicles with AIR BODY CONTROL: if you couple
up a trailer, the vehicle always remains at high-
way level. Observe the following note when cou-
pling up a trailer:
RUnless highway level has been set manually,
the vehicle is automatically lowered to high-
way level. If a speed of 5 mph (8 km/h) has
been reached, this may be the case.
These restrictions apply to accessories that are
supplied with power via the trailer socket in your
vehicle, e.g. a rear bicycle rack.
Observe the maximum permissible trailer
dimensions (width and length).
Most U.S. states and all Canadian provinces
require by law:
RSafety chains between the towing vehicle and
the trailer. The chains should be cross-wound
under the trailer drawbar. They must be fas-
tened to the vehicle's trailer coupling, not to
the bumper or the axle.
Leave enough play in the chains to make tight
cornering possible.
RA separate brake system for certain types of
trailer.
RSafety switch for braked trailers. Check the
specific legal requirements applicable to your state.
If the trailer becomes detached from the tow-
ing vehicle, the safety feature applies the
trailer brakes.
Towing a trailer
There are several legal requirements for towing
a trailer, e.g. the maximum permissible speed.
Make sure that your car/trailer combination
complies with the local regulations:
Rin your place of residence
Rat your destination
The police and local authorities can provide reli- able information.
To accumulate driving experience and accustom
yourself to the new handling characteristics,
practice the following at a location where there
is no traffic:
RCornering
RStopping
RBacking up
Check the following before the journey:
RTrailer tow hitch
RSafety switch for braked trailers
RSafety chains
RElectrical connections
RLighting system
RWheels and tires
RLoad securing
Adjust the exterior mirrors so that you have a
clear view of the rear section of the trailer.
If the trailer is equipped with electronically con-
trolled brakes, pull away carefully in the car/
trailer combination. Brake manually using the
brake controller and check whether the brakes
function correctly.
Regularly check that the load is secure.
When towing a trailer, your vehicle's handling
characteristics will be different in comparison
with when driving without a trailer.
The vehicle/trailer combination:
Ris heavier
Ris restricted in its acceleration and gradient-
climbing capability
Rhas an increased braking distance
Ris affected more by strong crosswinds
Rdemands more sensitive steering
Rhas a larger turning circle
Avoid sudden steering movements.
Avoid braking abruptly. If possible, brake gently
at first to allow the trailer to run on. Then,
increase the braking force rapidly.
200Towing a trailer
Driving and parking
Page 333 of 370

off-road or on rough roads. Damaged wheels
can cause a loss of tire pressure.
Pay particular attention to damage such as:
Rcuts in the tires
Rpunctures in the tires
Rtears in the tires
Rbulges on tires
Rdeformation or severe corrosion on wheels
Regularly check the tire tread depth and the
condition of the tread across the whole width of
the tire (
Ypage 331). If necessary, turn the
front wheels to full lock in order to inspect the
inner side of the tire surface.
All wheels must have a valve cap to protect the
valve against dirt and moisture. Do not mount
anything onto the valve other than the standard
valve cap or other valve caps approved by
Mercedes-Benz for your vehicle. Do not use any
other valve caps or systems, e.g. tire pressure
monitoring systems.
Regularly check the pressure of all the tires par-
ticularly prior to long trips. Adjust the tire pres-
sure as necessary (
Ypage 333).
The service life of tires depends, among other
things, on the following factors:
RDriving style
RTire pressure
RDistance covered
Notes on tire tread
GWARNING
Insufficient tire tread will reduce tire traction.
The tire is no longer able to dissipate water.
This means that on wet road surfaces, the risk
of hydroplaning increases, in particular where speed is not adapted to suit the driving con-
ditions. There is a risk of accident.
If the tire pressure is too high or too low, tires
may exhibit different levels of wear at differ-
ent locations on the tire tread. Thus, you
should regularly check the tread depth and
the condition of the tread across the entire
width of all tires.
Minimum tire tread depth for:
RSummer tires: âin (3 mm)
RM+S tires: ãin (4 mm)
For safety reasons, replace the tires before
the legally prescribed limit for the minimum
tire tread depth is reached.
Marking :shows where the bar indicator
(arrow) for tread wear is integrated into the tire
tread.
Treadwear indicators (TWI) are required by law. Six indicators are positioned on the tire tread.
They are visible once a tread depth of approx-
imately áin (1.6 mm) has been reached. If this
is the case, the tire is so worn that it must be
replaced.
Selecting, mounting and replacing
tires
ROnly mount tires and wheels of the same type
and make.
Exception: it is permissible to install a differ-
ent type or make in the event of a flat tire.
Observe the "MOExtended tires (tires with
run-flat characteristics" section (
Ypage 315).
ROnly mount tires of the correct size onto the
wheels.
RBreak in new tires at moderate speeds for the
first 60 miles (100 km). The new tires only
reach their full performance after this dis-
tance.
RDo not drive with tires which have too little
tread depth, as this significantly reduces the
traction on wet roads (hydroplaning).
RReplace the tires after six years at the latest,
regardless of wear.
Operation331
Wheels and tires
Z
Page 345 of 370

Step 3
Example 1Example 2Example 3
Permissible load (maxi-
mum gross vehicle
weight rating from the
Tire and Loading Infor-
mation placard minus
the gross weight of all
occupants)1500 lbs (680 kg)Ò
750 lbs (340 kg) =
750 lbs (340 kg)1500 lbs (680 kg) Ò
540 lbs (245 kg)
=960 lbs (435 kg)1500 lbs (680 kg) Ò
150 lbs (68 kg) =
1350 lbs (612 kg)
Vehicle identification plate
Even if you have calculated the total cargo care-
fully, you should still make sure that the gross
vehicle weight rating and the gross axle weight
rating are not exceeded. Details can be found on
the vehicle identification plate on the B-pillar on
the driver's side of the vehicle (
Ypage 340).
Permissible Gross Vehicle Weight Rating
(GVWR): the gross weight of the vehicle, all pas-
sengers, load and trailer load/noseweight (if
applicable) must not exceed the permissible
gross vehicle weight.
Gross Axle Weight Rating (GAWR): the maxi-
mum permissible load that can be carried by one
axle (front or rear axle).
To ensure that your vehicle does not exceed the
maximum permissible values (gross vehicle
weight and maximum gross axle weight rating),
have your loaded vehicle (including driver, occu-
pants, cargo, and full trailer load if applicable)
weighed on a suitable vehicle weighbridge.
All about wheels and tires
Uniform Tire Quality Grading Stand-
ards
Overview of Tire Quality Grading Stand-
ards
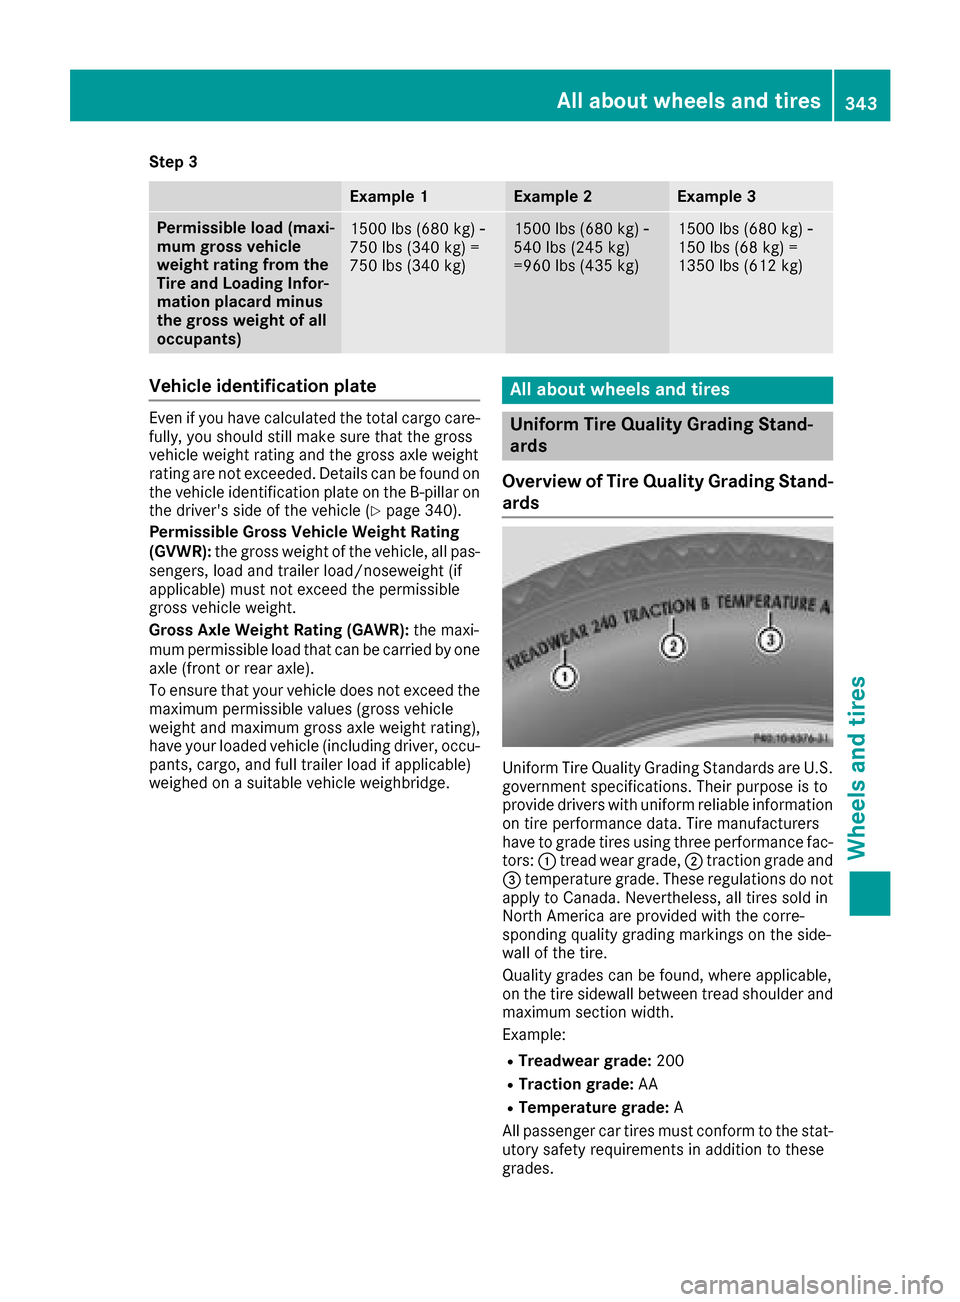
Uniform Tire Quality Grading Standards are U.S.
government specifications. Their purpose is to
provide drivers with uniform reliable information on tire performance data. Tire manufacturers
have to grade tires using three performance fac-
tors: :tread wear grade, ;traction grade and
= temperature grade. These regulations do not
apply to Canada. Nevertheless, all tires sold in
North America are provided with the corre-
sponding quality grading markings on the side-
wall of the tire.
Quality grades can be found, where applicable,
on the tire sidewall between tread shoulder and
maximum section width.
Example:
RTreadwear grade: 200
RTraction grade:AA
RTemperature grade: A
All passenger car tires must conform to the stat-
utory safety requirements in addition to these
grades.
All about wheels and tires343
Wheels and tires
Z