2017 MERCEDES-BENZ GLC COUPE buttons
[x] Cancel search: buttonsPage 8 of 370

Bag hook............................................ 279
Ball coupling
Installing ........................................ 199
Removing ....................................... 201
BAS (Brake Assist System) ................. 64
BAS PLUS with Cross-Traffic Assist
(Brake Assist PLUS with Cross-
Traffic Assist)
Function/notes ................................ 65
Important safety notes .................... 65
Battery (SmartKey)
Checking .......................................... 79
Important safety notes .................... 79
Replacing ......................................... 79
Battery (vehicle)
Charging ........................................ 321
Display message ............................ 236
Important safety notes .................. 319
Jump starting ................................. 322
Blind Spot Assist
Activating/deactivating (on-
board computer) ............................ 216
Display message ............................ 241
Notes/function .............................. 188
see Active Blind Spot Assist
Blootooth
®
Connecting a different mobile
phone ............................................ 271
BlueTEC
see DEF
Bluetooth
®
Searching for a mobile phone ........ 270
see also Digital Operator's Man-
ual .................................................. 263
Telephony ...................................... 270
Brake Assist
see BAS (Brake Assist System)
Brake fluid
Display message ............................ 228
Notes ............................................. 362
Brake force distribution
see EBD (electronic brake force
distribution)
Brake linings
Display message ............................ 228
Brakes
ABS .................................................. 64 Adaptive Brake Assist ...................... 68
BAS .................................................. 64
BAS PLUS with Cross-Traffic
Assist ............................................... 65
Brake fluid (notes) ......................... 362
Display message ............................ 223
EBD .................................................. 72
Hill start assist ............................... 131
HOLD function ............................... 166
Important safety notes .................. 154
Maintenance .................................. 155
Parking brake ................................ 150
Riding tips ...................................... 154
Warning lamp ................................. 253
Breakdown
Where will I find...? ........................ 313
see Flat tire
see Towing away
Brightness contro l (
instrument
cluster lighting) ................................... 34
Buttons on the steering wheel ......... 204
C
California
Important notice for retail cus-
tomers and lessees .......................... 27
Calling up a malfunction
see Display messages
Calling up the climate control bar
Multimedia system ........................ 267
Calling up the climate control
menu
Multimedia system ........................ 268
Camera
see 360° camera
see Rear view camera
Car
see Vehicle
Care
360° camera ................................. 310
Car wash ........................................ 305
Carpets .......................................... 312
Display ........................................... 310
Exhaust pipe .................................. 310
Exterior lights ................................ 309
General notes ................................ 305
Interior ........................................... 310
6Index
Page 22 of 370

Warning lamp ................................. 256
Standing lamps
Display message ............................2 34
Switching on/off ........................... 109
Start button
Display message ............................ 251
Start/Stop button
Key positions ................................. 128
Starting the engine ........................ 129
Start/stop function
see ECO start/stop function
Starting (engine) ................................ 128
STEER CONTROL .................................. 74
Steering
Display message ............................ 249
Warning lamps ............................... 262
Steering Assist and Stop&Go Pilot .. 164
Steering Assist and Stop&Go Pilot
(DISTRONIC PLUS)
Display message ............................ 243
Steering assistant STEER CON-
TROL
see STEER CONTROL
Steering wheel
Adjusting (electrically) ................... 101
Adjusting (manually) ...................... 101
Button overview ............................... 36
Buttons (on-board computer) ......... 204
Cleaning ......................................... 311
EASY ENTRY/EXIT feature ............. 102
Important safety notes .................. 101
Storing settings (memory func-
tion) ............................................... 106
Steering wheel heating
Problem (malfunction) ................... 102
Switching on/off ........................... 101
Steering wheel paddle shifters ........ 140
Stop&Go Pilot and Steering Assist .. 164
Stopwatch (RACETIMER) ................... 220
Stowage areas ................................... 273
Stowage compartments
Armrest (under) ............................. 274
Center console .............................. 274
Cup holders ................................... 284
Door ............................................... 275
Eyeglasses compartment ............... 274
Glove box ....................................... 274 Important safety information ......... 273
Map pockets .................................. 275
Rear ............................................... 275
Stowage net ................................... 275
see Stowage areas
Stowage net ....................................... 275
Summer tires
In winter ........................................ 332
Sun visor ............................................ 285
Suspension settings
AIR BODY CONTROL ...................... 168
Suspe
nsion tuning
AMG sports suspension based on
AIR BODY CONTROL ...................... 169
SETUP (on-board computer,
Mercedes-AMG vehicles) ............... 219
Switching air-recirculation mode
on/off ................................................. 123
Switching on media mode
Via the device list .......................... 271
T
Tachometer ........................................ 204
Tail lamps
Display message ............................ 234
Tailgate
Display message ............................ 248
Emergency unlocking ....................... 88
HANDS-FREE ACCESS ..................... 86
Important safety notes .................... 83
Limiting the opening angle ............... 88
Obstruction detection ...................... 84
Opening dimensions ...................... 364
Opening/closing (automatically
from inside) ...................................... 87
Opening/closing (automatically
from outside) ................................... 84
Reversing feature ............................. 84
Tank content
Fuel gauge ....................................... 35
Technical data
Capacities ...................................... 358
Drawbar load (maximum) ............... 365
Information .................................... 356
Trailer loads ................................... 365
Vehicle data ................................... 364
20Index
Page 42 of 370

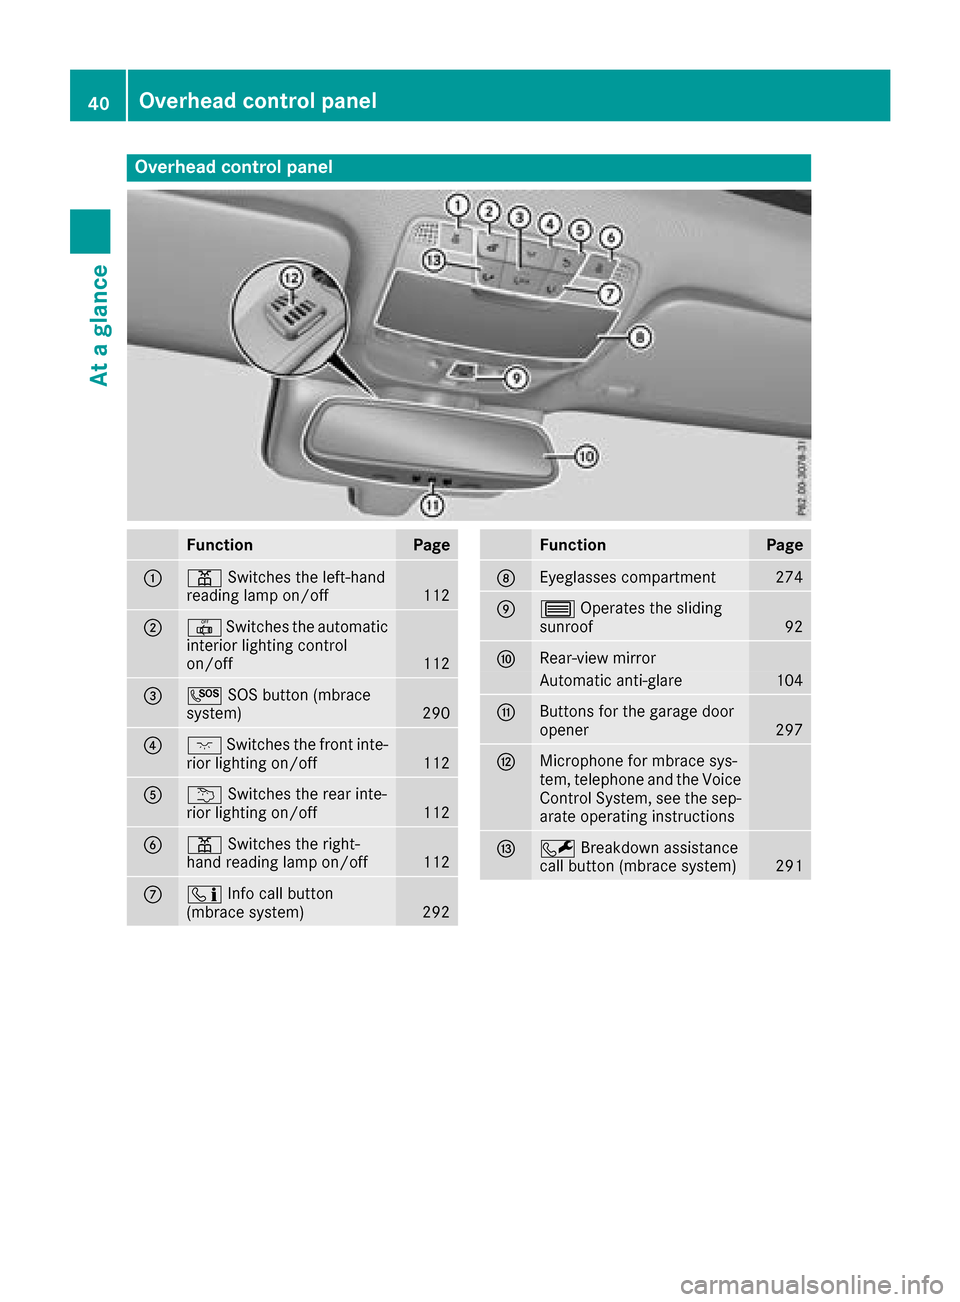
Overhead control panel
FunctionPage
:pSwitches the left-hand
reading lamp on/off112
;| Switches the automatic
interior lighting control
on/off
112
=G SOS button (mbrace
system)290
?c Switches the front inte-
rior lighting on/off112
Au Switches the rear inte-
rior lighting on/off112
Bp Switches the right-
hand reading lamp on/off112
Cï Info call button
(mbrace system)292
FunctionPage
DEyeglasses compartment274
E3 Operates the sliding
sunroof92
FRear-view mirror
Automatic anti-glare104
GButtons for the garage door
opener297
HMicrophone for mbrace sys-
tem, telephone and the Voice
Control System, see the sep-
arate operating instructions
IF Breakdown assistance
call button (mbrace system)291
40Overhead control panel
At a glance
Page 65 of 370

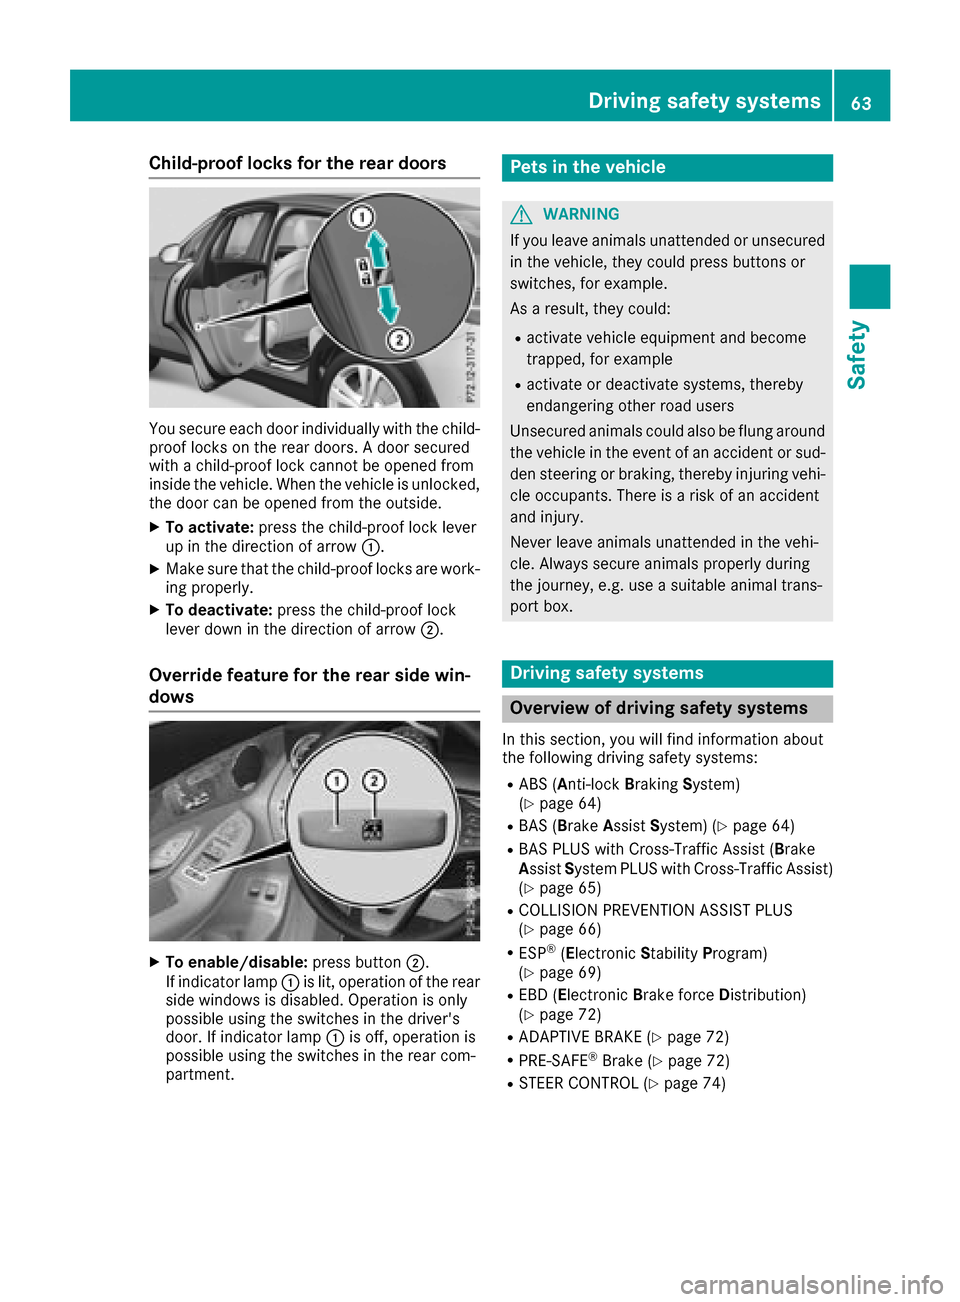
Child-proof locks for the rear doors
You secure each door individually with the child-
proof locks on the rear doors. A door secured
with a child-proof lock cannot be opened from
inside the vehicle. When the vehicle is unlocked,
the door can be opened from the outside.
XTo activate:press the child-proof lock lever
up in the direction of arrow :.
XMake sure that the child-proof locks are work-
ing properly.
XTo deactivate:press the child-proof lock
lever down in the direction of arrow ;.
Override feature for the rear side win-
dows
XTo enable/disable:press button;.
If indicator lamp :is lit, operation of the rear
side windows is disabled. Operation is only
possible using the switches in the driver's
door. If indicator lamp :is off, operation is
possible using the switches in the rear com-
partment.
Pets in the vehicle
GWARNING
If you leave animals unattended or unsecured
in the vehicle, they could press buttons or
switches, for example.
As a result, they could:
Ractivate vehicle equipment and become
trapped, for example
Ractivate or deactivate systems, thereby
endangering other road users
Unsecured animals could also be flung around
the vehicle in the event of an accident or sud-
den steering or braking, thereby injuring vehi-
cle occupants. There is a risk of an accident
and injury.
Never leave animals unattended in the vehi-
cle. Always secure animals properly during
the journey, e.g. use a suitable animal trans-
port box.
Driving safety systems
Overview of driving safety systems
In this section, you will find information about
the following driving safety systems:
RABS (Anti-lock Braking System)
(Ypage 64)
RBAS (B rakeAssist System) (Ypage 64)
RBAS PLUS with Cross-Traffic Assist ( Brake
Assist System PLUS with Cross-Traffic Assist)
(
Ypage 65)
RCOLLISION PREVENTION ASSIST PLUS
(Ypage 66)
RESP®( Electronic StabilityProgram)
(Ypage 69)
REBD (Electronic Brake force Distribution)
(Ypage 72)
RADAPTIVE BRAKE (Ypage 72)
RPRE-SAFE®Brake (Ypage 72)
RSTEER CONTROL (Ypage 74)
Driving safety systems63
Safety
Z
Page 80 of 370

KEYLESS-GOstart function
Gene ral notes
Bear in min dthat th eengin ecan be started by
any of th evehicl eoccupant sif there is aSmart -
Key in th evehicl e (
Ypage 129).
Changing the settings ofthe locking
system
You can chang eth esetting sof th elocking sys-
tem. This mean sthat only th edriver's door and
th efuel filler flap are unlocke dwhen th evehicl e
is unlocked. This is useful if you frequentl ytravel
alone.
XTo change th esetting: press and hold down
th e% and& buttons simultaneousl y
for approximately six seconds until th ebat -
tery chec klamp (
Ypage 79) flashes twice .
If th esetting of th elocking system is changed
within th esignal range of th evehicle, pressing
th e& or% button:
Rlocks or
Runlocks th evehicl e
The SmartKey no wfunction sas follows :
XTo unlock: press the% buttononce .
XTo unlock centrally: press the% button
twice .
XTo lock: press the& button.
XTo restor eth efactory settings: press and
hold th e% and& buttons simultane -
ousl yfor approximately six seconds until th e
battery chec klamp (
Ypage 79) flashes
twice .
The KEYLESS-GO function scan be changed as
follows :
XTo unlock th edriver's door :touch th einner
surfac eof th edoor handle on th edriver's
door .
XTo unlock centrally: touch theinner surfac e
of th edoor handle on th efront-passenger
door or there
ar door .
XTo lock centrally: touch theouter sensor
surfac eon on eof th edoor handles .
Mechanical key
Gene ral notes
If th evehicl ecan no longer be locke dor
unlocke dwit hth eSmartKey or KEYLESS-GO ,
use th emechanical key.
If you use th emechanical ke yto unloc kand
open th edriver's door ,th eanti-thef talarm sys-
te m will be triggered .Switc hoff th ealarm
(
Ypage 75) .
If you unloc kth evehicl eusin gth emechanical
key, th efuel filler flap will no tbe unlocke dauto -
matically.
XTo unlock th efuel filler flap: insert the
SmartKey int oth eignition lock.
Removing the mechanical key
XPush release catch :in th edirection of th e
arrow and at th esam etime remove mechan -
ical ke y; from th eSmartKey.
Fo rfurther information about :
RLocking/unlocking thedriver's door
(Ypage 83 )
RUnlocking th etailgat e (Ypage 88 )
Inserting the mechanical key
XPush mechanical ke y; completely int oth e
SmartKey until it engage sand release
catch :is bac kin it sbasic position .
78SmartKey
Opening and closing
Page 82 of 370

XRepeatedly tap theSmartKey against your
palm until battery =falls out .
XInsertth ene wbattery wit hth epositive ter-
minal facing upwards. Use alint-free cloth to
do so.
XMak esur ethat th esurfac eof th ebattery is
free of lint, grease and other contaminants.
XInser tth efron ttab sof battery compartmen t
cover :intoth ehousing first and then press
to close it .
XInsertmechanical ke y; intoth eSmartKey
(Ypage 78).
XChec kth efunction of all SmartKey buttons on
th evehicle.
Problems with the SmartKey
ProblemPossible causes/consequences and MSolutions
You can no longer lockor
unlock th evehicl eusin g
th eSmartKey.The SmartKey battery is discharged or nearly discharged.
XChec kth eSmartKey battery (Ypage 79) and replace it if necessar y
(Ypage 79).
If this does no twork:
XLoc kor unlock th evehicl eusin gth emechanical ke y (Ypage 83).
There is interferenc efrom apowerful source of radi owaves.
XLoc kor unlock th evehicl eusin gth emechanical ke y (Ypage 83).
The SmartKey is faulty.
XLockor unlock th evehicl eusin gth emechanical ke y (Ypage 83).
XHaveth eSmartKey checke dat aqualified specialist workshop.
You can no longer loc kor
unlock th evehicl eusin g
KEYLESS-GO .KEYLESS-GO was deactivated.
XReactivateKEYLESS-GO (Ypage 77).
The SmartKey battery is discharged or nearly discharged.
XCheckth eSmartKey battery (Ypage 79) and replace it if necessar y
(Ypage 79).
If this does no twork:
XLoc kor unlock th evehicl eusin gth emechanical ke y (Ypage 83).
There is interferenc efrom apowerful source of radi owaves.
XLoc kor unlock th evehicl eusin gth emechanical ke y (Ypage 83).
80SmartKey
Opening and closing
Page 85 of 370

The vehicle will be fully unlocked if it had previ-
ously been fully unlocked. If only the driver's
door had been previously unlocked, only the
door which has been opened from the inside is
unlocked.
Automatic locking feature
XTo deactivate:press and hold button :for
approximately five seconds until a tone
sounds.
XTo activate: press and hold button ;for
approximately five seconds until a tone
sounds.
If you press one of the two buttons and do not
hear a tone, the relevant setting has already
been selected.
The vehicle is locked automatically when the
ignition is switched on and the wheels are turn-
ing.
You could therefore be locked out if:
Rthe vehicle is being pushed.
Rthe vehicle is being towed.
Rthe vehicle is being tested on a dynamometer.
You can activate and deactivate the automatic
locking mechanism via the multimedia system
(see the Digital Operator's Manual).
Locking/unlocking the driver's door
with the mechanical key
i
If you want to centrally lock the vehicle using
the mechanical key, begin by pressing the
locking button for the interior locking mech-
anism while the driver's door is open. Then
lock the driver's door using the mechanical
key.
XInsert the mechanical key into opening :in
the protective cap.
XPull and hold the door handle.
XPull the protective cap on the mechanical key
as straight as possible away from the vehicle
until it releases.
XRelease the door handle.
XTo lock: turn the mechanical key clockwise as
far as it will go to position 1.
XTo unlock:turn the mechanical key counter-
clockwise as far as it will go to position 1.
If you use the mechanical key to unlock and
open the driver's door, the anti-theft alarm sys-
tem will be triggered. Switch off the alarm
(
Ypage 75).
Cargo compartment
Important safety notes
GWARNING
Combustion engines emit poisonous exhaust
gases such as carbon monoxide. If the tailgate
is open when the engine is running, particu-
larly if the vehicle is moving, exhaust fumes
Cargo compartment83
Opening and closing
Z
Page 98 of 370

of injury in the head and neck area, e.g. in theevent of an accident or when braking.
Always drive with the head restraints instal-
led. Before driving off, make sure for every
vehicle occupant that the center of the head
restraint supports the back of the head at
about eye level.
Using the fore-and-aft adjustment, adjust the
head restraint so that it is as close as possible to
your head.
GWARNING
If the driver's seat is not engaged, it could
move unexpectedly while the vehicle is in
motion. This could cause you to lose control of the vehicle. There is a risk of an accident.
Always make sure that the driver's seat is
engaged before starting the vehicle.
GWARNING
You could lose control of your vehicle if you do the following while driving:
Radjust the driver's seat, head restraint,
steering wheel or mirrors
Rfasten the seat belt
There is a risk of an accident.
Adjust the driver's seat, head restraint, steer-
ing wheel and mirror and fasten your seat belt before starting the engine.
GWARNING
If you adjust the seat height carelessly, you or
other vehicle occupants could be trapped and
thereby injured. Children in particular could
accidentally press the electrical seat adjust-
ment buttons and become trapped. There is a
risk of injury.
While moving the seats, make sure that your
hands or other body parts do not get under the
lever assembly of the seat adjustment sys-
tem.
GWARNING
The seat belt does not offer the intended level of protection if you have not moved the back-
rest to an almost vertical position. When brak-
ing or in the event of an accident, you could
slide underneath the seat belt and sustain
abdomen or neck injuries, for example. This
poses an increased risk of injury or even fatal
injury.
Adjust the seat properly before beginning
your journey. Always ensure that the backrest
is in an almost vertical position and that the
shoulder section of your seat belt is routed
across the center of your shoulder.
!To avoid damage to the seats and the seat
heating, observe the following information:
Rkeep liquids from spilling on the seats. If
liquid is spilled on the seats, dry them as
soon as possible.
Rif the seat covers are damp or wet, do not
switch on the seat heating. The seat heat-
ing should also not be used to dry the seats.
Rclean the seat covers as recommended;
see "Interior care".
Rdo not transport heavy loads on the seats.
Do not place sharp objects on the seat
cushions, e.g. knives, nails or tools. The
seats should only be occupied by passen-
gers, if possible.
Rwhen the seat heating is in operation, do
not cover the seats with insulating materi-
als, e.g. blankets, coats, bags, seat covers,
child seats or booster seats.
!Make sure that there are no objects in the
footwell under or behind the seats when mov-
ing the seats back. There is a risk that the
seats and/or the objects could be damaged.
iFor more information, contact a qualified
specialist workshop.
iRelated topic:
REASY-PACK Quickfold rear bench seat
(Ypage 276)
96Seats
Seats, steering wheel and mirrors