2017 MERCEDES-BENZ GLC COUPE change wheel
[x] Cancel search: change wheelPage 9 of 370

Matte finish ................................... 308
Paint ..............................................307
Plastic trim ....................................3 11
Power washer ................................ 307
Rear view camera .......................... 310
Roof lining ...................................... 312
Seat belt ........................................ 312
Seat cover ..................................... 311
Selector lever ................................ 311
Sensors ......................................... 309
Side running board ........................ 309
Steering wheel ............................... 311
Trim pieces ....................................3 11
Washing by hand ........................... 306
Wheels ...........................................3 08
Windows ........................................ 308
Wiper blades .................................. 309
Wooden trim .................................. 311
Cargo compartment
Opening/closing (from outside,
HANDS-FREE ACCESS) .................... 86
Plug-in module (telescopic rods) .... 282
Cargo compartment cover
Important safety notes .................. 279
Notes/how to use ......................... 279
Cargo compartment enlargement ... 276
Cargo compartment floor
Important safety notes .................. 282
Locking and unlocking ................... 283
Opening/closing ............................ 283
Stowage well (under) ..................... 282
Cargo compartment plug-in mod-
ule (telescope bars) .......................... 282
Cargo tie down rings ......................... 278
CD
see also Digital Operator's Man-
ual ..................................................2 63
CD player (on-board computer) ........212
Center console
Lower section .................................. 39
Upper section .................................. 37
Central locking
Locking/unlocking (SmartKey) ........7 6
Change of address .............................. 28
Change of owner
ship
.......................... 28
Changing the media source .............211 Charge-air pressure (on-board
computer, Mercedes-AMG vehi-
cles)
.................................................... 219
Child
Restraint system .............................. 59
Child seat
Forward-facing restraint system ...... 62
LATCH-type (ISOFIX) child seat
anchors ............................................ 60
On the front-passenger seat ............ 61
Rearward-facing restraint system .... 61
Top Tether ....................................... 60
Child-proof locks
Important safety notes .................... 62
Rear doors ....................................... 63
Children
Special seat belt retractor ............... 58
Children in the vehicle
Important safety notes .................... 58
Cigarette lighter ................................ 287
Cleaning
Mirror turn signal ........................... 309
Trailer tow hitch ............................. 310
Climate control
Control panel for dual-zone auto-
matic climate control ..................... 118
Controlling automatically ............... 120
Cooling with air dehumidification .. 120
Cooling with air dehumidification
(multimedia system) ...................... 268
Defrosting the windows ................. 122
Defrosting the windshield .............. 121
ECO start/stop function ................ 119
General notes ................................ 118
Indicator lamp ................................ 120
Ionization ....................................... 124
Ionization (multimedia system) ...... 268
Notes on using the automatic cli-
mate control .................................. 119
Overview ........................................ 267
Overview of systems ...................... 118
Perfume atomizer .......................... 123
Perfume atomizer (multimedia
system) .......................................... 268
Problem with the rear window
defroster ........................................ 122
Problems with cooling with air
dehumid ifica
tion ............................ 120
Index7
Page 23 of 370

TelephoneAccepting a call (multifunction
steering wheel) .............................. 213
Authorizing a mobile phone (con-
necting) ......................................... 270
Connecting a mobile phone (gen-
eral information) ............................ 270
Display message ............................ 249
Introduction ................................... 213
Menu (on-board computer) ............ 213
Number from the phone book ........ 213
Redialing ........................................ 214
Rejecting/ending a call ................. 213
see also Digital Operator's Man-
ual .................................................. 263
Switching between mobile
phones ........................................... 271
see Mobile phone
Temperature
Coolant (display in the instrument
cluster) .......................................... 204
Engine oil (on-board computer,
Mercedes-AMG vehicles) ............... 219
Outside temperature ...................... 204
Setting (climate control) ................ 121
Transmission oil (on-board com-
puter, Mercedes-AMG vehicles) ..... 219
Timing (RACETIMER) ......................... 220
Tire pressure
Calling up (on-board computer) ..... 337
Checking manually ........................ 336
Display message ............................ 245
Maximum ....................................... 336
Not reached (TIREFIT) .................... 318
Notes ............................................. 335
Reached (TIREFIT) .......................... 318
Recommended ............................... 333
Using the TIREFIT kit ...................... 317
Tire pressure loss warning system
General notes ................................ 336
Important safety notes .................. 336
Restarting ...................................... 337
Tire pressure monitor
Checking the tire pressure elec-
tronically ........................................ 339
Function/notes ............................. 337
General notes ................................ 337
Important safety notes .................. 338 Radio type approval for the tire
pressure monitor ........................... 340
Restarting
...................................... 339
W
arning lamp ................................. 261
Warning message .......................... 339
Tire pressure sensors
Display message ............................ 246
Tire-change tool kit ........................... 314
TIREFIT kit
Important safety notes .................. 316
Storage location ............................ 314
Tire pressure not reached .............. 318
Tire pressure reached .................... 318
Using ............................................. 317
Tires
Aspect ratio (definition) ................. 349
Average weight of the vehicle
occupants (definition) .................... 348
Bar (definition) ............................... 348
Changing a wheel .......................... 350
Characteristics .............................. 348
Checking ........................................ 330
Curb weight (definition) ................. 349
Definition of terms ......................... 348
Direction of rotation ...................... 350
Display message ............................ 245
Distribution of the vehicle occu-
pants (definition) ............................ 350
DOT (Department of Transporta-
tion) (definition) ............................. 348
DOT, Tire Identification Number
(TIN) ............................................... 347
GAWR (Gross Axle Weight Rating)
(definition) ..................................... 348
GVW (Gross Vehicle Weight) (def-
inition) ........................................... 349
GVWR (Gross Vehicle Weight Rat-
ing) (definition) .............................. 349
Important safety notes .................. 330
Increased vehicle weight due to
optional equipment (definition) ...... 348
Information on driving .................... 330
Kilopascal (kPa) (definition) ........... 349
Labeling (overview) ........................ 345
Load bearing index (definition) ...... 350
Load index ..................................... 347
Load index (definition) ................... 349
Index21
Page 28 of 370

Protecting the environment
General notes
HEnvironmental note
Daimler's declared policy is one of compre-
hensive environmental protection.
The objectives are for the natural resources
that form the basis of our existence on this
planet to be used sparingly and in a manner
that takes the requirements of both nature
and humanity into account.
You too can help to protect the environment
by operating your vehicle in an environmen-
tally responsible manner.
Fuel consumption and the rate of engine,
transmission, brake and tire wear are affected by these factors:
Roperating conditions of your vehicle
Ryour personal driving style
You can influence both factors. You should
bear the following in mind:
Operating conditions:
Ravoid short trips as these increase fuel con-
sumption.
Ralways make sure that the tire pressures
are correct.
Rdo not carry any unnecessary weight.
Rremove roof racks once you no longer need
them.
Ra regularly serviced vehicle will contribute
to environmental protection. You should
therefore adhere to the service intervals.
Ralways have service work carried out at a
qualified specialist workshop.
Personal driving style:
Rdo not depress the accelerator pedal when
starting the engine.
Rdo not warm up the engine when the vehicle
is stationary.
Rdrive carefully and maintain a safe distance
from the vehicle in front.
Ravoid frequent, sudden acceleration and
braking.
Rchange gear in good time and use each gear
only up to Ôof its maximum engine speed.
Rswitch off the engine in stationary traffic.
Rkeep an eye on the vehicle's fuel consump-
tion.
Environmental concerns and recom-
mendations
Wherever the Operator's Manual requires you to
dispose of materials, first try to regenerate or re-
use them. Observe the relevant environmental
rules and regulations when disposing of materi-
als. In this way you will help to protect the envi-
ronment.
Genuine Mercedes-Benz parts
HEnvironmental note
Daimler AG also supplies reconditioned major
assemblies and parts which are of the same
quality as new parts. They are covered by the
same Limited Warranty entitlements as new
parts.
!Air bags and Emergency Tensioning Devi-
ces, as well as control units and sensors for
these restraint systems, may be installed in
the following areas of your vehicle:
Rdoors
Rdoor pillars
Rdoor sills
Rseats
Rcockpit
Rinstrument cluster
Rcenter console
Do not install accessories such as audio sys-
tems in these areas. Do not carry out repairs or welding. You could impair the operating
efficiency of the restraint systems.
Have aftermarket accessories installed at a
qualified specialist workshop.
You could jeopardize the operating safety of
your vehicle if you use parts, tires and wheels as
well as accessories relevant to safety which
have not been approved by Mercedes-Benz. This
could lead to malfunctions in safety-relevant
26Genuine Mercedes-Benz parts
Introduction
Page 31 of 370
Operating safety
Important safety notes
GWARNING
If you do not have the prescribed service/
maintenance work or any required repairs
carried out, this can result in malfunctions or system failures. There is a risk of an accident.
Always have the prescribed service/mainte-
nance work as well as any required repairs
carried out at a qualified specialist workshop.
GWARNING
Flammable material such as leaves, grass or
twigs may ignite if they come into contact with
hot parts of the exhaust system. There is a risk of fire.
When driving off road or on unpaved roads,
check the vehicle's underside regularly. In
particular, remove parts of plants or other
flammable materials which have become
trapped. In the case of damage, contact a
qualified specialist workshop.
GWARNING
Modifications to electronic components, their software as well as wiring can impair their
function and/or the function of other net-
worked components. In particular, systems
relevant to safety could also be affected. As a
result, these may no longer function as inten-
ded and/or jeopardize the operating safety of
the vehicle. There is an increased risk of an
accident and injury.
Never tamper with the wiring as well as elec-
tronic components or their software. You
should have all work to electrical and elec-
tronic equipment carried out at a qualified
specialist workshop.
!There is a risk of damage to the vehicle if:
Rthe vehicle becomes stuck, e.g. on a high
curb or an unpaved road
Ryou drive too fast over an obstacle, e.g. a
curb, a speed bump or a pothole in the road
Ra heavy object strikes the underbody or
parts of the chassis
In situations like this, the body, the under-
body, chassis parts, wheels or tires could be
damaged without the damage being visible.
Components damaged in this way can unex-
pectedly fail or, in the case of an accident, no
longer withstand the loads they are designed
to.
If the underbody paneling is damaged, com-
bustible materials such as leaves, grass or
twigs can gather between the underbody and
the underbody paneling. If these materials
come in contact with hot parts of the exhaust system, they can catch fire.
In such situations, have the vehicle checked
and repaired immediately at a qualified spe-
cialist workshop. If on continuing your jour-
ney you notice that driving safety is impaired,
pull over and stop the vehicle immediately,
paying attention to road and traffic condi-
tions. In such cases, consult a qualified spe-
cialist workshop.
Declaration of conformity for wireless
vehicle components
USA: "The wireless devices of this vehicle com-
ply with Part 15 of the FCC Rules. Operation is
subject to the two following two conditions: 1)
These devices may not cause harmful interfer-
ence, and 2) These devices must accept any
interference received, including interference
that may cause undesired operation. Changes
or modifications not expressly approved by the
party responsible for compliance could void the
user’s authority to operate the equipment."
Canada: "The wireless devices of this vehicle
comply with Industry Canada license-exempt
RSS standard(s). Operation is subject to the fol-
lowing two conditions: (1) These devices may
not cause interference, and (2) These devices
must accept any interference, including inter-
ference that may cause undesired operation of
the device."
Operating safety29
Introduction
Z
Page 38 of 370

Multifunction steering wheel
FunctionPage
:Multifunction display205
;Multimedia system display
=~Rejects or ends a call
6Makes or accepts a call
Further telephone functions213
WXAdjusts volume
8 Mute
óSwitches on voice-
operated control for naviga-
tion or the Voice Control Sys-
tem
FunctionPage
?ò Opens the menu list
9:Selects a menu
aConfirms the selection
%Back
Operates the on-board com-
puter204
ñSwitches on voice-
operated control for naviga-
tion or the Voice Control Sys-
tem
iVehicles with Audio 20 multimedia sys-
tem: you can find further information
Ron the multimedia system in the Digital
Operator's Manual
Ron voice-controlled navigation in the man-
ufacturer's operating instructions
iVehicles with COMAND multimedia sys-
tem: you can find further information
Ron the multimedia system in the Digital
Operator's Manual
Ron the DVD changer or single DVD drive in
the Digital Operator's Manual
Ron the Voice Control System in the sepa-
rate operating instructions
36Multifunction steering wheel
At a glance
Page 107 of 370
piratory organs or clothing or be swallowed.
There is a risk of injury.
If you come into contact with the electrolyte,
observe the following:
RRinse off the electrolyte from your skin
immediately with water.
RImmediately rinse the electrolyte out of
your eyes thoroughly with clean water.
RIf the electrolyte is swallowed, immediately
rinse your mouth out thoroughly. Do not
induce vomiting.
RIf electrolyte comes into contact with your
skin or hair or is swallowed, seek medical
attention immediately.
RImmediately change out of clothing which
has come into contact with electrolyte.
RIf an allergic reaction occurs, seek medical
attention immediately.
The exterior mirror on the driver's side and the
rear-view mirror automatically go into anti-glare
mode if:
Rthe ignition is switched on
Rincident light from headlamps strikes the sen-
sor in the rear-view mirror
The mirrors do not go into anti-glare mode if
reverse gear is engaged or if the interior lighting
is switched on.
Parking position for the exterior mir-
ror on the front-passenger side
Storing the parking position
You can set the front-passenger side exterior
mirror such that you can see the rear wheel on
that side as soon as you engage reverse gear.
You can store this position.
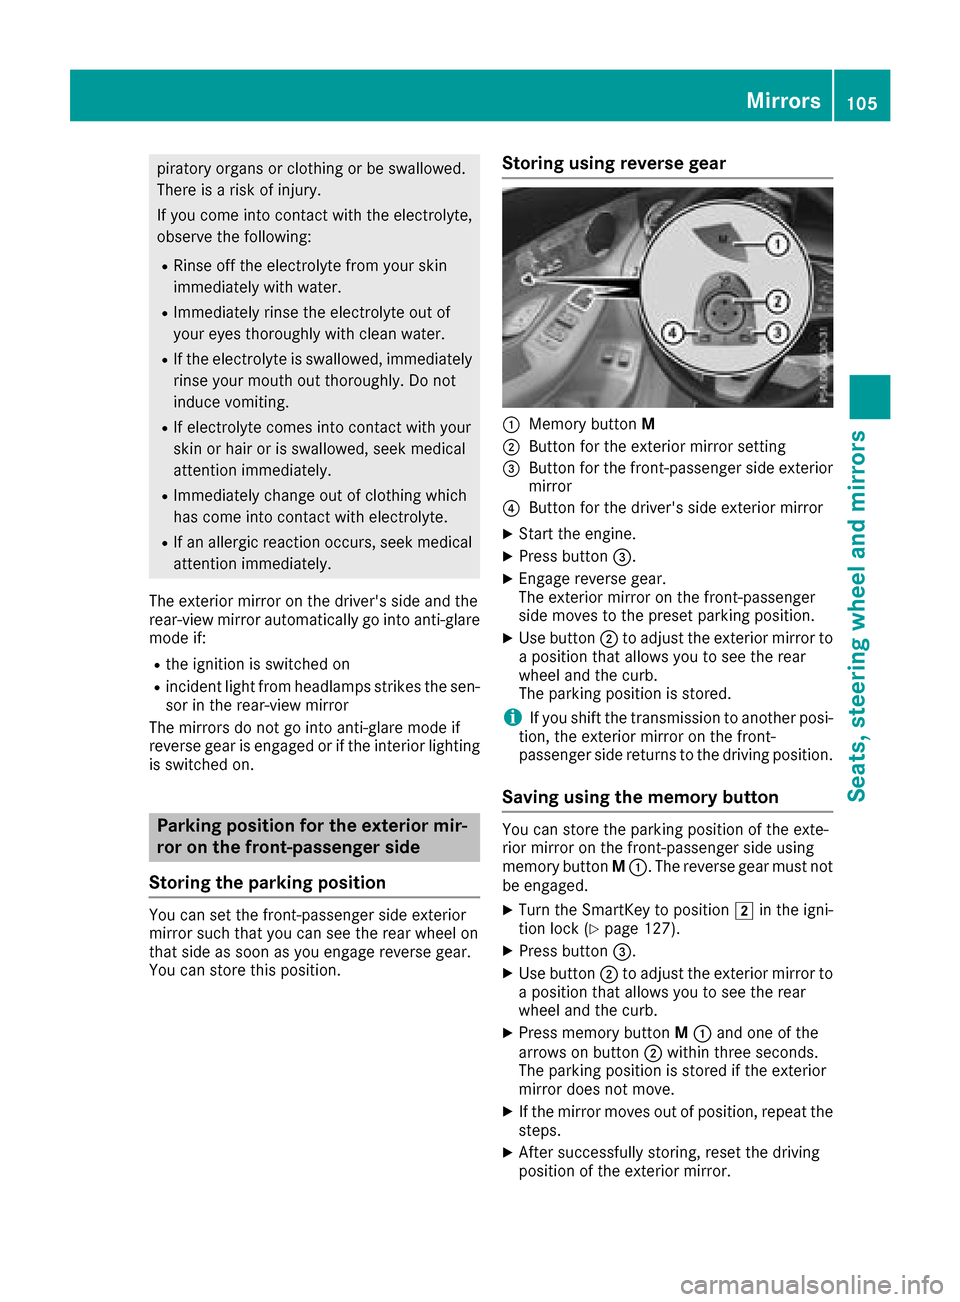
Storing using reverse gear
:Memory button M
;Button for the exterior mirror setting
=Button for the front-passenger side exterior
mirror
?Button for the driver's side exterior mirror
XStart the engine.
XPress button=.
XEngage reverse gear.
The exterior mirror on the front-passenger
side moves to the preset parking position.
XUse button;to adjust the exterior mirror to
a position that allows you to see the rear
wheel and the curb.
The parking position is stored.
iIf you shift the transmission to another posi-
tion, the exterior mirror on the front-
passenger side returns to the driving position.
Saving using the memory button
You can store the parking position of the exte-
rior mirror on the front-passenger side using
memory button M:. The reverse gear must not
be engaged.
XTurn the SmartKey to position 2in the igni-
tion lock (Ypage 127).
XPress button =.
XUse button;to adjust the exterior mirror to
a position that allows you to see the rear
wheel and the curb.
XPress memory button M: and one of the
arrows on button ;within three seconds.
The parking position is stored if the exterior
mirror does not move.
XIf the mirror moves out of position, repeat the
steps.
XAfter successfully storing, reset the driving
position of the exterior mirror.
Mirrors105
Seats, steering wheel and mirrors
Z
Page 112 of 370

=High-beam flasher
?Turn signal, left
XTo indicate briefly:press the combination
switch briefly to the pressure point in the
direction of arrow ;or?.
The corresponding turn signal flashes three
times.
XTo indicate: press the combination switch
beyond the pressure point in the direction of
arrow ;or?.
XTo switch on the high-beam headlamps:
turn the light switch to the LorÃ
position.
XPress the combination switch beyond the
pressure point in the direction of arrow :.
In the Ãposition, the high-beam head-
lamps are switched on only when it is dark and
the engine is running.
The blue Kindicator lamp on the instru-
ment cluster lights up when the high-beam
headlamps are switched on.
XTo switch off the high-beam headlamps:
move the combination switch back to its nor-
mal position.
The blue Kindicator lamp on the instru-
ment cluster goes out.
Vehicles with Adaptive Highbeam Assist:
If Adaptive Highbeam Assist is active, it auto-
matically controls activation and deactivation of
the high-beam headlamps (
Ypage 110).
XHigh-beam flasher: pull the combination
switch in the direction of arrow =.
Hazard warning lamps
XTo switch the hazard warning lamps on or
off: press button :.
The turn signal lamps flash when the hazard
warning lamps are switched on. If you now switch on a turn signal lamp using the com-
bination switch, only the turn signal lamp on
the corresponding side of the vehicle will
flash.
The hazard warning lamps switch on automati-
cally if an air bag is deployed.
The hazard warning lamps still operate if the
ignition is switched off.
Cornering light function
The cornering light function improves the illu-
mination of the road over a wide angle in the
direction you are turning, enabling better visi-
bility in tight bends, for example. It can only be
activated when the low-beam headlamps are
switched on.
Active:
Rif you are driving at speeds below 25 mph
(40 km/h) and switch on the turn signal or
turn the steering wheel
Rif you are driving at speeds between 25 mph
(40 km/h) and 45 mph (70 km/h) and turn
the steering wheel
The cornering lamp may remain lit for a short
time, but is automatically switched off after no
more than three minutes.
Cornering light function with traffic circle
function:
The cornering light function is activated on both
sides before entering a traffic circle through an
evaluation of the current GPS position of the
vehicle. It remains active until after the vehicle
has left the traffic circle. In this way, pedestrians
crossing the road, for example, are illuminated
by your vehicle in good time.
Only vehicles with the COMAND multimedia sys-
tem have this function.
Adaptive Highbeam Assist
General notes
You can use this function to set the headlamps
to change between low beam and high beam
automatically. The system recognizes vehicles
with their lights on, either approaching from the
opposite direction or traveling in front of your
vehicle, and consequently switches the head-
lamps from high beam to low beam.
110Exterior lighting
Lights and windshield wipers
Page 116 of 370

XInsert new bulb into bulb holder;.
XInsert bulb holder;into groove with lug at
top.
XPush bulb holder ;down until it engages
audibly.
XPress on housing cover :and turn it clock-
wise.
Turn signals
XRemove the cover in the front wheel housing
(Ypage 114).
XTurn bulb holder :counter-clockwise using
the grip under the headlamp casing and
remove it downwards with bulb.
XTurn defective bulb counter-clockwise and
remove it from bulb holder :.
XInsert new bulb into bulb holder :.
XInsert bulb holder:, turn it clockwise and
lock.
XReplace the cover in the front wheel housing
(Ypage 114).
Removing and installing the cover in the
front wheel housing
You must remove the cover of the front wheel
housing before you can change the front turn
signal lamp.
XTo remove: switch off the lights.
XTurn the front wheels inwards.
XTurn rotary knob :180° outwards until it
stops using a suitable object.
Cover ;is released.
XFold cover ;up.
XTo install: insert cover ;into the left, right
and two lower catches.
XTurn rotary knob :180° inwards until it
stops using a suitable object.
Cover ;is locked.
Windshield wipers
Switching the windshield wipers
on/off
!
Do not operate the windshield wipers when
the windshield is dry, as this could damage
the wiper blades. Moreover, dust that has col-
lected on the windshield can scratch the glass
if wiping takes place when the windshield is
dry.
If it is necessary to switch on the windshield
wipers in dry weather conditions, always use
washer fluid when operating the windshield
wipers.
!If the windshield wipers leave smears on the
windshield after the vehicle has been washed
in an automatic car wash, wax or other resi-
dues may be the reason for this. Clean the
windshield using washer fluid after washing
the vehicle in an automatic car wash.
!Intermittent wiping with rain sensor: due to
optical influences and the windshield becom-
ing dirty in dry weather conditions, the wind-
shield wipers may be activated inadvertently.
This could then damage the windshield wiper
blades or scratch the windshield.
114Windshield wipers
Lights and windshield wipers