2017 MERCEDES-BENZ GLA SUV change time
[x] Cancel search: change timePage 4 of 369
Welcome to the world of Mercedes-Benz
Before you drive off for the first time, read this
Owner's Manual carefully and familiarise your-
self with your vehicle. For your own safety and a longer vehicle life, follow the instructions and
warning notices in this manual. Disregarding
them may lead to damage to the vehicle or per-
sonal injury.
The equipment or model designation of your
vehicle may vary according to:
R model
R order
R country variant
R availability
The illustrations in this manual show a left-hand-
drive vehicle. On right-hand-drive vehicles, the
layout of components and controls differs
accordingly.
Mercedes-Benz is constantly updating its vehi-
cles to the state of the art.
Mercedes-Benz therefore reserves the right to
introduce changes in the following areas:
R design
R equipment
R technical features
Consequently, the description may differ from
your vehicle in some cases.
The following are integral components of the
vehicle:
R Printed Owner's Manual
R Service Booklet
R Equipment-dependent supplements
Keep these documents in the vehicle at all
times. If you sell the vehicle, always pass all
documents on to the new owner.
i You can find out about important features of
your vehicle in the interactive Owner's Man-
ual on the internet at:
http://www.mercedes-benz.de/
betriebsanleitung
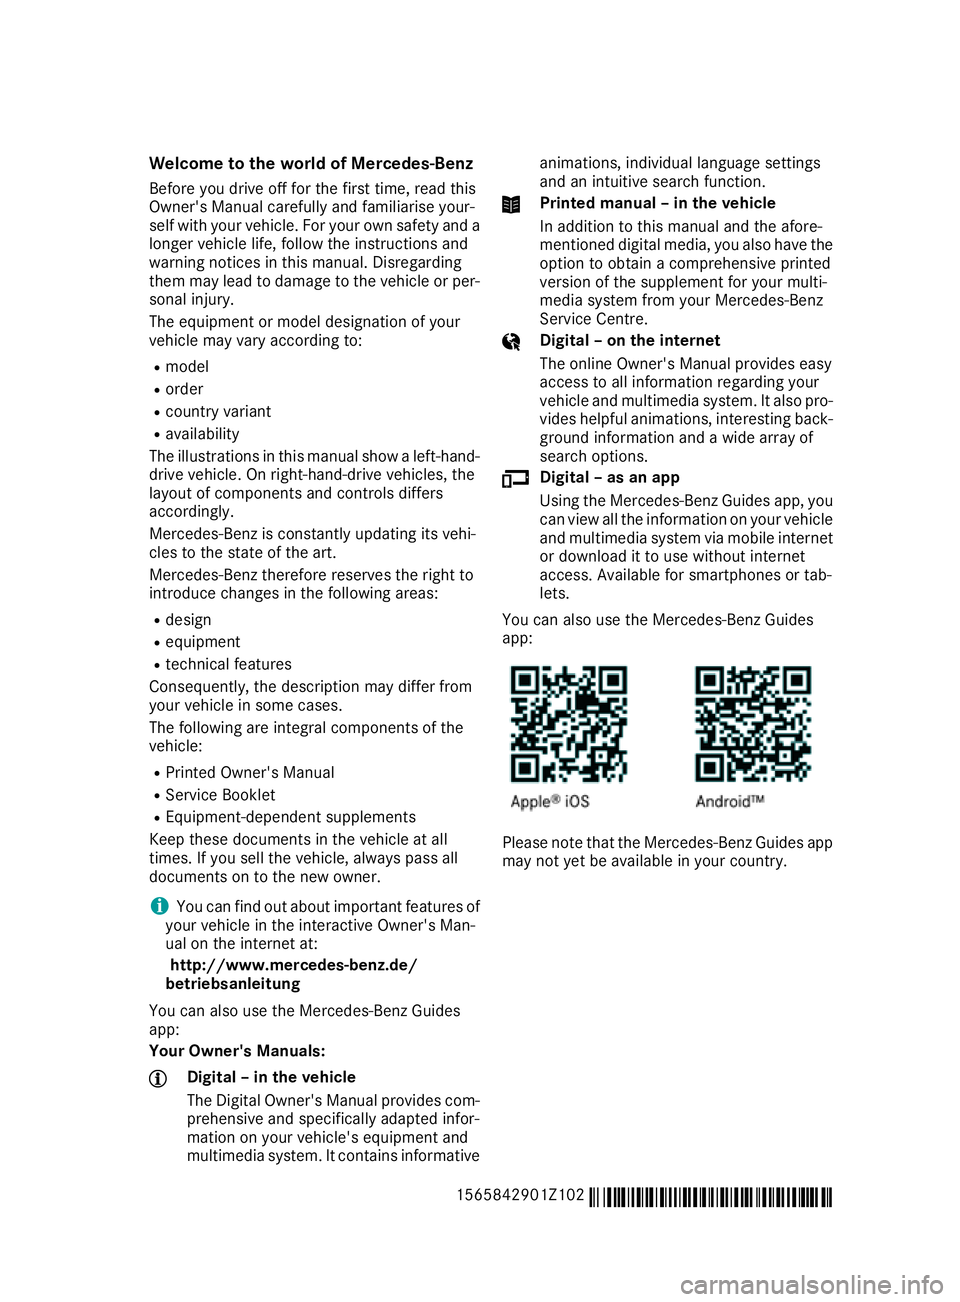
You can also use the Mercedes-Benz Guides
app:
Your Owner's Manuals: Digital – in the vehicle
The Digital Owner's Manual provides com-
prehensive and specifically adapted infor-
mation on your vehicle's equipment and
multimedia system. It contains informative animations, individual language settings
and an intuitive search function. Printed manual – in the vehicle
In addition to this manual and the afore-
mentioned digital media, you also have the
option to obtain a comprehensive printed
version of the supplement for your multi-
media system from your Mercedes-Benz
Service Centre. Digital – on the internet
The online Owner's Manual provides easy
access to all information regarding your
vehicle and multimedia system. It also pro-
vides helpful animations, interesting back-
ground information and a wide array of
search options. Digital – as an app
Using the Mercedes-Benz Guides app, you
can view all the information on your vehicle and multimedia system via mobile internet or download it to use without internet
access. Available for smartphones or tab-
lets.
You can also use the Mercedes-Benz Guides
app: Please note that the Mercedes-Benz Guides app
may not yet be available in your country.
1565842901Z102 É1565842901Z1027ËÍ
Page 29 of 369

Environmental protection
General notes
H
Environmental note
Daimler's declared policy is one of compre-
hensive environmental protection.
Our objectives are to use the natural resour-
ces which form the basis of our existence on
this planet sparingly and in a manner which
takes the requirements of both nature and
humanity into consideration.
You too can help to protect the environment
by operating your vehicle in an environmen-
tally-responsible manner.
Fuel consumption and the rate of engine,
transmission, brake and tyre wear depend on
the following factors:
R operating conditions of your vehicle
R your personal driving style
You can influence both factors. Therefore,
please bear the following in mind:
Operating conditions:
R avoid short trips, as these increase fuel
consumption.
R observe the correct tyre pressure.
R do not carry any unnecessary weight in the
vehicle.
R remove the roof rack once you no longer
need it.
R a regularly serviced vehicle will contribute
to environmental protection. You should
therefore adhere to the service intervals.
R all maintenance work should be carried out
at a qualified specialist workshop.
Personal driving style:
R do not depress the accelerator pedal when
starting the engine.
R do not warm up the engine when the vehicle
is stationary.
R drive carefully and maintain a safe distance
from the vehicle in front.
R avoid frequent, sudden acceleration and
braking. R
change gear in good time and use each gear
only up to Ôof its maximum engine speed.
R switch off the engine in stationary traffic.
R monitor the vehicle's fuel consumption. Take-back of end-of-life vehicles
EU countries only:
Mercedes-Benz will take back your end-of-life
vehicle for environmentally-friendly disposal in
accordance with the European Union (EU) End-
Of-Life Vehicles Directive.
A network of vehicle take-back points and dis-
mantlers has been established for you to return
your vehicle. You can leave it at any of these
points free of charge. This makes an important
contribution to closing the recycling circle and
conserving resources.
For further information about the recycling and
disposal of end-of-life vehicles, and the take-
back conditions, please visit the national
Mercedes-Benz website for your country. Genuine Mercedes-Benz parts
H
Environmental note
Daimler AG also supplies reconditioned
assemblies and parts which are of the same
quality as new parts. For these, the same war-
ranty applies as for new parts.
! Airbags and seat belt tensioners, as well as
control units and sensors for these restraint
systems, may be installed in the following
areas of your vehicle:
R doors
R door pillars
R door sills
R seats
R dashboard
R instrument cluster
R centre console
Do not install accessories such as audio sys-
tems in these areas. Do not carry out repairs or welding. You could impair the operating
efficiency of the restraint systems. 26
Genuine Mercedes-Benz partsIntroduction
Page 30 of 369
Have accessories retrofitted at a qualified
specialist workshop.
You could jeopardise the operating safety of
your vehicle if you use parts, tyres and wheels as
well as accessories relevant to safety that have not been approved by Mercedes-Benz. This
could lead to malfunctions in safety-relevant
systems, e.g. the brake system. Use only genu-
ine Mercedes-Benz parts or parts of equal qual- ity. Use only tyres, wheels and accessories that
have been specifically approved for your vehi-
cle.
Mercedes-Benz tests genuine parts and conver-
sion parts and accessories that have been spe-
cifically approved for your vehicle for their reli-
ability, safety and suitability. Despite ongoing
market research, Mercedes-Benz is unable to
assess other parts. Mercedes-Benz therefore
accepts no responsibility for the use of such
parts in Mercedes-Benz vehicles, even if they
have been officially approved or independently
approved by a testing centre.
In Germany, certain parts are officially approved for installation or modification only if they com-
ply with legal requirements. This also applies to some other countries. All genuine Mercedes-
Benz parts meet the approval requirements. The
use of non-approved parts may invalidate the
vehicle's general operating permit.
This is the case:
R if they cause a change of the vehicle type from
that for which the vehicle's general operating permit was granted
R if other road users could be endangered
R if the emission or noise levels are adversely
affected
Always specify the vehicle identification number (VIN) (Y page 351) when ordering genuine
Mercedes-Benz parts. Owner's Manual
Vehicle equipment
i This Owner's Manual describes all models
and all standard and optional equipment
available for your vehicle at the time of pub-
lication of the Owner's Manual. Country-spe-
cific differences are possible. Note that your
vehicle may not be fitted with all features
described. This is also the case for systems
and functions relevant to safety. Therefore, the equipment on your vehicle may differ from
that in the descriptions and illustrations.
The original purchase contract documentation
for your vehicle contains a list of all the systems in your vehicle.
Should you have any questions concerning
equipment and operation, please consult a
Mercedes-Benz Service Centre.
The Owner's Manual and Service Booklet are
important documents and should be kept in the
vehicle. Operating safety
Declarations of conformity
Wireless vehicle components The following information applies to all compo-
nents of the vehicle and the information sys-
tems and communication devices integrated
into the vehicle that receive and/or transmit
radio waves:
The components of this vehicle that receive
and/or transmit radio waves are compliant with
the basic requirements and all other relevant
conditions of Directive 1999/5/EC. You can
obtain further information from any Mercedes-
Benz Service Centre.
Electromagnetic compatibility The electromagnetic compatibility of the vehicle
components has been checked and certified
according to the currently valid version of Reg-
ulation ECE-R 10.
Jack Copy and translation of the original declaration
of conformity:
EC declaration of conformity
1. The signatory, as a representative
Manufacturer:
BRANO a.s.
74741 Hradec nad Moravicí, Opav-
ská 1000,
Czech Republic
ID no.: 64-387-5933
VAT ID no.: CZ64-387-5933 Operating safety
27Introduction Z
Page 38 of 369
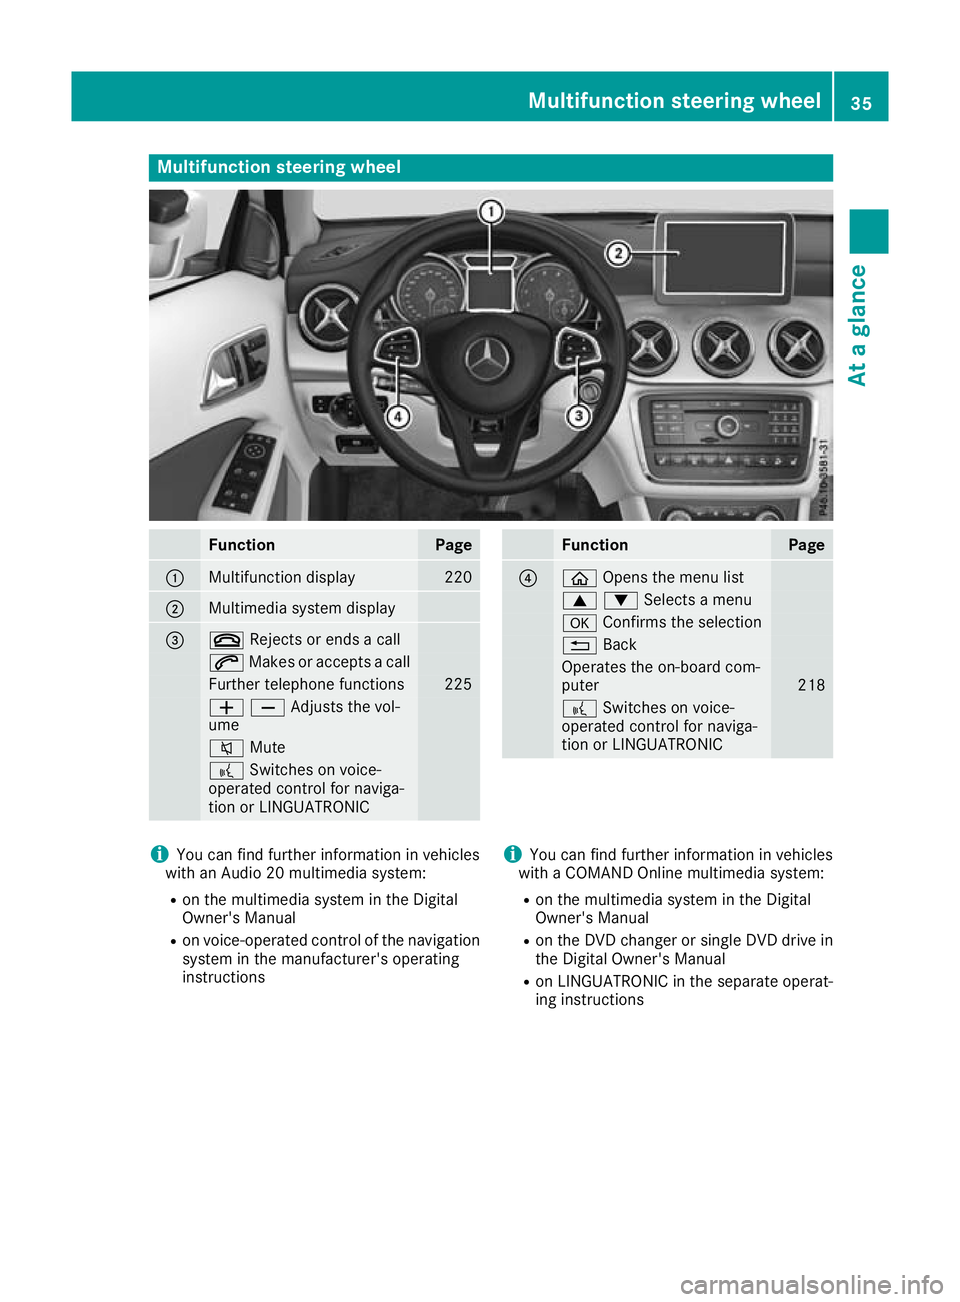
Multifunction steering wheel
Function Page
:
Multifunction display 220
;
Multimedia system display
=
~
Rejects or ends a call 6
Makes or accepts a call Further telephone functions 225
WXAdjusts the vol-
ume 8
Mute ?
Switches on voice-
operated control for naviga-
tion or LINGUATRONIC Function Page
?
ò
Opens the menu list 9:Selects a menu
a
Confirms the selection %
Back Operates the on-board com-
puter
218
?
Switches on voice-
operated control for naviga-
tion or LINGUATRONIC i
You can find further information in vehicles
with an Audio 20 multimedia system:
R on the multimedia system in the Digital
Owner's Manual
R on voice-operated control of the navigation
system in the manufacturer's operating
instructions i
You can find further information in vehicles
with a COMAND Online multimedia system:
R on the multimedia system in the Digital
Owner's Manual
R on the DVD changer or single DVD drive in
the Digital Owner's Manual
R on LINGUATRONIC in the separate operat-
ing instructions Multifunction steering wheel
35At a glance
Page 84 of 369
Deactivating and activating
If you do not intend to use the vehicle for an
extended period of time, you can deactivate
KEYLESS-GO. The key will then use very little
power, thereby conserving battery power. For
the purposes of activation or deactivation, the
vehicle does not have to be nearby.
X To deactivate: press the&button on the
key twice in rapid succession.
The battery check lamp of the key flashes
twice briefly and lights up once, then KEY-
LESS-GO is deactivated (Y page 82).
X To activate: press any button on the key.
or X Insert the key into the ignition lock.
KEYLESS-GO and all its associated features
are available again. Changing the settings of the locking
system
You can change the settings of the locking sys-
tem. This means that only the driver's door and
the fuel filler flap are unlocked when the vehicle is unlocked. This is useful if you frequently travelalone.
X To change the setting: press and hold down
the % and& buttons simultaneously
for about six seconds until the battery indica-
tor lamp flashes twice (Y page 82).
If the setting of the locking system is changed
within the signal range of the vehicle, pressing
the & or% button:
R locks or
R unlocks the vehicle
The key now functions as follows:
X To unlock: press the%button once.
X To unlock centrally: press the%button
twice.
X To lock centrally: press the&button. The KEYLESS-GO function is changed as fol-
lows:
X To unlock the driver's door: touch the inner
surface of the door handle on the driver's
door.
X To unlock centrally: touch the inner surface
of the door handle on the front-passenger
door or the rear door.
X To lock centrally: touch the outer sensor
surface on one of the door handles.
X To restore the factory settings: press and
hold down the %and& buttons simul-
taneously for approximately six seconds until
the battery check lamp flashes twice
(Y page 82). Emergency key element
General notes If the vehicle can no longer be unlocked with the
key or KEYLESS-GO, use the emergency key ele-
ment.
If you use the emergency key element to unlock
and open the driver's door or the tailgate, the
anti-theft alarm system will be triggered
(Y page 76).
There are several ways to deactivate the alarm:
X To deactivate the alarm with the key: press
the % or& button on the key.
or X Insert the key into the ignition lock.
or X To deactivate the alarm with KEYLESS-GO:
press the Start/Stop button in the ignition
lock. The key must be in the vehicle.
or X Lock or unlock the vehicle using KEYLESS-
GO. The key must be outside the vehicle.
If you unlock the vehicle using the emergency
key element, the fuel filler flap will not be
unlocked automatically. X To unlock the fuel filler flap: insert the key
into the ignition lock. Key
81Opening and closing Z
Page 124 of 369
Protect bulbs from moisture during operation.
Do not allow bulbs to come into contact with
liquids.
Replace only the bulbs listed (Y page 121).
Have the bulbs that you cannot change yourself replaced at a qualified specialist workshop.
If you require assistance replacing bulbs, con-
sult a qualified specialist workshop.
If the new bulb still does not light up, consult a
qualified specialist workshop.
Headlamps and lights are an important aspect of
vehicle safety. You must therefore make sure
that these function correctly at all times. Have
the headlamp setting verified regularly.
Vehicles with LED headlamps: the front and
rear lamp clusters of your vehicle are equipped
with LED bulbs. Do not replace the bulbs your-
self. Contact a qualified specialist workshop
with the necessary specialist knowledge and
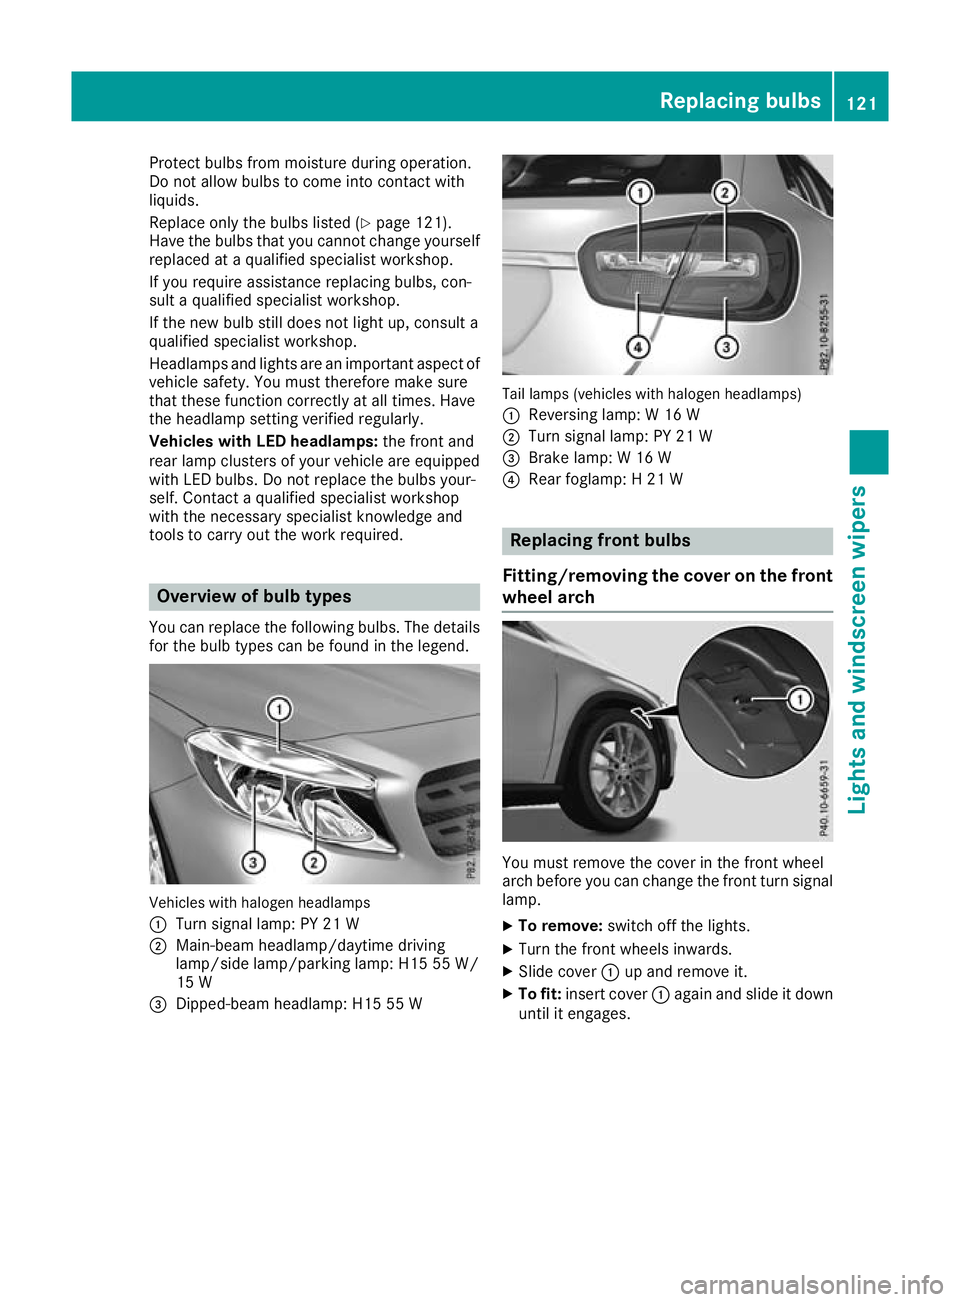
tools to carry out the work required. Overview of bulb types
You can replace the following bulbs. The details for the bulb types can be found in the legend. Vehicles with halogen headlamps
:
Turn signal lamp: PY 21 W
; Main-beam headlamp/daytime driving
lamp/side lamp/parking lamp: H15 55 W/
15 W
= Dipped-beam headlamp: H15 55 W Tail lamps (vehicles with halogen headlamps)
: Reversing lamp: W 16 W
; Turn signal lamp: PY 21 W
= Brake lamp: W 16 W
? Rear foglamp: H 21 W Replacing front bulbs
Fitting/removing the cover on the front wheel arch You must remove the cover in the front wheel
arch before you can change the front turn signal
lamp.
X To remove: switch off the lights.
X Turn the front wheels inwards.
X Slide cover :up and remove it.
X To fit: insert cover :again and slide it down
until it engages. Replacing bulbs
121Lights and windscreen wipers Z
Page 134 of 369
I
To switch the rear window heating on/off (Y page 135)
J To switch the ZONE function on/off (Y page 134)Information on operating
THERMOTRONIC automatic climate
control
Automatic climate control The following contains instructions and recom-
mendations to enable you to get the most out of
your THERMOTRONIC automatic climate con-
trol.
R Activate climate control using the Ãand
¿ buttons. The indicator lamps in the
à and¿ buttons light up.
R Set the temperature to 22 †.
R Use the "Windscreen demisting" function only
briefly until the windscreen is clear again.
R Use the "Air-recirculation mode" function only
briefly, e.g. if there are unpleasant outside
odours or when in a tunnel. The windows
could otherwise mist up as no fresh air is
drawn into the vehicle in air-recirculation
mode.
R Use the ZONE function to adopt the temper-
ature settings on the driver's side for the
front-passenger side as well. The indicator
lamp in the ábutton goes out.
R Use the "Residual heat" function if you want to
heat or ventilate the vehicle interior when the
ignition is switched off. The "Residual heat"
function can be switched on or off only with
the ignition switched off.
R If you change the settings of the climate con-
trol system, the climate status display
appears for approximately three seconds at
the bottom of the screen in the multimedia
system display; see separate operating
instructions. You will see the current settings of the various climate control functions.
DYNAMIC SELECT button (except
Mercedes-AMG vehicles) You can choose between various drive programs
with the DYNAMIC SELECT button
(Y page 151). If you have selected drive program
E:
R when heating, the electrical heater booster is
deactivated and in the warming-up phase
heat output is reduced
R the rear window heating running time is
reduced
Depending on the configuration, the climate set-
tings can also be influenced in drive program I.
If you have selected drive program Cor S, the
climate settings are not affected.
ECO start/stop function During automatic engine stop, the climate con-
trol operates only at a reduced capacity. If you
require the full climate control output, you can
switch off the ECO start/stop function by press-
ing the ECO button (Y page 149). Operating the climate control sys-
tems
Switching the climate control on/off
General notes When climate control is switched off, the air
supply and air circulation are also switched off.
The windows could mist up. Therefore, switch
off climate control only briefly.
Air-conditioning system X
Turn the key to position 2in the ignition lock
(Y page 144).
X To switch on: turn controlAclockwise to
the desired position (except position 0)
(Y page 129).
X To switch off: turn controlAanti-clockwise
to position 0(Y page 129). Operating the climate control systems
131Climate control
Page 141 of 369
Switch the auxiliary heating on regularly – once
a month – for about ten minutes.
The auxiliary heating timer function calculates
the switch-on time according to the outside
temperature so that the vehicle is preheated by the departure time. When the departure time is
reached, the auxiliary heating continues to heat for a further five minutes and then switches off.
The auxiliary heating heats the air in the vehicle interior to the set temperature. This occurs with-out using the heat of the running engine. The
auxiliary heating is operated directly using the
vehicle's fuel. For this reason, the fuel tank must
be at least Õfull to ensure that the auxiliary
heating functions.
The auxiliary heating/ventilation automatically
adjusts to changes in temperature and weather conditions. For this reason, the auxiliary heating
could switch from ventilation mode to heating
mode or from heating mode to ventilation mode.
The auxiliary heating switches off when the
engine is switched off. The auxiliary ventilation
switches off when you turn the key to key posi-
tion 2(Ypage 144).
The auxiliary heating switches off automatically
after 50 minutes.
You cannot use the auxiliary ventilation to cool
the vehicle interior to a temperature lower than
the outside temperature.
Before switching on X
Turn the key to position 2in the ignition lock
(Y page 144).
X Set the desired temperature.
Auxiliary heating or ventilation can also be
switched on if the manually set climate control is
activated. Optimum comfort is attained by set-
ting the system to automatic mode. Set the tem-
perature to 22 †.
The auxiliary heating or auxiliary ventilation can be switched on/off using the button on the
centre console or the remote control.
The on-board computer can be used to specify
up to three departure times, one of which may
be preselected (Y page 230). Switching the auxiliary heating/venti-
lation on or off using the button on the
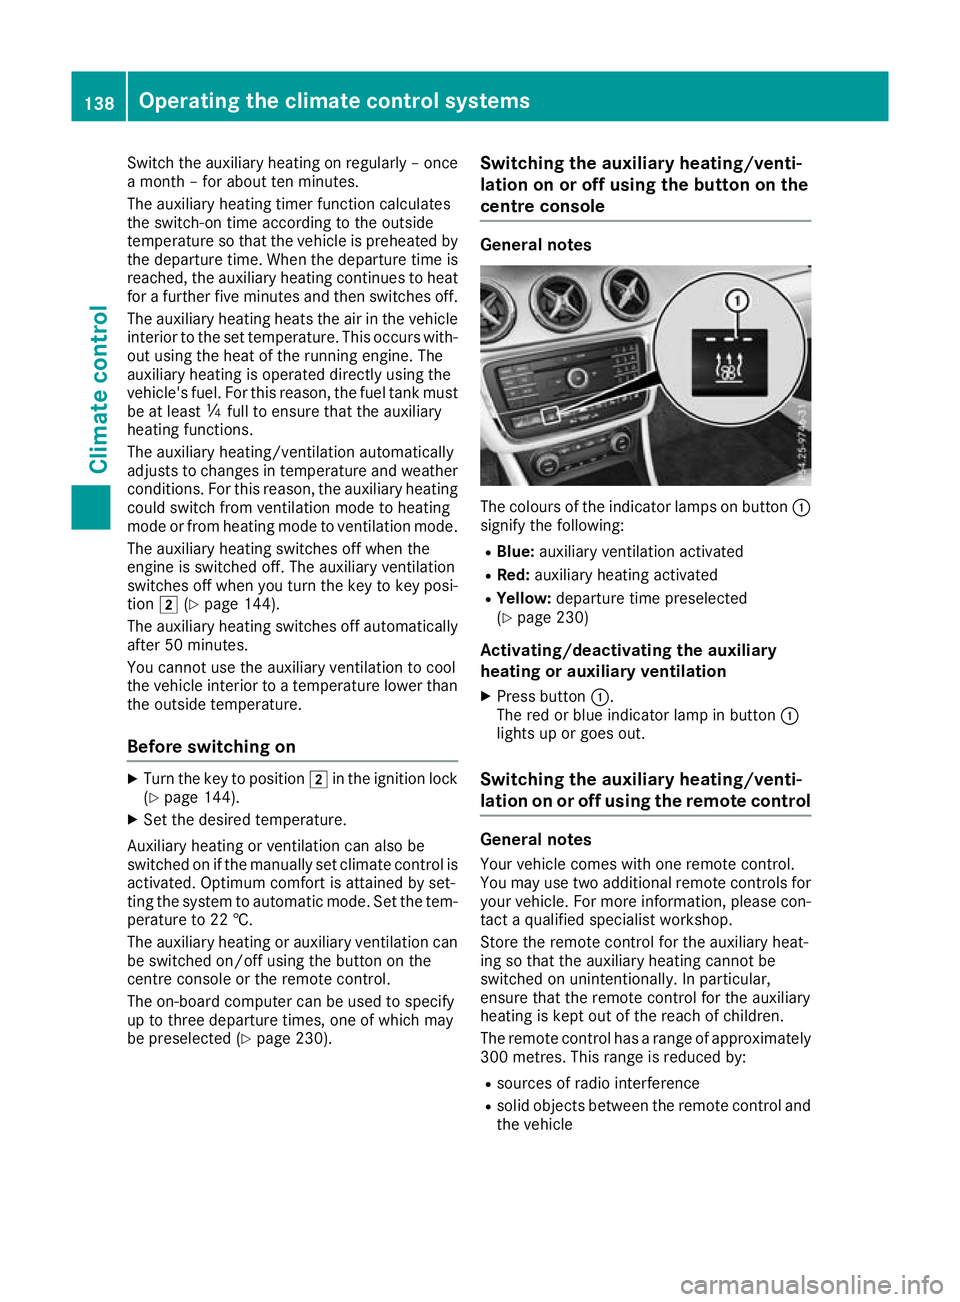
centre console General notes
The colours of the indicator lamps on button
:
signify the following:
R Blue: auxiliary ventilation activated
R Red: auxiliary heating activated
R Yellow: departure time preselected
(Y page 230)
Activating/deactivating the auxiliary
heating or auxiliary ventilation
X Press button :.
The red or blue indicator lamp in button :
lights up or goes out.
Switching the auxiliary heating/venti-
lation on or off using the remote control General notes
Your vehicle comes with one remote control.
You may use two additional remote controls for
your vehicle. For more information, please con-
tact a qualified specialist workshop.
Store the remote control for the auxiliary heat-
ing so that the auxiliary heating cannot be
switched on unintentionally. In particular,
ensure that the remote control for the auxiliary
heating is kept out of the reach of children.
The remote control has a range of approximately
300 metre s. Thisrange is reduced by:
R sources of radio interference
R solid objects between the remote control and
the vehicle 138
Operating the climate control systemsClimate control