2017 MERCEDES-BENZ G-Class display
[x] Cancel search: displayPage 222 of 286
Mercedes-BenzCustomer Assistanc eCenter
at 1-800-FOR-MERCedes (1-800-367-6372)
or 1-866-990-9007
You will be asked for your password.
The next time you are inside the vehicle and you
switch on the ignition, the Doors Locked
Remotelymessage appears in the multifunction
display.
Alternatively, the vehicle can be locked via:
Rthe Internet, under the "Owners Online" sec-
tion
Rtelephone applications (e.g. for iPhone®,
Android™)
To do this, you will need your identification num-
ber and password.
Stolen vehicle recovery service
If your vehicle has been stolen:
XNotify the police.
The police will issue anumbered incident
report.
XThis number will be forwarded to the
Mercedes-BenzC ustomer Assistanc eCenter
together with your PIN.
The Mercedes-BenzC ustomer Assistance
Center then tries to locate the system. The
Mercedes-BenzC ustomer Assistanc eCenter
contacts you and the local law enforcement
agency if the vehicle is located.
However, only the law enforcement agency is
informed of the location of the vehicle.
If the anti-theft alarm system is activated for
longer than 30 seconds, the Mercedes-Benz
Customer Assistanc eCenter is automatically
notified.
Vehicle Health Check
With the Vehicle Health Check, the Customer
Assistanc eCenter can provide improved sup-
port for problems with your vehicle. During an
existing call, vehicle data is transferred to the
Customer Assistanc eCenter.
The customer service representative can use
the received data to decide what kind of assis-
tance is required. You are then, for example,
guided to the nearest Mercedes-BenzS ervice
Center or arecovery vehicle is called.
If vehicle data need to be transferred during an
Info call or aRoadside Assistanc ecall, this is
initiated by the Customer Assistanc eCenter. You will see the
Roadside Assistance Con‐
nectedmessage in the display.Ift he Vehicle
Health Check can be started, the RequestforVehicle Diagnostics Received Startvehicle diagnostics?message appears in
the display.
XPress the Yesbutton to confirm the message.
XWhen the Vehicle Diagnostics PleaseStart Ignitionmessage appears: turn the
SmartKey to position 2in the ignition lock
(
Ypage 104).
XIf the Please follow the instructionsreceivedbyphoneandmoveyourvehi‐cle to asafe position.message
appears: please follow the instructions
received by phone and move your vehicle to a
safe position.
The message in the display disappears.
The vehicle operating state check begins. You
will see the Vehicle Diagnostics Active
message.
If you select Cancel
,the Vehicle Health
Check is canceled completely.
When the check is complete, the Sending
vehicle diagnostics data. (Voice con‐nection may be interrupted duringdatatransfer)message appears. The vehicle
data can now be sent.
XPress the OKbutton to confirm the message.
The voice connection with the Customer
Assistanc eCenter is terminated.
You will see the Vehicle diagnosis:
Transferring data...message.
The vehicle data is sent to the Customer
Assistanc eCenter.
Depending on what the customer service rep-
resentative agreed with you, the voice connec-
tion is re-established after the transfer is com-
plete. If necessary, you will be contacted at a
later time by another means, e.g. by e-mail or
phone.
Another function of the Vehicle Health Check is
the transfer of service data to the Customer
Assistanc eCenter. If aservice is due, the display
shows amessage to this effect together with
information about any special offers at your
workshop.
This information can also be called up under
"Owners Online" at http://www.mbusa.com.
Information on the data stored in the vehicle
(
Ypage 28).
220Features
Stowage and features
Page 223 of 286
Information on Roadside Assistance
(Ypage 25).
Downloading routes
Downloading routes allows you to transfer and
save predefined routes in the navigation sys-
tem.
Aroute can be prepared and sent by either a
customer service representative or under "Own-
ers Online" at http://www.mbusa.com.
Each route can include up to four way points.
Once aroute has been received by the naviga-
tion system, you wills ee theDo
youwanttostart route guidance? DestinationReceived destination has been savedin "Previous destinations".message on
the multimedia system display.
The route is saved.
XTo start route guidance: selectYes.
An overview of the route is shown in the dis-
play.
If you select No
,the saved route can be called
up later in the navigation menu.
XSelect Start.
Route guidance starts.
Downloaded and saved routes can be calledu p
again.
Speed alert
You can define the uppers peed limit, which
must not be exceeded by the vehicle.
If this selected speed is exceeded by the vehicle,
am essagew illbesent to the Customer Assis-
tance Center. The Customer Assistance Center
then forward sthis information to you.
You can select the way in which you receive this
information beforehand. Possible options
include text message,e -mail or an automated
call.
The data you receive contains the following
information:
Rthe location where the speed limitw as excee-
ded
Rthe time at which the speed limitw as excee-
ded
Rthe selected speed limitw hich was exceeded
Geo fencing
Geo fencing allows you to select areasw hich the
vehicle shoul dnot enter or leave. You willb e
informed if the vehicle crosses the boundaries
of the selected areas. You can select the way in
which you receive this information beforehand.
Possible options include text message, e-mail or an automated call.
The area can be determined as either acircle or
ap olygon with amaximum of ten corners. You
can specify up to ten areass imultaneously. Dif-
ferent settings are possible for each area.
These settings can be calledupu nder "Owners
Online" at http://www.mbusa.com.
Alternatively,y ou can trigger an Info call and
notify the customer service representative that
you wish to activate geo-fencing.
Currently inactive areasc an be activated by text
message.
Triggering the vehicle alarm
With this function, you can trigger the vehicle's
panic alarm via text message. An alarm sounds
and the exterior lighting flashes. Depending on
the setting, the panic alarm lasts five or ten sec- onds. Afterwards, the alarm switches off.
Brush guard (USA only)
If the brush guard has to be removed, contact a
qualifieds pecialist workshop.
Garage door opener
General notes
You can use the HomeLink®garage door opener
integrated into the rear-view mirror to operate
up to three different gate/garage door opener
systems.
Certai ngarage door drives are incompatible
with the integrated garage door opener. If you
have difficulty programing the integrated garage
door opener, contact aMercedes-Benz Service
Center.
Features221
Stowagea nd features
Z
Page 229 of 286
GWARNING
Opening the hood when the engine is over-
heated or when there is afire in the engine
compartment coul dexpose you to hot gases
or other service products. There is arisk of
injury.
Let an overheated engine cool downb efore
opening the hood. If there is afire in the
engine compartment, keep the hood closed
and contact the fire department.
Notes on the oil level
Depending on you rdriving style ,the vehicle
consumes up to 0.9 US qt (0.8 liters )ofoil per
600 mile s(1000 km). The oil consumption may
be higher than this whe nthe vehicle is new or if
you frequently drive at high engine speeds.
Depending on the engine, the oil dipstick may be
in ad ifferent location.
When checking the oil level:
Rpark the vehicle on alevels urface
Rthe engine should be switched off for approx-
imately five minutes if the engine is at normal
operating temperature
Rif the engine is not at normal operating tem-
perature, e.g. if the engine wa sonly started
briefly,w aita pproximately 30 minutes before
carrying out the measurement
Checking the oil level usingt he oil dip-
stick
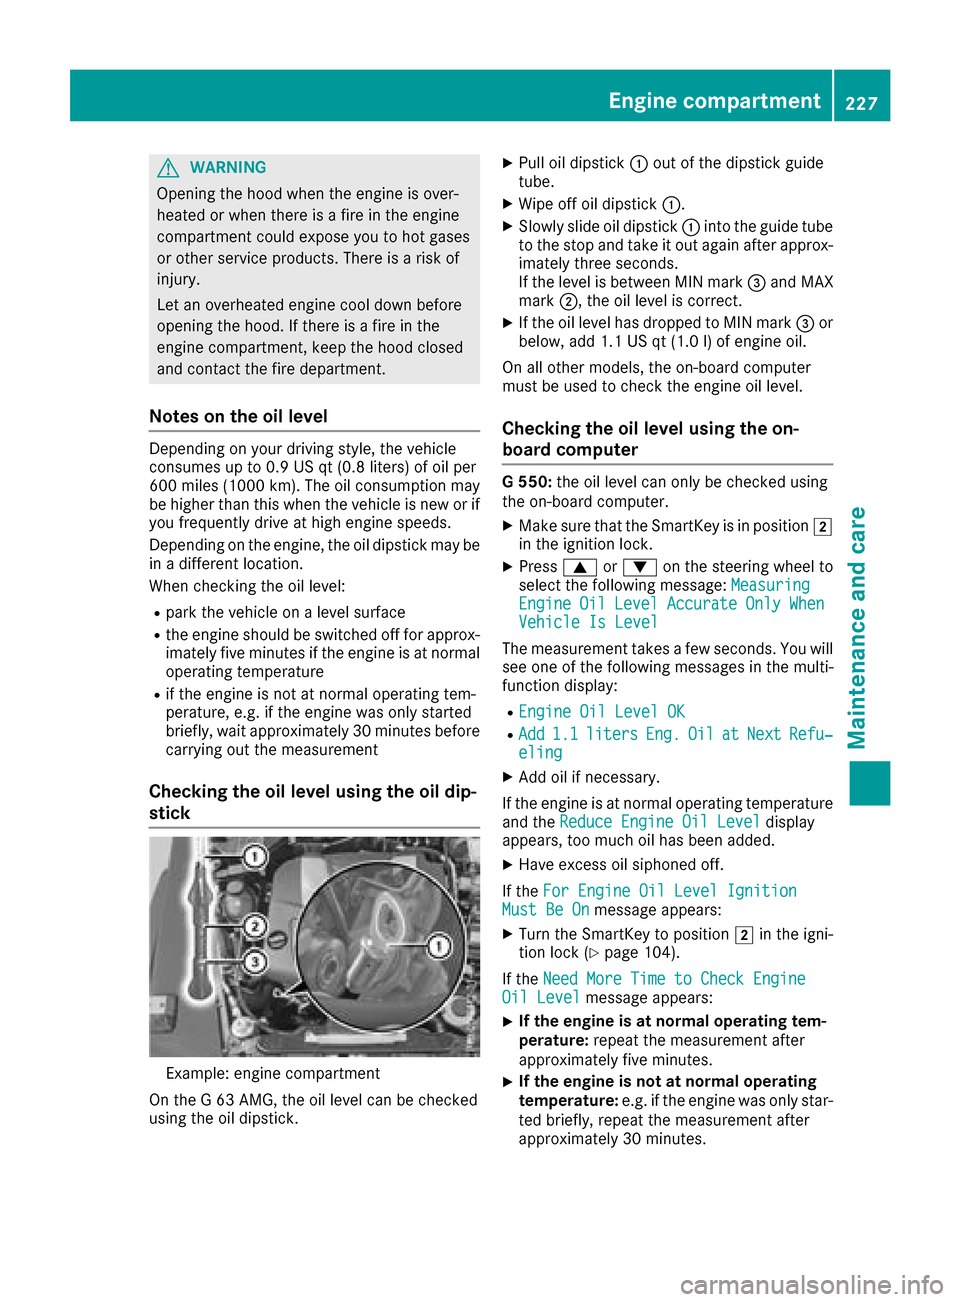
Example: engine compartment
On the G63AMG, the oil levelc an be checked
using the oil dipstick.
XPul loil dipstick :out of the dipstick guide
tube.
XWipeo ff oil dipstick :.
XSlowly slide oil dipstick :into the guide tube
to the stop and take it out again after approx-
imately three seconds.
If the levelisb etween MIN mark =and MAX
mark ;,the oil levelisc orrect.
XIf the oil levelh as dropped to MIN mark =or
below, add 1.1 US qt (1.0 l)of engine oil.
On all other models, the on-board computer
must be used to check the engine oil level.
Checking the oil level using the on-
board computer
G5 50: the oil level can only be checked using
the on-board computer.
XMake sure that the SmartKey is in position 2
in the ignition lock.
XPress 9or: on the steering wheel to
select the following message: Measuring
EngineOilLevelAccurateOnlyWhenVehicle Is Level
The measurement takesafew seconds. You will
see one of the following messages in the multi-
function display:
REngine Oil Level OK
RAdd1.1litersEng.OilatNextRefu‐eling
XAdd oil if necessary.
If the engine is at normal operating temperature and the Reduce Engine Oil Level
display
appears, too much oil has been added.
XHave excess oil siphoned off.
If the For Engine Oil Level Ignition
Must Be Onmessage appears:
XTurn the SmartKey to position 2in the igni-
tion lock (Ypage 104).
If the Need More Time to Check Engine
Oil Levelmessage appears:
XIf the engine is at norma loperating tem-
perature: repeat the measurement after
approximately five minutes.
XIf the engine is not at norma loperating
temperature: e.g. if the engine was only star-
ted briefly, repeat the measurement after
approximately 30 minutes.
Engine compartment227
Maintenance and care
Z
Page 231 of 286
If you need to do any work inside the engine
compartment:
Rswitch off the ignition
Rnever reach into the area where there is a
risk of danger from moving components,
such as the fan rotation area
Rremove jewelry and watches
Rkeep items of clothing and hair, for exam-
ple, awayfrom moving parts
GWARNING
The cooling system is pressurized, particularly
when the motor is warm. If you open the cap,
you could be scaldedifh ot coolant spraysout.
There is arisk of injury.
Let the engine cool down before you open the
cap. Wear gloves and eye protection. Slowly
open the cap to relieve pressure.
GWARNING
Opening the hood when the engine is over-
heated or when there is afire in the engine
compartment could expose you to hot gases
or other service products. There is arisk of
injury.
Let an overheated engine cool down before
opening the hood. If there is afire in the
engine compartment, keep the hood closed
and contact the fire department.
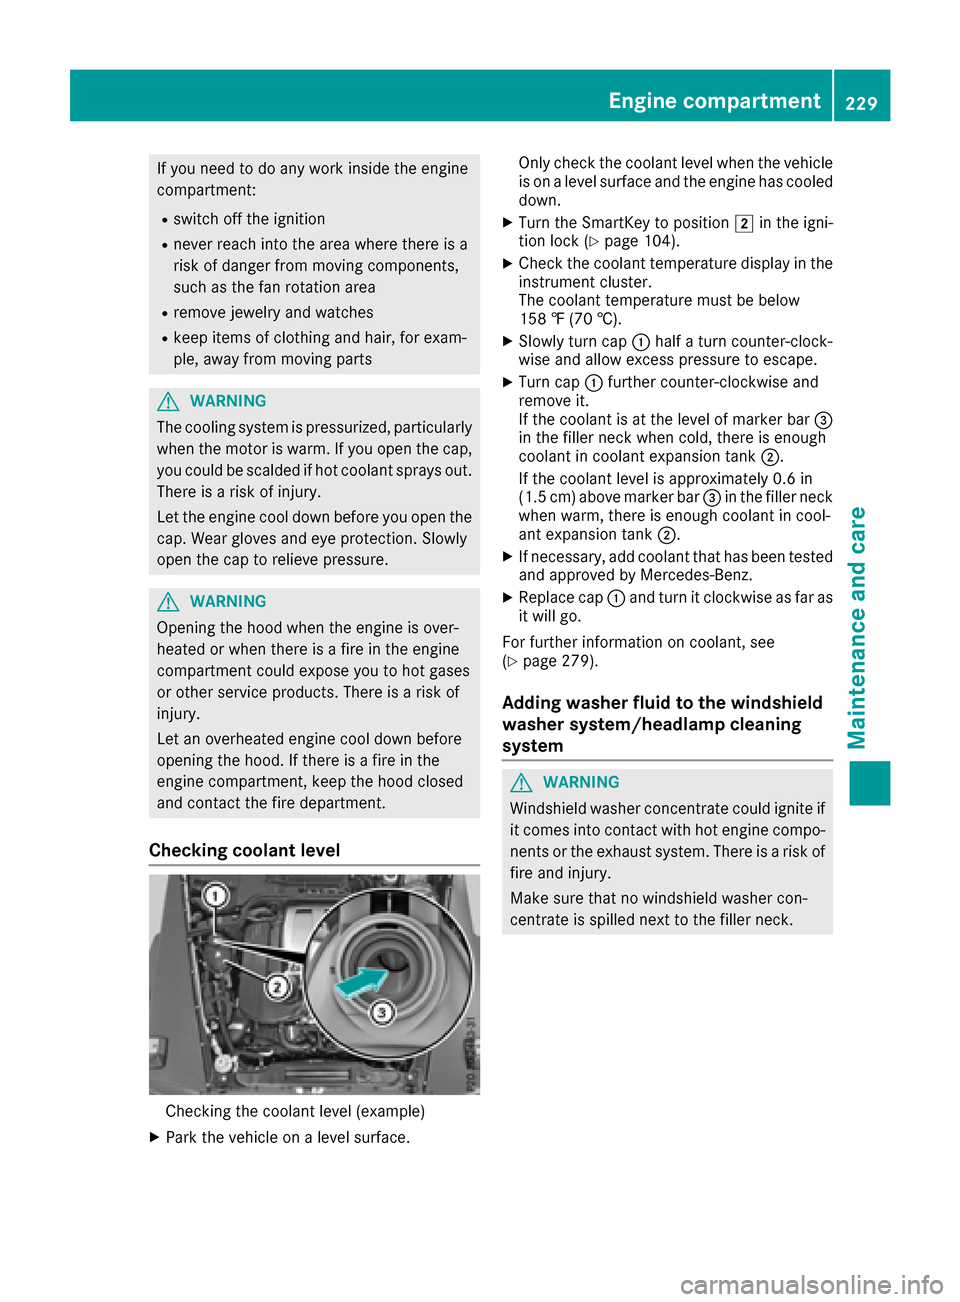
Checking coolant level
Checking the coolant level (example)
XPark the vehicle on alevel surface. Only check the coolant level when the vehicle
is on alevel surface and the engine has cooled
down.
XTurn the SmartKey to position 2in the igni-
tion lock (Ypage 104).
XCheck the coolant temperature display in the
instrument cluster.
The coolant temperature must be below
158 ‡(70 †).
XSlowlyt urn cap :half aturn counter-clock-
wise and allow excess pressure to escape.
XTurn cap :further counter-clockwise and
remove it.
If the coolant is at the level of marker bar =
in the fillern eck when cold, there is enough
coolant in coolant expansion tank ;.
If the coolant level is approximately 0.6 in
(1.5 cm) above marker bar =in the fillern eck
when warm, there is enough coolant in cool-
ant expansion tank ;.
XIf necessary,add coolant that has been tested
and approved by Mercedes-Benz.
XReplace cap :and turn it clockwise as far as
it willg o.
For further information on coolant, see
(
Ypage 279).
Adding washe rfluid to the windshield
washe rsystem/headlamp cleaning
system
GWARNING
Windshield washer concentrate could ignite if it comes into contact with hot engine compo-
nents or the exhaust system. There is arisk of
fire and injury.
Make sure that no windshield washer con-
centrate is spilled next to the fillern eck.
Engine compartment229
Maintenanceand care
Z
Page 232 of 286
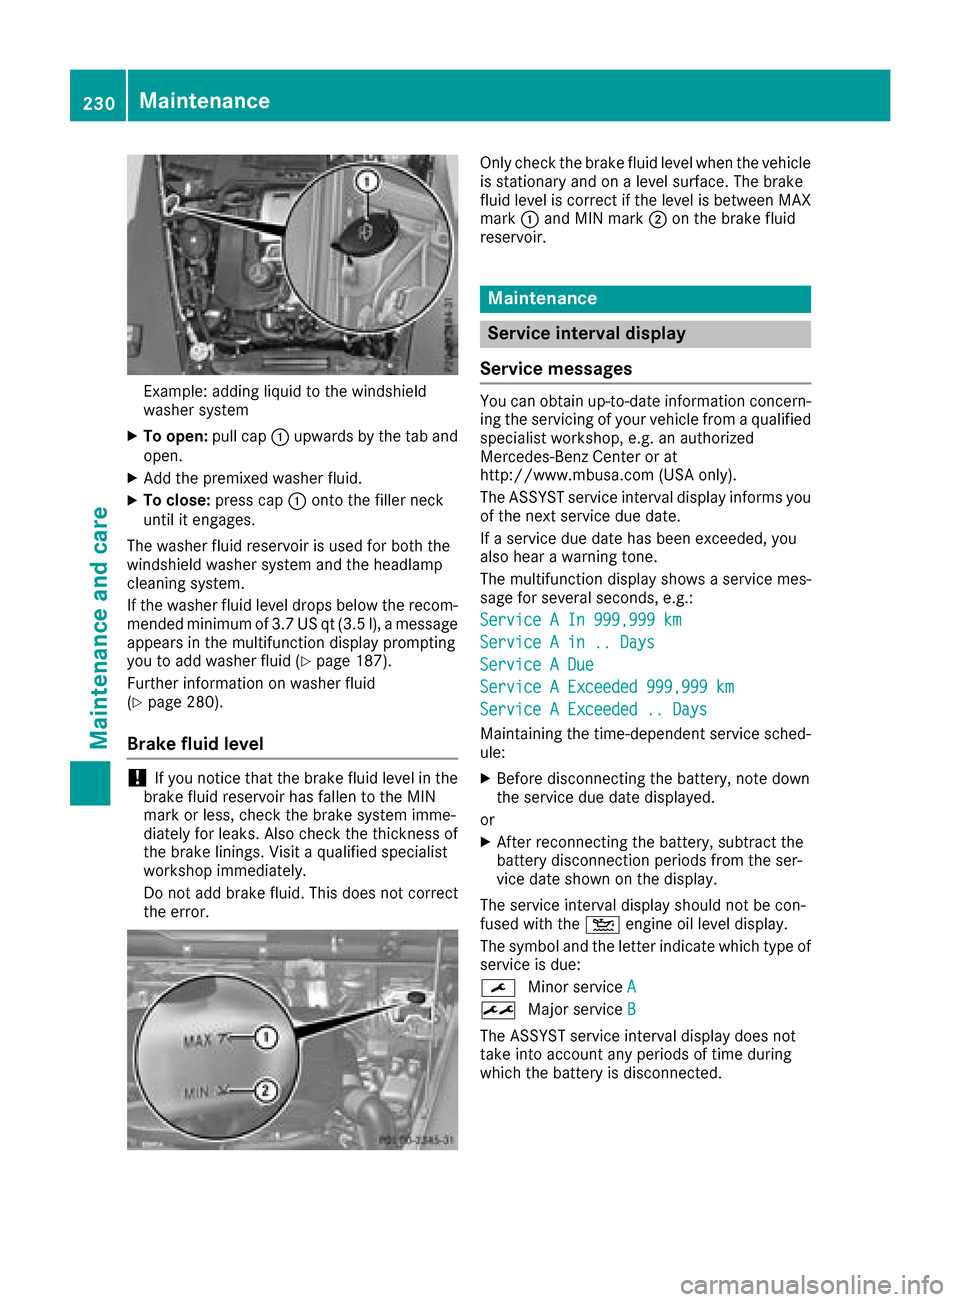
Example: adding liquid to the windshield
washersystem
XTo open: pull cap:upwards by the tab and
open.
XAdd the premixed washe rfluid.
XTo close: press cap :onto the fille rneck
unti lite ngages.
The washe rfluid reservoi risusedf or both the
windshiel dwashers ystem and the headlamp
cleaning system.
If the washe rfluid level drops belo wthe recom-
mended minimu mof3.7 US qt (3.5 l) ,amessage
appear sinthe multifunctio ndisplay prompting
yo utoa ddwashe rfluid (
Ypage 187).
Furtheri nformatio nonwasherf luid
(
Ypage 280).
Brake fluid level
!If yo unotice thatt he brake fluid level in the
brake fluid reservoi rhas fallen to the MIN
mark or less, check the brake system imme-
diately for leaks .Alsoc heck the thicknes sof
the brake linings. Visitaq ualified specialist
workshop immediately.
Do not ad dbrake fluid .Thisd oesn ot correct
the error.
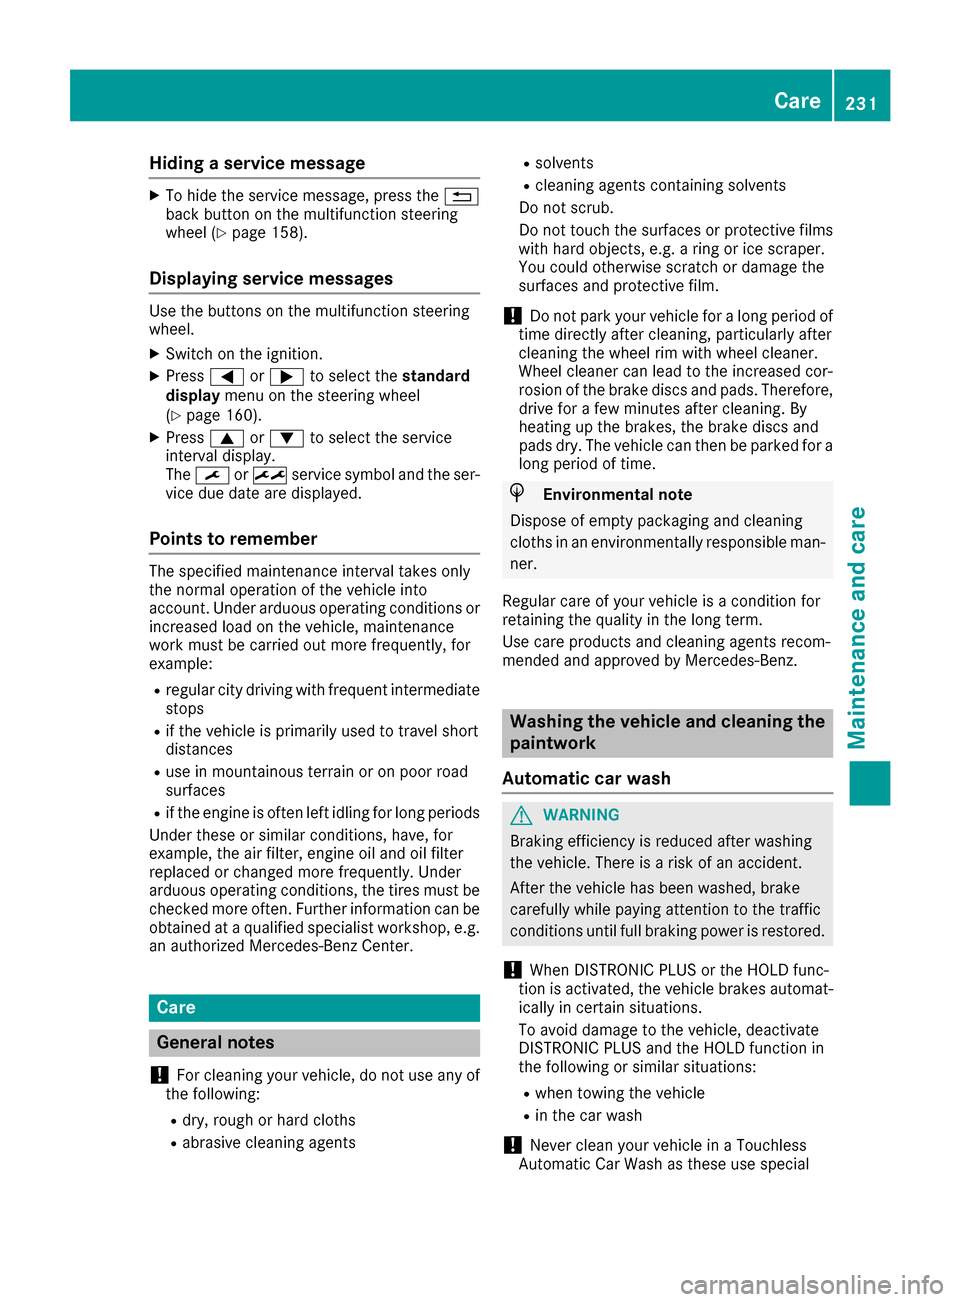
Onlyc heck the brake fluid level when the vehicle
is stationar yand on alevel surface. The brake
fluid level is correct if the level is between MAX
mark :and MIN mark ;on the brake fluid
reservoir.
Maintenance
Service interval display
Service messages
Yo uc an obtai nup-to-date informatio nconcern-
ing the servicing of your vehicl efromaq ualified
specialis tworkshop ,e.g.ana uthorized
Mercedes-Benz Center or at
http://www.mbusa.com (USA only).
The ASSYST servic eintervald isplayinforms you
of the next servic eduedate.
If as ervic eduedate hasb eene xceeded ,you
also hear awarning tone.
The multifunctio ndisplay shows aservic emes-
sage for severa lseconds, e.g.:
ServiceAIn9 99,999km
ServiceAin..D ays
ServiceADue
ServiceAExceeded 999,999k m
ServiceAExceeded .. Days
Maintaining the time-dependent servic esched-
ule:
XBefore disconnecting the battery ,note down
the servic eduedate displayed.
or
XAfter reconnecting the battery ,sub tract the
battery disconnection periods fromt he ser-
vic ed ates hown on the display.
The servic eintervald isplayshouldnot be con-
fused with the 4engine oi llev el display.
The symbo land the letter indicate which typ eof
servic eisdue:
¯ Minor service A
±
Major service B
The ASSYST servic eintervald isplaydoes not
take into account any periods of time during
which the battery is disconnected.
230Maintenance
Maintenance and care
Page 233 of 286
Hidingaservice message
XTo hide the service message, press the %
back button on the multifunction steering
wheel(
Ypage1 58).
Displayings ervice messages
Use the buttons on the multifunction steering
wheel.
XSwitch on the ignition.
XPress=or; to select the standard
display menu on the steering wheel
(
Ypage1 60).
XPress9or: to select the service
interval display.
The ¯ or± service symbol and the ser-
vice due date are displayed.
Points to remember
The specified maintenance interval takes only
the normal operation of the vehiclei nto
account. Under arduous operating conditions or
increased loadont he vehicle, maintenance
work must be carrie dout more frequently, for
example:
Rregular city driving with frequent intermediate
stops
Rif the vehicleisp rimarily usedtotravel short
distances
Ruse in mountainous terrainoronp oor road
surfaces
Rif the engine is often left idling for long periods
Under these or similar conditions, have ,for
example, the air filter, engine oil and oil filter
replaced or changed more frequently. Under
arduous operating conditions, the tires must be
checked more often. Further information can be obtained at aqualified specialist workshop, e.g.
an authorized Mercedes-Benz Center.
Care
General notes
!
For cleaning you rvehicle, do not use any of
the following:
Rdry, roug horhard cloths
Rabrasive cleaning agents
Rsolvents
Rcleaning agents containing solvents
Do not scrub.
Do not touch the surfaces or protective films
with hard objects, e.g. aring or ice scraper.
You coul dotherwise scratch or damage the
surfaces and protective film.
!Do not park you rvehiclef oralong period of
time directly after cleaning, particularly after
cleaning the wheelr im with wheelcleaner.
Wheelc leaner can leadtot he increased cor-
rosionoft he brake discs and pads. Therefore,
drive for afew minutes after cleaning. By
heating up the brakes ,the brake discs and
padsd ry. The vehiclec an then be parked for a
long period of time.
HEnvironmental note
Disposeofe mpty packaging and cleaning
cloths in an environmentally responsiblem an-
ner.
Regula rcare of you rvehicleisac ondition for
retaining the quality in the long term.
Use care products and cleaning agents recom-
mended and approved by Mercedes-Benz.
Washing the vehicle and cleaning the
paintwork
Automatic car wash
GWARNING
Braking efficiency is reduced after washing
the vehicle. There is arisk of an accident.
After the vehicleh as been washed, brake
carefully while paying attention to the traffic
conditions until full braking power is restored.
!When DISTRONIC PLUS or the HOLD func-
tion is activated, the vehicleb rakes automat-
ically in certain situations.
To avoi ddamage to the vehicle, deactivate
DISTRONIC PLUS and the HOLD function in
the following or similar situations:
Rwhen towing the vehicle
Rin the car wash
!Never cleany ourv ehicleinaT ouchless
Automatic Ca rWash as these use special
Care231
Maintenance and care
Z
Page 238 of 286
Interior care
Cleaning th edisplay
!Forcleaning ,donotuse any of th efollowing:
Ralcohol-base dthinner or gasolin e
Rabrasive cleaning agents
Rcommercially-available household cleaning
agents
Thes emay damag ethe display surface. Do
no tp ut pressur eonthedisplay surfac ewhen
cleaning .This could lead to irreparable dam-
age to th edisplay.
XBefore cleaning th edisplay, mak esuret hatit
is switched off and has cooled down .
XClean thedisplay surfac eusingac omme r-
cially available microfiber cloth and TFT/LCD
display cleaner.
XDr yt he display surfac eusingad ry microfiber
cloth .
Cleaning th eplastic trim
GWARNIN G
Care products and cleaning agents containing solvents caus esurfaces in th ecockpi tto
become porous. As aresult ,plastic part smay
come loos eintheevent of air bag deploy-
ment. Ther eisariskofi njury.
Do no tuse any car eproducts and cleaning
agents to clean th ecockpit.
!Never attach th efollowin gtoplastic surfa-
ces:
Rstickers
Rfilm s
Rperfum eoil container or similar
You could otherwise damag ethe plastic.
!Do no tallow cosmetics ,insec trepellen tor
sunscree ntocomeintoc ontac twitht he plas-
ti ct rim. This maintains th ehigh-qualit ylook of
th es urfaces.
XWipe th eplastic trim wit hadamp,lint-free
cloth ,e.g.a microfiber cloth .
XHeavy soiling:use careand cleaning prod-
uct srecommended and approve dby
Mercedes-Benz.
The surfac emay chang ecolor temporarily.
Wait until th esurfac eisd ry again .
Cleaning th esteering wheel and selec-
tor lever
XThoroughly wipe wit hadamp cloth or use
leather car eagents that have been recom-
mended and approve dbyMercedes-Benz.
Cleaning genuine wood and trim ele-
ments
!Do notuse solvent-base dcleaning agents
suc hast ar remover, whee lcleaners, polishes
or waxes. Ther eisotherwise ariskofd amag-
ing th esurface.
!Do no tuse chrom epolis hfor trim strips .The
trim strips have achrom elook but are mostl y
made of anodized aluminum and can lose
their shin eifchrom epolis hisu sed. Use a
damp ,lint-free cloth instead when cleaning
th et rims trips .
If th echrome-plated trim strips are ver ydirty,
you can use achrom epolish. If you are unsure
as to whether th etrims trips are chrome-
plated or not, consult an authorize d
Mercedes-Ben zCenter.
XWipe th ewooden trim and trim pieces wit ha
damp ,lint-free cloth ,e.g.a microfiber cloth .
XTrim elementswith piano black finish :
wipe wit hasoft, damp cotton cloth .Use clean
water.
XHeavy soiling: use careand cleaning prod-
uct srecommended and approve dby
Mercedes-Benz.
Cleaning th eseat covers
Gene raln otes
!Do no tuse am icrofiber cloth to clean cover s
made out of real leather ,artificial leather or
DINAMICA .Ifused often ,the se can damag e
th ec over.
!Observ ethe followin gwhen cleaning :
Rclean artificial leather cover swithac loth
moistened wit hasolution containing 1%
detergen t(e.g. dish washing liquid).
Rclean cloth cover switham icrofiber cloth
moistened wit hasolution containing 1%
detergen t(e.g. dish washing liquid). Rub
carefully and always wipe entire seat sec -
tion stoa voidleaving visible lines. Leav e
th es eat to dry afterwards .Cleaning result s
236Care
Maintenance and care
Page 259 of 286

Checking thetirep ressures
Important safety notes
Observ ethe note sont irep ressure
(Ypage 254).
Information on air pressure for th etires on your
vehicle can be found:
Ron th evehicle's Tire and Loading Information
placard on th eB-pillar
Rin th etirep ressure table in th efuel fille rflap
(Ypage 119)
Runde r"Tire pressure "(Ypage 254)
Checking tir epressures manually
To determine and set th ecorrec ttirep ressure,
procee dasfollows:
XRemove th evalvec ap of th etiret hatistob e
checked.
XPress th etirep ressure gage securely onto the
valve.
XRead th etirep ressure and compare it to the
recommended value on th eTire and Loading
Information placard or th etirep ressure table
(
Ypage 254).
XIf th etirep ressure is to olow, increas ethe tire
pressure to th erecommended value.
XIf th etirep ressure is to ohigh,r elease air. To
do so, pres sdown th emetal pin in th evalve,
usingt hetip of apen for example .Then check
th et irep ressure again usingt hetirep ressure
checker.
XScrew th evalvec ap onto th evalve.
XRepeat these steps for th eother tires.
Tir ep ressure monitor
General notes
If at irep ressure monito risinstalled, th evehi-
cle's wheelsh ave sensorsthatm onito rthe tire
pressure sinall four tires. The tir epressure mon-
ito rw arn syou if th epressure drops in oneo r
mor eoft hetires. The tir epressure monito ronly
functionsift hecorrespondings ensorsare
installed in all wheels.
Information on tir epressure sisdisplayed in the
multifunction display. The curren ttirep ressure
of each wheel is shown in the Serv.
menuafter
driving for afew minutes.
Information on th emessage display can be
foun dint he"Checkin gthe tirep ressure elec-
tronically" sectio n(
Ypage 258).
Important safety notes
GWARNING
Eac htire, includingt hespare( if provided),
should be checked at least once amonth
when col dand inflate dtothepressure rec-
ommended by th evehicle manufacturer on
th eT ire and Loading Information placard on
th ed river'sd oor B-pillar or th etirep ressure
label on th einside of th efuel fille rflap. If your
vehicle has tires of adifferent sizet hant he
sizei ndicated on th eTire and Loading Infor-
mation placard or th etirep ressure label, you
should determine th eproper tir epressure for
those tires.
As an added safety feature, your vehicle has
been equipped withat irep ressure monitoring
system (TPMS) that illuminate salow tir epres-
sure telltale when oneorm oreofy our tires
are significantly underinflated. Accordingly,
when th elow tir epressure telltale illuminates,
you should stop and check your tires as soon
as possible, and inflate them to th eproper
pressure .Drivin gonas ignificantly underin-
flated tir ecauses th etiretoo verheat and can
lead to tir efailure. Underinflation also
reduces fuel efficienc yand tir etread life ,and
may affect th evehicle's handlinga nd stop-
pinga bility.
Pleasen otet hatthe TPMS is no tasubstitute
for proper tir emaintenance, and it is th edriv-
er'sr esponsibility to maintain correc ttire
pressure ,evenifu nderinflation has not
reached thel evelt otrigger illuminat
ionoft he
TPMS low tir epressure telltale.
USAo nly:
Tir ep ressure257
Wheels and tires
Z