2017 MERCEDES-BENZ E43AMG light
[x] Cancel search: lightPage 78 of 482

This meansthat there ve rsing function can‐
not pr event someone being trapped in these
situations.
#When closing, make sure that no body
parts are in the closing area.
#Re lease the button immediately if
somebody becomes trapped.
or
#Press the button in any direction during
th e automatic closing process.
The closing process is stopped.
Au tomatic reve rsing function of thero ller
sunblind
If th ere is an object obstructing thero ller sun‐
blind during the closing process, thero ller sun‐
blind opens again automaticall y.The automatic
re ve rsing function is only an aid and is not a sub‐
st itute foryo ur attentiveness.
#When opening or closing thero ller sunblind,
make sure that no body parts are in the
sweep.
& WARNING Risk of becoming trapped
despite there ve rsing function being
active
In particular, there ve rsing function does not
re act tosoft, light and thin objects, forex am‐
ple small fingers.
This means that there ve rsing function can‐
not pr event entrapment in these situations.
#When opening or closing thero ller sun
blind, make sure that no body parts are
in the sweep.
#Re lease the button immediately if
somebody becomes trapped.
or
#Press the button in any direction during
th e automatic closing process.
The closing process is stopped.
Au tomatic features of the sliding sunroof
%
The term "sliding sunro of" alsorefers to the
panoramic sliding sunroof. By pushing or pulling
the3 button you can
inter rupt the automatic functions: "Rain closing
function when driving " and "Automatic lo wering
fe ature".
Ra in closing function when driving
Ve hicles with a panoramic sliding sunroof: if
it starts torain, thera ised sliding sunroof is
automatically lo wered while theve hicle is in
motion.
Au tomatic lo weringfeature
Ve hicles with a panoramic sliding sunroof: if
th e sliding sunroof is raised at there ar, the slid‐
ing sunroof is automatically lo wered slightly at
higher speeds. Atlow speeds it is raised again
automaticall y.
&
WARNING Risk of entrapment byauto‐
matic lo wering of the sliding sunroof
At high speeds thera ised sliding sunroof
automatically lo wersslightly at there ar.
This could trap you or other persons.
76
Opening and closing
Page 79 of 482
#Make surethat nobody reaches into the
sweep of the sliding sunroof whilst the
ve hicle is in motion.
#If somebody becomes trapped, immedi‐
ately pull back the sliding sunroof but‐
to n.
The sliding sunroof li fts during opening.
Problems with the sliding sunroof
%
The term "sliding sunro of" alsorefers to the
panoramic sliding sunroof.
Problem Possible causes/consequences and MSolutions
The sliding sunroof cann otbe closed
and you cannot see the cause. &
WARNING Risk of becoming trapped byclosing the sliding sunroof again
If yo u close the sliding sunroof again immediately af ter it has been bloc ked or reset, the sliding sunroof
closes with increased or maximum forc e.
The reve rsing function is then not active. Parts of the body could be trapped in the closing area in the
process. This poses an increased risk of injury or evenfa ta l injur y.
#Make sure that no parts of the body are in the closing area.#Re lease the button immediately if somebody becomes trapped.
or
#Press the button in any direction during the automatic closing process.
The closing process is stopped.
If th e sliding sunroof is obstructed during closing and reopens again slightly:
Opening and closing 77
Page 80 of 482
ProblemPossible causes/consequences and MSolutions
#Immediately after au tomatic reve rsing, pull and hold the3 button down again tothe point of resist‐
ance until the sliding sunroof is closed.
The sliding sunroof is closed with increased forc e.
If th e sliding sunroof is obstructed again and reopens again slightly:
#Re peat the pr evious step.
The sliding sunroof is closed again with increased forc e.
Ve hicles without a panoramic slid‐
ing sunroof: the sliding sunroof does
not operate smoo thly.
#Ra ise the sliding sunroof fully at there ar.
#Press the3 button for ano ther second.
#Use automatic operation tofully raise and then close the sliding sunroof.
Ve hicles with a panoramic sliding
sunroof :th e sliding sunroof or the
ro ller sunblind does not opera te
smoo thly.
#Pull the3 button down repeatedly tothe point of resis tance until the sliding sunroof is fully closed.
#Pull the3 button for ano ther second.
#Pull and hold the3 button down until thero ller sunblind is comple tely closed.
#Pull the3 button for ano ther second.
#Use automatic operation tofully open and then close the sliding sunroof.
78
Opening and closing
Page 83 of 482
Correct driver's seat position
&
WARNING Risk of injury from adjusting
th eve hicle settings while theve hicle is in
motion
Yo u could lose cont rol of theve hicle in the
fo llowing situations:
Rifyo u adjust the driver's seat, the head
re stra int, thesteering wheel or the mir ror
while theve hicle is in motion
Rifyo ufa sten your seat belt while theve hi‐
cle is in motion
#Before starting the engine: adjust the
driver's seat, the head restra int, the
st eering wheel or the mir ror and fasten
yo ur seat belt.
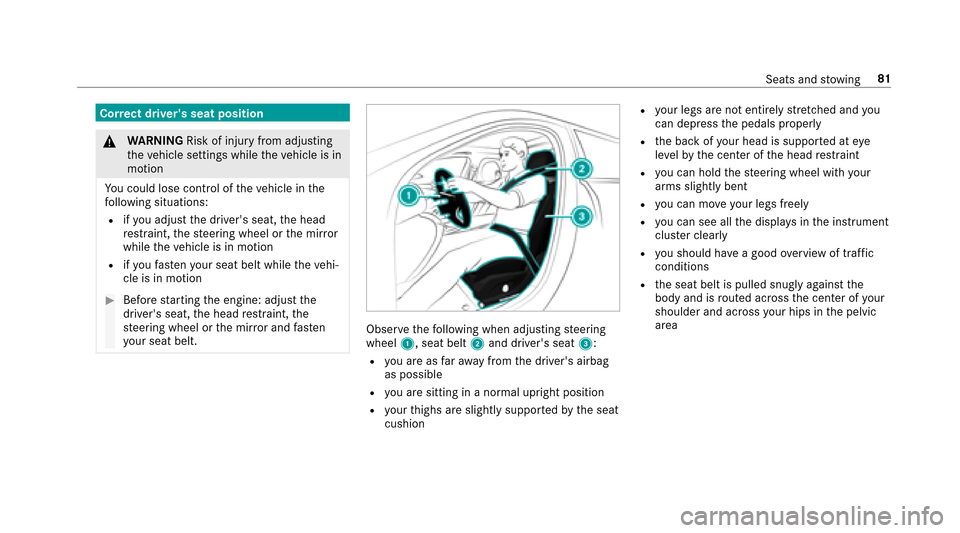
Obser vethefo llowing when adjusting steering
wheel 1, seat belt 2and driver's seat 3:
Ryou are as faraw ay from the driver's airbag
as possible
Ryo u are sitting in a no rmal upright position
Ryour thighs are slightly supportedby the seat
cushion
Ryo ur legs are not entirely stre tched and you
can dep ress the pedals properly
Rthe back of your head is support ed ateye
le ve lby the center of the head restra int
Ryo u can hold thesteering wheel with your
arms slightly bent
Ryo u can mo veyour legs freely
Ryou can see all the displa ysinthe instrument
clus ter clearl y
Ryou should ha vea good overview of traf fic
conditions
Rth e seat belt is pulled snugly against the
body and is routed across the center of your
shoulder and across your hips in the pelvic
area
Seats and stowing 81
Page 88 of 482

#Press button1repeatedly until the indica‐
to r lamp in the button lights up.
The front passenger seat is selected.
#Ad just the front passenger seat using the
buttons in the door control panel on the driv‐
er's side.
Ad justing the 4-w aylumbar support
1Toraise
2To sof ten
3To lowe r
4To harden
#Using buttons 1to4, adjust the conto ur
of the backrest individually tosuit your bac k.
Headrestra ints
Ad justing the front seat head restra ints man‐
ually
& WARNING Risk of injury from adjusting
th eve hicle settings while theve hicle is in
motion
Yo u could lose cont rol of theve hicle in the
fo llowing situations:
Rifyo u adjust the driver's seat, the head
re stra int, thesteering wheel or the mir ror
while theve hicle is in motion
Rifyo ufa sten your seat belt while theve hi‐
cle is in motion
#Before starting the engine: adjust the
driver's seat, the head restra int, the
st eering wheel or the mir ror and fasten
yo ur seat belt.
86
Seats and stowing
Page 90 of 482
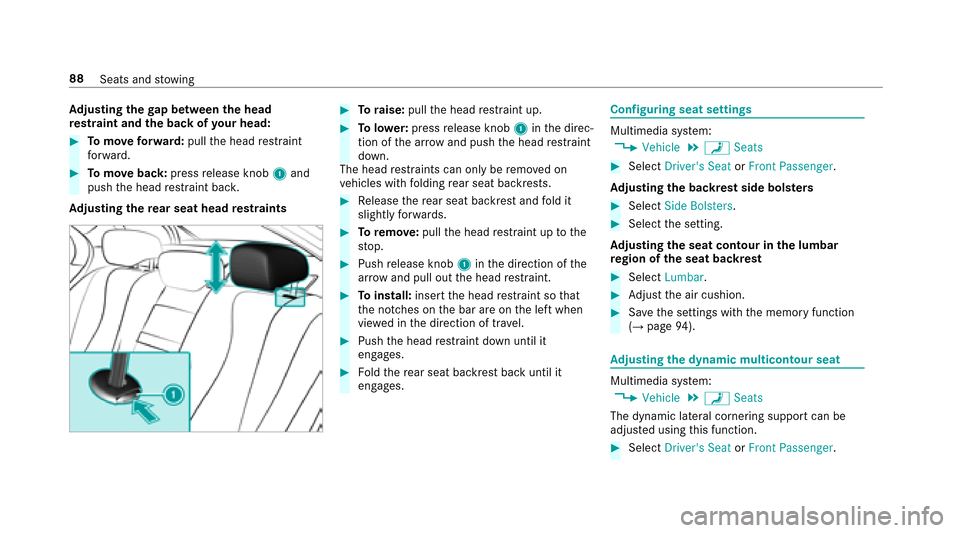
Adjusting the gap between the head
re stra int and the back of your head:
#To mo veforw ard: pullthe head restra int
fo rw ard.
#To mo veback: pressrelease knob 1and
push the head restra int bac k.
Ad justing the rear seat head restra ints
#To raise: pullthe head restra int up.
#To lowe r:press release knob 1inthe direc‐
tion of the ar row and push the head restra int
down.
The head restra ints can only be remo ved on
ve hicles with folding rear seat backrests.
#Re lease there ar seat backrest and fold it
slightly forw ards.
#To remo ve:pull the head restra int up tothe
st op.
#Push release knob 1inthe direction of the
ar row and pull out the head restra int.
#To install: insertthe head restra int so that
th e notches on the bar are on the left when
vie we d in the direction of tra vel.
#Push the head restra int down until it
engages.
#Fo ldthere ar seat backrest back until it
engages.
Configuring seat settings
Multimedia sy stem:
,�9�H�K�L�F�O�H.a �6�H�D�W�V
#Select �'�U�L�Y�H�U�
�V �6�H�D�W or�)�U�R�Q�W �3�D�V�V�H�Q�J�H�U.
Ad justing the backrest side bols ters
#Select �6�L�G�H �%�R�O�V�W�H�U�V .
#Selectthe setting.
Ad justing the seat contour in the lumbar
re gion of the seat backrest
#Select �/�X�P�E�D�U.
#Adjust the air cushion.
#Sa ve the settings with the memory function
(→page 94).
Ad justing the dynamic multicon tour seat
Multimedia sy stem:
,�9�H�K�L�F�O�H.a �6�H�D�W�V
The dynamic lateral cornering support can be
adjus ted using this function.
#Select �'�U�L�Y�H�U�
�V �6�H�D�W or�)�U�R�Q�W �3�D�V�V�H�Q�J�H�U.
88
Seats and stowing
Page 93 of 482
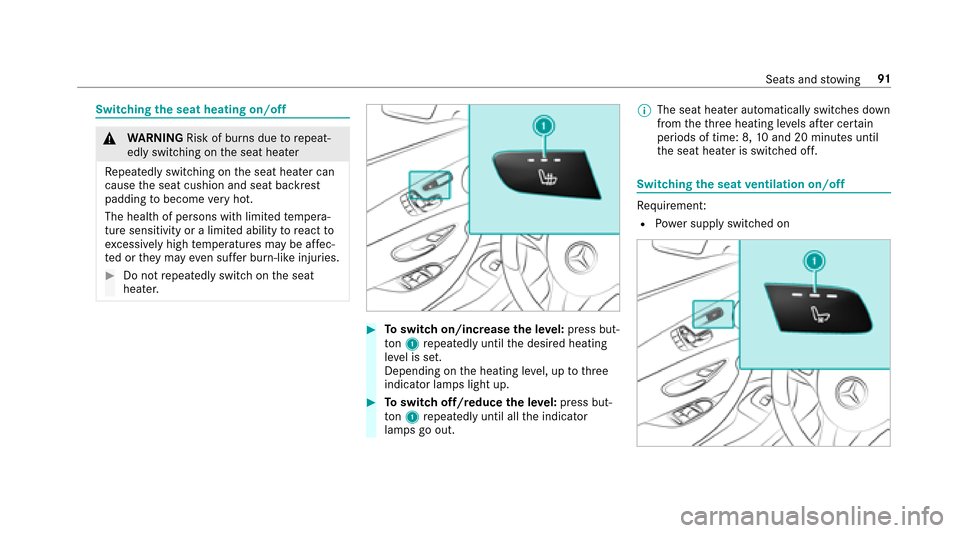
Switchingthe seat heating on/off
&
WARNING Risk of burn s duetorepeat‐
edly switching on the seat heater
Re peatedly switching on the seat heater can
cause the seat cushion and seat backrest
padding tobecome very hot.
The health of persons with limited temp era‐
ture sensitivity or a limited ability toreact to
exc essively high temp eratures may be af fec‐
te d or they may even suf fer burn-like injuries.
#Do not repeatedly switch on the seat
heater.
#To switch on/increase the le vel:press but‐
to n1 repeatedly until the desired heating
le ve l is set.
Depending on the heating le vel, up tothre e
indicator lamps light up.
#To switch off/reduce the le vel:press but‐
to n1 repeatedly until all the indicator
lamps go out. %
The seat heater automatically switches down
from theth re e heating le vels af ter cer tain
periods of time: 8, 10and 20 minutes until
th e seat heater is switched off.
Switching the seat ventilation on/off
Re quirement:
RPo we r supp lyswitched on
Seats and stowing 91
Page 94 of 482

#Toswitch on/increase the le vel/
decrease the le vel:press button 1repeat‐
edly until the desired ventilation le vel is set.
Depending on theve ntilation le vel, up to
th re e indicator lamps light up.
#To switch off: press button 1repeatedly
until all the indicator lamps go out.
Ste ering wheel
Adjusting the steering wheel manually
&
WARNING Risk of injury from adjusting
th eve hicle settings while theve hicle is in
motion
Yo u could lose cont rol of theve hicle in the
fo llowing situations:
Rifyo u adjust the driver's seat, the head
re stra int, thesteering wheel or the mir ror
while theve hicle is in motion
Rifyo ufa sten your seat belt while theve hi‐
cle is in motion
#Before starting the engine: adjust the
driver's seat, the head restra int, the
st eering wheel or the mir ror and fasten
yo ur seat belt.
&
WARNING Risk of entrapment forch il‐
dren when adjusting thesteering wheel
Children could injure themselves if they
adjust thesteering wheel.
#Ne ver lea vechildren unatte nded inthe
ve hicle.
#When leaving theve hicle, alw aysta ke
th e SmartK eywith you and lock the
ve hicle.
#To unlock thest eering column: push
re lease le ver1 down comple tely.
#Ad just height 2and di stance tosteering
wheel 3.
#Tolock thest eering column: pushrelease
le ve r1 up as far as it will go.
#Check and make sure that thesteering col‐
umn is loc kedby moving thesteering wheel.
92
Seats and stowing