2017 MERCEDES-BENZ E-CLASS SALOON buttons
[x] Cancel search: buttonsPage 110 of 497

St
oring
Seat adjustments for up tothre e people can be
st ored and called up using the memory function.
The following sy stems can be selected:
R Seat, backrest and head restra int
R Steering wheel
R Outside mir rors
R Head-up display #
Set the seat, thesteering wheel, the head-up
display and the outside mir rorto the desired
position. #
Press memory button M toge ther with one of
th estorage position buttons 1,2 or 3.
An acou stic signal sounds. The settings are
st ored. #
Tocall up: press and hold there leva nt pre‐
set position button 1,2 or 3 until the front
seat, thesteering wheel, head-up display and
outside mir ror is in thestored position. St
ow age areas Note
s on loading theve hicle &
WARNING Risk ofexhaust gas poisoning
Combustion engines emit poisonous exhaust
ga ses such as carbon monoxide. Exhaust
ga ses can enter theve hicle interior if the
boot lid is open when the engine is running,
especially if theve hicle is in motion. #
Alw ays switch off the engine before
opening the boot lid. #
Never drive with the boot lid open. &
WARNING Risk of inju ryfrom unsecu red
items in theve hicle
If objects, luggage or loads are not secured
or not secured suf ficientl y,they could slip,
tip ove r or be throw n around and thereby hit
ve hicle occupants.
There is a risk of injur y,particularly in the
ev ent of sudden braking or a sudden change
in direction. #
Alw aysstow objects in such a wayth at
th ey cannot be thro wn around. #
Before the journe y,secure objects, lug‐
ga ge or loads against slipping or tipping
ove r. &
WARNING Risk of inju ryfrom incor rectly
stowe d objects
If objects in the passenger compartment are
stowe d incor rectl y,they can slide or be
th ro wn around and hit vehicle occupants. In Seats and
stowing 107
Page 146 of 497
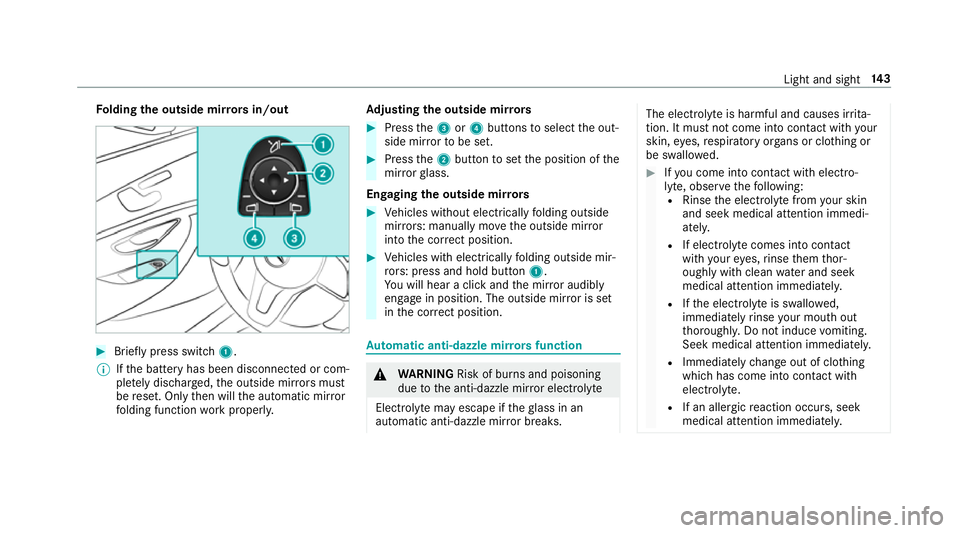
Fo
lding the outside mir rors in/out #
Brief lypress switch 1.
% Ifth e battery has been disconnected or com‐
ple tely discharged, the outside mir rors must
be reset. Only then will the automatic mir ror
fo lding function workproperly. Ad
justing the outside mir rors #
Press the3 or4 buttons toselect the out‐
side mir rorto be set. #
Press the2 button toset the position of the
mir rorgl ass.
Engaging the outside mir rors #
Vehicles without electrically folding outside
mir rors: manually mo vethe outside mir ror
into the cor rect position. #
Vehicles with electrically folding outside mir‐
ro rs: press and hold button 1.
Yo u will hear a click and the mir ror audibly
engage in position. The outside mir ror is set
in the cor rect position. Au
tomatic anti-dazzle mir rors function &
WARNING Risk of bu rns and poisoning
due tothe anti-dazzle mir ror electrolyte
Electrolyte may escape if theglass in an
automatic anti-dazzle mir ror breaks. The electrolyte is harmful and causes ir
rita‐
tion. It mu stnot come into contact wi thyour
skin, eyes,respiratory organs or clo thing or
be swallo wed. #
Ifyo u come into contact with electro‐
ly te , obser vethefo llowing:
R Rinse the electrolyte from your skin
and seek medical attention immedi‐
atel y.
R If electrolyte comes into contact
with your eyes, rinse them thor‐
oughly with clean water and seek
medical attention immediately.
R Ifth e electrolyte is swallo wed,
immediately rinse your mouth out
th oroughly. Do not induce vomiting.
Seek medical attention immediately.
R Immedia tely ch ange out of clo thing
which has come into con tact wi th
electrolyte.
R If an allergic reaction occurs, seek
medical attention immediatel y. Light and sight
14 3
Page 150 of 497

Overview of climate control sy
stems Note
s on climate control Ve
hicles with THERMOTRONIC automatic cli‐
mate control: an interior airfilter must alw ays
be used so that the air conditioning sy stem, the
pollution le vel monitoring and the air filtering
function workcor rectly. Ma kesure that thefilter
is ins talled cor rectly and thefilter housing in the
engine compartment is closed cor rectly using
th e cap and alw ays tightly sealed when in opera‐
tion. Use filters recommended and appr ovedby
Mercedes-Benz. Alw ays ha veservice workcar‐
ri ed out at a qualified specialist workshop. THERMATIC control panel
overview The indicator lamps in
the buttons indicate that
th e cur rent function is acti vated. 1
w Toset the driver's side temp erature
2 _ Toset the air distribution
3 H Toset the air flow or switch off climate
control
4 Ã Toset climate contro lto automatic
mode (→ page149)
5 ¬ Todemist the windscreen 6
Vehicles without a stationary heater: t
to call up the air conditioning menu
Ve hicles with a stationary heater: !to
call up the air conditioning menu, toswitch
th ere sidual heat on/off (→ page151)
7 ¤ Toswitch there ar wind owheater
on/off
8 Vehicles without a stationary heater: 0
to switch the synchronisation on/off
(→ page 150)
Ve hicles with a stationary heater: &to
switch thest ationary heater on/off
(→ page 153)
9 g Toswitch air-recirculation mode on/off
(→ page 150)
A ¿ Toswitch the A/C function on/off
(→ page 149)
B w Toset the front passenger side tem‐
perature THERMOTRONIC control panel
overview The indicator lamps in
the buttons indicate that
th e cur rent function is acti vated. Climate control
147
Page 158 of 497
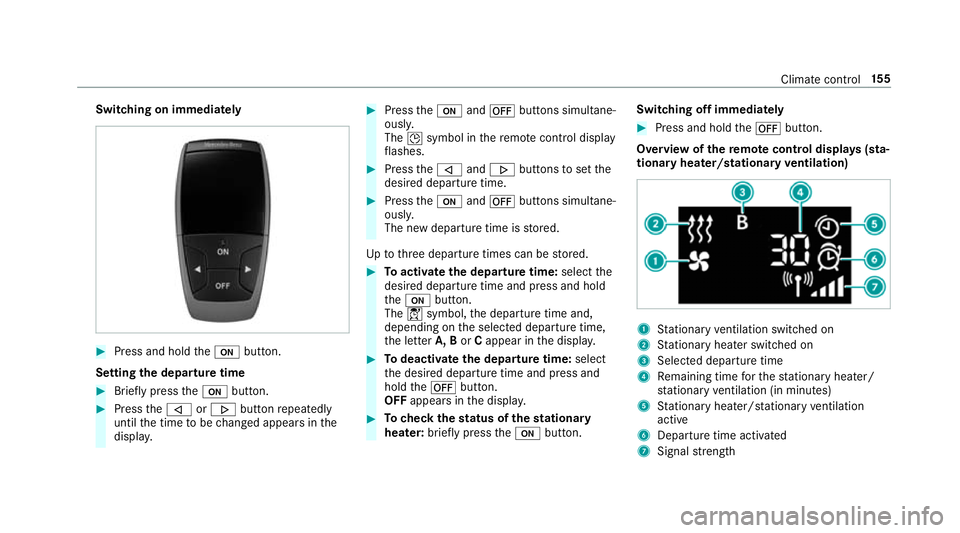
Switching on immediately
#
Press and hold theu button.
Setting the departu retime #
Brie fly press theu button. #
Press the, or. button repeatedly
until the time tobe changed appears in the
displa y. #
Press theu and^ buttons simultane‐
ousl y.
The Îsymbol in there mo tecontrol displ ay
fl ashes. #
Press the, and. buttons toset the
desired departure time. #
Press theu and^ buttons simultane‐
ousl y.
The new departure time is stored.
Up tothre e departure times can be stored. #
Toactivate the departu retime: select the
desired departure time and press and hold
th eu button.
The Ísymbol, the departure time and,
depending on the selected departure time,
th e letter A, BorCappear in the displa y. #
Todeactivate the departure time: select
th e desired departure time and press and
hold the^ button.
OFF appears in the displa y. #
Tocheck thest atus of thest ationary
heater: briefly press theu button. Switching off immediately #
Press and hold the^ button.
Overview of there mo tecont rol displa ys(sta‐
tiona ryheater/stationary ventilation) 1
Stationary ventilation switched on
2 Stationary heater swit ched on
3 Selected departure time
4 Remaining time forth est ationary heater/
st ationary ventilation (in minu tes)
5 Stationary heater/ stationary ventilation
acti ve
6 Departure time acti vated
7 Signal stre ngth Clima
tecontrol 15 5
Page 185 of 497
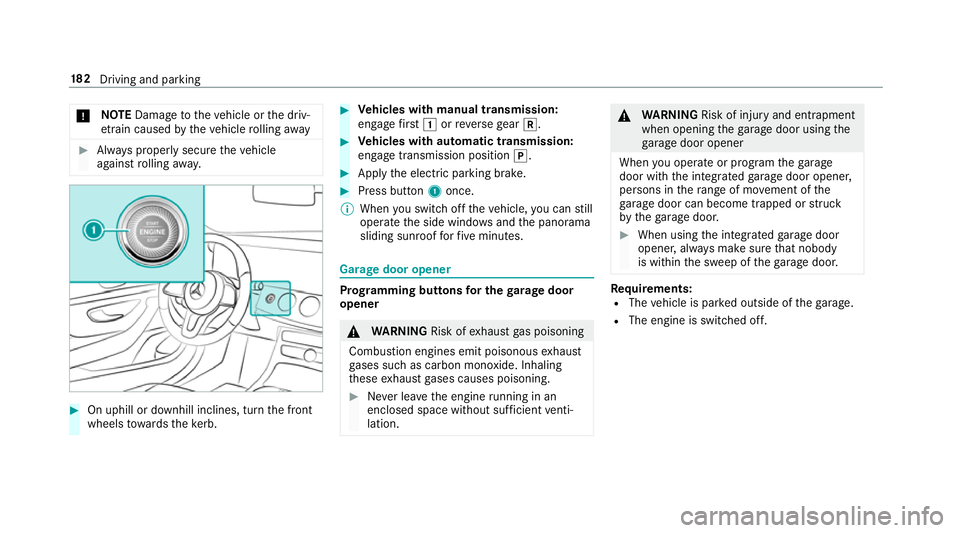
*
NO
TEDama getotheve hicle or the driv‐
et ra in caused bytheve hicle rolling away #
Alw ays proper lysecure theve hicle
against rolling away. #
On uphill or downhill inclines, turn the front
wheels towa rdsth eke rb. #
Vehicles with manual transmission:
engage firs t1 orreve rsege ar k. #
Vehicles with automatic transmission:
engage transmission position j. #
Apply the electric parking brake. #
Press button 1once.
% When you swit choff theve hicle, you can still
opera tethe side windo wsand the panorama
sliding sunroof forfive minutes. Garage door opener
Prog
ramming buttons for the garage door
opener &
WARNING Risk ofexhaust gas poisoning
Combustion engines emit poisonous exhaust
ga ses such as carbon monoxide. Inhaling
th ese exhaust gases causes poisoning. #
Never lea vethe engine running in an
enclosed space wi thout suf ficient venti‐
lation. &
WARNING Risk of inju ryand ent rapment
when opening thega rage door using the
ga rage door opener
When you operate or program thega rage
door with the integrated garage door opener,
persons in thera nge of mo vement of the
ga rage door can become trapped or stru ck
by thega rage door. #
When using the integrated garage door
opener, alw ays make sure that nobody
is within the sweep of thega rage door. Re
quirements:
R The vehicle is par ked outside of thega rage.
R The engine is switched off. 18 2
Driving and pa rking
Page 186 of 497
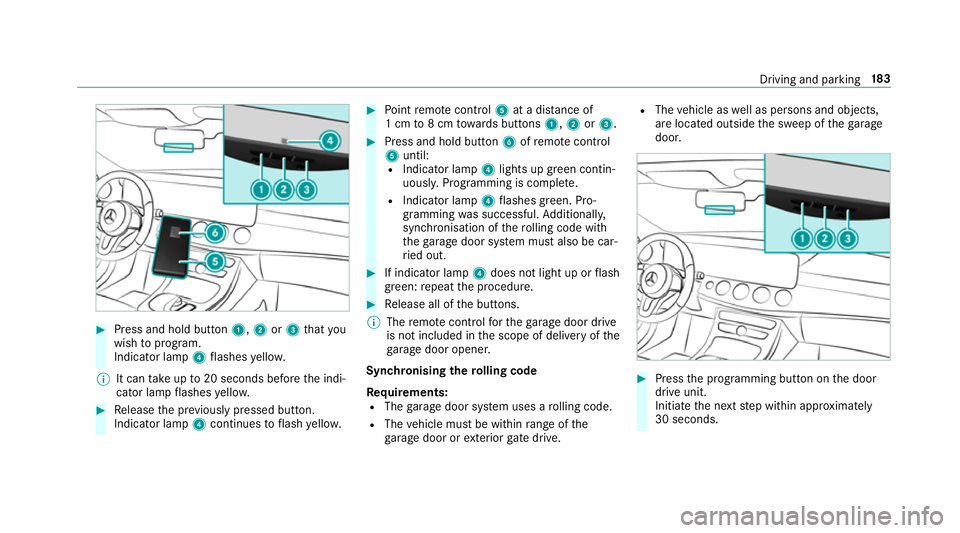
#
Press and hold button 1,2or3 that you
wish toprog ram.
Indicator lamp 4flashes yello w.
% It can take up to20 seconds before the indi‐
cator lamp flashes yello w. #
Release the pr eviously pressed button.
Indicator lamp 4continues toflash yello w. #
Point remo tecontrol 5at a di stance of
1 cm to8 cm towa rds buttons 1,2or3. #
Press and hold button 6ofremo tecontrol
5 until:
R Indicator la mp4lights up green contin‐
uousl y.Programming is comple te.
R Indicator lamp 4flashes green. Pro‐
gr amming was successful. Additionally,
synchronisation of thero lling code with
th ega rage door sy stem must also be car‐
ri ed out. #
If indicator lamp 4does not light up or flash
green: repeat the procedure. #
Release all of the buttons.
% The remo tecontrol forth ega rage door drive
is not included in the scope of delivery of the
ga rage door opener.
Synchronising thero lling code
Re quirements:
R The garage door sy stem uses a rolling code.
R The vehicle must be within range of the
ga rage door or exterior gate drive. R
The vehicle as well as persons and objects,
are located outside the sweep of thega rage
door. #
Press the programming button on the door
drive unit.
Initiate the next step within appr oximately
30 seconds. Driving and parking
18 3
Page 187 of 497
#
Press pr eviously prog rammed button 1,2
or 3 repeatedl y,until the door closes.
When the door closes, programming is com‐
ple ted.
% Please also read the operating instructions
fo rth ega rage door drive.
Tr oubleshooting when prog ramming the
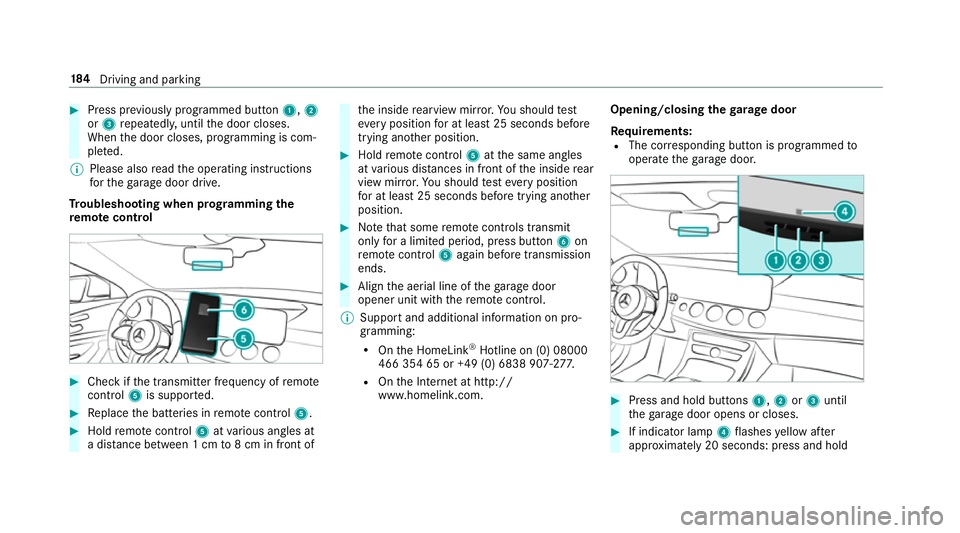
re mo tecont rol #
Check if the transmit ter frequency of remo te
control 5is suppo rted. #
Replace the batteries in remo tecontrol 5. #
Hold remo tecontrol 5atvarious angles at
a dis tance between 1 cm to8 cm in front of th
e inside rearview mir ror.Yo u should test
eve ryposition for at least 25 seconds before
trying ano ther position. #
Hold remo tecontrol 5atthe same angles
at various dis tances in front of the inside rear
view mir ror.Yo u should test eve ryposition
fo r at least 25 seconds before trying ano ther
position. #
Notethat some remo tecontrols transmit
only for a limi ted period, press button 6on
re mo tecontrol 5again before transmission
ends. #
Align the aerial line of thega rage door
opener unit with there mo tecontrol.
% Support and additional information on pro‐
gramming:
R Onthe HomeLink ®
Hotline on (0) 08000
466 354 65 or +49 (0) 6838 907-2 77.
R Onthe Internet at http://
www.homelin k.com. Opening/closing the
garage door
Requ irements:
R The cor responding button is programmed to
operate thega rage door. #
Press and hold buttons 1,2or3 until
th ega rage door opens or closes. #
If indicator lamp 4flashes yellow af ter
appr oximately 20 seconds: press and hold 184
Driving and pa rking
Page 188 of 497
th
e pr eviously pressed button again until the
ga rage door opens or closes.
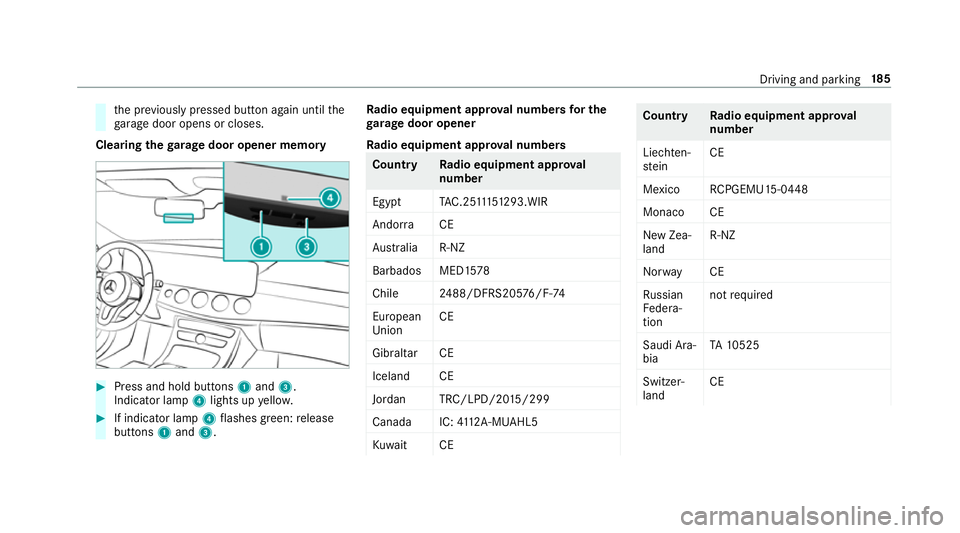
Clearing thega rage door opener memo ry#
Press and hold buttons 1and 3.
Indicator lamp 4lights up yello w. #
If indicator lamp 4flashes green: release
buttons 1and 3. Ra
dio equipment appr oval numbers for the
ga rage door opener
Ra dio equipment appr oval numbers Countr
yRadio equipment appr oval
number
Egyp tT AC.25 111 51293.WIR
Andor ra CE
Au stra lia R-NZ
Barbados MED1 578
Chile 2488/DFRS205 76/F-74
European
Union CE
Gibral tarCE
Iceland CE
Jordan TRC/LPD/20 15/299
Canad aI C:4112 A-MUAHL5
Ku wa it CE Count
ryRadio equipment appr oval
number
Liechten‐
st ein CE
Mexico RCPGEMU15-0448
Monaco CE
New Zea‐
land R-
NZ
Nor wayCE
Ru ssian
Fe dera‐
tion not
requ ired
Saudi Ara‐
bia TA
10525
Switzer‐
land CE Driving and parking
18 5