2017 MERCEDES-BENZ E-CLASS SALOON warning
[x] Cancel search: warningPage 313 of 497

Engine oil
Checking
the engine oil le vel using the oil
dip stick &
WARNING Danger of bu rns from hot
component parts in the engine compart‐
ment
Cer tain component parts in the engine com‐
partment may be very hot, e.g. the engine,
th era diator and parts of theex haust sy stem. #
Let the engine cool down and only
to uch the component parts described
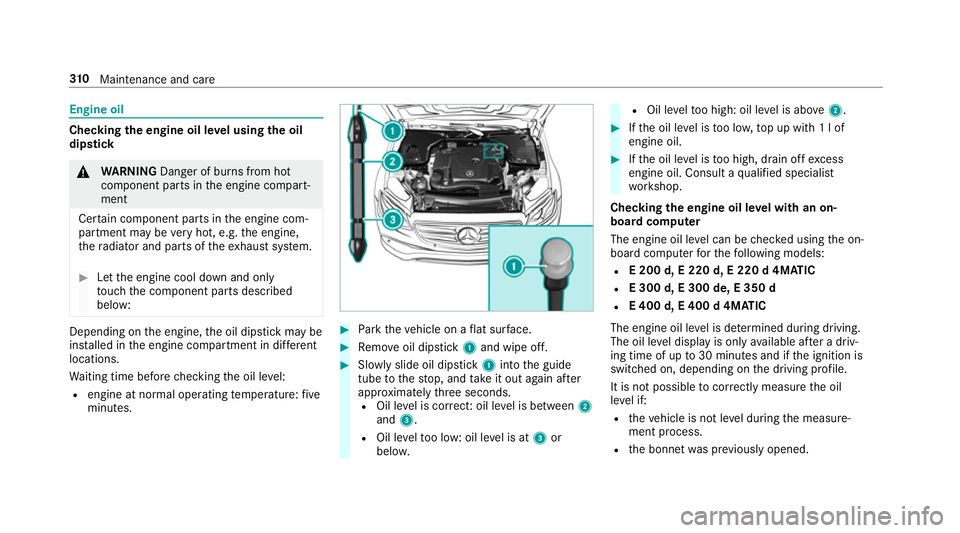
below: Depending on
the engine, the oil dipstick may be
ins talled in the engine compartment in dif fere nt
locations.
Wa iting time before checking the oil le vel:
R engine at normal operating temp erature: five
minutes. #
Park theve hicle on a flat sur face. #
Remo veoil dipstick 1and wipe off. #
Slowly slide oil dipstick 1into the guide
tube tothestop, and take it out again af ter
appr oximately thre e seconds.
R Oil le vel is cor rect: oil le vel is between 2
and 3.
R Oil le velto o low: oil le vel is at 3or
belo w. R
Oil le velto o high: oil le vel is abo ve2 . #
Ifth e oil le vel is too lo w,top up with 1 l of
engine oil. #
Ifth e oil le vel is too high, drain off excess
engine oil. Consult a qualified specialist
wo rkshop.
Checking the engine oil le vel with an on-
board computer
The engine oil le vel can be checked using the on-
board computer forth efo llowing models:
R E 200 d, E 220 d, E 220 d 4MATIC
R E 300 d, E 300 de, E 350 d
R E 400 d, E 400 d 4MATIC
The engine oil le vel is de term ined during driving.
The oil le vel display is only available af ter a driv‐
ing time of up to30 minutes and if the ignition is
switched on, depending on the driving profile.
It is not possible tocor rectly measu rethe oil
le ve l if:
R theve hicle is not le vel during the measure‐
ment process.
R the bonn etwa s pr eviously opened. 310
Maintenance and care
Page 314 of 497

The engine must be
restar ted and the engine oil
le ve l will be de term ined again when driving.
On-board computer: , Service .
Engine oil level:
Yo u will see one of thefo llowing display
messa ges in the multifunction displa y:#
Engine oil level Measuring now: measu re‐
ment of the oil le vel is not yet possible.
Re peat there qu est af ter a maximum of 30
minutes' driving. #
Engine oil level OK andthe bar display for
indicating the oil le vel in the multifunction
display is green and is between "min" and
"max": the oil le vel is cor rect. #
Engine oil level Add 1,0 l andthe bar display
fo r indicating the oil le vel in the multifunction
display is orange and is below "min": top up
with 1 l of engine oil. #
Reduce engine oil level andthe bar display
fo r indicating the oil le vel in the multifunction
display is orange and is abo ve"max": drain
off theexc ess engine oil. Consult a qualified
specialist workshop. #
For engine oil level turn on ignition: switch on
th e ignition tocheck the engine oil le vel. #
Engine oil level System inoperative : sensor
fa ulty or not connected. Consult a qualified
specialist workshop. #
Engine oil level System currently unavail. :
close the bonn et.
To pping up engine oil &
WARNING Danger of bu rns from hot
component parts in the engine compart‐
ment
Cer tain component parts in the engine com‐
partment may be very hot, e.g. the engine,
th era diator and parts of theex haust sy stem. #
Let the engine cool down and only
to uch the component parts described
below: &
WARNING Risk offire and injury from
engine oil
If engine oil comes into con tact wi thhot
component parts in the engine compart‐
ment, it may ignite. #
Make sure that no engine oil is spilled
next tothefiller opening. #
Allow the engine tocool off and thor‐
oughly clean the engine oil from compo‐
nent parts before starting theve hicle. *
NO
TEEngine dama gecaused byan
incor rect oil filter, incor rect oil or addi‐
tives #
Do not use engine oils or oil filters
which do not cor respond tothe specifi‐
cations explicitly prescribed forthe
service inter vals. #
Do not alter the engine oil or oil filter in
order toachie velonger change inter vals
th an presc ribed. #
Do not use additives. Maintenance and care
311
Page 315 of 497

#
Follow the instructions in the service
inter val display rega rding the oil
ch ange. *
NO
TEDama gecaused bytopping up too
much engine oil To
pping up too much engine oil can cause
damage tothe engine or the catalytic con‐
ve rter. #
Have excess engine oil remo ved at a
qu alified specialist workshop. #
Turn cap 1anti-clockwise and remo veit. #
Top up the engine oil. #
Replace cap 1and turn it clockwise as far
as it will go. #
Check the oil le vel again (→ page310). Che
cking the coolant le vel &
WARNING Danger of bu rns from hot
component parts in the engine compart‐
ment
Cer tain component parts in the engine com‐
partment may be very hot, e.g. the engine,
th era diator and parts of theex haust sy stem. #
Let the engine cool down and only
to uch the component parts described
below: &
WARNING Danger of bu rns from hot
coolant
The engine cooling sy stem is pressurised,
particularly when the engine is warm. If you
open the cap, you could be scalded byhot
coolant spr aying out. #
Let the mo tor cool down before opening
th e cap. #
When opening the cap, wearglove s and
pr otective eyew ear. 312
Maintenance and care
Page 316 of 497

#
Slowly turn the cap half a turn toallow
pressure toescape. #
Park theve hicle on a le vel sur face. #
Check the coolant temp erature display in the
instrument clus ter.
The coolant temp erature must be below
70 °C. #
Slowly turn cap 1anti-clockwise torelie ve
exc ess pressure. #
Continue turning cap 1anti-clockwise and
re mo veit.
The coolant le vel is cor rect:
R ifth e engine is cold up tomar ker bar 2
R ifth e engine is warm upto1.5 cm over
mar ker bar 2 #
If necessar y,top up with coolant that has
been appr ovedby Mercedes-Benz.
R Further information on coolant (→ page375) To
pping up the windsc reen washer sy stem &
WARNING Danger of bu rns from hot
component parts in the engine compart‐
ment
Cer tain component parts in the engine com‐
partment may be very hot, e.g. the engine,
th era diator and parts of theex haust sy stem. #
Let the engine cool down and only
to uch the component parts described
below: &
WARNING Danger of bu rns when open‐
ing the bonn et
If yo u open the engine bonn etwhen the
engine has overheated or during a fire inthe
engine compartment, you could come into
contact with hot gases or other escaping
operating fluids. #
Before opening the bonn et, allow the
engine tocool down. #
Intheeve nt of a fire inthe engine com‐
partment, keep the engine bonn et
closed and call thefire service. &
WARNING ‑ Risk of fire and injury due to
windscreen washer concentrate
Wi ndsc reen washer concentrate is highly
fl ammable. It could ignite if it comes into
con tact wi thhot engine component parts or
th eex haust sy stem. Maintenance and care
313
Page 317 of 497

#
Make sure that no windsc reen washer
concentrate spills out next tothefiller
opening. #
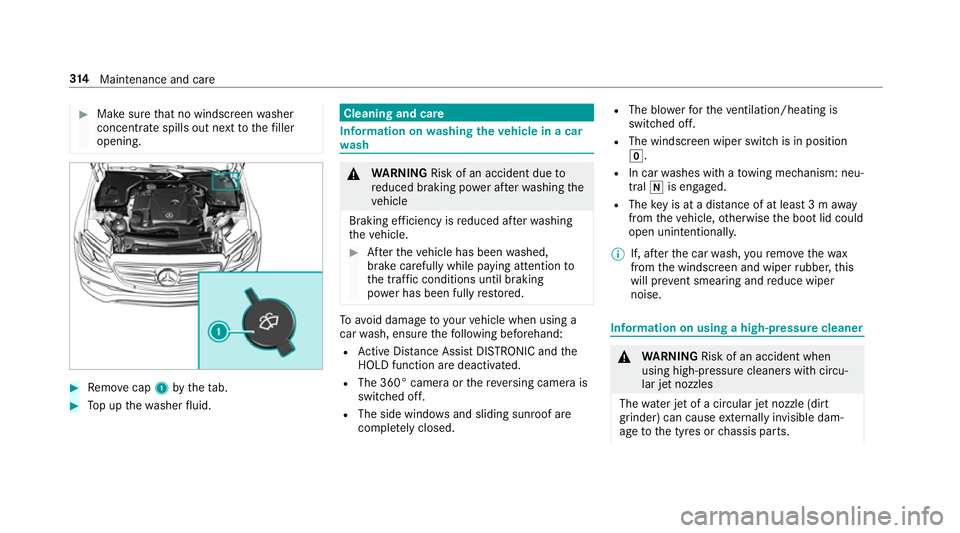
Remo vecap 1bytheta b. #
Top up thewa sher fluid. Cleaning and care
Information on
washing theve hicle in a car
wa sh &
WARNING Risk of an accident due to
re duced braking po wer af terwa shing the
ve hicle
Braking ef ficiency is reduced af terwa shing
th eve hicle. #
Afterth eve hicle has been washed,
brake carefully while paying attention to
th e traf fic conditions until braking
po we r has been fully restored. To
avo id damage to yourvehicle when using a
car wash, ensure thefo llowing beforehand:
R Active Dis tance Assi stDISTRONIC and the
HOLD function are deactivated.
R The 360° came raor there ve rsing camera is
switched off.
R The side windo wsand sliding sun roof are
comple tely closed. R
The bl owerforth eve ntilation/heating is
switched off.
R The windsc reen wiper switch is in position
g.
R In car washes with a towing mechanism: neu‐
tral iis engaged.
R The key is at a dis tance of at least 3 m away
from theve hicle, otherwise the boot lid could
open unintentionally.
% If, af terth e car wash, youre mo vethewax
from the windscreen and wiper rubber, this
will pr event smearing and reduce wiper
noise. Information on using a high-p
ressure cleaner &
WARNING Risk of an accident when
using high-pressure cleane rswith circu‐
lar jet nozzles
The wate r jet of a circular jet nozzle (dirt
grinder) can cause extern ally invisible dam‐
age tothe tyres or chassis parts. 314
Maintenance and care
Page 320 of 497

Note
s on care of car parts &
WARNING Risk of entrapment if the
windscreen wipers are swit ched on while
th e windscreen is being cleaned
If th e windscreen wipers are set in motion
while you are cleaning the windscreen or
wiper blades, you can be trapped bythe
wiper arm. #
Alw ays switch off the windscreen wip‐
ers and the ignition before cleaning the
windscreen or wiper blades. &
WARNING Risk of bu rns from tailpipes
and tailpipe trim
The tailpipe and tailpipe trim can become
ve ry hot. If you come into contact with these
parts of theve hicle, you could burn yourself. #
Alw ays be particular lycareful around
th eta ilpipe and theta ilpipe trim. #
Allow theve hicle parts tocool down
before youto uch them. Obser
vethefo llowing information: Note
s on cleaning and car eA voiding vehicle damage
Wheels/rims Usewate r and acid-free wheel cleaners. R
Do not use acidic wheel cleaners toremo vebrake dust.
This could damage wheel bolts and brake components.
R Toavoid cor rosion of the brake discs and brake pads,
drive theve hicle for a few minutes af ter cleaning before
parking it. The brake discs and brake pads warm up and
dry out.
Wi ndo ws
Cleanthe windo wsonthe inside and outside using a damp
clo thand cleaning agents recommended byMercedes-Benz. Do not use dry clo
ths or abrasive or sol vent-based cleaning
agents toclean the inside of windo ws. Maintenance and care
317
Page 322 of 497

Note
s on cleaning and car eA voiding vehicle damage
Exhaust pipes Clean with cleaning agents recommended byMercedes-Benz,
particular lyin the winter and af terwa shing theve hicle. Do not use acidic cleaning agents.
Tr ailer tow hit ch R
Remo vetraces of rust on the ball, e.g. with a wire brush.
R Remo vedirt with a lint-free clo th.
R After cleaning, oil or grease the ball coupling lightl y.
R Obser vethe no tes on care in the trailer tow hit chmanu‐
fa cturer's ope rating instructions. Do not clean
the ball coupling with a high-pressure cleaner or
solvent. Note
s on care of the interior &
WARNING Risk of inju ryfrom pla stic
parts breaking off af terth e use of sol‐
ve nt-based care products
Ca reand cleaning products con taining sol‐
ve nts can cause su rfaces in the cockpit to
become porous. When
the airbags are deplo yed, plastic parts
may break away. #
Do not use any care or cleaning prod‐
ucts containing sol vents toclean the
cockpit. &
WARNING Risk of inju ryor death from
bleached seat belts
Bleaching or dyeing seat belts can se verely
we aken them.
This can, forex ample, cause seat belts to
te ar or fail in an accident. #
Never blea chor dye seat belts. Maintenance and care
319
Page 326 of 497

Wa
rning triangle Re
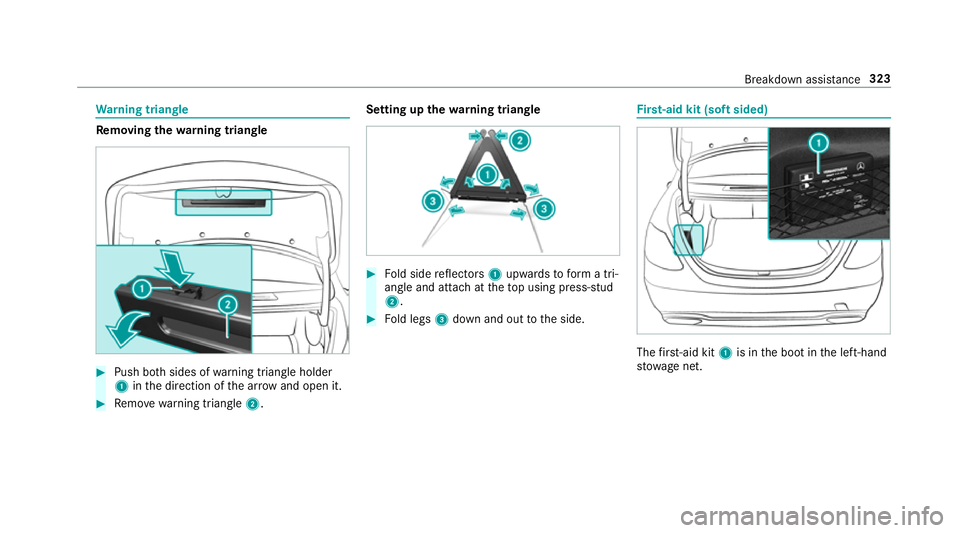
moving the warning triangle #
Push bo thsides of warning triangle holder
1 inthe direction of the ar row and open it. #
Remo ve wa rning triangle 2. Setting up
thewa rning triangle #
Fold side reflectors 1upwards toform a tri‐
angle and attach at theto p using press-stud
2. #
Fold legs 3down and out tothe side. Fi
rs t-aid kit (soft sided) The
firs t-aid kit 1is in the boot in the left-hand
stow age net. Breakdown assis
tance 323