Page 25 of 104
24
GX460_QG_OM60P00U_(U)
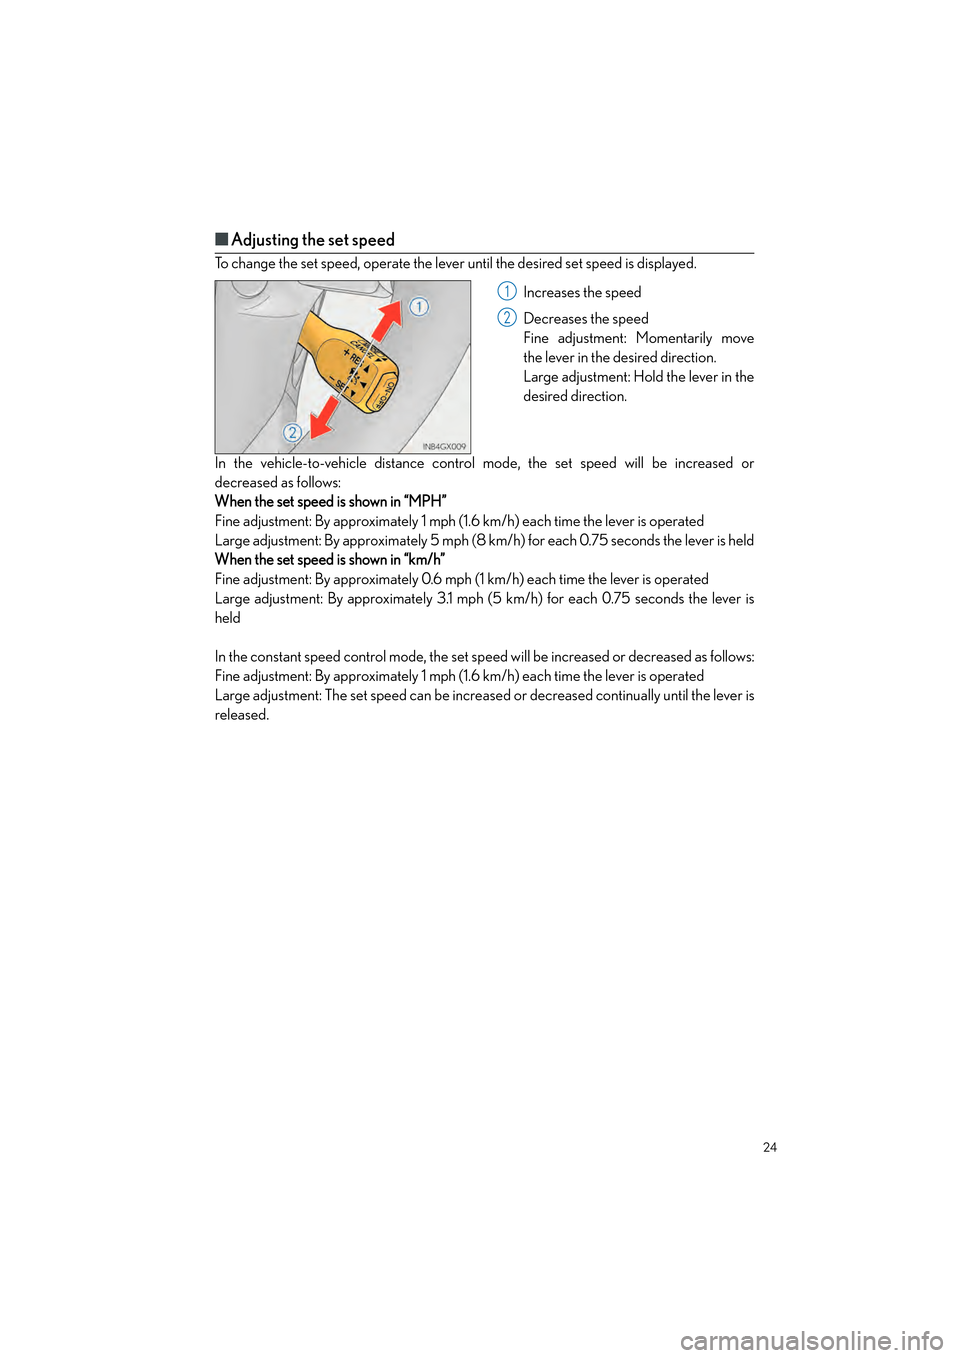
■Adjusting the set speed
To change the set speed, operate the lever until the desired set speed is displayed.
Increases the speed
Decreases the speed
Fine adjustment: Momentarily move
the lever in the desired direction.
Large adjustment: Hold the lever in the
desired direction.
In the vehicle-to-vehicle distance contro l mode, the set speed will be increased or
decreased as follows:
When the set speed is shown in “MPH”
Fine adjustment: By approximately 1 mph (1.6 km/h) each time the lever is operated
Large adjustment: By approximately 5 mph (8 km/h) for each 0.75 seconds the lever is held
When the set speed is shown in “km/h”
Fine adjustment: By approximately 0.6 mph (1 km/h) each time the lever is operated
Large adjustment: By approximately 3.1 mph (5 km/h) for each 0.75 seconds the lever is
held
In the constant speed control mode, the set sp eed will be increased or decreased as follows:
Fine adjustment: By approximately 1 mph (1.6 km/h) each time the lever is operated
Large adjustment: The set speed can be increase d or decreased continually until the lever is
released.
1
2
GX460_QG_OM60P00U_(U).book Page 24 Friday, June 3, 2016 2:27 PM
Page 26 of 104
25
GX460_QG_OM60P00U_(U)
■Changing the vehicle-to-vehicle distance
Pressing the button changes the vehicle-to-
vehicle distance as follows:
Long
Medium
Short
The vehicle-to-vehicle distance is set
automatically to long mode when the
engine switch is turned to IGNITION
ON mode.
If a vehicle is running ahead of you, the
preceding vehicle mark will be also dis-
played.
■Vehicle-to-vehicle distance settings
Select a distance from the table below. Note that the distances shown correspond to a vehi-
cle speed of 50 mph (80 km/h). Vehicle- to-vehicle distance increases/decreases in accor-
dance with vehicle speed.
Preceding vehicle mark
1
2
3
Distance optionsVehicle-to-vehicle distance
LongApproximately 160 f t . (5 0 m)
MediumApproximately 130 f t. (40 m)
ShortApproximately 100 ft. (30 m)
GX460_QG_OM60P00U_(U).book Page 25 Friday, June 3, 2016 2:27 PM
Page 27 of 104
26
GX460_QG_OM60P00U_(U)
■Canceling and resuming the speed control
Pulling the lever toward you cancels
the cruise control.
The speed setting is also canceled
when the brakes are applied.
Pushing the lever up resumes the
cruise control and returns vehicle
speed to the set speed.
Resuming is available when the vehicle
speed is more than approximately
25 mph (40 km/h).1
2
The vehicle-to-vehicle distance control mode maintains the preset cruising speed as long
as no vehicle is detected ahead.
GX460_QG_OM60P00U_(U).book Page 26 Friday, June 3, 2016 2:27 PM
Page 28 of 104
27
GX460_QG_OM60P00U_(U)
LDA (Lane Departure Alert) (if equipped)
■Turning the LDA system on
Press the “LDA” switch to activate the sys-
tem.
“LDA” indicator and the lane lines will
come on.
Press the switch again to turn the LDA
system off.
■ Indication on the multi-information display
When the LDA system is on , the lane lines are shown.
When thin lines are shown:
Lane markers are not recognized by the
system, or the LDA system is temporarily
canceled.
When solid lane lines are shown:
The LDA system is active.If the vehicle deviates from the lane, the
lane line will flash.
While driving on a road that has lane markers, this system recognizes the white lane mark-
ers using a camera as a sensor to alert the driv er when the vehicle deviates from its lane.
If the system judges that the vehicle may deviate from its lane, it alerts the driver using beep-
ing and indications on the multi-information display.
GX460_QG_OM60P00U_(U).book Page 27 Friday, June 3, 2016 2:27 PM
Page 29 of 104
28
GX460_QG_OM60P00U_(U)
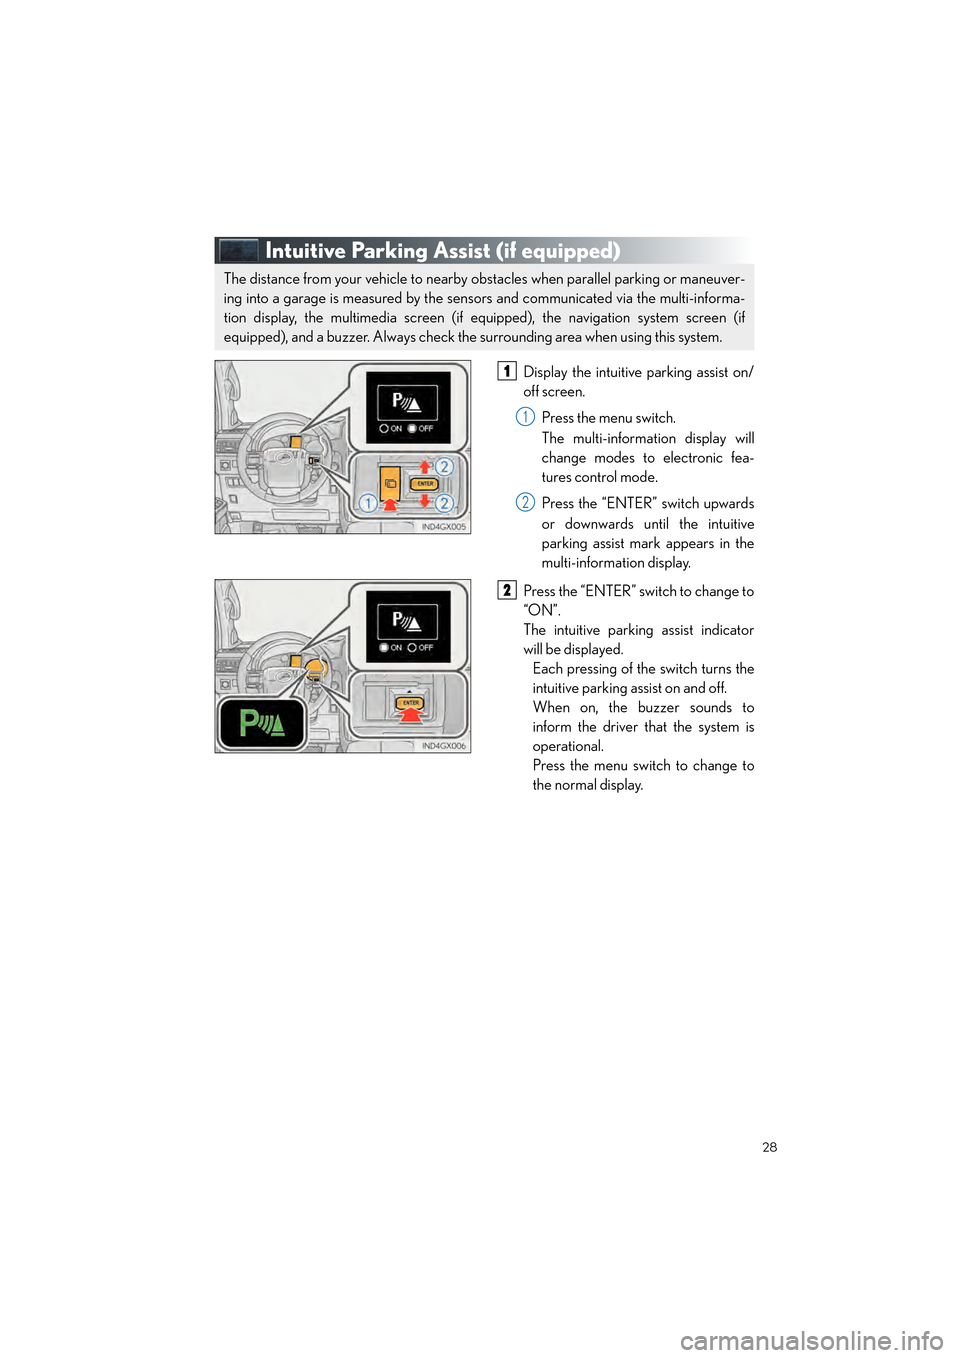
Intuitive Parking Assist (if equipped)
Display the intuitive parking assist on/
off screen.
Press the menu switch.
The multi-information display will
change modes to electronic fea-
tures control mode.
Press the “ENTER” switch upwards
or downwards until the intuitive
parking assist mark appears in the
multi-information display.
Press the “ENTER” switch to change to
“ON”.
The intuitive parking assist indicator
will be displayed. Each pressing of the switch turns the
intuitive parking as sist on and off.
When on, the buzzer sounds to
inform the driver that the system is
operational.
Press the menu switch to change to
the normal display.
The distance from your vehicle to nearby obstacles when parallel parking or maneuver-
ing into a garage is measured by the sensors and communicated via the multi-informa-
tion display, the multimedia screen (if equipped), the navigation system screen (if
equipped), and a buzzer. Always check the surrounding area when using this system.
1
1
2
2
GX460_QG_OM60P00U_(U).book Page 28 Friday, June 3, 2016 2:27 PM
Page 30 of 104
29
GX460_QG_OM60P00U_(U)
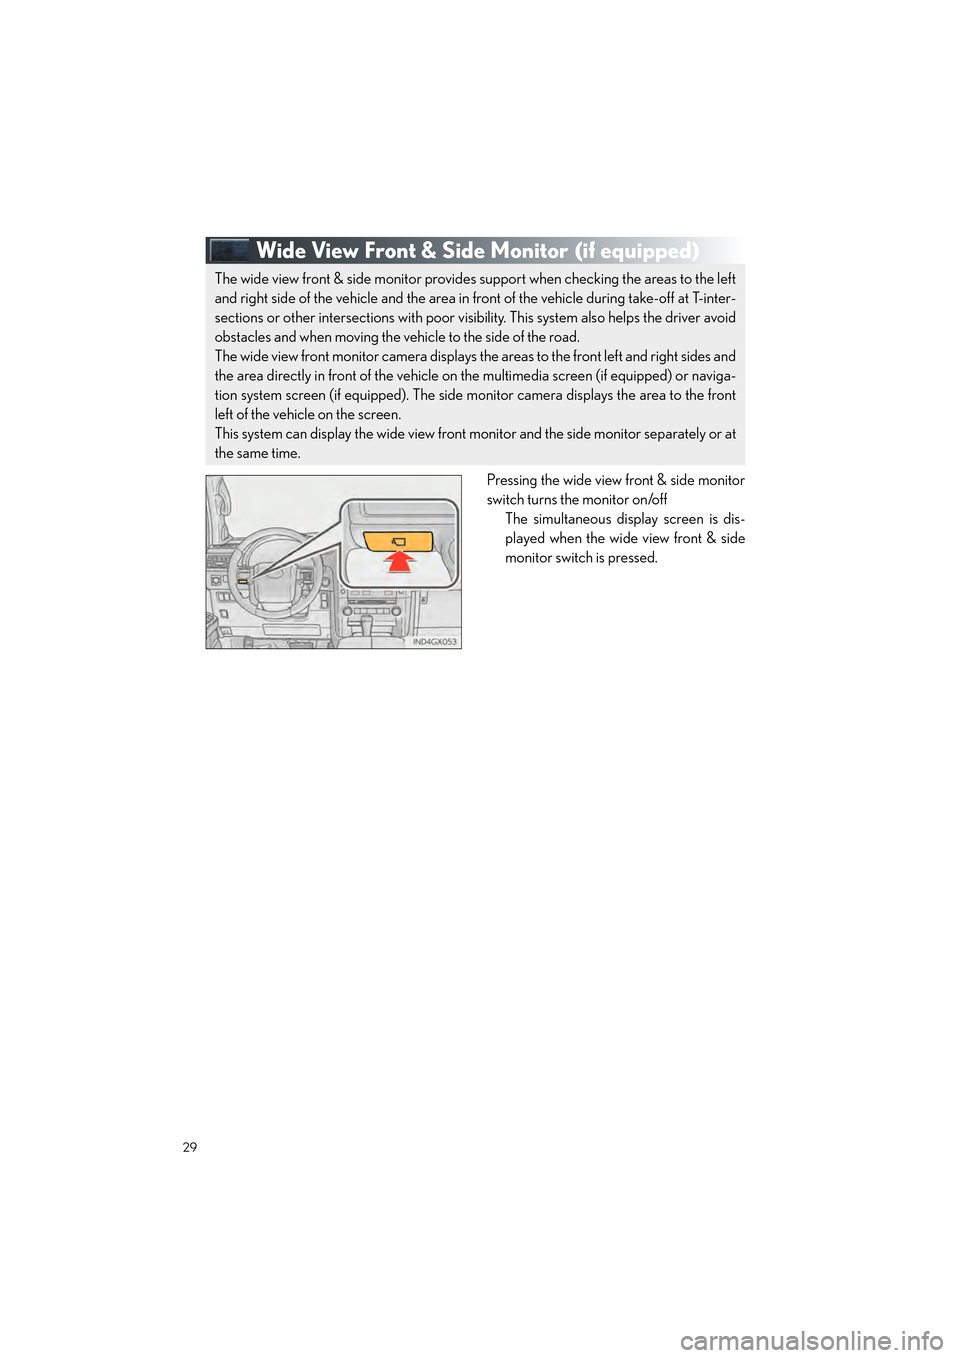
Wide View Front & Side Monitor (if equipped)
Pressing the wide view front & side monitor
switch turns the monitor on/off
The simultaneous display screen is dis-
played when the wide view front & side
monitor switch is pressed.
The wide view front & side monitor provides support when checking the areas to the left
and right side of the vehicle and the area in front of the vehicle during take-off at T-inter-
sections or other intersections with poor visibi lity. This system also helps the driver avoid
obstacles and when moving the vehicle to the side of the road.
The wide view front monitor camera displays the areas to the front left and right sides and
the area directly in front of the vehicle on the multimedia screen (if equipped) or naviga-
tion system screen (if equipped). The side monitor camera displays the area to the front
left of the vehicle on the screen.
This system can display the wide view front monitor and the side monitor separately or at
the same time.
GX460_QG_OM60P00U_(U).book Page 29 Friday, June 3, 2016 2:27 PM
Page 31 of 104
30
GX460_QG_OM60P00U_(U)
Multi-terrain Select (if equipped)
Menu switch
“ENTER” switch
Multi-information display
Displays status information including
operating status and road type selec-
tion.
Multi-terrain Select indicator
■Selectable modes
Multi-terrain Select is a system that helps drivability in off-road situations.
1
2
3
4
ModeRoad Conditions
MUD & SANDSuitable for muddy roads, sandy roads, snow-covered roads, dirt
trails and other slippery or dirty conditions
LO OSE ROCKSuitable for slippery conditions consisting of mixtures of earth and
loose rock
MOGULSuitable for a wide range of off-road conditions, particularly very
bumpy conditions
ROCKSuitable for rocky terrain
GX460_QG_OM60P00U_(U).book Page 30 Friday, June 3, 2016 2:27 PM
Page 32 of 104
31
GX460_QG_OM60P00U_(U)
■Switching modes
Push the menu switch.
The multi-information display will
change to electronic features control
mode.
Press the “ENTER” switch upwards or
downwards until “MULTI-TERRAIN
SELECT” appears and then press the
“ENTER” switch.
The mode selection screen is dis-
played.
Press the “ENTER” switch upwards or
downwards to select a desired mode
and then press the “ENTER” switch.
The system switches to the selected
mode, and the multi-terrain select indi-
cator will turn on.
Once the mode has been set, the
mode name will be displayed and
operation will commence.1
2
3
4
GX460_QG_OM60P00U_(U).book Page 31 Friday, June 3, 2016 2:27 PM
 1
1 2
2 3
3 4
4 5
5 6
6 7
7 8
8 9
9 10
10 11
11 12
12 13
13 14
14 15
15 16
16 17
17 18
18 19
19 20
20 21
21 22
22 23
23 24
24 25
25 26
26 27
27 28
28 29
29 30
30 31
31 32
32 33
33 34
34 35
35 36
36 37
37 38
38 39
39 40
40 41
41 42
42 43
43 44
44 45
45 46
46 47
47 48
48 49
49 50
50 51
51 52
52 53
53 54
54 55
55 56
56 57
57 58
58 59
59 60
60 61
61 62
62 63
63 64
64 65
65 66
66 67
67 68
68 69
69 70
70 71
71 72
72 73
73 74
74 75
75 76
76 77
77 78
78 79
79 80
80 81
81 82
82 83
83 84
84 85
85 86
86 87
87 88
88 89
89 90
90 91
91 92
92 93
93 94
94 95
95 96
96 97
97 98
98 99
99 100
100 101
101 102
102 103
103


