2017 Lexus GX460 Quick Guide
-
 1
1 -
 2
2 -
 3
3 -
 4
4 -
 5
5 -
 6
6 -
 7
7 -
 8
8 -
 9
9 -
 10
10 -
 11
11 -
 12
12 -
 13
13 -
 14
14 -
 15
15 -
 16
16 -
 17
17 -
 18
18 -
 19
19 -
 20
20 -
 21
21 -
 22
22 -
 23
23 -
 24
24 -
 25
25 -
 26
26 -
 27
27 -
 28
28 -
 29
29 -
 30
30 -
 31
31 -
 32
32 -
 33
33 -
 34
34 -
 35
35 -
 36
36 -
 37
37 -
 38
38 -
 39
39 -
 40
40 -
 41
41 -
 42
42 -
 43
43 -
 44
44 -
 45
45 -
 46
46 -
 47
47 -
 48
48 -
 49
49 -
 50
50 -
 51
51 -
 52
52 -
 53
53 -
 54
54 -
 55
55 -
 56
56 -
 57
57 -
 58
58 -
 59
59 -
 60
60 -
 61
61 -
 62
62 -
 63
63 -
 64
64 -
 65
65 -
 66
66 -
 67
67 -
 68
68 -
 69
69 -
 70
70 -
 71
71 -
 72
72 -
 73
73 -
 74
74 -
 75
75 -
 76
76 -
 77
77 -
 78
78 -
 79
79 -
 80
80 -
 81
81 -
 82
82 -
 83
83 -
 84
84 -
 85
85 -
 86
86 -
 87
87 -
 88
88 -
 89
89 -
 90
90 -
 91
91 -
 92
92 -
 93
93 -
 94
94 -
 95
95 -
 96
96 -
 97
97 -
 98
98 -
 99
99 -
 100
100 -
 101
101 -
 102
102 -
 103
103

■CD player
■
Playing an audio CD
Random playback
Repeat playback
Playback/pause
CD eject
Selecting a track
Disc slot
■Playing a CD with MP3/WMA/AAC files
Displaying a fo")

■Operating an iPod
■
Playing an iPod audio
Selecting a play mode
Random playback
Repeat playback
Playback/pause
Selecting a track/fast forward/rewind
■Playing an iPod vi")

Rear Seat Entertainment System (if equipped)
Front audio/visual system
Displays
Rear seat entertainment system controller
Headphone volume control dials and headphone jacks
HD")

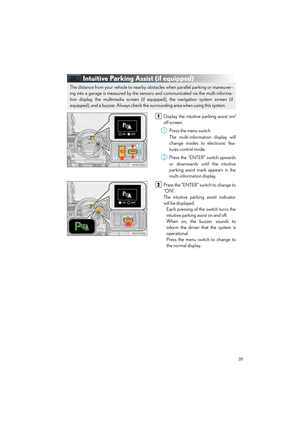
■Basic operation
Turns display off
Selects the display to be operated
L: left side display
R: right side display
Power on or off
Turning on the audio source selection
screen")

■DISC/USB/iPod/BT-A
Select desired mode on the source screen
to display the control screen.
Selecting a folder/an album
Play/pause
Fast for ward or rewind
Press: Selecting")

■DVD v ideo
Press “DISC” or select disc mode to display DVD video.
Selecting an icon
Tu r n i n g o n t h e D V D m o d e
Inputting the selected icon
Playing/pausin")

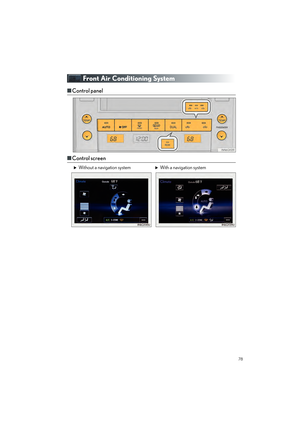
Front Air Conditioning System
■Control panel
■Control screen
Without a navigation system With a navigation system
GX460_QG_OM60P00U_(U).book Page 78 Friday, June 3, 2016")

■Adjusting the temperature setting
Press to increase the temperature and to decrease the temperature.
■Adjusting the fan speed setting
Press to increase the fan spee")