2017 HYUNDAI ELANTRA SE change time
[x] Cancel search: change timePage 206 of 586
3-112
Convenient features of your vehicle
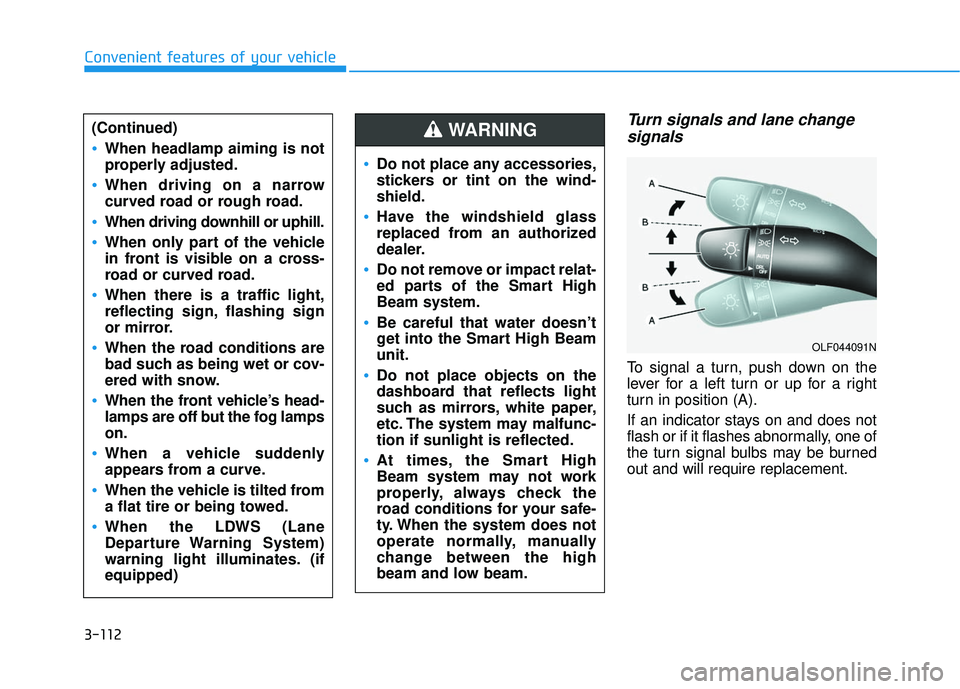
Turn signals and lane changesignals
To signal a turn, push down on the
lever for a left turn or up for a right
turn in position (A).
If an indicator stays on and does not
flash or if it flashes abnormally, one of
the turn signal bulbs may be burned
out and will require replacement.
(Continued)
When headlamp aiming is not
properly adjusted.
When driving on a narrow
curved road or rough road.
When driving downhill or uphill.
When only part of the vehicle
in front is visible on a cross-
road or curved road.
When there is a traffic light,
reflecting sign, flashing sign
or mirror.
When the road conditions are
bad such as being wet or cov-
ered with snow.
When the front vehicle’s head-
lamps are off but the fog lamps
on.
When a vehicle suddenly
appears from a curve.
When the vehicle is tilted from
a flat tire or being towed.
When the LDWS (Lane
Departure Warning System)
warning light illuminates. (if
equipped)
OLF044091N
Do not place any accessories,
stickers or tint on the wind-
shield.
Have the windshield glass
replaced from an authorized
dealer.
Do not remove or impact relat-
ed parts of the Smart High
Beam system.
Be careful that water doesn’t
get into the Smart High Beam
unit.
Do not place objects on the
dashboard that reflects light
such as mirrors, white paper,
etc. The system may malfunc-
tion if sunlight is reflected.
At times, the Smart High
Beam system may not work
properly, always check the
road conditions for your safe-
ty. When the system does not
operate normally, manually
change between the high
beam and low beam.
WARNING
Page 207 of 586
3-113
Convenient features of your vehicle
3
Onetouch turn signal function
To activate the One Touch Turn
Signal function, push the turn signal
lever up or down to position (B) and
then release it.
The lane change signals will blink 3,
5 or 7 times.
You can activate or deactivate the
One Touch Turn Signal function or
choose the number of blinking (3, 5,
or 7) from the User Settings Mode
(Light) on the LCD display.
For more information, refer to the
"LCD Display" section in this
chapter.
Battery saver function
The purpose of this feature is to pre-
vent the battery from being dis-
charged. The system automatically
turns off the parking lamp when the
key is removed (remote key) or when
the driver turns the engine off (smart
key) and opens the driver-side door.
With this feature, the parking lamps
will turn off automatically if the driver
parks on the side of road at night.
If necessary, to keep the lamps on
when the engine is turned off, perform
the following:
1) Open the driver-side door.
2) Turn the parking lamps OFF andON again using the light switch on
the steering column.
Headlamp delay function (if equipped)
If the key is removed from the ignition
switch or placed in the ACC position
or the LOCK/OFF position with the
headlamps ON, the headlamps
(and/or parking lamps) remain on for
about 5 minutes. However, if the dri-
ver’s door is opened and closed, the
headlights are turned off after 15
seconds. Also, with the engine off if
the driver's door is opened and
closed, the headlamps (and/or park-
ing lamps) are turned off after 15
seconds.
The headlamps (and/or parking
lamps) can be turned off by pressing
the lock button on the remote key or
smart key twice or turning the light
switch to the OFF or AUTO position.
You can activate or deactivate the
Headlamp Delay function from the
User Settings Mode (Light) on the
LCD display.
For more information, refer to the
"LCD Display" section in this
chapter.
Page 236 of 586
3-142
Convenient features of your vehicle
Air conditioning
All HYUNDAI Air Conditioning
Systems are filled with environmen-
tally friendly R-134a refrigerant.
1. Start the engine.
2. Push the air conditioning button.
3. Set the mode to the Face Levelmode.
4. Set the air intake control to the recirculated air position. However,
prolonged operation of the recircu-
lated air position will excessively
dry the air. In this case, change the
air position.
5. Adjust the fan speed control and temperature control to maintain
maximum comfort.
When maximum cooling is desired,
set the temperature control to the
extreme left position then set the fan
speed control to the highest speed. When using the air conditioning
system, monitor the engine tem-
perature gauge closely while driv-
ing up hills or in heavy traffic
when outside temperatures are
high. Air conditioning system
operation can cause engine over-
heating. Continue to use the blow-
er fan, but turn the air condition-
ing system off if the engine tem-
perature gauge indicates engine
overheating.
Air conditioning system operation
tips
If the vehicle has been parked in
direct sunlight during hot weather,
open the windows for a short time
to let the hot air inside the vehicle
escape.
After sufficient cooling has been achieved, switch back from the
recirculated air to the fresh outside
air position.
To help reduce moisture inside of the windows on rainy or humid
days, decrease the humidity inside
the vehicle by operating the air
conditioning system with the win-
dows and sunroof closed.
Use the air conditioning system every month only for a few minutes
to ensure maximum system per-
formance.
NOTICE
Page 243 of 586
3-149
Convenient features of your vehicle
3
C
CL
LI
IM
M A
AT
TE
E
C
C O
O N
NT
TR
R O
O L
L
A
A D
DD
DI
IT
T I
IO
O N
NA
AL
L
F
F E
E A
A T
TU
U R
RE
ES
S
(
( I
IF
F
E
E Q
Q U
UI
IP
P P
PE
ED
D )
)
Automatic Ventilation
(if equipped)
When the ignition switch is in the ON
position or when the engine is run-
ning and temperature is below 59°F
(15°C) with the recirculated air posi-
tion selected more than five minutes,
the air intake position will automati-
cally change to the outside (fresh) air
position.
To cancel or reset the Automatic
Ventilation
When the air conditioning system is
on, select Face Level mode and
while pressing the A/C button, press
the recirculated air position button
five times within three seconds.
Sunroof Inside Air
Recirculation (if equipped)
When the heater or air conditioning
system is on with the sunroof
opened, the outside (fresh) air posi-
tion will be automatically selected. At
this time, if you press the recirculated
air position button, the recirculated
air position will be selected but will
change back to the outside (fresh) air
position after 3 minutes.
When the sunroof is closed, the air
intake position will return to the orig-
inal position that was selected.
Page 266 of 586
(Continued)
• If your iPhone
®is connected to both
the Bluetooth®Wireless Technology
and USB, the sound may not be
properly played. In your iPhone
®,
select the Dock c onnector or
Bluetooth
®Wireless Technology to
change the sound output (source).
• iPod mode cannot be operated when the iPod
®cannot be recognized due
to versions that do not support com-
munication protocols.
• For fifth generation iPod
®Nano
devices, the iPod®may not be recog-
nized when the battery level is low.
Please charge the iPod
®for use.
• Search/play orders shown within the iPod
®device may differ with the
orders shown within the audio sys-
tem.
• If the iPod
®malfunctions due to an
iPod®device defect, reset the iPod®
and try again. (To learn more, refer to
your iPod®manual)
(Continued) (Continued)
• Some iPod
®s may not sync with the
System depending on its version. If
the Media is removed before the
Media is recognized, then the sys-
tem may not properly restore the
previously operated mode. (iPad
®
charging is not supported.)
Information - Using the AUX
device
• If an external device connector is connected with the AUX terminal,
then AUX mode will automatically
operate. Once the connector is dis-
connected, the previous mode will
be restored.
• AUX mode can be used only when an external audio player (cam-
corder, in-car DVD player, etc.) has
been connected.
• The AUX volume can be controlled separately from other audio modes.
• Connecting a connector jack to the AUX terminal without an external
device will convert the system to
AUX mode, but only output noise.
When an external device is not
being used, also remove the connec-
tor jack.
• When the external device power is connected to the power jack, play-
ing the external device may output
noise. In such cases, disconnect the
power connection before use.
• Fully insert the AUX cable to the AUX jack upon use.i
4-14
Multimedia System
Page 270 of 586
4-18
Multimedia System
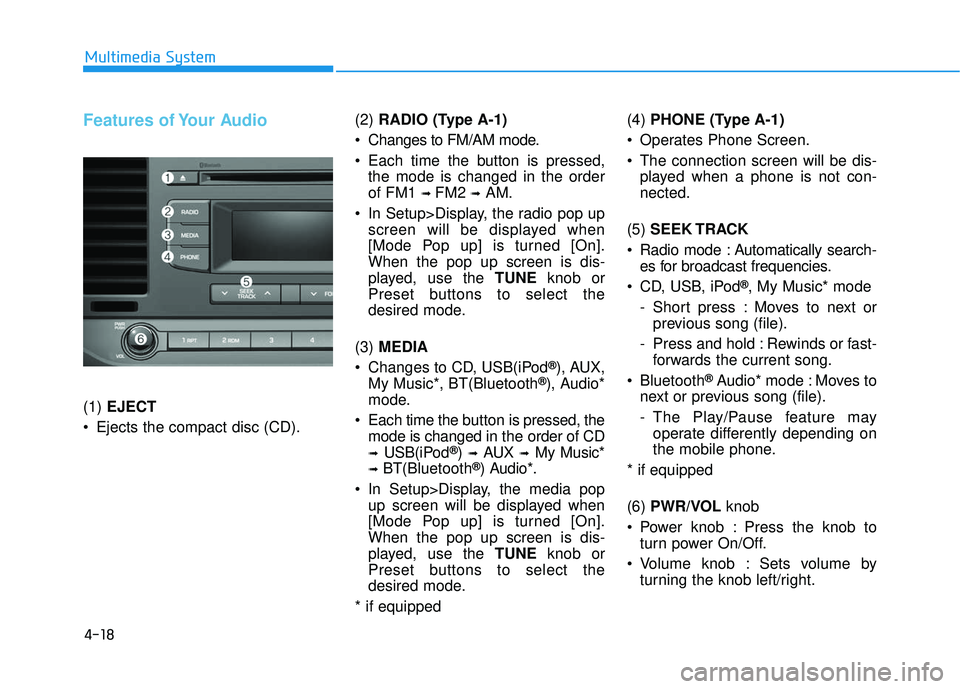
Features of Your Audio
(1) EJECT
Ejects the compact disc (CD). (2)
RADIO (Type A-1)
Changes to FM/AM mode.
Each time the button is pressed, the mode is changed in the order
of FM1
➟ FM2 ➟AM.
In Setup>Display, the radio pop up screen will be displayed when
[Mode Pop up] is turned [On].
When the pop up screen is dis-
played, use the TUNE knob or
Preset buttons to select the
desired mode.
(3) MEDIA
Changes to CD, USB(iPod
®), AUX,
My Music*, BT(Bluetooth®), Audio*
mode.
Each time the b utton is pressed, the
mode is changed in the order of CD
➟USB(iPod®)➟AUX➟My Music*
➟BT(Bluetooth®) Audio*.
In Setup>Display, the media pop up screen will be displayed when
[Mode Pop up] is turned [On].
When the pop up screen is dis-
played, use the TUNE knob or
Preset buttons to select the
desired mode.
* if equipped (4)
PHONE (Type A-1)
Operates Phone Screen.
The connection screen will be dis- played when a phone is not con-
nected.
(5) SEEK TRACK
Radio mode : Automatically search- es for broadcast frequencies.
CD, USB, iPod
®, My Music* mode
- Short press : Moves to next or previous song (file).
- Press and hold : Rewinds or fast- forwards the current song.
Bluetooth
®Audio* mode : Moves to
next or previous song (file).
- The Play/Pause feature may operate differently depending on
the mobile phone.
* if equipped
(6) PWR/VOL knob
Power knob : Press the knob to turn power On/Off.
Volume knob : Sets volume by turning the knob left/right.
Page 272 of 586
4-20
Multimedia System
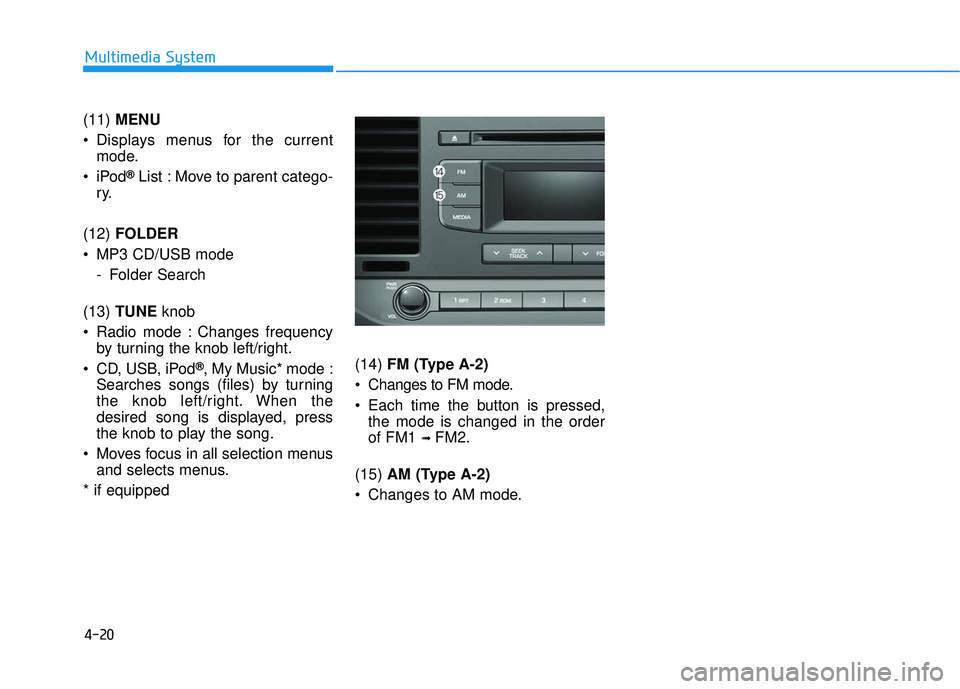
(11) MENU
Displays menus for the current mode.
®List : Move to parent catego-
ry.
(12) FOLDER
MP3 CD/USB mode - Folder Search
(13) TUNE knob
Radio mode : Changes frequency by turning the knob left/right.
CD, USB, iPod
®, My Music* mode :
Searches songs (files) by turning
the knob left/right. When the
desired song is displayed, press
the knob to play the song.
Moves focus in all selection menus and selects menus.
* if equipped (14)
FM (Type A-2)
Changes to FM mode.
Each time the button is pressed, the mode is changed in the order
of FM1
➟ FM2.
(15) AM (Type A-2)
Changes to AM mode.
Page 274 of 586
4-22
Multimedia System
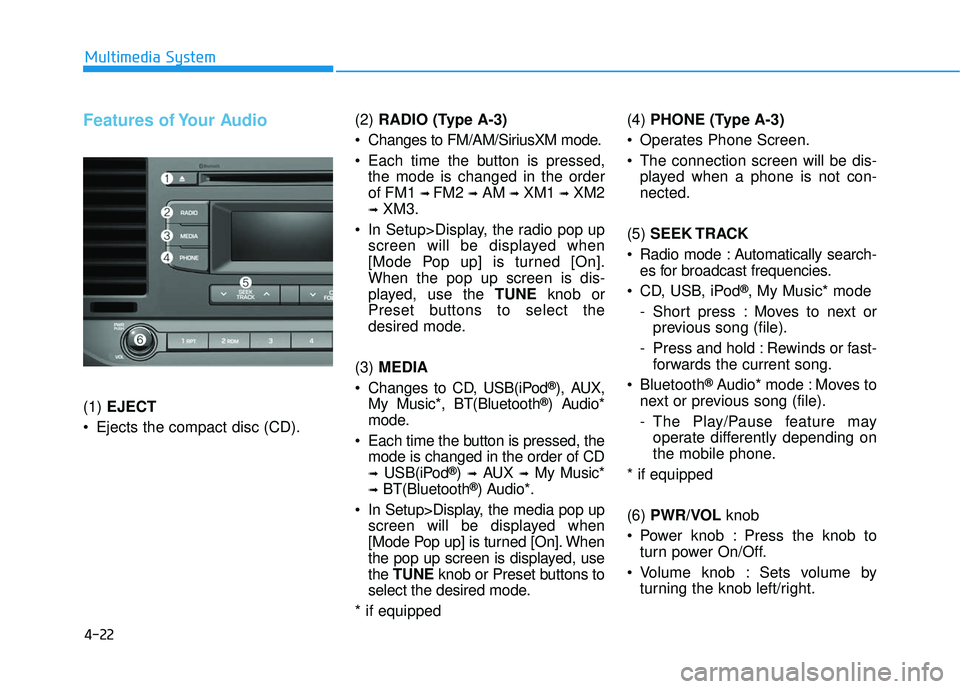
Features of Your Audio
(1) EJECT
Ejects the compact disc (CD). (2)
RADIO (Type A-3)
Changes to FM/AM/SiriusXM mode.
Each time the button is pressed, the mode is changed in the order
of FM1
➟ FM2 ➟AM ➟XM1 ➟XM2
➟XM3.
In Setup>Display, the radio pop up screen will be displayed when
[Mode Pop up] is turned [On].
When the pop up screen is dis-
played, use the TUNE knob or
Preset buttons to select the
desired mode.
(3) MEDIA
Changes to CD, USB(iPod
®), AUX,
My Music*, BT(Bluetooth®) Audio*
mode.
Each time the button is pressed, the mode is changed in the order of CD
➟USB(iPod®)➟AUX➟My Music*
➟BT(Bluetooth®) Audio*.
In Setup>Display, the media pop up screen will be displayed when
[Mode Pop up] is turned [On]. When
the pop up screen is displayed, use
the TUNE knob or Preset buttons to
select the desired mode.
* if equipped (4)
PHONE (Type A-3)
Operates Phone Screen.
The connection screen will be dis- played when a phone is not con-
nected.
(5) SEEK TRACK
Radio mode : Automatically search- es for broadcast frequencies.
CD, USB, iPod
®, My Music* mode
- Short press : Moves to next or previous song (file).
- Press and hold : Rewinds or fast- forwards the current song.
Bluetooth
®Audio* mode : Moves to
next or previous song (file).
- The Play/Pause feature may operate differently depending on
the mobile phone.
* if equipped
(6) PWR/VOL knob
Power knob : Press the knob to turn power On/Off.
Volume knob : Sets volume by turning the knob left/right.