2017 HYUNDAI ELANTRA SE change time
[x] Cancel search: change timePage 109 of 586
3-15
Convenient features of your vehicle
3
Smart key
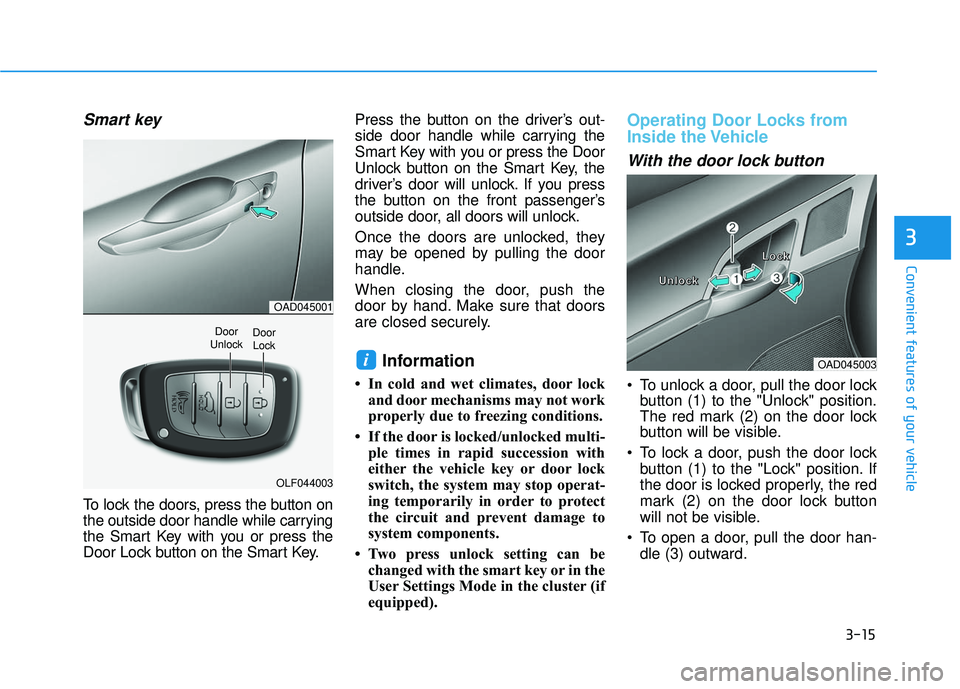
To lock the doors, press the button on
the outside door handle while carrying
the Smart Key with you or press the
Door Lock button on the Smart Key.Press the button on the driver’s out-
side door handle while carrying the
Smart Key with you or press the Door
Unlock button on the Smart Key, the
driver’s door will unlock. If you press
the button on the front passenger’s
outside door, all doors will unlock.
Once the doors are unlocked, they
may be opened by pulling the door
handle.
When closing the door, push the
door by hand. Make sure that doors
are closed securely.
Information
• In cold and wet climates, door lock
and door mechanisms may not work
properly due to freezing conditions.
• If the door is locked/unlocked multi- ple times in rapid succession with
either the vehicle key or door lock
switch, the system may stop operat-
ing temporarily in order to protect
the circuit and prevent damage to
system components.
• Two press unlock setting can be changed with the smart key or in the
User Settings Mode in the cluster (if
equipped).
Operating Door Locks from
Inside the Vehicle
With the door lock button
To unlock a door, pull the door lockbutton (1) to the "Unlock" position.
The red mark (2) on the door lock
button will be visible.
To lock a door, push the door lock button (1) to the "Lock" position. If
the door is locked properly, the red
mark (2) on the door lock button
will not be visible.
To open a door, pull the door han- dle (3) outward.
iOAD045003
U
U
U
U
n
n
n
n
l
l
l
l
o
o
o
o
c
c
c
c
k
k
k
k L
L
L
L
o
o
o
o
c
c
c
c
k
k
k
k
OAD045001
OLF044003
Door
UnlockDoor Lock
Page 117 of 586
3-23
Convenient features of your vehicle
3
Tilt Steering / Telescope Steering
Adjust the steering wheel so it points
toward your chest, not toward your
face. Make sure you can see the
instrument panel warning lights and
gauges. After adjusting, push the
steering wheel both up and down to
be certain it is locked in position.
Always adjust the position of the
steering wheel before driving.To change the steering wheel angle
and height:
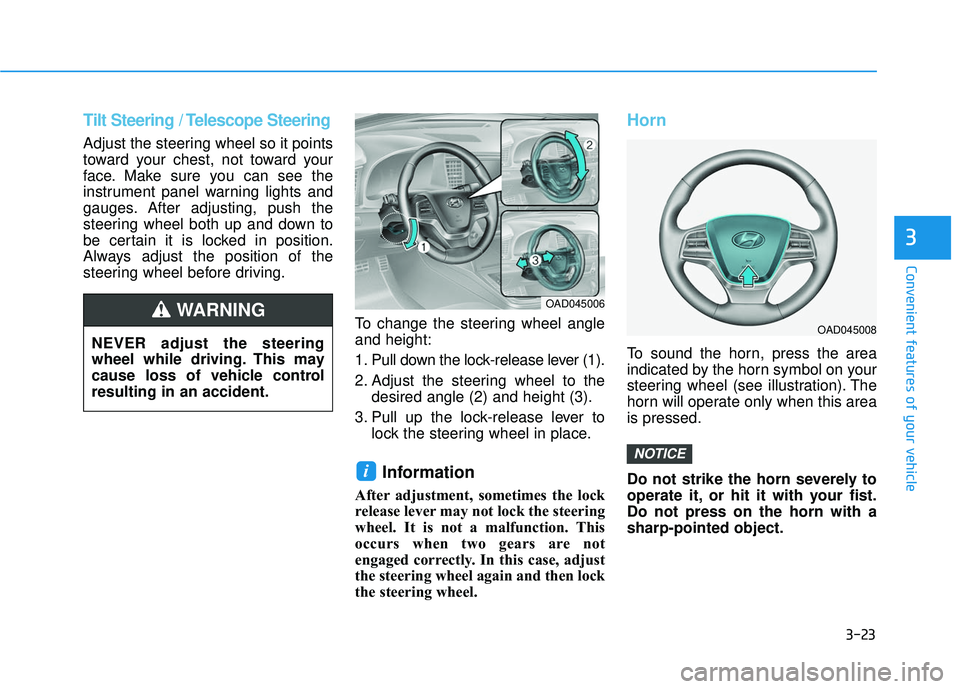
1. Pull down the lock-release lever (1).
2. Adjust the steering wheel to thedesired angle (2) and height (3).
3. Pull up the lock-release lever to lock the steering wheel in place.
Information
After adjustment, sometimes the lock
release lever may not lock the steering
wheel. It is not a malfunction. This
occurs when two gears are not
engaged correctly. In this case, adjust
the steering wheel again and then lock
the steering wheel.
Horn
To sound the horn, press the area
indicated by the horn symbol on your
steering wheel (see illustration). The
horn will operate only when this area
is pressed.
Do not strike the horn severely to
operate it, or hit it with your fist.
Do not press on the horn with a
sharp-pointed object.
NOTICE
i
OAD045006
NEVER adjust the steering
wheel while driving. This may
cause loss of vehicle control
resulting in an accident.
WARNING
OAD045008
Page 124 of 586
3-30
Convenient features of your vehicle
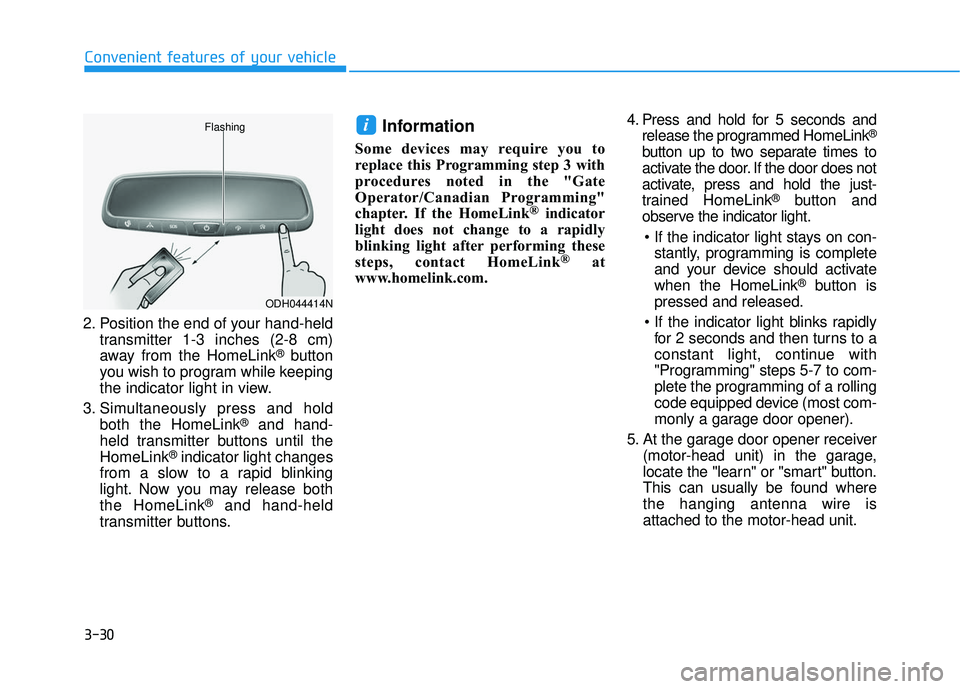
2. Position the end of your hand-held transmitter 1-3 inches (2-8 cm)
away from the HomeLink
®button
you wish to program while keeping
the indicator light in view.
3. Simultaneously press and hold both the HomeLink
®and hand-
held transmitter buttons until the
HomeLink
®indicator light changes
from a slow to a rapid blinking
light. Now you may release both
the HomeLink
®and hand-held
transmitter buttons.
Information
Some devices may require you to
replace this Programming step 3 with
procedures noted in the "Gate
Operator/Canadian Programming"
chapter. If the HomeLink
®indicator
light does not change to a rapidly
blinking light after performing these
steps, contact HomeLink
®at
www.homelink.com. 4. Press and hold for 5 seconds and
release the programmed HomeLink
®
button up to two separate times to
activate the door. If the door does not
activate, press and hold the just-
trained HomeLink
®button and
observe the indicator light.
stantly, programming is complete
and your device should activate
when the HomeLink
®button is
pressed and released.
for 2 seconds and then turns to a
constant light, continue with
"Programming" steps 5-7 to com-
plete the programming of a rolling
code equipped device (most com-
monly a garage door opener).
5. At the garage door opener receiver (motor-head unit) in the garage,
locate the "learn" or "smart" button.
This can usually be found where
the hanging antenna wire is
attached to the motor-head unit.
i
ODH044414N
Flashing
Page 126 of 586

3-32
Convenient features of your vehicle
Erasing HomeLink®buttons
Individual buttons cannot be erased.
However, to erase all three pro-
grammed buttons:
1. Press and hold the two outerHomeLink
®buttons until the indi-
cator light begins to flash after 10
seconds.
2. Release both buttons. Do not hold for longer than 20 seconds.
The Integrated HomeLink
®Wireless
Control System is now in the training
(learn) mode and can be pro-
grammed at any time following the
appropriate steps in the
Programming chapters above.
NVS
®is a registered trademark and
Z-Nav™ is a trademark of the Gentex
Corporation, Zeeland, Michigan.
HomeLink
®is a registered trademark
owned by Johnson Controls,
Incorporated, Milwaukee, Wisconsin.
FCC ID: NZLTLMHL4
IC: 4112A-TLMHL4
Information
This device complies with Part 15 of
the FCC Rules.
Operation is subject to the following
three conditions:
1. This device may not cause harmful interference, and
2. This device must accept any inter- ference received, including interfer-
ence that may cause undesired
operation.
3. The transceiver has been tested and complies with FCC and Industry
Canada rules. Changes or modifica-
tions not expressly approved by the
party responsible for compliance
could void the user’s authority to
operate the device.
Electric chromic mirror (ECM)with compass and HomeLink®
system (for Canada)
Your vehicle may be equipped with a
Gentex Automatic-Dimming Mirror
with a Z-Nav™ Electronic Compass
Display and an Integrated HomeLink
®
Wireless Control System.
During nighttime driving, this feature
will automatically detect and reduce
rearview mirror glare while the com-
pass indicates the direction the vehi-
cle is pointed. The HomeLink
®
Universal Transceiver allows you to
activate your garage door(s), electric
gate, home lighting, etc.
i
Page 133 of 586
3-39
Convenient features of your vehicle
3
Reprogramming a singleHomeLink®button
To program a new device to a previ-
ously trained HomeLink®button, fol-
low these steps:
1. Press and hold the desired HomeLink
®button. Do NOT
release until step 4 has been com-
pleted.
2. When the indicator light begins to flash slowly (after 20 seconds),
position the handheld transmitter 1
to 3 inches away from the
HomeLink
®surface.
3. Press and hold the handheld transmitter button. The HomeLink
®
indicator light will flash, first slowly
and then rapidly.
4. When the indicator light begins to flash rapidly, release both buttons.
5. Press and hold the just-trained HomeLink
®button and observe
the red Status Indicator LED. If the
indicator light stays on constantly,
programming is complete and
your new device should activate.
Erasing HomeLink®buttons
Individual buttons cannot be erased.
However, to erase all three pro-
grammed buttons:
1. Press and hold the two outer HomeLink
®buttons until the indi-
cator light begins to flash-after 20
seconds.
2. Release both buttons. Do not hold for longer than 30 seconds.
The Integrated HomeLink
®Wireless
Control System is now in the training
(learn) mode and can be pro-
grammed at any time following the
appropriate steps in the Programming
chapters above.
NVS
®is a registered trademark and
Z-Nav™ is a trademark of the Gentex
Corporation, Zeeland, Michigan.
HomeLink
®is a registered trademark
owned by Johnson Controls,
Incorporated, Milwaukee, Wisconsin.
FCC ID: NZLZTVHL3
IC: 4112A-ZTVHL3
Information
This device complies with Part 15 of
the FCC Rules.
Operation is subject to the following
three conditions:
1. This device may not cause harmful interference, and
2. This device must accept any interfer- ence received, including interference
that may cause undesired operation.
3. The transceiver has been tested and complies with FCC and Industry
Canada rules. Changes or modifica-
tions not expressly approved by the
party responsible for compliance
could void the user’s authority to
operate the device.
i
Page 175 of 586

3-81
Convenient features of your vehicle
3
Press brake pedal to start engine
This warning message is displayed if
the Engine Start/Stop button
changes to the ACC position twice by
pressing the button repeatedly with-
out depressing the brake pedal.
In order to start the vehicle, press the
brake pedal to start the engine.
Press START button with key
This warning message is displayed if
you press the Engine Start/Stop but-
ton while the warning message "Key
not detected" is shown.
At this time, the immobilizer indicator
light blinks.
Low Key Battery
This warning message is displayed if
the battery of the smart key is dis-
charged when the Engine Start/Stop
button changes to the OFF position.
OTL045142LOTL045140LOTL045141L
■Supervision cluster ■Supervision cluster ■Supervision cluster
Page 187 of 586
3-93
Convenient features of your vehicle
3
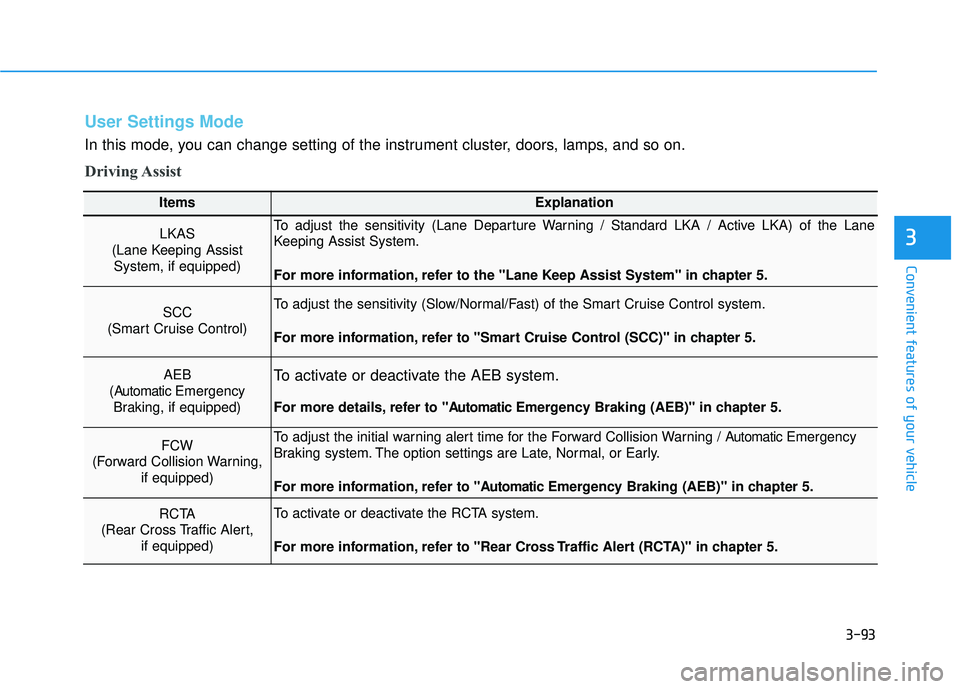
User Settings Mode
In this mode, you can change setting of the instrument cluster, doors, lamps, and so on.
Driving Assist
ItemsExplanation
LKAS
(Lane Keeping Assist System, if equipped)To adjust the sensitivity (Lane Departure Warning / Standard LKA / Active LKA) of the Lane
Keeping Assist System.
For more information, refer to the "Lane Keep Assist System" in chapter 5.
SCC
(Smart Cruise Control) To adjust the sensitivity (Slow/Normal/Fast) of the Smart Cruise Control system.
For more information, refer to "Smart Cruise Control (SCC)" in chapter 5.
AEB
(Automatic Emergency
Braking, if equipped)To activate or deactivate the AEB system.
For more details, refer to "A utomaticEmergency Braking (AEB)" in chapter 5.
FCW
(Forward Collision Warning, if equipped)To adjust the initial warning alert time for the Forward Collision Warning / A utomaticEmergency
Braking system. The option settings are Late, Normal, or Early.
For more information, refer to "A utomaticEmergency Braking (AEB)" in chapter 5.
RCTA
(Rear Cross Traffic Alert, if equipped)To activate or deactivate the RCTA system.
For more information, refer to "Rear Cross Traffic Alert (RCTA)" in chapter 5.
Page 195 of 586
3-101
Convenient features of your vehicle
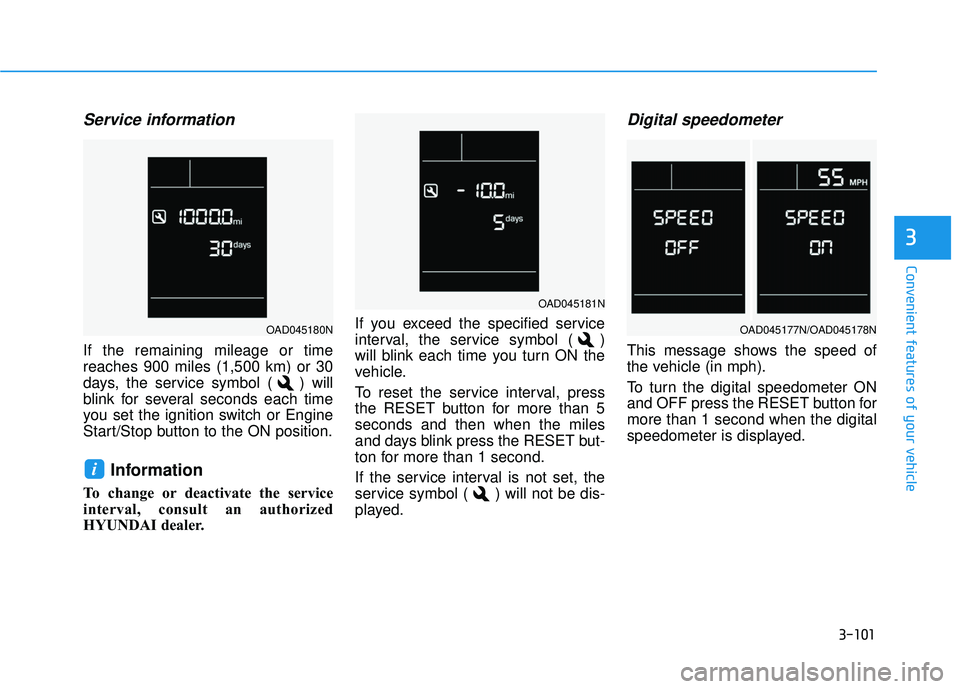
Service information
If the remaining mileage or time
reaches 900 miles (1,500 km) or 30
days, the service symbol ( ) will
blink for several seconds each time
you set the ignition switch or Engine
Start/Stop button to the ON position.
Information
To change or deactivate the service
interval, consult an authorized
HYUNDAI dealer.If you exceed the specified service
interval, the service symbol ( )
will blink each time you turn ON the
vehicle.
To reset the service interval, press
the RESET button for more than 5
seconds and then when the miles
and days blink press the RESET but-
ton for more than 1 second.
If the service interval is not set, the
service symbol ( ) will not be dis-
played.
Digital speedometer
This message shows the speed of
the vehicle (in mph).
To turn the digital speedometer ON
and OFF press the RESET button for
more than 1 second when the digital
speedometer is displayed.
i
3
OAD045181N
OAD045177N/OAD045178NOAD045180N