Page 483 of 571

7-13
7
Maintenance
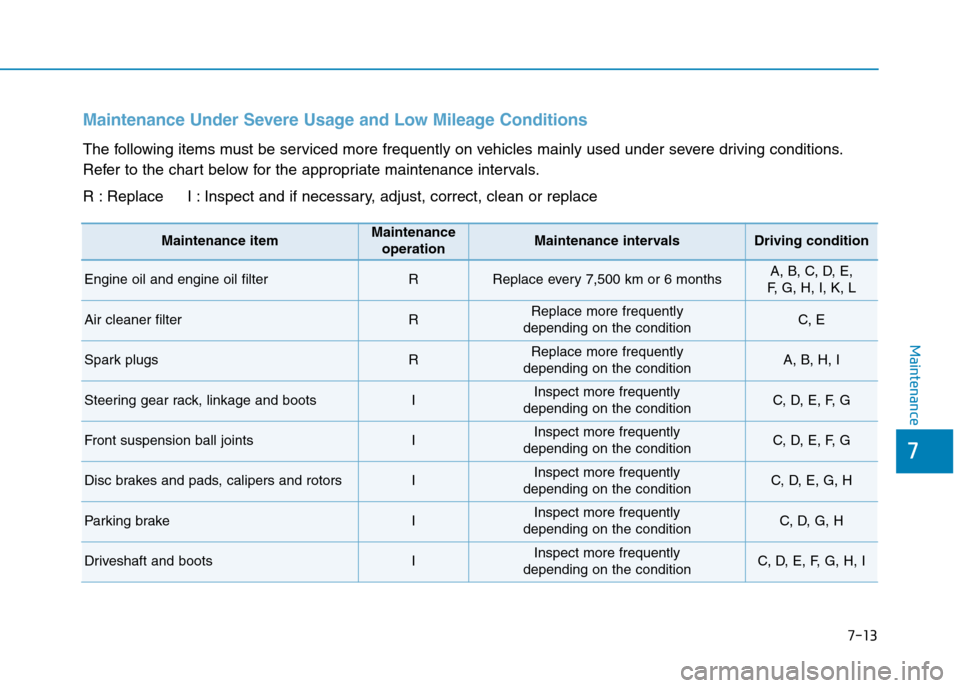
Maintenance Under Severe Usage and Low Mileage Conditions
The following items must be serviced more frequently on vehicles mainly used under severe driving conditions.
Refer to the chart below for the appropriate maintenance intervals.
R : Replace I : Inspect and if necessary, adjust, correct, clean or replace
Maintenance itemMaintenance
operationMaintenance intervalsDriving condition
Engine oil and engine oil filterRReplace every 7,500 km or 6 monthsA, B, C, D, E,
F, G , H , I , K , L
Air cleaner filterRReplace more frequently
depending on the conditionC, E
Spark plugs RReplace more frequently
depending on the conditionA, B, H, I
Steering gear rack, linkage and bootsIInspect more frequently
depending on the conditionC, D, E, F, G
Front suspension ball jointsIInspect more frequently
depending on the conditionC, D, E, F, G
Disc brakes and pads, calipers and rotorsIInspect more frequently
depending on the conditionC, D, E, G, H
Par king brakeIInspect more frequently
depending on the conditionC, D, G, H
Driveshaft and bootsIInspect more frequently
depending on the conditionC, D, E, F, G, H, I
Page 488 of 571
7-18
Maintenance
Steering gear box, linkage &
boots/lower arm ball joint
With the vehicle stopped and engine
off, check for excessive free-play in
the steering wheel.
Check the linkage for bends or dam-
age. Check the dust boots and ball
joints for deterioration, cracks, or
damage. Replace any damaged
parts.
Drive shafts and boots
Check the drive shafts, boots and
clamps for cracks, deterioration, or
damage. Replace any damaged
parts and, if necessary, repack the
grease.
Air conditioning refrigerant/
compressor
Check the air conditioning lines and
connections for leakage and dam-
age.
Page 545 of 571
7-75
7
Maintenance
Rear combination lamp bulb
replacement
(1) Tail/Stop lamp
(2) Tail lamp
(3) Turn signal lamp
(4) Reverse lamp
(5) Fog lamp (if equipped)
Outside lamp
1.Open the boot lid.
2.Remove the ser vice cover by
pulling out the service cover.
OAD075036
■ Ty p e C ( L E D w i t h f o g l a m p )
OAD075049
OAD075036
■ Ty p e A ( B u l b )
OAD075036
■ Ty p e B ( L E D )
Page 547 of 571
7-77
7
Maintenance
6.Remove the bulb from the socket
by pressing it in and rotating it anti-
clockwise until the tabs on the bulb
align with the slots in the socket.
Pull the bulb out of the socket.
7.Insert a new bulb by inserting it into
the socket and rotating it until it
locks into place.
8.Install the socket in the assembly
by aligning the tabs on the socket
with the slots in the assembly.
Push the socket into the assembly
and turn the socket clockwise.
Inside lamp
1.Open the boot.
2.Loosen the retaining screw of the
boot lid cover and then remove the
cover.
3.Disconnect the connector and then
remove the nuts by turning the nuts
anticlockwise.
Reverse lamp
1.Take the light assembly out.
OAD075056
OAD075055
OAD075052
Page 548 of 571

7-78
Maintenance
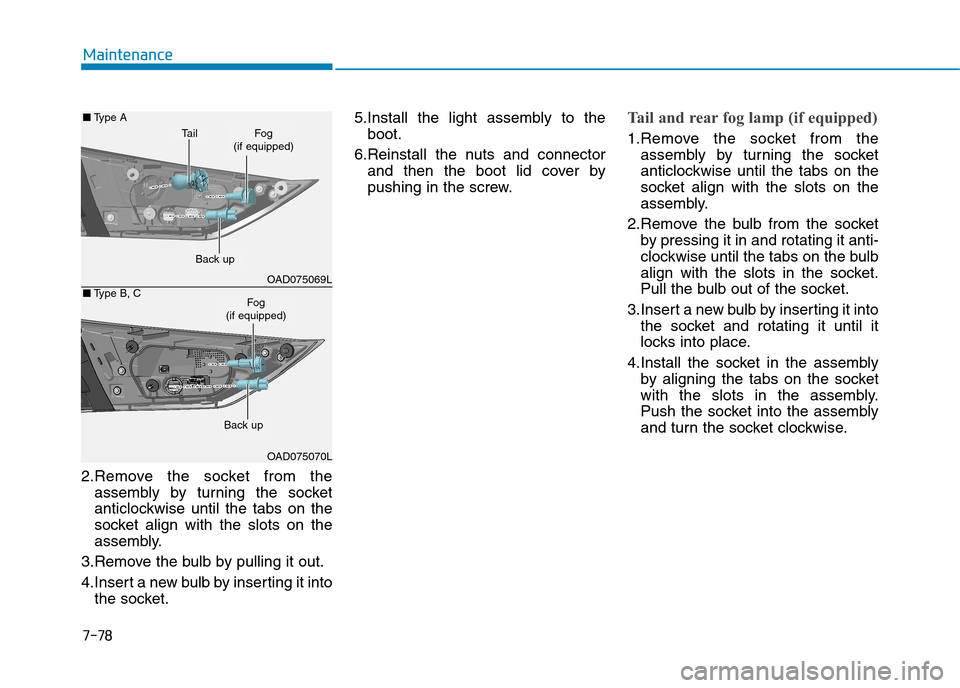
2.Remove the socket from the
assembly by turning the socket
anticlockwise until the tabs on the
socket align with the slots on the
assembly.
3.Remove the bulb by pulling it out.
4.Insert a new bulb by inserting it into
the socket.
5.Install the light assembly to the
boot.
6.Reinstall the nuts and connector
and then the boot lid cover by
pushing in the screw.
Tail and rear fog lamp (if equipped)
1.Remove the socket from the
assembly by turning the socket
anticlockwise until the tabs on the
socket align with the slots on the
assembly.
2.Remove the bulb from the socket
by pressing it in and rotating it anti-
clockwise until the tabs on the bulb
align with the slots in the socket.
Pull the bulb out of the socket.
3.Insert a new bulb by inserting it into
the socket and rotating it until it
locks into place.
4.Install the socket in the assembly
by aligning the tabs on the socket
with the slots in the assembly.
Push the socket into the assembly
and turn the socket clockwise.
OAD075069L
OAD075070L
■Ty p e A
■Ty p e B , C
Back up
Ta i lFog(if equipped)
Fog(if equipped)
Back up
Page 549 of 571
7-79
7
Maintenance
High mounted stop lamp
replacement
1.Open the boot.
2.Remove the socket by turning it
anticlockwise until the tabs on the
socket align with the slots.
3.Remove the bulb from the socket
by pressing it in and rotating it anti-
clockwise until the tabs on the bulb
align with the slots in the socket.
Pull the bulb out of the socket.
4.Insert a new bulb by inserting it into
the socket and rotating it until it
locks into place.
5.Install the socket in the assembly
by aligning the tabs on the socket
with the slots in the assembly.
Push the socket into the assembly
and turn the socket clockwise.
Licence plate light bulb
replacement
1.Remove the cover by pressing it in
the direction of the arrows.
2.Remove the bulb by pulling it
straight out.
3.Install a new bulb.
4.Reinstall in the reverse order.
OAD075043
OAD075041
OAD075042
Page 551 of 571

7-81
7
Maintenance
AAPPPPEEAARRAANNCCEE CCAARREE
Exterior care
Exterior general caution
It is very important to follow the label
directions when using any chemical
cleaner or polish. Read all warning
and caution statements that appear
on the label.
High-pressure washing
•When using high-pressure wash-
ers, make sure to maintain suffi-
cient distance from the vehicle.
Insufficient clearance or excessive
pressure can lead to component
damage or water penetration.
•Do not spray the camera, sensors
or its surrounding area directly with
a high pressure washer. Shock
applied from high pressure water
may cause the device to not oper-
ate normally.
•Do not bring the nozzle tip close to
boots (rubber or plastic covers) or
connectors as they may be dam-
aged if they come into contact with
high pressure water.
Finish maintenance
Washing
To h e l p p r o t e c t y o u r v e h i c l e ’ s f i n i s h
from rust and deterioration, wash it
thoroughly and frequently at least
once a month with lukewarm or cold
water.
If you use your vehicle for off-road
driving, you should wash it after each
off-road trip. Pay special attention to
the removal of any accumulation of
salt, dirt, mud, and other foreign
materials. Make sure the drain holes
in the lower edges of the doors and
rocker panels are kept clear and
clean.
Insects, tar, tree sap, bird droppings,
industrial pollution and similar
deposits can damage your vehicle’s
finish if not removed immediately.
Even prompt washing with plain
water may not completely remove all
these deposits.
A mild soap, safe for use on painted
surfaces, may be used.
After washing, rinse the vehicle thor-
oughly with lukewarm or cold water.
Do not allow soap to dry on the finish.
•Do not use strong soap,chemi-
cal detergents or hot water, and
do not wash the vehicle in direct
sunlight or when the body of the
vehicle is warm.
•Be careful when washing the
side windows of your vehicle.
Especially, with high-pressure
water, water may leak through
the windows and wet the interi-
or.
•To prevent damage to the plastic
parts and lamps, do not clean
with chemical solvents or strong
detergents.
NOTICE