2017 Hyundai Elantra oil
[x] Cancel search: oilPage 506 of 571
7-36
Maintenance
Battery capacity label
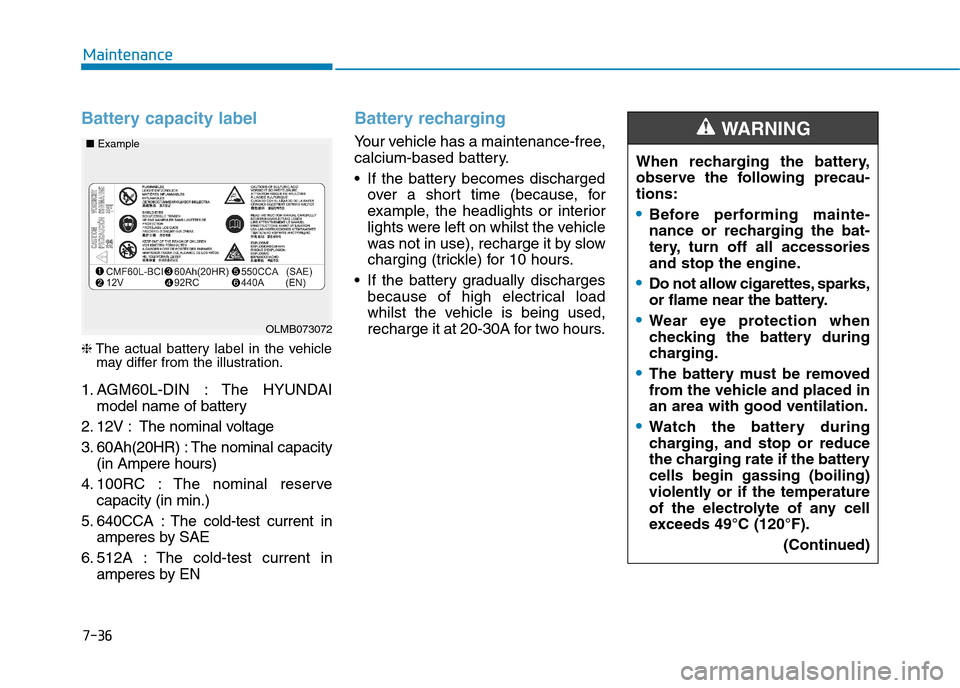
❈The actual battery label in the vehiclemay differ from the illustration.
1. AGM60L-DIN : The HYUNDAI
model name of battery
2. 12V : The nominal voltage
3. 60Ah(20HR) : The nominal capacity
(in Ampere hours)
4. 100RC : The nominal reser ve
capacity (in min.)
5. 640CCA : The cold-test current in
amperes by SAE
6. 512A : The cold-test current in
amperes by EN
Battery recharging
Yo u r v e h i c l e h a s a m a i n t e n a n c e - f r e e ,
calcium-based battery.
•If the battery becomes discharged
over a shor t time (because, for
example, the headlights or interior
lights were left on whilst the vehicle
was not in use), recharge it by slow
charging (trickle) for 10 hours.
•If the battery gradually discharges
because of high electrical load
whilst the vehicle is being used,
recharge it at 20-30A for two hours.OLMB073072
■Example
When recharging the battery,
observe the following precau-
tions:
•Before performing mainte-
nance or recharging the bat-
tery, turn off all accessories
and stop the engine.
•Do not allow cigarettes, sparks,
or flame near the battery.
•Wear eye protection when
checking the battery during
charging.
•The battery must be removed
from the vehicle and placed in
an area with good ventilation.
•Watch the battery during
charging, and stop or reduce
the charging rate if the battery
cells begin gassing (boiling)
violently or if the temperature
of the electrolyte of any cell
exceeds 49°C (120°F).
(Continued)
WA R N I N G
Page 521 of 571
7-51
7
Maintenance
Do not use a screwdriver or any
other metal object to remove
fuses because it may cause a
short circuit and damage the sys-
tem.
•When replacing a blown fuse or
relay with a new one, make sure
the new fuse or relay fits tightly
into the clips. An inadequately
fastened fuse or relay may
cause vehicle wiring and electri-
cal system damage, and a possi-
ble fire.
•Do not remove fuses,relays and
terminals fastened with bolts or
nuts. The fuses, relays and ter-
minals may be fastened inade-
quately, and it may cause a pos-
sible fire. If fuses, relays and ter-
minals fastened with bolts or
nuts are blown, we recommend
that you consult an authorised
HYUNDAI dealer.
•Do not input any other objects
except fuses or relays into
fuse/relay terminals such as a
screwdriver or wiring. It may
cause contact failure and sys-
tem malfunction.
NOTICENOTICE
Fuse replacement
•Never replace a fuse with any-
thing but another fuse of the
same rating.
•A higher capacity fuse could
cause damage and possibly a
fire.
•Never install a wire or alumini-
um foil instead of the proper
fuse - even as a temporary
repair. It may cause extensive
wiring damage and a possible
fire.
WA R N I N G
Page 536 of 571
7-66
Maintenance
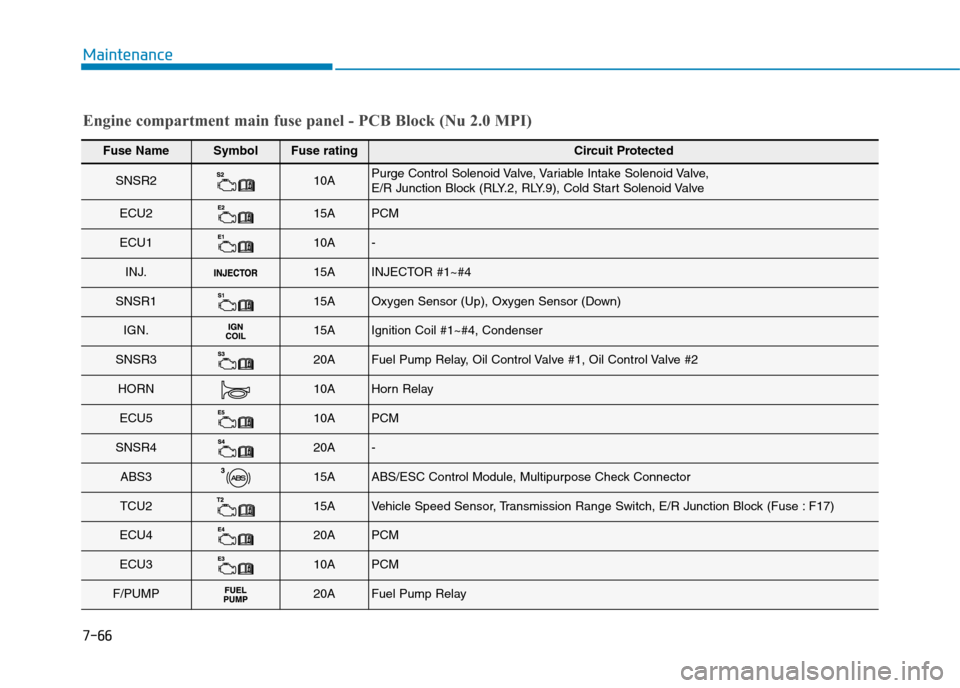
Engine compartment main fuse panel - PCB Block (Nu 2.0 MPI)
Fuse NameSymbolFuse ratingCircuit Protected
SNSR210APurge Control Solenoid Valve, Variable Intake Solenoid Valve, E/R Junction Block (RLY.2, RLY.9), Cold Start Solenoid Valve
ECU215APCM
ECU110A-
INJ.15AINJECTOR #1~#4
SNSR115AOxygen Sensor (Up), Oxygen Sensor (Down)
IGN.15AIgnition Coil #1~#4, Condenser
SNSR320AFuel Pump Relay, Oil Control Valve #1, Oil Control Valve #2
HORN10AHorn Relay
ECU510APCM
SNSR420A-
ABS315AABS/ESC Control Module, Multipurpose Check Connector
TCU215AVe h i c l e S p e e d S e n s o r, Tr a n s m i s s i o n R a n g e S w i t c h , E / R J u n c t i o n B l o c k ( F u s e : F 1 7 )
ECU420APCM
ECU310APCM
F/PUMP20AFuel Pump Relay
Page 539 of 571
7-69
7
Maintenance
Headlamp (Halogen bulb)
•Always handle them carefully, and
avoid scratches and abrasions. If
the bulbs are lit, avoid contact with
liquids.
•Never touch the glass with bare
hands. Residual oil may cause the
bulb to overheat and burst when lit.
•A bulb should be operated only
when installed in a headlamp.
•If a bulb becomes damaged or
cracked, replace it immediately
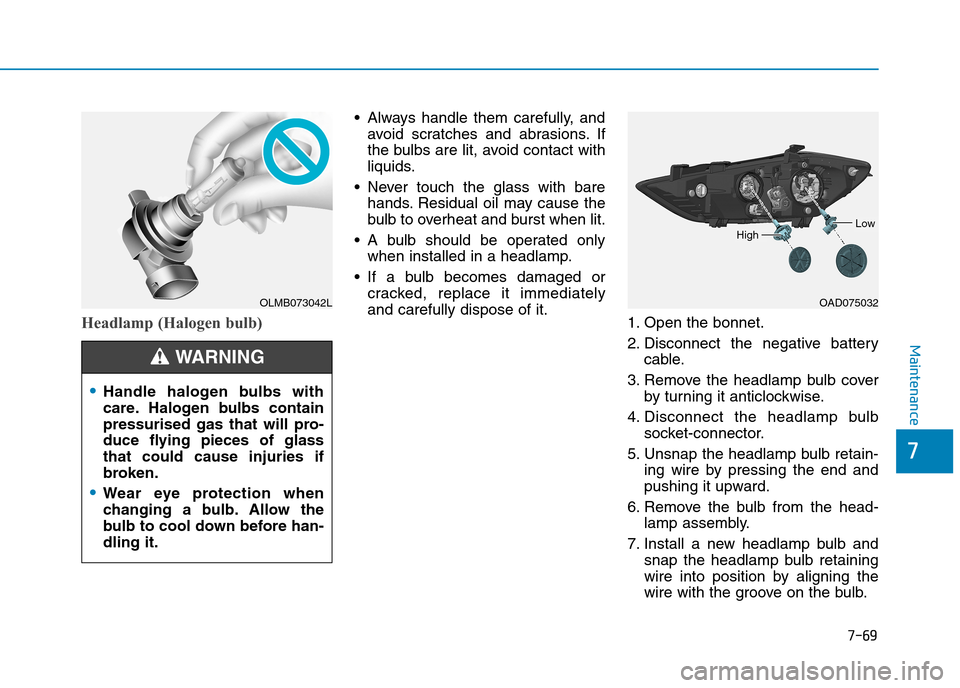
and carefully dispose of it.1. Open the bonnet.
2. Disconnect the negative battery
cable.
3. Remove the headlamp bulb cover
by turning it anticlockwise.
4. Disconnect the headlamp bulb
socket-connector.
5. Unsnap the headlamp bulb retain-
ing wire by pressing the end and
pushing it upward.
6. Remove the bulb from the head-
lamp assembly.
7. Install a new headlamp bulb and
snap the headlamp bulb retaining
wire into position by aligning the
wire with the groove on the bulb.
OLMB073042L
•Handle halogen bulbs with
care. Halogen bulbs contain
pressurised gas that will pro-
duce flying pieces of glass
that could cause injuries if
broken.
•Wear eye protection when
changing a bulb. Allow the
bulb to cool down before han-
dling it.
WA R N I N G
OAD075032
HighLow
Page 542 of 571
7-72
Maintenance
•Always handle them carefully, and
avoid scratches and abrasions. If
the bulbs are lit, avoid contact with
liquids.
•Never touch the glass with bare
hands. Residual oil may cause the
bulb to overheat and burst when lit.
•A bulb should be operated only
when installed in a headlamp.
•If a bulb becomes damaged or
cracked, replace it immediately
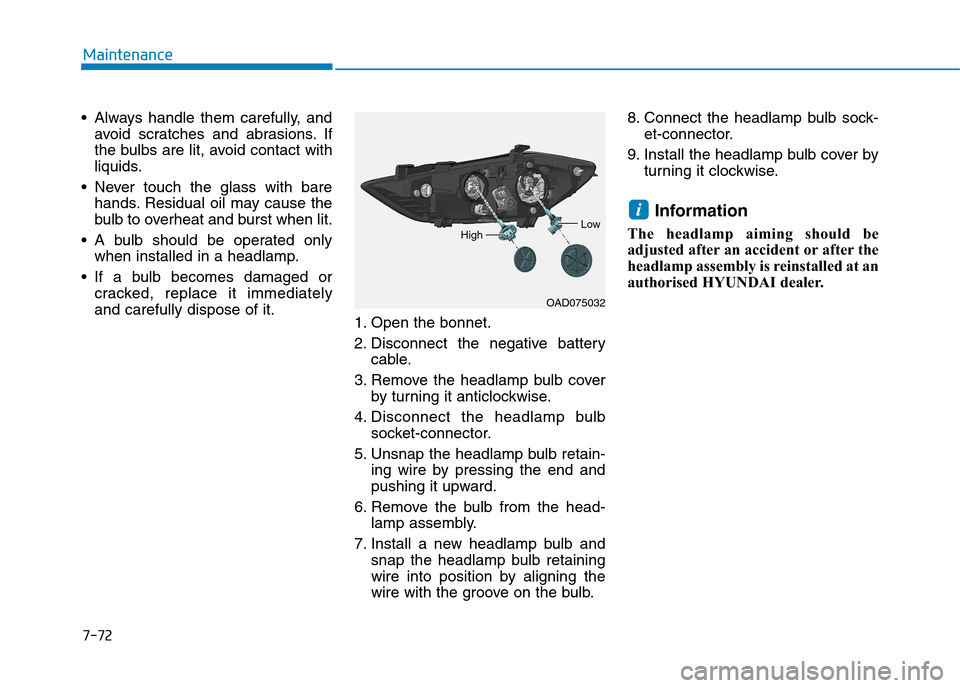
and carefully dispose of it.1. Open the bonnet.
2. Disconnect the negative battery
cable.
3. Remove the headlamp bulb cover
by turning it anticlockwise.
4. Disconnect the headlamp bulb
socket-connector.
5. Unsnap the headlamp bulb retain-
ing wire by pressing the end and
pushing it upward.
6. Remove the bulb from the head-
lamp assembly.
7. Install a new headlamp bulb and
snap the headlamp bulb retaining
wire into position by aligning the
wire with the groove on the bulb.
8. Connect the headlamp bulb sock-
et-connector.
9. Install the headlamp bulb cover by
turning it clockwise.
Information
The headlamp aiming should be
adjusted after an accident or after the
headlamp assembly is reinstalled at an
authorised HYUNDAI dealer.
i
OAD075032
LowHigh
Page 552 of 571
7-82
Maintenance
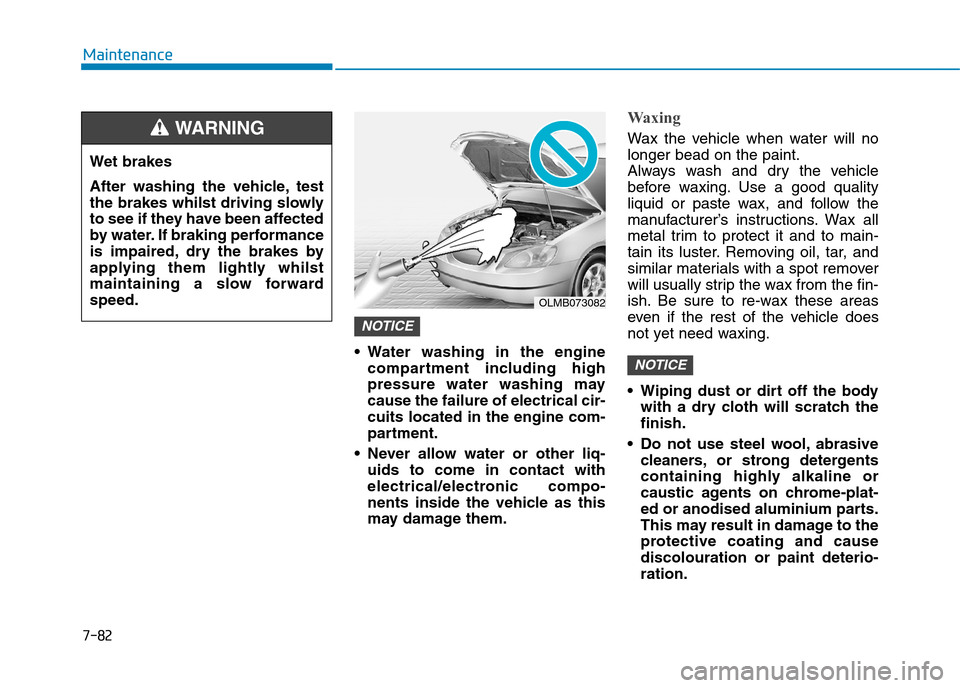
•Water washing in the engine
compartment including high
pressure water washing may
cause the failure of electrical cir-
cuits located in the engine com-
partment.
•Never allow water or other liq-
uids to come in contact with
electrical/electronic compo-
nents inside the vehicle as this
may damage them.
Waxing
Wax the vehicle when water will no
longer bead on the paint.
Always wash and dry the vehicle
before waxing. Use a good quality
liquid or paste wax, and follow the
manufacturer’s instructions. Wax all
metal trim to protect it and to main-
tain its luster. Removing oil, tar, and
similar materials with a spot remover
will usually strip the wax from the fin-
ish. Be sure to re-wax these areas
even if the rest of the vehicle does
not yet need waxing.
•Wiping dust or dirt off the body
with a dry cloth will scratch the
finish.
•Do not use steel wool,abrasive
cleaners, or strong detergents
containing highly alkaline or
caustic agents on chrome-plat-
ed or anodised aluminium parts.
This may result in damage to the
protective coating and cause
discolouration or paint deterio-
ration.
NOTICE
NOTICE
Wet brakes
After washing the vehicle, test
the brakes whilst driving slowly
to see if they have been affected
by water. If braking performance
is impaired, dry the brakes by
applying them lightly whilst
maintaining a slow forward
speed.
WA R N I N G
OLMB073082
Page 557 of 571
7-87
7
Maintenance
Interior care
Interior general precautions
Prevent chemicals such as perfume,
cosmetic oil, sun cream, hand clean-
er and air freshener from contacting
the interior parts because they may
cause damage or discolouration. If
they do contact the interior parts,
wipe them off immediately.
See the instructions that follow for
the proper way to clean vinyl.
Never allow water or other liquids
to come in contact with electri-
cal/electronic components inside
the vehicle as this may damage
them.
When cleaning leather products
(steering wheel, seats etc.), use
neutral detergents or low alcohol
content solutions. If you use high
alcohol content solutions or
acid/alkaline detergents, the
colour of the leather may fade or
the surface may get stripped off.
Cleaning the upholstery and
interior trim
Vinyl
Remove dust and loose dirt from
vinyl with a whisk broom or vacuum
cleaner. Clean vinyl surfaces with a
vinyl cleaner.
Fabric
Remove dust and loose dirt from fab-
ric with a whisk broom or vacuum
cleaner. Clean with a mild soap solu-
tion recommended for upholstery or
carpets. Remove fresh spots imme-
diately with a fabric spot cleaner. If
fresh spots do not receive immediate
attention, the fabric can be stained
and its colour can be affected. Also,
its fire-resistant properties can be
reduced if the material is not proper-
ly maintained.
Using anything but recommended
cleaners and procedures may
affect the fabric’s appearance and
fire-resistant properties.
Cleaning the lap/shoulder belt
webbing
Clean the belt webbing with any mild
soap solution recommended for
cleaning upholstery or carpet. Follow
the instructions provided with the
soap. Do not bleach or re-dye the
webbing because this may weaken it.
Cleaning the interior window
glass
If the interior glass surfaces of the
vehicle become fogged (that is, cov-
ered with an oily, greasy or waxy
film), they should be cleaned with
glass cleaner. Follow the directions
on the glass cleaner container.
NOTICE
NOTICE
NOTICE
Do not scrape or scratch the
inside of the rear window. This
may result in damage to the rear
window defroster grid.
CAUTION
Page 567 of 571
8-6
Specifications & Consumer information
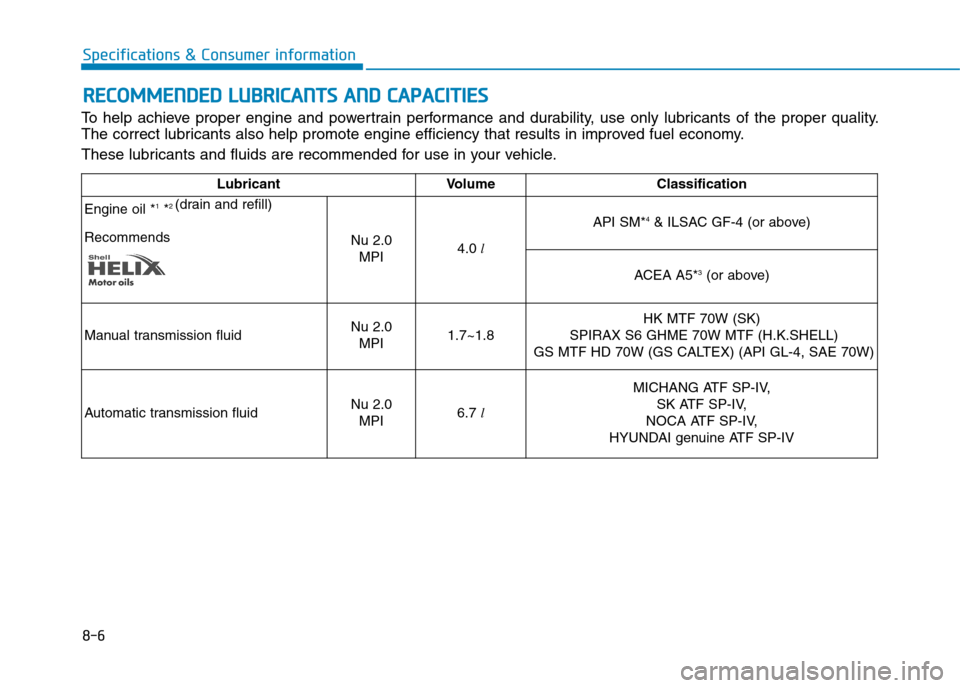
RREECCOOMMMMEENNDDEEDD LLUUBBRRIICCAANNTTSS AANNDD CCAAPPAACCIITTIIEESS
To h e l p a c h i e v e p r o p e r e n g i n e a n d p o w e r t r a i n p e r f o r m a n c e a n d d u r a b i l i t y, u s e o n l y l u b r i c a n t s o f t h e p r o p e r q u a l i t y.
The correct lubricants also help promote engine efficiency that results in improved fuel economy.
These lubricants and fluids are recommended for use in your vehicle.
Lubricant Volume Classification
Engine oil *1*2(drain and refill)
RecommendsNu 2.0
MPI4.0l
API SM*4& ILSAC GF-4 (or above)
ACEA A5*3(or above)
Manual transmission fluidNu 2.0
MPI1.7~1.8
HK MTF 70W (SK)
SPIRAX S6 GHME 70W MTF (H.K.SHELL)
GS MTF HD 70W (GS CALTEX) (API GL-4, SAE 70W)
Automatic transmission fluidNu 2.0
MPI6.7 l
MICHANG ATF SP-IV,
SK ATF SP-IV,
NOCA ATF SP-IV,
HYUNDAI genuine ATF SP-IV