Page 476 of 571

7-6
Maintenance
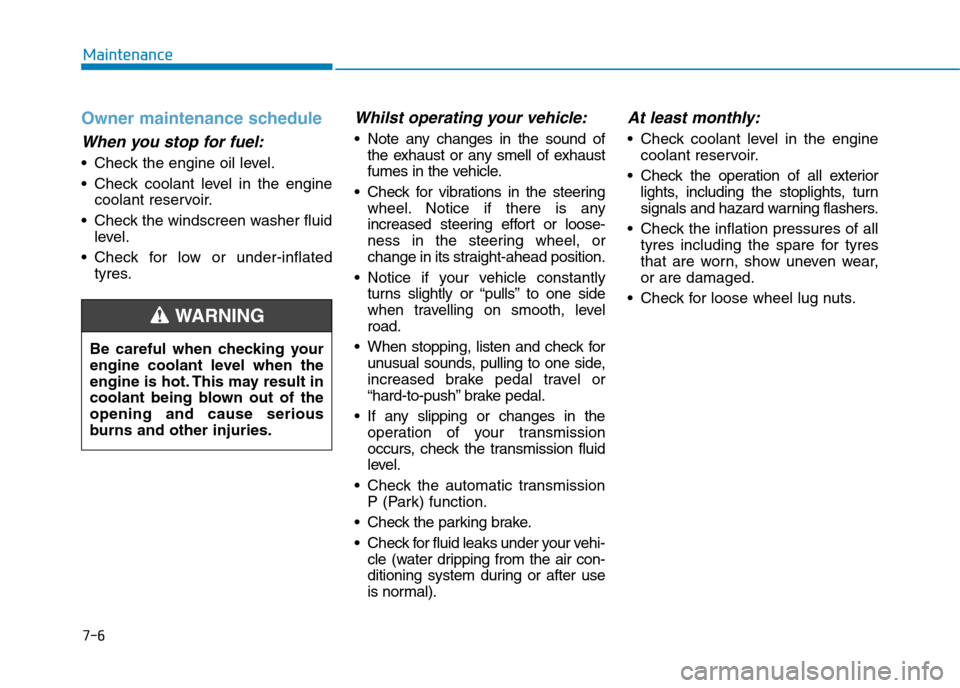
Owner maintenance schedule
When you stop for fuel:
•Check the engine oil level.
•Check coolant level in the engine
coolant reservoir.
•Check the windscreen washer fluid
level.
•Check for low or under-inflated
tyres.
Whilst operating your vehicle:
•Note any changes in the sound of
the exhaust or any smell of exhaust
fumes in the vehicle.
•Check for vibrations in the steering
wheel. Notice if there is any
increased steering effort or loose-
ness in the steering wheel, or
change in its straight-ahead position.
•Notice if your vehicle constantly
turns slightly or “pulls” to one side
when travelling on smooth, level
road.
•When stopping, listen and check for
unusual sounds, pulling to one side,
increased brake pedal travel or
“hard-to-push” brake pedal.
•If any slipping or changes in the
operation of your transmission
occurs, check the transmission fluid
level.
•Check the automatic transmission
P (Park) function.
•Check the parking brake.
•Check for fluid leaks under your vehi-
cle (water dripping from the air con-
ditioning system during or after use
is normal).
At least monthly:
•Check coolant level in the engine
coolant reservoir.
•Check the operation of all exterior
lights, including the stoplights, turn
signals and hazard warning flashers.
•Check the inflation pressures of all
tyres including the spare for tyres
that are worn, show uneven wear,
or are damaged.
•Check for loose wheel lug nuts.
Be careful when checking your
engine coolant level when the
engine is hot. This may result in
coolant being blown out of the
opening and cause serious
burns and other injuries.
WA R N I N G
Page 479 of 571
7-9
7
MaintenanceI:Inspect and if necessary, adjust, correct, clean or replace.
R:Replace or change.
*1:Adjust alternator and power steering (and water pump drive belt) and air conditioner drive belt (if equipped).
Inspect and if necessary correct or replace.
*2:Check the engine oil level and for leaks every 500 km or before starting a long trip.
*3:If good quality petrols meet Europe Fuel standards (EN228) or equivalents including fuel additives is not available, one bottle
of additive is recommended. Additives are available from your authorised HYUNDAI dealer along with information on how to
use them. Do not mix other additives.
Number of months or driving distance, whichever comes first
Months1224364860728496
Km×1,000153045607590105120
Drive belts *1IIII
Engine oil and engine oil filter *2RRRRRRRR
Air cleaner filterIIRIIRII
Fuel additives *3Add every 15,000 km or 12 months
MAINTENANCE
INTERVALS
MAINTENANCE
ITEM
Normal Maintenance Schedule
Page 483 of 571

7-13
7
Maintenance
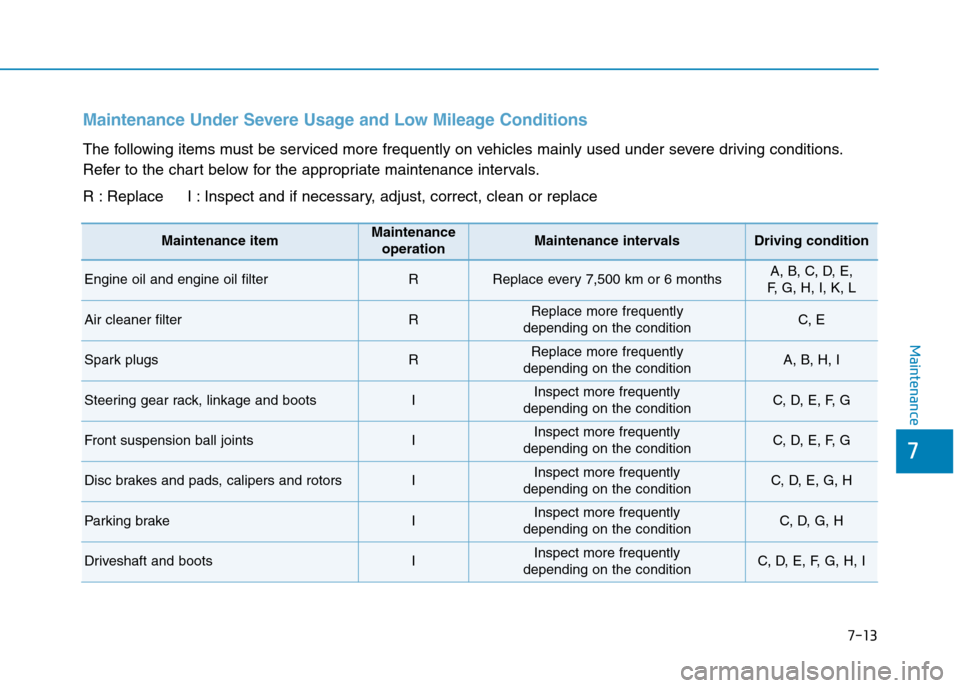
Maintenance Under Severe Usage and Low Mileage Conditions
The following items must be serviced more frequently on vehicles mainly used under severe driving conditions.
Refer to the chart below for the appropriate maintenance intervals.
R : Replace I : Inspect and if necessary, adjust, correct, clean or replace
Maintenance itemMaintenance
operationMaintenance intervalsDriving condition
Engine oil and engine oil filterRReplace every 7,500 km or 6 monthsA, B, C, D, E,
F, G , H , I , K , L
Air cleaner filterRReplace more frequently
depending on the conditionC, E
Spark plugs RReplace more frequently
depending on the conditionA, B, H, I
Steering gear rack, linkage and bootsIInspect more frequently
depending on the conditionC, D, E, F, G
Front suspension ball jointsIInspect more frequently
depending on the conditionC, D, E, F, G
Disc brakes and pads, calipers and rotorsIInspect more frequently
depending on the conditionC, D, E, G, H
Par king brakeIInspect more frequently
depending on the conditionC, D, G, H
Driveshaft and bootsIInspect more frequently
depending on the conditionC, D, E, F, G, H, I
Page 485 of 571

7-15
7
Maintenance
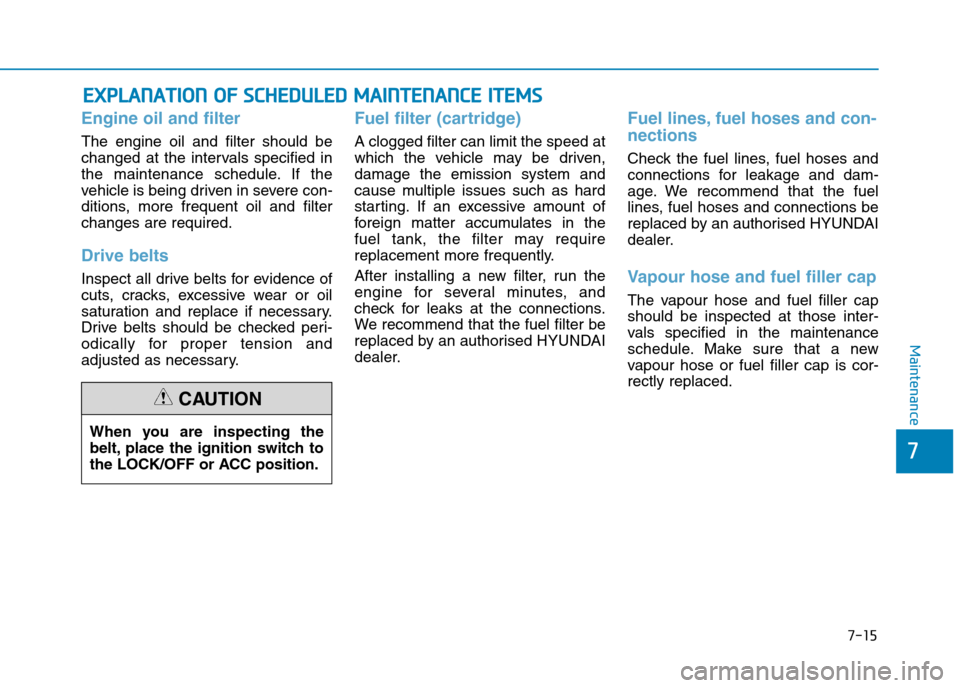
EEXXPPLLAANNAATTIIOONN OOFF SSCCHHEEDDUULLEEDD MMAAIINNTTEENNAANNCCEE IITTEEMMSS
Engine oil and filter
The engine oil and filter should be
changed at the intervals specified in
the maintenance schedule. If the
vehicle is being driven in severe con-
ditions, more frequent oil and filter
changes are required.
Drive belts
Inspect all drive belts for evidence of
cuts, cracks, excessive wear or oil
saturation and replace if necessary.
Drive belts should be checked peri-
odically for proper tension and
adjusted as necessary.
Fuel filter (cartridge)
A clogged filter can limit the speed at
which the vehicle may be driven,
damage the emission system and
cause multiple issues such as hard
starting. If an excessive amount of
foreign matter accumulates in the
fuel tank, the filter may require
replacement more frequently.
After installing a new filter, run the
engine for several minutes, and
check for leaks at the connections.
We recommend that the fuel filter be
replaced by an authorised HYUNDAI
dealer.
Fuel lines, fuel hoses and con-
nections
Check the fuel lines, fuel hoses and
connections for leakage and dam-
age. We recommend that the fuel
lines, fuel hoses and connections be
replaced by an authorised HYUNDAI
dealer.
Va p o u r h o s e a n d f u e l f i l l e r c a p
The vapour hose and fuel filler cap
should be inspected at those inter-
vals specified in the maintenance
schedule. Make sure that a new
vapour hose or fuel filler cap is cor-
rectly replaced.
When you are inspecting the
belt, place the ignition switch to
the LOCK/OFF or ACC position.
CAUTION
Page 489 of 571
7-19
7
Maintenance
EENNGGIINNEE OOIILL
Checking the engine oil level
1. Be sure the vehicle is on level
ground.
2. Start the engine and allow it to
reach normal operating tempera-
ture.
3. Turn the engine off and wait for a
few minutes (about 5 minutes) for
the oil to return to the oil pan.
4. Pull the dipstick out, wipe it clean,
and re-insert it fully.
5. Pull the dipstick out again and
check the level. The level should
be between F and L.
•Do not overfill the engine oil.It
may damage the engine.
•Do not spill engine oil, when
adding or changing engine oil. If
you drop the engine oil on the
engine compartment, wipe it off
immediately.
•When you wipe the oil level
gauge, you should wipe it with a
clean cloth. When mixed with
debris, it can cause engine dam-
age.
NOTICE
Radiator hose
Be very careful not to touch the
radiator hose when checking or
adding the engine oil as it may
be hot enough to burn you.
WA R N I N G
OAD075062L
Page 490 of 571
7-20
Maintenance
If it is near or at L, add enough oil to
bring the level to F.Do not overfill.
Use a funnel to help prevent oil
from being spilled on engine com-
ponents.
Use only the specified engine oil.
(Refer to “Recommended lubricants
and capacities” in Chapter 8.)
Checking the engine oil and
filter
We recommend that the engine oil
and filter be replaced by an autho-
rised HYUNDAI dealer.
Used engine oil may cause irri-
tation or cancer of the skin if
left in contact with the skin for
prolonged periods of time. Used
engine oil contains chemicals
that have caused cancer in lab-
oratory animals. Always protect
your skin by washing your
hands thoroughly with soap
and warm water as soon as pos-
sible after handling used oil.
WA R N I N G
OAD075063L
Page 495 of 571
7-25
7
Maintenance
Do not allow brake/clutch fluid to
contact the vehicle's body paint,
as paint damage will result.
Brake/clutch fluid, which has been
exposed to open air for an extend-
ed time should never be used as
its quality cannot be guaranteed. It
should be disposed of properly.
Don't put in the wrong kind of
fluid.
A few drops of mineral-based oil,
such as engine oil, in your
brake/clutch system can damage
brake/clutch system parts.
NOTICE
When changing and adding
brake/clutch fluid, handle it
carefully. Do not let it come in
contact with your eyes. If brake/
clutch fluid should come in con-
tact with your eyes, immediately
flush them with a large quantity
of fresh tap water. Have your
eyes examined by a doctor as
soon as possible.
WA R N I N G
Page 498 of 571
7-28
Maintenance
AAIIRR CCLLEEAANNEERR
Filter replacement
The air cleaner filter can be cleaned
for inspection using compressed air.
Do not attempt to wash or to rinse it,
as water will damage the filter.
If soiled, the air cleaner filter must be
replaced.
1. Loosen the air cleaner cover
attaching clips and open the cover.
2. Wipe the inside of the air cleaner.
3. Replace the air cleaner filter.
4. Lock the cover with the cover
attaching clips.
OAD075015OAD075016
OAD075014