Page 17 of 85

INSTRUMENT PANEL
26 || 27
I
NSTRUMENT PANEL
INSTRUMENT PANEL
Learn about the indicators and displays related to driving the vehicle.
Indicators briefly appear with each engine start and then go out. Red \
and amber indicators are most critical. Blue and green indicators are used for gen\
eral information.
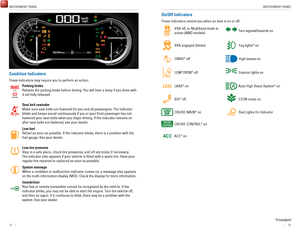
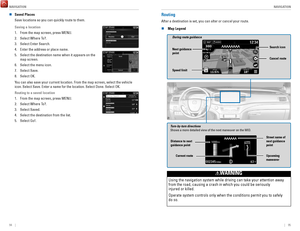
Malfunction Indicators
These are the most critical indicators. If they come on and stay lit whi\
le driving or at any other time, there may be a problem. See your dealer if necessary.
Ca nada
U.S.
Brake system
The brake fluid is low, or the brake system has a problem. Press the brake pedal lightly to check pedal pressure. If normal, check the brake flui\
d level when you stop. If abnormal, take immediate action. If necessary, downshift
the transmission to slow the vehicle using engine braking. Have your vehicle
repaired immediately.
Low oil pressure
Engine oil pressure is low. Stop in a safe place. Open the hood. Check the oil level, and add oil if necessary (see page 143). If the indicator does not turn off,
have your vehicle repaired immediately.
Charging system
The battery is not charging. Turn off all electrical items, but do not turn off the vehicle to prevent further battery discharge. Have your vehicle repa\
ired
immediately.
Supplemental Restraint System (SRS)
There is a problem with one of the airbag systems or seat belt tensioner\
s.
Smart Entry system*
There is a problem with the smart entry system.
*if equipped
Lane Keeping Assist System (LKAS)*
There is a problem with the system.
Malfunction indicator lamp (check engine light)
The emissions control system may have a problem. Avoid high speeds. Have your vehicle repaired immediately. If the indicator blinks, a misfire in the
engine’s cylinders is detected. Stop in a safe place, and wait for the engine to
cool down.
Anti-lock Brake System (ABS)
There is a problem with the anti-lock brake system. Your vehicle still has normal braking ability, but no anti-lock function.
Tire Pressure Monitoring System (TPMS)*
There is a problem with the tire pressure monitoring system, or the vehi\
cle is fitted with a spare tire.
Vehicle Stability Assist (VSA) system
There is a problem with the VSA or hill start assist system.
Canada U.S.
SYSTEMBrake system
There is a problem with one of the braking systems.
Collision Mitigation Braking System (CMBS)*
There is a problem with the system, the temperature is too high, or the \
camera or sensor is blocked.
Lane Departure Warning (LDW)*/Road Departure Mitigation (RDM)*
There is a problem with the system, the temperature is too high, or the \
camera is blocked.
Blind spot information (BSI)*
There is a problem with the system, or the radar is blocked.
Electric power steering
There is a problem with the system. Stop the vehicle in a safe place, an\
d restart the engine.
All-Wheel Drive (AWD)*
There is a problem with the system. If the indicator blinks, the differe\
ntial temperature is too high. Stop in a safe place, and let the engine idle u\
ntil the
indicator goes off.
Adaptive Cruise Control (ACC)*
There is a problem with the system.
*if equipped
Page 18 of 85

INSTRUMENT PANEL
28 || 29
I
NSTRUMENT PANEL
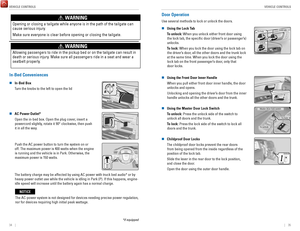
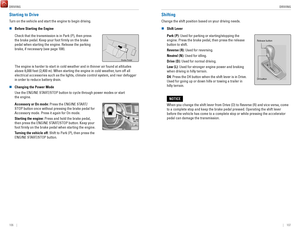
Condition Indicators
These indicators may require you to perform an action.
Ca
nada
U.S.
Parking brake
Release the parking brake before driving. You will hear a beep if you drive with
it not fully released.
Seat belt reminder
Make sure seat belts are fastened for you and all passengers. The indicator blinks and beeps sound continuously if you or your front passenger has not fastened your seat belts when you begin driving. If the indicator remain\
s on
after seat belts are fastened, see your dealer.
Low fuel
Refuel as soon as possible. If the indicator blinks, there is a problem \
with the fuel gauge. See your dealer.
Low tire pressure
Stop in a safe place, check tire pressures, and infl ate tire(s) if \
necessary.
The indicator also appears if your vehicle is fitted with a spare tire\
. Have your regular tire repaired or replaced as soon as possible.
System message When a condition or malfunction indicator comes on, a message also appea\
rs
on the multi-information display (MID). Check the display for more inf\
ormation.
Immobilizer
Your key or remote transmitter cannot be recognized by the vehicle. If th\
e indicator blinks, you may not be able to start the engine. Turn the vehicle off,
and then on again. If it continues to blink, there may be a problem with\
the system. See your dealer.
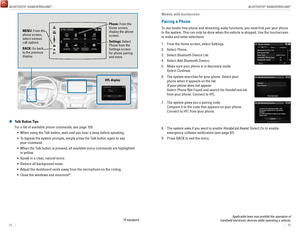
On/Off Indicators
These indicators remind you when an item is on or off.
VSA off, or Mud/Sand mode is
active (AWD models)Turn signals/hazards on
VSA engaged (blinks)Fog lights* on
CMBS* offHigh beams on
LDW*/RDM* offExterior lights on
LKAS* onAuto High Beam System* on
BSI* offECON mode on
CRUISE MAIN* onBed Lights On Indicator
CRUISE CONTROL* on
ACC* on
*if equipped
Page 19 of 85

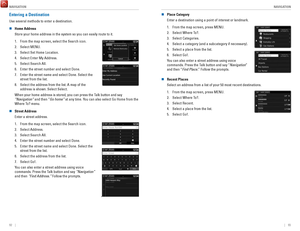
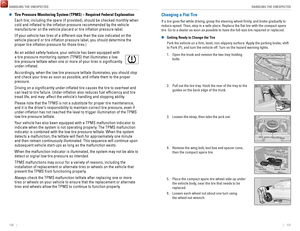
Consists of several displays that provide you with useful information.
RESET button
Info (/) buttons
Main displa")
INSTRUMENT PANEL
30 || 31
V
EHICLE CONTROLS
Multi-Information Display (MID)
Consists of several displays that provide you with useful information.
RESET button
Info (/) buttons
Main display (also
shows odometer, gear
position, and outside
temperature)
Press the Info (/) buttons on the steering wheel to change displays. Press the
RESET button to enter menu selections when applicable.
Main display
Engine oil life Tire pressures Compass*
Turn-by-turn directions*
Distance, average fuel
economy, range, instant
fuel economy (Trip A)
Distance, average fuel
economy, range, instant
fuel economy (Trip B)
VEHICLE CONTROLS
Learn about the controls used for operating and driving the vehicle.
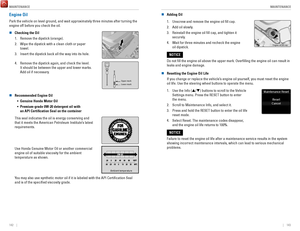
Using the Remote Transmitter
Lock or unlock the doors and trunk.
Models with remote engine start
Lock button: Press to
lock the doors and trunk.
Press again for audible
verification.
Engine button*: Press the
lock button, then press
and hold this button to
remotely start the engine
(see page 105). Unlock button: Press once to
unlock the driver’s door.
Press again to unlock all doors
and the trunk.
Panic button: Press to sound
the alarm for 30 seconds.
Press again to cancel.
Models without remote engine start
Lock button: Press to lock
the doors and tailgate.
Press again for audible
verification.
Unlock button: Press once to
unlock the driver’s door.
Press again to unlock all doors
and the tailgate.
Leaving the key or remote transmitter in the vehicle can result in theft\
or accidental
movement of the vehicle. Always take it with you whenever you leave the vehicle
unattended.
NOTICE
*if equipped
Panic button: Press to sound
the alarm for 30 seconds.
Press again to cancel.
Page 20 of 85
 and it is
outside the vehicle and within range (about")
VEHICLE CONTROLS
32 || 33
V
EHICLE CONTROLS
Smart Entry System
When you carry the remote transmitter (for example, in a pocket or purs\
e) and it is
outside the vehicle and within range (about 32 inches or 80 cm), you c\
an lock or unlock the doors and trunk without handling the transmitter.
n
Unlocking / Locking the Doors and Trunk To unlock: Grab the driver’s door handle when the vehicle is off to unlock the driver’
s door. Grab the front
passenger’s door handle to unlock all the doors and the trunk. You can customize this feature’s behavior
(see page 54).
To lock: Press the door lock button on either front door handle. If the remote transmitter is inside the vehicle, neither the doors nor trunk will lock.Door Lock Button
n Walk Away Auto Lock
When you walk away from the vehicle while carrying the remote transmitter, the
doors and trunk can automatically lock if the following conditions are m\
et:
•
The remote transmitter is within a range of 6 feet (2 m).
•
All doors and the trunk are closed.
•
There is not an additional remote transmitter inside the vehicle.
When you are within the range, the system is activated and a beep sounds\
.
When you go outside the range, the lights flash and a beep sounds agai\
n.
The doors and trunk automatically lock.
To turn on this feature, follow the steps below:
1.
From the HOME screen, select Settings.
2.
Select Vehicle.
3.
Select Keyless Access Setup.
4.
Select Walk Away Auto Lock.
5.
Select Enable.
Tailgate and Trunk Operation
To drop open the tailgate, pull up in the upper handle. Support the tailgate until it is fully open.Upper handle
To swing open the tailgate, pull up on the lower handle.
Lower handl e
To open the trunk, unlock the doors, then pull up on the
trunk release button. Trunk Release Button
Or, insert the key into the trunk lock cylinder.
The main switch in the glove box disables the trunk release button.
ON
OF F
Main Switch
*if equipped
Page 21 of 85

VEHICLE CONTROLS
34 || 35
V
EHICLE CONTROLS
WARNING
Opening or closing a tailgate while anyone is in the path of the tailgat\
e can
cause serious injury.
Make sure everyone is clear before opening or closing the tailgate.
WARNING
Allowing passengers to ride in the pickup bed or on the tailgate can res\
ult in
death or serious injury. Make sure all passengers ride in a seat and wear a
seatbelt properly.
In-Bed Conveniences
n In-Bed Box
Turn the knobs to the left to open the lid
Knob
n AC Power Outlet* Open the in-bed box. Open the plug cover, insert a powercord slightly, rotate it 90° clockwise, then push
it in all the way.
Push the AC power button to turn the system on or off. The maximum power is 400 watts when the engine is running and the vehicle is in Park. Otherwise, the maximum power is 150 watts.
The battery charge may be affected by using AC power with truck bed audi\
o* or by heavy power outlet use while the vehicle is idling in Park (P). If thi\
s happens, engine-
idle speed will increase until the battery again has a normal charge.
Door Operation
Use several methods to lock or unlock the doors.
n
Using the Lock Tab To unlock: When you unlock either front door using the lock tab, the specific door (driver’s or passenger’
s)
unlocks.
To lock: When you lock the door using the lock tab on the driver’s door, all the other doors and the trunk lock
at the same time. When you lock the door using the lock tab on the front passenger’s door, only that
door locks.
Lo ck tab
To lock
To unlock
n Using the Front Door Inner Handle When you pull either front door inner handle, the door
unlocks and opens.
Unlocking and opening the driver’s door from the inner handle unlocks all the other doors and the trunk.
n Using the Master Door Lock Switch
To unlock: Press the unlock side of the switch to unlock all doors and the trunk.
To lock: Press the lock side of the switch to lock all doors and the trunk.Master door lock switch
To lock
To unlock
n Childproof Door Locks
The childproof door locks prevent the rear doors from being opened from the inside regardless of the
position of the lock tab.
Slide the lever in the rear door to the lock position,
and close the door.
Open the door using the outer door handle.
Lock Unlock
*if equipped
The AC-power system is not designed for devices needing precise power re\
gulation,
nor for devices requiring high initial peak wattage.
NOTICE
Page 22 of 85

VEHICLE CONTROLS
36 || 37
V
EHICLE CONTROLS
Power Window Operation
The power windows can be opened and closed when the vehicle is on by usi\
ng the
switches on the doors. The switches on the driver’s side can be used to open and close
all the windows.
n
Automatic OperationTo open: Push the switch down firmly.
To close:
Pull the switch up firmly.
The window opens or closes completely. To stop the window at any time, push or pull the switch again
briefly.
n
Manual Operation To open: Push the switch down lightly.
To close:
Pull the switch up lightly.
Release the switch when the windows reach the
desired position.
Off
Power window
lock button
Driver’s
window
switch Front passenger’s
window switch On
Rear window
switches
n Power Window Lock Push in the power window lock button so only the driver’s window can be operated. An indicator
appears in the button when window lock is on.
n
Back Window* To open: Push the switch back.
To close: Pull the switch forward.
Open
Close
WARNING
Closing a power window on someone’s hands or fingers can cause
serious injury.
Make sure your passengers are away from the windows before
closing them.
*if equipped
Power Moonroof Operation*
The moonroof can be opened and closed when the vehicle is on by using th\
e switch on the ceiling.
n
Automatic Operation To open: Push the switch back firmly to the second detent, then release.
To close: Push the switch forward firmly to the second detent, then release.
The moonroof opens or closes completely
. To stop the moonroof at any time, push
the switch briefly.
n
Manual Operation To open: Push and hold the switch back lightly to the first detent until the desired position is reached.
To close: Push and hold the switch forward lightly to the first detent until the desired position is reached.
Open
Close Tilt
n Moonroof Tilt
To tilt: Push the center of the switch.
To close:
Push the switch forward firmly, then release.
WARNING
Closing the moonroof on someone’s hands or fingers can cause
serious injury.
Make sure your passengers are away from the moonroof before closing it.
Opening the moonroof in below freezing temperatures or when it is covere\
d with
snow or ice can damage the moonroof panel or motor.
NOTICE
*if equipped
Page 23 of 85

VEHICLE CONTROLS
38 || 39
V
EHICLE CONTROLS
Interior and Exterior Lights
Operate interior and exterior lights when the vehicle is on or off.
n
Brightness Control
Adjust instrument panel brightness when the vehicle is on.
To brighten: Press the + button.
To dim: Press the - button.
A beep sounds when the brightness reaches minimum or maximum.+ button
-button
n Interior Lights Change the interior light settings using the switch on the ceiling.
ON position: Interior lights remain on. Door-activated position: Interior lights come on when
any of the doors are opened, the driver’s door is unlocked, or the vehicle is turned off.
OFF position:
Interior lights remain off.Models without moonroof
Door-activated position
Off
On
Models with
moonroof
Door-activated position
Off On
n Map Lights
Press the front map lights to turn on or off.
There are also map lights on the ceiling for the rear seats. Turn them on or off when the front interior light
switch is in the door-activated position.Models without
moonroof
Models with
moonroof
n Bed Lights
Press the button to turn the bed lights on or off. The vehicle must be in Park.
The lights come on automatically when the tailgate is swung open or the trunk is opened.
n Exterior Lights
Rotate the switches on the headlight lever to operate the exterior light\
s. Push the lever forward to turn on the high beams. Return the lever to its origina\
l position for low beams.
OFF: All exterior lights are off.
: Turn on exterior lights except headlights.
AUTO: Turn on the automatic lighting feature. Headlights turn on or off depending on ambient brightness when the vehicle is on. Headlights
automatically come on after the wipers are engaged for a certain time.
: Turn on all exterior lights including headlights.
: Turn fog lights* on or off.
High beams
Low beams Flash high
beams
Fog lights*
One-Touch Turn Signal
Use this quick and convenient method to signal a lane change.
Lightly push the turn signal lever up or down for
a three-blink sequence.
For a continuous signal, push the lever up or down until it locks into place.
Right turn
Left turn
*if equipped
Page 24 of 85

VEHICLE CONTROLS
40 || 41
V
EHICLE CONTROLS
Auto High Beam System*
Automatically changes the low beam headlights to high beam headlights wh\
en
necessary.
n
How It Works When you are driving at night above 25 mph (40 km/h) and the headlight\
lever is
in the low beam position with the switch rotated to AUTO, the system cha\
nges
between low and high beams depending on the brightness of the vehicle li\
ghts
ahead of you.
15-degrees
If a vehicle is detected ahead of you, the headlights stay in low beams.\
If the system does not detect any vehicles ahead of you, the headlights change to high\
beams.
Certain conditions, such as weather and brightness of other vehicles’\
lights, can
affect system operation.
n
Turning the System On or Off Make sure the headlight lever is in the low beam position with the switch rotated to the AUTO position.
The auto high beam system indicator comes on.
To disable the system: Pull and hold the headlight lever toward you for about 40 seconds, until the indicator
flashes twice.
To enable the system:
Pull and hold the headlight lever
toward you for about 30 seconds, until the indicator
flashes once.
Headlight
switch
To temporarily cancel operation, do either of the following:
•
Flash the high beams by moving the lever toward you. Flash the high beams
again to resume auto high beam operation.
•
Engage high beams by moving the lever into the high beam position. Retur\
n the
lever to the low beam position to resume auto high beam operation.
*if equipped
*if equipped
Wiper Operation
The windshield wipers and washers can be used when the vehicle is on.
n
Front Wipers
Move the wiper lever up or down to the desired position.
Pull toward
you to use
washer.
MIST
OFF
INT* / AUTO*
LO: Low speed wipe
HI: High speed wipe
n Headlight-Wiper Integration
When the headlights are in the AUTO position, they automatically turn on\
when the
front wipers operate several times within a certain interval. The headli\
ghts turn off
shortly after the wipers are turned off, or if there is enough ambient l\
ight.
n
Intermittent (INT) Wipers*
When you move the lever to the INT position, the
wipers operate based on the delay adjustment.
Rotate the adjustment ring to adjust the wiper delay.
Rotate the
adjustment ring.
Long delay
Short delay
INT position