2017 HONDA RIDGELINE reset
[x] Cancel search: resetPage 5 of 85

VISUAL INDEX
2 || 3
V
ISUAL INDEX
Dashboard and Nearby Controls
u v w x y z
uVehicle Stability Assist (VSA®) OFF
button p. 110
Parking sensor system button* p. 118
Collision Mitigation Braking System
(CMBS) OFF button* p. 117
Road Departure Mitigation (RDM)
button* p. 116
Heated windshield button* p. 52
AC power outlet button* p. 34
Bed light button p. 39
vAudio controls p. 56
wHeated steering wheel button* p. 52
xVoice recognition button p. 80, p. 90
Phone/Back buttons p. 80
yHorn
zINFO/RESET buttons p. 30
Lane Keeping Assist System (LKAS)*
button p. 115
Cruise control* p. 111
Adaptive Cruise Control (ACC)* p. 112
}ENGINE START/STOP button p. 106
uPower window switches p. 36
Door lock switches p. 35
vDriving Position Memory System* p. 47
wFuel fill door button p. 123
xColor audio system* p. 60
Touchscreen* p. 65
Navigation system* p. 90
ySeat heater/ventilation buttons* p. 53
zClimate control system p. 51
Hood release handle p. 140
Parking brake p. 108
}Shifter p. 107
Intelligent Traction Management
button p. 109
~USB port p. 56
Accessory power socket p. 57
AUX input (in console) p. 57
u v w x y z
} ~
*if equipped *if equipped
}
Page 19 of 85

INSTRUMENT PANEL
30 || 31
V
EHICLE CONTROLS
Multi-Information Display (MID)
Consists of several displays that provide you with useful information.
RESET button
Info (/) buttons
Main display (also
shows odometer, gear
position, and outside
temperature)
Press the Info (/) buttons on the steering wheel to change displays. Press the
RESET button to enter menu selections when applicable.
Main display
Engine oil life Tire pressures Compass*
Turn-by-turn directions*
Distance, average fuel
economy, range, instant
fuel economy (Trip A)
Distance, average fuel
economy, range, instant
fuel economy (Trip B)
VEHICLE CONTROLS
Learn about the controls used for operating and driving the vehicle.
Using the Remote Transmitter
Lock or unlock the doors and trunk.
Models with remote engine start
Lock button: Press to
lock the doors and trunk.
Press again for audible
verification.
Engine button*: Press the
lock button, then press
and hold this button to
remotely start the engine
(see page 105). Unlock button: Press once to
unlock the driver’s door.
Press again to unlock all doors
and the trunk.
Panic button: Press to sound
the alarm for 30 seconds.
Press again to cancel.
Models without remote engine start
Lock button: Press to lock
the doors and tailgate.
Press again for audible
verification.
Unlock button: Press once to
unlock the driver’s door.
Press again to unlock all doors
and the tailgate.
Leaving the key or remote transmitter in the vehicle can result in theft\
or accidental
movement of the vehicle. Always take it with you whenever you leave the vehicle
unattended.
NOTICE
*if equipped
Panic button: Press to sound
the alarm for 30 seconds.
Press again to cancel.
Page 33 of 85

AUDIO AND CONNECTIVITY
58 || 59
A
UDIO AND CONNECTIVITY
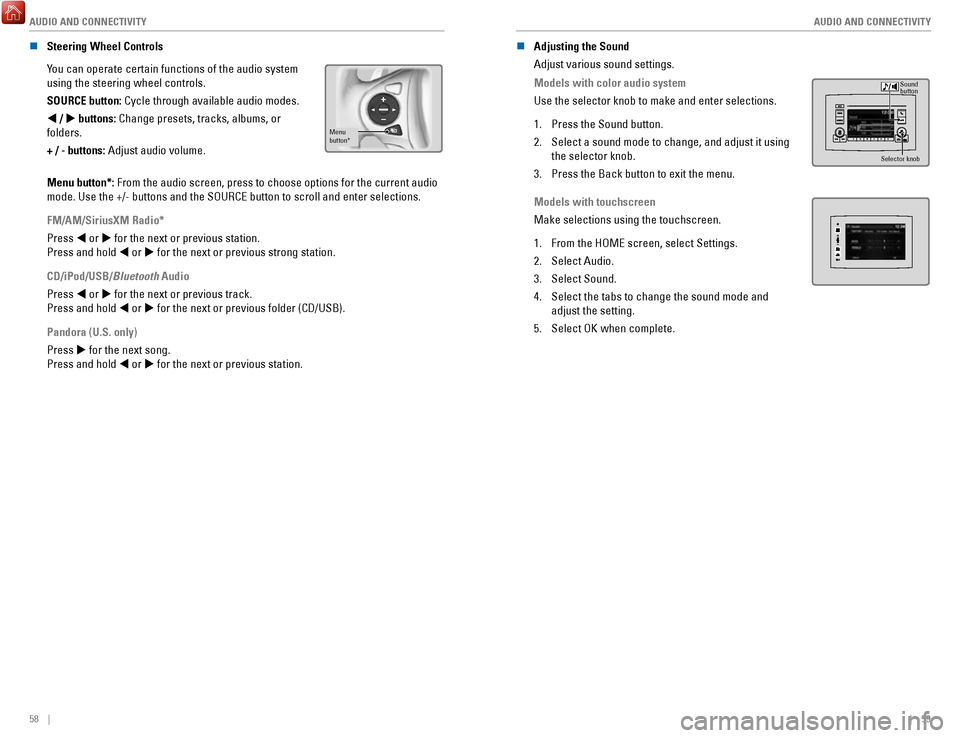
n Steering Wheel Controls
You can operate certain functions of the audio system
using the steering wheel controls.
SOURCE button: Cycle through available audio modes.
t / u
buttons: Change presets, tracks, albums, or
folders.
+ / - buttons: Adjust audio volume.
Menu
button*
Menu button*: From the audio screen, press to choose options for the current audio
mode. Use the +/- buttons and the SOURCE button to scroll and enter sele\
ctions.
FM/AM/SiriusXM Radio*
Press t or u for the next or previous station.
Press and hold t or u for the next or previous strong station.
CD/iPod/USB/Bluetooth Audio
Press t or u for the next or previous track.
Press and hold t or u for the next or previous folder (CD/USB).
Pandora (U.S. only)
Press u for the next song.
Press and hold t or u for the next or previous station. n
Adjusting the Sound
Adjust various sound settings.
Models with color audio system
Use the selector knob to make and enter selections.
1.
Press the Sound button.
2.
Select a sound mode to change, and adjust it using
the selector knob.
3.
Press the Back button to exit the menu.
Sound
button
Selector knob
Models with touchscreen
Make selections using the touchscreen.
1.
From the HOME screen, select Settings.
2.
Select Audio.
3.
Select Sound.
4.
Select the tabs to change the sound mode and
adjust the setting.
5.
Select OK when complete.
Page 34 of 85

AUDIO AND CONNECTIVITY
60 || 61
A
UDIO AND CONNECTIVITY
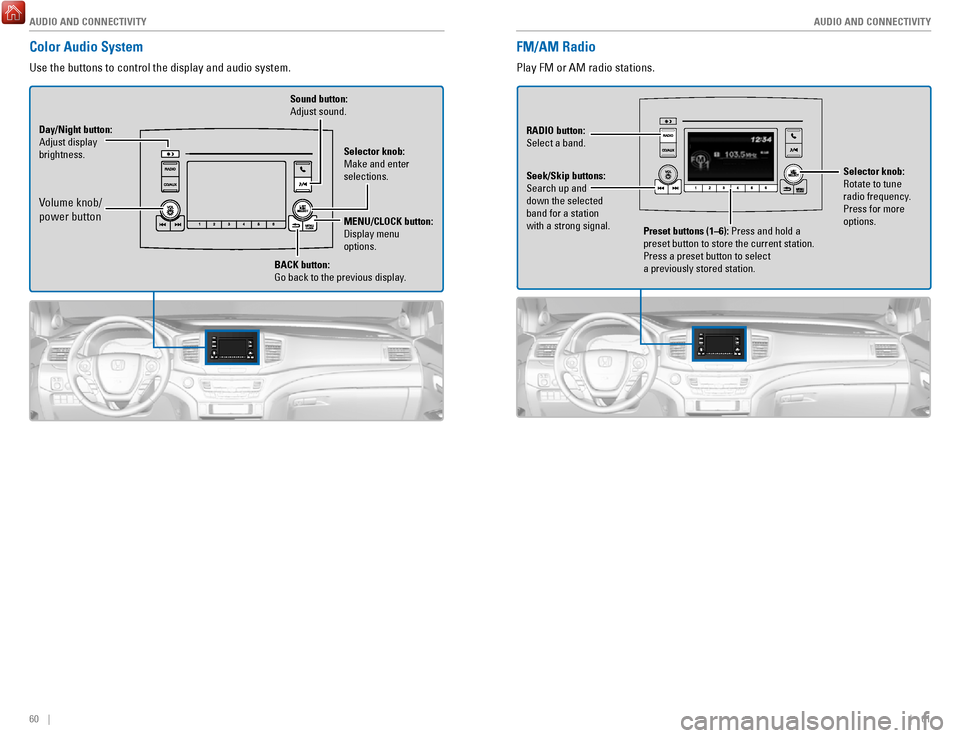
FM/AM Radio
Play FM or AM radio stations.
Preset buttons (1–6): Press and hold a
preset button to store the current station.
Press a preset button to select
a previously stored station.
RADIO
button:
Select a band.
Seek/Skip buttons:
Search up and
down the selected
band for a station
with a strong signal. Selector knob:
Rotate to tune
radio frequency
.
Press for more
options.
Color Audio System
Use the buttons to control the display and audio system.
Selector knob:
Make and enter
selections.
Volume knob/
power button
MENU/CLOCK button:
Display menu
options.
BACK
button:
Go back to the previous display.
Day/Night
button:
Adjust display
brightness. Sound button:
Adjust sound.
Page 36 of 85

AUDIO AND CONNECTIVITY
64 || 65
A
UDIO AND CONNECTIVITY
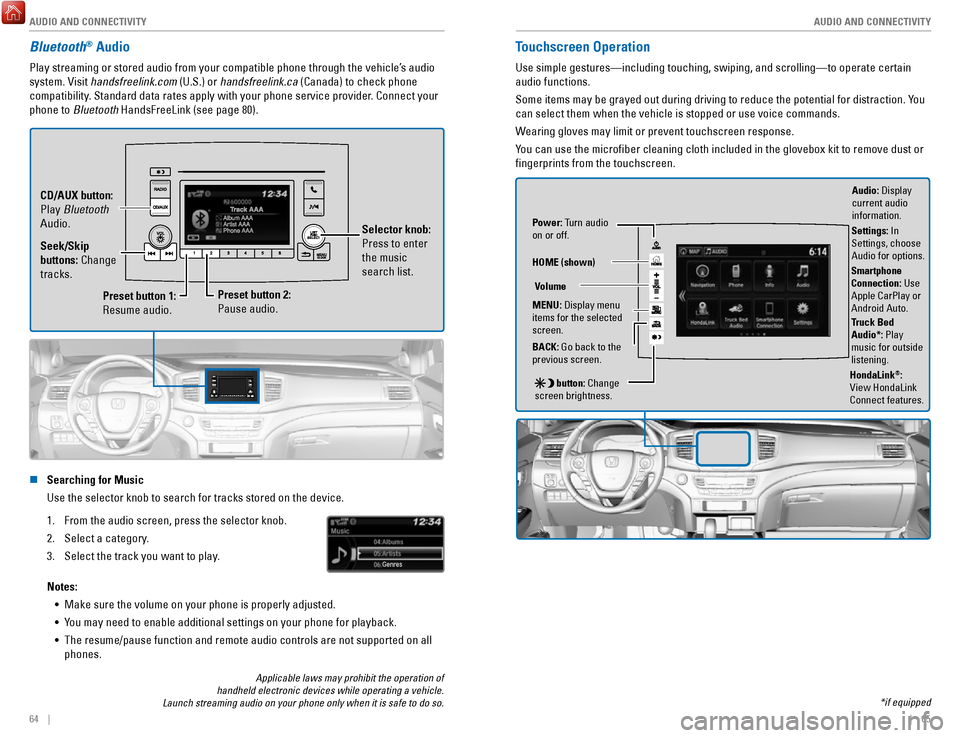
Bluetooth® Audio
Play streaming or stored audio from your compatible phone through the ve\
hicle’s audio
system. Visit handsfreelink.com (U.S.) or handsfreelink.ca (Canada) to check phone
compatibility. Standard data rates apply with your phone service provider. Connect your
phone to Bluetooth HandsFreeLink (see page 80).
Preset button 1:
Resume audio.
Preset button 2:
Pause audio. Selector knob:
Press to enter
the music
search list.
Seek/Skip
buttons: Change
tracks. CD/AUX button:
Play Bluetooth
Audio.
n Searching for Music
Use the selector knob to search for tracks stored on the device.
1.
From the audio screen, press the selector knob.
2.
Select a category.
3.
Select the track you want to play.
Notes: •
Make sure the volume on your phone is properly adjusted.
•
You may need to enable additional settings on your phone for playback.
•
The resume/pause function and remote audio controls are not supported on\
all
phones.
Touchscreen Operation
Use simple gestures—including touching, swiping, and scrolling—to \
operate certain
audio functions.
Some items may be grayed out during driving to reduce the potential for \
distraction. You
can select them when the vehicle is stopped or use voice commands.
Wearing gloves may limit or prevent touchscreen response.
You can use the microfiber cleaning cloth included in the glovebox kit \
to remove dust or
fingerprints from the touchscreen.
Power: Turn audio
on or off.
HOME (shown)
MENU: Display menu
items for the selected
screen.
BACK: Go back to the
previous screen.
button: Change
screen brightness. Settings: In
Settings, choose
Audio for options.
HondaLink®:
View HondaLink
Connect features.
Volume
Truck Bed
Audio*: Play
music for outside
listening.
Applicable laws may prohibit the operation of
handheld electronic devices while operating a vehicle.
Launch streaming audio on your phone only when it is safe to do so. *if equipped
Audio: Display
current audio
information.
Smartphone
Connection: Use
Apple CarPlay or
Android Auto.
Page 40 of 85

AUDIO AND CONNECTIVITY
72 || 73
A
UDIO AND CONNECTIVITY
*if equipped
Models with touchscreen
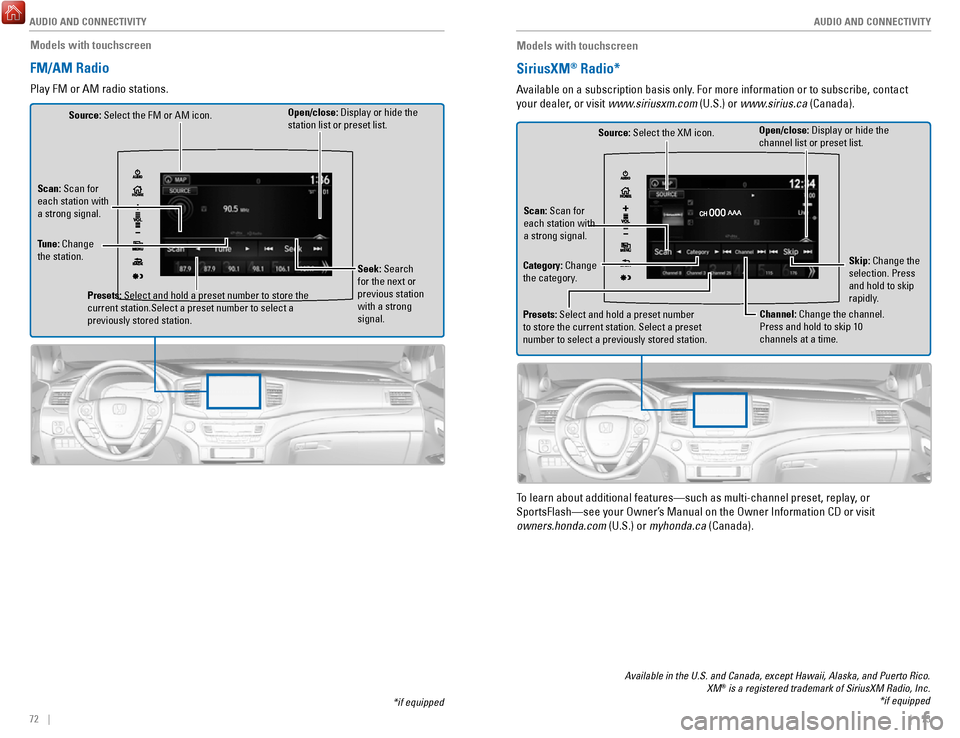
FM/AM Radio
Play FM or AM radio stations.
Source: Select the FM or AM icon.
Tune: Change
the station. Seek: Search
for the next or
previous station
with a strong
signal.
Open/close: Display or hide the
station list or preset list.
Scan: Scan for
each station with
a strong signal.
Presets: Select and hold a preset number to store the
current station.Select a preset number to select a
previously stored station.
Models with touchscreen
SiriusXM® Radio*
Available on a subscription basis only. For more information or to subscribe, contact
your dealer, or visit www.siriusxm.com (U.S.) or www.sirius.ca (Canada).
Open/close: Display or hide the
channel list or preset list.
Source: Select the XM icon.
Category: Change
the category. Channel: Change the channel.
Press and hold to skip 10
channels at a time.
Scan: Scan for
each station with
a strong signal.
Presets: Select and hold a preset number
to store the current station. Select a preset
number to select a previously stored station. Skip: Change the
selection. Press
and hold to skip
rapidly.
To learn about additional features—such as multi-channel preset, repla\
y, or
SportsFlash—see your Owner’s Manual on the Owner Information CD or visit
owners.honda.com (U.S.) or myhonda.ca (Canada).
Available in the U.S. and Canada, except Hawaii, Alaska, and Puerto Rico.\
XM® is a registered trademark of SiriusXM Radio, Inc. *if equipped
Page 73 of 85

MAINTENANCE
138 || 139
M
AINTENANCE
Maintenance Minder™
When maintenance is due, the system message indicator comes on and a mes\
sage
appears on the display every time you turn the vehicle on. See page 139 to check what
maintenance is due indicated by the codes that appear.
Press the Info (
/) button on the steering wheel to change displays.
System message
indicator
Maintenance Minder message
Main
items Sub items
• Independent of the Maintenance Minder information, replace the brake fl\
uid every
3 years.
•
Inspect idle speed every 160,000 miles (256,000 km).
•
Adjust the valves during services A, B, 1, 2, or 3 if they are noisy.
U.S. models
Maintenance, replacement, or repair of emissions control devices and sys\
tems may
be done by any automotive repair establishment or individuals using part\
s that are
certified to EPA standards.
According to state and federal regulations, failure to perform maintenan\
ce on the
maintenance main items marked with # will not void your emissions warranties.
However
, all maintenance services should be performed in accordance with the
intervals indicated by the multi-information display. n
Maintenance Minder Service Codes
These codes indicate what services are due on your vehicle.
*1: If the message Maintenance Due Now does not appear more than 12 months after the display
is reset, change the engine oil every year.
#: See information on maintenance and emissions warranty.
*2: If you drive in dusty conditions, replace the air cleaner element every \
15,000 miles (24,000 km).
*3: If you drive primarily in urban areas that have high concentrations of s\
oot in the air from industry and diesel-powered vehicles, replace every 15,000 miles (24,000 km).
CODEMaintenance Main Items
A
�Replace engine oi l*1
B�Replace engine oil*1 and oil �lter
�Inspect front and rear brakes
�Check parking brake adjustment
�Inspect tie rod ends, steering gearbox, and boots
�Inspect suspension components
�Inspect driveshaft boots
�Inspect brake hoses and lines (Including ABS/VSA)
�Inspect all �uid levels and condition of �uids
�Inspect exhaust system#
�Inspect fuel lines and connection s#
*4: If you drive regularly in very high temperatures (over 110°F, 43°\
C), in very low temperatures
(under -20°F, -29°C), or towing a trailer, replace every 60,000 \
miles/100,000 km.
*5: Driving in mountainous areas at very low vehicle speeds or trailer towin\
g results in higher level
of mechanical (Shear) stress to �uid. This requires differential �\
uid changes more frequently
than recommended by the Maintenance Minder. If you regularly drive your \
vehicle under these
conditions, have the differential �uid changed at 7,500 miles (12,00\
0 km), then every 15,000 miles
(24,000 km).
CODEMaintenance Sub Item s
1
�Rotate tires
2�Replace air cleaner element*2
�Replace dust and pollen �lte r*3
�Inspect drive belt
3
�Replace transfer-case �uid and transmission �ui d
4�Replace spark plugs
�Replace timing belt and inspect water pump*4
�Inspect valve clearance
5
�Replace engine coolant
6�Replace rear differential �ui d*, *5
*
*if equipped
Page 75 of 85

MAINTENANCE
142 || 143
M
AINTENANCE
Engine Oil
Park the vehicle on level ground, and wait approximately three minutes after turning the
engine off before you check the oil.
n
Checking the Oil
1.
Remove the dipstick (orange).
2.
Wipe the dipstick with a clean cloth or paper
towel.
3.
Insert the dipstick back all the way into its hole.
4.
Remove the dipstick again, and check the level.
It should be between the upper and lower marks.
Add oil if necessary.
Upper mark
Lower mark
n Recommended Engine Oil •
Genuine Honda Motor Oil
•
Premium-grade 0W-20 detergent oil with
an API Certification Seal on the container
This seal indicates the oil is energy conserving and
that it meets the American Petroleum Institute’s latest
requirements.
Use Honda Genuine Motor Oil or another commercial
engine oil of suitable viscosity for the ambient
temperature as shown.
Ambient temperatureAmbient temperature
You may also use synthetic motor oil if it is labeled with the API Certifi\
cation Seal
and is of the specified viscosity grade. n
Adding Oil
1.
Unscrew and remove the engine oil fill cap.
2.
Add oil slowly.
3.
Reinstall the engine oil fill cap, and tighten it
securely.
4.
Wait for three minutes and recheck the engine
oil dipstick.Engine oil �ll cap
Do not fill the engine oil above the upper mark. Overfilling the eng\
ine oil can result in
leaks and engine damage.
NOTICE
n
Resetting the Engine Oil Life
If you change or replace the vehicle’s engine oil yourself, you must reset the engine
oil life. Use the steering wheel buttons to operate the menu.
1.
Use the Info (/) buttons to scroll to the Vehicle
Settings menu. Press the RESET button to enter
the menu.
2.
Scroll to Maintenance Info, and select it.
3.
Press and hold the RESET button to enter the oil life
reset mode.
4.
Select Reset. The maintenance codes disappear,
and the engine oil life returns to 100%.
Failure to reset the engine oil life after a maintenance service results\
in the system
showing incorrect maintenance intervals, which can lead to serious mecha\
nical
problems.
NOTICE