Page 73 of 85

MAINTENANCE
138 || 139
M
AINTENANCE
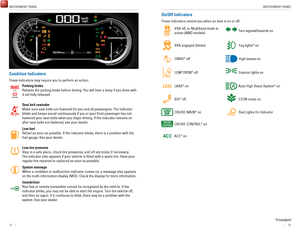
Maintenance Minder™
When maintenance is due, the system message indicator comes on and a mes\
sage
appears on the display every time you turn the vehicle on. See page 139 to check what
maintenance is due indicated by the codes that appear.
Press the Info (
/) button on the steering wheel to change displays.
System message
indicator
Maintenance Minder message
Main
items Sub items
• Independent of the Maintenance Minder information, replace the brake fl\
uid every
3 years.
•
Inspect idle speed every 160,000 miles (256,000 km).
•
Adjust the valves during services A, B, 1, 2, or 3 if they are noisy.
U.S. models
Maintenance, replacement, or repair of emissions control devices and sys\
tems may
be done by any automotive repair establishment or individuals using part\
s that are
certified to EPA standards.
According to state and federal regulations, failure to perform maintenan\
ce on the
maintenance main items marked with # will not void your emissions warranties.
However
, all maintenance services should be performed in accordance with the
intervals indicated by the multi-information display. n
Maintenance Minder Service Codes
These codes indicate what services are due on your vehicle.
*1: If the message Maintenance Due Now does not appear more than 12 months after the display
is reset, change the engine oil every year.
#: See information on maintenance and emissions warranty.
*2: If you drive in dusty conditions, replace the air cleaner element every \
15,000 miles (24,000 km).
*3: If you drive primarily in urban areas that have high concentrations of s\
oot in the air from industry and diesel-powered vehicles, replace every 15,000 miles (24,000 km).
CODEMaintenance Main Items
A
�Replace engine oi l*1
B�Replace engine oil*1 and oil �lter
�Inspect front and rear brakes
�Check parking brake adjustment
�Inspect tie rod ends, steering gearbox, and boots
�Inspect suspension components
�Inspect driveshaft boots
�Inspect brake hoses and lines (Including ABS/VSA)
�Inspect all �uid levels and condition of �uids
�Inspect exhaust system#
�Inspect fuel lines and connection s#
*4: If you drive regularly in very high temperatures (over 110°F, 43°\
C), in very low temperatures
(under -20°F, -29°C), or towing a trailer, replace every 60,000 \
miles/100,000 km.
*5: Driving in mountainous areas at very low vehicle speeds or trailer towin\
g results in higher level
of mechanical (Shear) stress to �uid. This requires differential �\
uid changes more frequently
than recommended by the Maintenance Minder. If you regularly drive your \
vehicle under these
conditions, have the differential �uid changed at 7,500 miles (12,00\
0 km), then every 15,000 miles
(24,000 km).
CODEMaintenance Sub Item s
1
�Rotate tires
2�Replace air cleaner element*2
�Replace dust and pollen �lte r*3
�Inspect drive belt
3
�Replace transfer-case �uid and transmission �ui d
4�Replace spark plugs
�Replace timing belt and inspect water pump*4
�Inspect valve clearance
5
�Replace engine coolant
6�Replace rear differential �ui d*, *5
*
*if equipped
Page 74 of 85

Washer Fluid
Radiator Cap
Engine Coolant
Reserve Tan
k
Engine Oil Dipstick
(Orange)
Battery
Engine Oil Fill Ca p
Aut")
MAINTENANCE
140 || 141
M
AINTENANCE
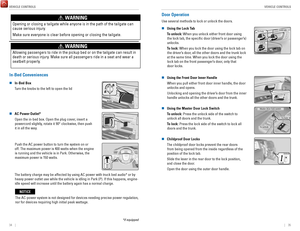
Under the Hood
Brake Fluid
(Black Cap)
Washer Fluid
Radiator Cap
Engine Coolant
Reserve Tan
k
Engine Oil Dipstick
(Orange)
Battery
Engine Oil Fill Ca p
Automatic Transmission Fluid Dipstick
n Opening the Hood
1.
Park the vehicle on a level surface, and set the
parking brake.
2.
Pull the hood release handle under the lower left
corner of the dashboard.
3.
Push up the hood latch lever in the center of the
hood to release the lock mechanism, and open the
hood.
4.
Remove the support rod from the clamp using the
grip. Mount the support rod in the hood.
When closing, remove the support rod, and stow it
in the clamp, then gently lower the hood. Remove
your hand at a height of approximately 12 inches
(30 cm) and let the hood close.
Pull
Lever
Support Ro d
Grip
Clamp
Do not open the hood when the wiper arms are raised. The hood will strik\
e the
wipers, and may damage either the hood or the wipers.
NOTICE
*if equipped
n Engine Compartment Cover
The component parts in the engine compartment are protected by a cover. You may
need to remove the cover when you perform certain maintenance work.
Starting at either side, lift the outermost edge of the
engine compartment cover. Pull up on the cover, and
remove it from the pins. Move towards the opposite
side while applying uniform upward pressure.
Engine Compartment Cove r
Page 75 of 85

MAINTENANCE
142 || 143
M
AINTENANCE
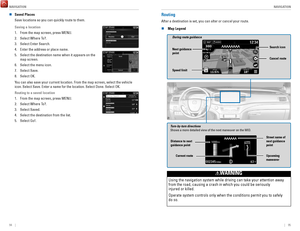
Engine Oil
Park the vehicle on level ground, and wait approximately three minutes after turning the
engine off before you check the oil.
n
Checking the Oil
1.
Remove the dipstick (orange).
2.
Wipe the dipstick with a clean cloth or paper
towel.
3.
Insert the dipstick back all the way into its hole.
4.
Remove the dipstick again, and check the level.
It should be between the upper and lower marks.
Add oil if necessary.
Upper mark
Lower mark
n Recommended Engine Oil •
Genuine Honda Motor Oil
•
Premium-grade 0W-20 detergent oil with
an API Certification Seal on the container
This seal indicates the oil is energy conserving and
that it meets the American Petroleum Institute’s latest
requirements.
Use Honda Genuine Motor Oil or another commercial
engine oil of suitable viscosity for the ambient
temperature as shown.
Ambient temperatureAmbient temperature
You may also use synthetic motor oil if it is labeled with the API Certifi\
cation Seal
and is of the specified viscosity grade. n
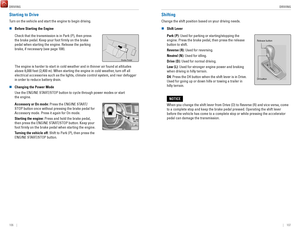
Adding Oil
1.
Unscrew and remove the engine oil fill cap.
2.
Add oil slowly.
3.
Reinstall the engine oil fill cap, and tighten it
securely.
4.
Wait for three minutes and recheck the engine
oil dipstick.Engine oil �ll cap
Do not fill the engine oil above the upper mark. Overfilling the eng\
ine oil can result in
leaks and engine damage.
NOTICE
n
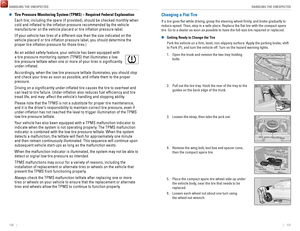
Resetting the Engine Oil Life
If you change or replace the vehicle’s engine oil yourself, you must reset the engine
oil life. Use the steering wheel buttons to operate the menu.
1.
Use the Info (/) buttons to scroll to the Vehicle
Settings menu. Press the RESET button to enter
the menu.
2.
Scroll to Maintenance Info, and select it.
3.
Press and hold the RESET button to enter the oil life
reset mode.
4.
Select Reset. The maintenance codes disappear,
and the engine oil life returns to 100%.
Failure to reset the engine oil life after a maintenance service results\
in the system
showing incorrect maintenance intervals, which can lead to serious mecha\
nical
problems.
NOTICE
Page 76 of 85

MAINTENANCE
144 || 145
M
AINTENANCE
Engine Coolant
Park the vehicle on level ground. Check the reserve tank and the coolant\
level in the
radiator. We recommend Honda Long Life Antifreeze/Coolant Type 2.
n
Checking the Reserve Tank
1.
Remove the engine compartment cover.
2.
Check the amount of coolant in the reserve tank.
3.
If the coolant level is below the MIN mark, add the
specified coolant until it reaches the MAX mark.
4.
Inspect the cooling system for leaks.
MAX
MIN
If temperatures consistently below −22°F (−30°C) are expec\
ted, the coolant mixture
should be changed to a higher concentration. Consult a dealer for detail\
s for more
information.
NOTICE
n
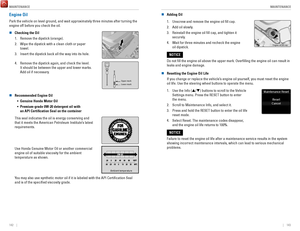
Adding Coolant
1.
Make sure the engine and radiator are cool.
2.
Remove the engine compartment cover.
3.
Turn the radiator cap counterclockwise and relieve
any pressure in the coolant system. Do not push
the cap down when turning.
4.
Push down and turn the radiator cap
counterclockwise to remove it.
5.
The coolant level should be up to the base of the
filler neck. Add coolant if it is low.
6.
Put the radiator cap back on, and tighten it fully.
7.
Pour coolant into the reserve tank until it reaches
the MAX mark. Put the cap back on the
reserve tank.
Radiator
cap
Removing the radiator cap while the engine is hot can cause the coolant \
to spray out, seriously scalding you.
Always let the engine and radiator cool down before removing the
radiator cap.
WARNING
Pour the fluid slowly and carefully so you do not spill any. Clean up any spills
immediately; they can damage components in the engine compartment.
NOTICE
Checking the Battery
The battery condition is monitored by the sensor on the negative termina\
l. If there is a
problem with the sensor, a message appears on the multi-information display. Have your
vehicle checked by a dealer.
For jump starting, see page 126.
The battery gives off explosive hydrogen gas during normal operation.
A spark or flame can cause the battery to explode with enough force to\
kill
or seriously hurt you.
When conducting any battery maintenance, wear protective clothing and
a face shield, or have a skilled technician do it.
WARNING
WARNING: Battery posts, terminals, and related accessories contain lead and lead\
compounds. Wash your hands after handling.
Window Washer Fluid
If the washer fluid level is low, fill the washer reservoir. You can check the level by
looking at the reservoir, or a message* will appear on the MID.
Pour the washer fluid carefully. Do not overflow the reservoir.
Do not use engine antifreeze or a vinegar/water solution in the windshie\
ld washer
reservoir. Antifreeze can damage your vehicle’s paint. A vinegar/water solution can
damage the windshield washer pump.
NOTICE
Brake Fluid
The fluid level should be between the MIN and MAX marks on the side of\
the reservoir.
We recommend using Honda Heavy Duty Brake Fluid DOT 3.
Pour the fluid carefully.
If the fluid level is at or below the MIN mark, have a dealer
inspect for leaks or worn brake pads as soon as possible.
Brake reservoir
MAX
MIN
Brake fluid marked DOT 5 is not compatible with your vehicle’s braking system and can
cause extensive damage.
NOTICE
*if equipped
Page 77 of 85

MAINTENANCE
146 || 147
M
AINTENANCE
Changing Wiper Blades
If the wiper blades leave streaks across the windshield, try cleaning th\
em first with a
paper towel or soft cloth and wiper fluid. If the wiper blade rubber h\
as deteriorated, you
should change the wiper blades.
n
Changing the Front Wiper Blade Rubber
1.
Lift the driver side wiper arm first, then the
passenger side.
2. Place a cloth on the edge of the lock tab. Push the
lock tab up using a flat-tip screwdriver.Lock tab
3. Slide the blade from the wiper arm.
4.
Slide the wiper blade out from its holder by pulling
the tabbed end out.
Blade
5. Remove the retainers from the rubber blade that
has been removed, and mount to a new rubber
blade. Correctly align the rubber protrusion and the
retainer grooves.
Retainer
Blade
6. Slide the new wiper blade onto the holder from the
bottom end. The tab on the holder should fit in the
indent of the wiper blade. Slide the wiper blade
onto the wiper arm until it locks
7. Slide the wiper blade onto the wiper arm, then
push down the lock tab.
8.
Lower the passenger side wiper arm first, then the driver side.
Avoid dropping the wiper arm, as it may damage the windshield.
NOTICE
Tire Information
To safely operate your vehicle, your tires must be of the proper type and\
size, in good
condition with adequate tread, and properly inflated.
n
Inflation Guidelines •
Properly inflated tires provide the best combination of handling, trea\
d life, and
comfort. Refer to the driver’s doorjamb label or the specifications (see page 154)
for the specified pressure.
•
Underinflated tires wear unevenly, adversely affect handling and fuel economy,
and are more likely to fail from overheating.
•
Overinflated tires make your vehicle ride harshly, are more prone to road
hazards, and wear unevenly.
•
Every day before you drive, look at each of the tires. If one looks lowe\
r than the
others, check the pressure with a tire gauge.
•
Measure the air pressure when tires are cold. This means the vehicle has been
parked for at least 3 hours, or driven less than 1 mile (1.6 km). If n\
ecessary, add
or release air until the specified pressure is reached. If checked whe\
n hot, tire
pressure can be as much as 4-6 psi (30-40 kPa, 0.3-0.5 kgf/cm2) higher\
than
checked when cold.
•
At least once a month or before long trips, use a gauge to measure the p\
ressure
in all tires, including the spare. Even tires in good condition can lose\
1-2 psi
(10-20 kPa, 0.1-0.2 kgf/cm2) per month.
n
Inspection Guidelines
Every time you inflate the tires, check for the following: •
Any damage to tires, including bumps, bulges, cuts, splits, or cracks in\
the side
or tread. Remove any foreign objects and inspect for air leaks. Replace \
tires if
you see fabric or cord.
•
Uneven or excessive tread wear. Have a dealer check the wheel alignment.
•
Cracks or other damage around the valve stems.
n
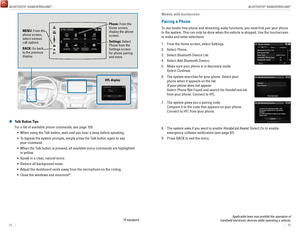
Wear Indicators
The groove where the wear indicator is located is
1/16 inch (1.6 mm) shallower than elsewhere on the
tire. If the tread has worn so low that the indicator is
exposed, replace the tire. Worn out tires have poor
traction on wet roads.Example of a wear
indicator mark
Page 78 of 85

MAINTENANCE
148 || 149
M
AINTENANCE
Using tires that are excessively worn or improperly inflated can cause\
a
crash in which you can be seriously hurt or killed.
Follow all instructions in this owner’s manual regarding tire inflation and
maintenance
.
WARNING
n Tire and Loading Information Label
The label attached to the driver’s doorjamb provides necessary tire and
loading information.
Original
tire sizes
Number of people your
vehicle can carry
Proper cold tire pressure Total weight your
vehicle can carry
(do not exceed)
n Tire and Wheel Replacement
Replace your tires with radials of the same size, load range, speed rati\
ng, and
maximum cold tire pressure rating (as shown on the tire’s sidewall). Using tires of a
different size or construction can cause certain vehicle systems to work\
incorrectly
.
It is best to replace all four tires at the same time. If that isn’t possible, replace the
front or rear tires in pairs.
If you change or replace a wheel, make sure that the wheel’s specifications match
those of the original wheels. Only use TPMS-specified wheels approved \
for your
vehicle.
Installing improper tires on your vehicle can affect handling and stabil\
ity.
This can cause a crash in which you can be seriously hurt or killed.
Always use the size and type of tires recommended in the Owner’s
Manual.
WARNING
n Tire Service Life
The life of your tires is dependent on many factors, including driving h\
abits, road
conditions, vehicle loading, inflation pressure, maintenance history, speed, and
environmental conditions (even when the tires are not in use).
In addition to regular inspections and inflation pressure maintenance,\
it is
recommended that you have annual inspections performed once the tires re\
ach five
years old. All tires, including the spare, should be removed from servic\
e after
10 years from the date of manufacture, regardless of their condition or \
state of wear
.
n
Winter Tires
If driving on snowy or frozen roads, mount all season tires marked “M\
+S”, snow tires, or tire chains; reduce speed; and maintain sufficient distance \
between
vehicles when driving. For winter tires, select the size and load ranges\
that are the same as the original tires, and mount them to all four wheels.
n
Tire Chains
Install tire chains on the front tires only. Because your vehicle has limited tire
clearance, we strongly recommend using the following chains:
Cable type: SCC Super Z LT-ZT735
Mount chains as tightly as you can, and make sure that they do not touch\
the brake
lines or suspension.
Traction devices that are the wrong size or improperly installed can
damage your vehicle’s brake lines, suspension, body, and wheels. Stop
driving if they are hitting any part of the vehicle.
NOTICE
Using the wrong chains, or not properly installing chains, can damage th\
e
brake lines and cause a crash in which you can be seriously injured or
killed.
Follow all instructions in this guide regarding the selection and use of\
tire
chains.
WARNING
Page 79 of 85

MAINTENANCE
150 || 151
M
AINTENANCE
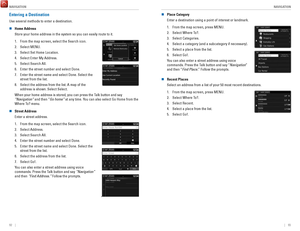
Tire Labeling
The tires that came on your vehicle have a number of markings. Those you\
should be aware of are described below.
Here is an example of what each marking means:
P235/60R18 102V
•
P: vehicle type (P indicates passenger vehicle)
•
235: tire width in millimeters
•
60: aspect ratio (tire section height as a
percentage of its width)
•
R: tire construction code (radial)
•
18: rim diameter in inches
•
102: load index (code indicating maximum load
tire can carry)
•
V: speed symbol (code indicating maximum
speed rating)
Tire size
Tire
identi�cation
number (TIN)
Maximum
tire load
Maximum
tire pressure
Tire size
n Tire Identification Number (TIN)
The tire identification number
(TIN) is a group of numbers and
letters that look like the example
below. TIN is located on the
sidewall of the tire.DOT B97R FW6X 2209
DOT: This indicates that the tire meets all
requirements of the U.S. Department of
Transportation.
B97R: Manufacturer’s identi�cation mark
FW6X: Tire type code
22 09: Date of Transportation
Year
Week
n Glossary of Tire Terminology
Cold Tire Pressure – The tire air pressure when the vehicle has been parked
for at least three hours or driven less than 1 mile (1.6 km).
Load Rating –
The maximum load that a tire is rated to carry for a given
inflation pressure.
Maximum Inflation Pressure – The maximum tire air pressure that the tire
can hold.
Maximum Load Rating – The load rating for a tire at the maximum
permissible inflation pressure for that tire.
Recommended Inflation Pressure – The cold tire inflation pressure
recommended by the manufacturer.
Treadwear Indicators (TWI) – The projections within the principal grooves
designed to give a visual indication of the degrees of wear of the tread\
.
DOT Tire Quality Grading
The tires on your vehicle meet all U.S. Federal Safety Requirements. All\
tires are also
graded for treadwear, traction, and temperature performance according to Department
of Transportation (DOT) standards. The following explains these gradings.
n
Uniform Tire Quality Grading
Quality grades can be found where applicable on the tire sidewall betwee\
n tread
shoulder and maximum section width.
For example:
Treadwear 200
Traction AA
Temperature A
All passenger car tires must conform to Federal Safety Requirements in a\
ddit
ion to
these grades.
n
Treadwear
The treadwear grade is a comparative rating based on the wear rate of th\
e tire
when tested under controlled conditions on a specified government test\
course. For
example, a tire graded 150 would wear one and one-half (1 1/2) times a\
s well on the
government course as a tire graded 100. The relative performance of tire\
s depends
upon the actual conditions of their use, however, and may depart significantly from
the norm due to variations in driving habits, service practices, and dif\
ferences
in
road characteristics and climate.
n
Traction
The traction grades, from highest to lowest, are AA, A, B, and C. Those \
grades represent the tire’s ability to stop on wet pavement as measured under controlled
conditions on specified government test surfaces of asphalt and concre\
te. A tire
marked C may have poor traction performance.
W
ARNING: The traction grade assigned to this tire is based on straight-ahead
braking traction tests, and does not include acceleration, cornering, hy\
droplaning,
or peak traction characteristics.
Page 80 of 85
, B, and C, representing the\
tire’s
resistance to the generation of heat and its ability to dissi")
MAINTENANCE
152 || 153
M
AINTENANCE
n Temperature
The temperature grades are A (the highest), B, and C, representing the\
tire’s
resistance to the generation of heat and its ability to dissipate heat w\
hen tested
under controlled conditions on a specified indoor laboratory test whee\
l. Sustained
high temperature can cause the material of the tire to degenerate and re\
duce
tire life, and excessive temperature can lead to sudden tire failure. Th\
e grade C
corresponds to a level of performance which all passenger car tires must\
meet
under the Federal Motor Vehicle Safety Standard No. 109. Grades B and A represent
higher levels of performance on the laboratory test wheel than the minim\
um required
by law.
W
ARNING: The temperature grade for this tire is established for a tire that is
properly inflated and not overloaded. Excessive speed, underinflatio\
n, or excessive
loading, either separately or in combination, can cause heat buildup and\
possible
tire failure.Testing of Readiness Codes
Your vehicle has readiness codes as part of the onboard self-diagnostic s\
ystem. Some
states use these codes for testing to verify your vehicle’s emissions components are
working properly. The codes may not be read if you go through the testing just after the\
battery has gone dead or been disconnected.
To check if they are set, turn the vehicle on without starting the engine\
. The malfunction
indicator lamp will come on for several seconds. If it goes off, the rea\
diness codes are
set. If it blinks five times, the readiness codes are not set.
If you are required to have your vehicle tested before the readiness cod\
es are set,
prepare the vehicle for retesting by doing the following:
1.
Fill the gas tank to approximately 3/4 full.
2.
Park the vehicle and leave the engine off for 6 hours or more.
3.
Make sure the ambient temperature is between 40°F and 95°F (4°\
C and 35°C).
4.
Start the engine without touching the accelerator pedal, and let it idle\
for 20
seconds.
5.
Keep the vehicle in Park (P). Increase the engine speed to 2,000 rpm, \
and hold it
there for about 3 minutes.
6.
Let the engine idle with your foot off the accelerator for 20 seconds.
7.
Select a nearby, lightly traveled major highway where you can maintain a speed of
50 to 60 mph (80 to 97 km/h) for at least 20 minutes. Drive on the hig\
hway with the
vehicle in Drive. Do not use cruise control. When traffic allows, driv\
e for 90 seconds
without using the accelerator pedal. (V
ehicle speed may vary slightly; this is OK.)
If you cannot do this for a continuous 90 seconds because of traffic c\
onditions, drive
for at least 30 seconds, then repeat two more times (for a total of 90 \
seconds).
8.
Drive in city/suburban traffic for at least 10 minutes. When traffic\
conditions allow,
let the vehicle coast for several seconds without using the accelerator \
pedal or the
brake pedal.
9.
Park the vehicle and leave the engine off for 30 minutes.
The readiness codes are erased when the battery is disconnected, and set\
again only
after several days of driving under a variety of conditions.
If a testing facility determines that the readiness codes are not set, y\
ou may be
requested to return at a later date to complete the test, or see your de\
aler.