Page 65 of 76

122 || 123
MAINTENANCE
MAINTENANCE
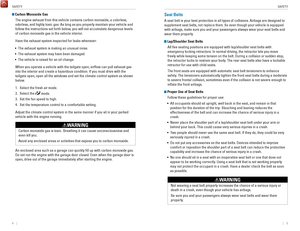
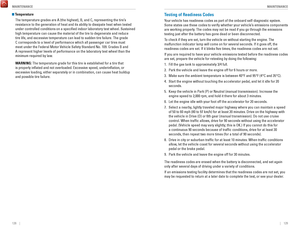
Changing the Rear Wiper Blade Rubber
1.
Lift the wiper arm off the window.
2.
Pivot up the bottom end of the wiper blade until it
comes off from the wiper arm.
3.
Slide the wiper blade out from the end with the
indent.
4.
Remove the retainers from the rubber blade that
has been removed, and mount to a new rubber
blade.
5.
Slide the new wiper blade onto the holder. Make
sure it is engaged correctly, then install the wiper
blade assembly onto the wiper arm.
Blade
Retainers
Holder
Tire Information
To safely operate your vehicle, your tires must be of the proper type and\
size, in good
condition with adequate tread, and properly inflated.
Inflation Guidelines •
Properly inflated tires provide the best combination of handling, trea\
d life, and
comfort. Refer to the driver’s doorjamb label or the specifications (see page
130) for the specified pressure.
•
Underinflated tires wear unevenly, adversely affect handling and fuel economy,
and are more likely to fail from overheating.
•
Overinflated tires make your vehicle ride harshly, are more prone to road
hazards, and wear unevenly.
•
Every day before you drive, look at each of the tires. If one looks lowe\
r than the
others, check the pressure with a tire gauge.
•
Measure the air pressure when tires are cold. This means the vehicle has been
parked for at least 3 hours, or driven less than 1 mile (1.6 km). If n\
ecessary
, add
or release air until the specified pressure is reached, and then calib\
rate the
system (see page 102). If checked when hot, tire pressure can be as mu\
ch as
4–6 psi (30–40 kPa, 0.3–0.5 kgf/cm
2) higher than checked when cold.
•
At least once a month or before long trips, use a gauge to measure the p\
ressure
in all tires, including the spare. Even tires in good condition can lose\
1–2 psi
(10–20 kPa, 0.1–0.2 kgf/cm
2) per month.
Inspection Guidelines
Every time you inflate the tires, check for the following:
•
Any damage to tires, including bumps, bulges, cuts, splits, or cracks in\
the side
or tread. Remove any foreign objects and inspect for air leaks. Replace \
tires if you see fabric or cord.
•
Uneven or excessive tread wear. Have a dealer check the wheel alignment.
•
Cracks or other damage around the valve stems.
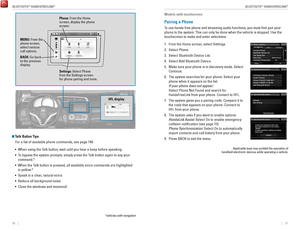
Wear Indicators The groove where the wear indicator is located is
1/16 inch (1.6 mm) shallower than elsewhere on the
tire. If the tread has worn so low that the indicator is
exposed, replace the tire. Worn out tires have poor
traction on wet roads.
Example of a wear
indicator mark
Page 66 of 76

124 || 125
MAINTENANCE
MAINTENANCE
Tire and Loading Information Label
The label attached to the driver’s doorjamb provides necessary tire and
loading information. Using tires that are excessively worn or improperly inflated can cause\
a crash in which you can be seriously hurt or killed.
Follow all instructions in this owner’s manual regarding tire inflation
and maintenance
.
WARNING
Original
tire sizes
Number of
people your
vehicle can
carry Proper cold
tire pressure
Total weight
your vehicle
can carry
(do not exceed)
Tire and Wheel Replacement
Replace your tires with radials of the same size, load range, speed rati\
ng, and
maximum cold tire pressure rating (as shown on the tire’s sidewall). Using tires
of a different size or construction can cause certain vehicle systems to\
work
incorrectly. It is best to replace all four tires at the same time. If that isn’\
t possible,
replace the front or rear tires in pairs.
If you change or replace a wheel, make sure that the wheel’s specifications match
those of the original wheels.
Installing improper tires on your vehicle can affect handling and stabil\
ity.
This can cause a crash in which you can be seriously hurt or killed.
Always use the size and type of tires recommended in the Owner’s Manual.
WARNING
Tire Service LifeThe life of your tires is dependent on many factors, including driving h\
abits, road
conditions, vehicle loading, inflation pressure, maintenance history, speed, and
environmental conditions (even when the tires are not in use).
In addition to regular inspections and inflation pressure maintenance,\
it is
recommended that you have annual inspections performed once the tires re\
ach
five years old. All tires, including the spare, should be removed from\
service after
10 years from the date of manufacture, regardless of their condition or \
state of
wear.
Winter TiresIf driving on snowy or frozen roads, mount all season tires marked “M\
+S”, snow
tires, or tire chains; reduce speed; and maintain sufficient distance \
between
vehicles when driving. For winter tires, select the size and load ranges\
that are the
same as the original tires, and mount them to all four wheels.
Tire ChainsInstall tire chains on the front tires only. Because your vehicle has limited tire
clearance, we strongly recommend using the following chains:
Cable type: SCC Radial Chain SC1026.
Mount chains as tightly as you can, and make sure that they do not touch\
the
brake lines or suspension.
Traction devices that are the wrong size or improperly installed can dama\
ge your
vehicle’s brake lines, suspension, body, and wheels. Stop driving if they are hitting
any part of the vehicle.
NOTICE
Using the wrong chains, or not properly installing chains, can damage th\
e
brake lines and cause a crash in which you can be seriously injured or k\
illed.
Follow all instructions in this guide regarding the selection and use of\
tire
chains.
WARNING
Page 67 of 76

126 || 127
MAINTENANCE
MAINTENANCE
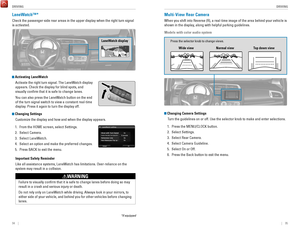
Tire Labeling
The tires that came on your vehicle have a number of markings. Those you\
should be aware of are described below.
Here is an example of what each marking means:
P185/55R16 83V
•
P: vehicle type (passenger)
•
185: tire width in millimeters
•
55: aspect ratio (tire section height as
a percentage of its width)
•
R: tire construction code (radial)
•
16: rim diameter in inches
•
83: load index (code indicating
maximum load tire can carry)
•
H: speed symbol (code indicating
maximum speed rating)
Tire Identification Number (TIN)
The tire identification number
(TIN) is a group of numbers
and letters that look like the
example shown. TIN is located
on the sidewall of the tire.
Glossary of Tire TerminologyCold Tire Pressure – The tire air pressure when the vehicle has been
parked for at least three hours or driven less than 1 mile (1.6 km).
Load Rating – The maximum load that a tire is rated to carry for a gi\
ven
inflation pressure.
Maximum Inflation Pressure – The maximum tire air pressure that the\
tire
can hold.
Maximum Load Rating – The load rating for a tire at the maximum
permissible inflation pressure for that tire.
Recommended Inflation Pressure – The cold tire inflation pressure\
recommended by the manufacturer.
Treadwear Indicators (TWI) – The projections within the principal gr\
ooves
designed to give a visual indication of the degrees of wear of the tread\
.
Tire size
Tire
identi�cation
number (TIN)
Maximum
tire load
Maximum
tire pressure
Tire size
DOT B97R FW6X 2209\n
DOT: This in\ficat\bs t\nhat th\b tir\b m\b\bts all
r\bquir\bm\bnts of th\b U.S\n. D\bpartm\bnt of
Transportation.
B97R: Manufactur\br’s \ni\f\bntifcation mark
FW6X: Tir\b typ\b co\f\b
22 09: Dat\b of Transp\nortation
Year
Week
DOT Tire Quality Grading
The tires on your vehicle meet all U.S. Federal Safety Requirements. All\
tires are
also graded for treadwear, traction, and temperature performance according
to Department of Transportation (DOT) standards. The following explains these
gradings.
Uniform Tire Quality Grading
Quality grades can be found where applicable on the tire sidewall betwee\
n tread
shoulder and maximum section width.
For example:
Treadwear 200
Traction AA
Temperature A
All passenger car tires must conform to Federal Safety Requirements in
addition to these grades.
TreadwearThe treadwear grade is a comparative rating based on the wear rate of th\
e tire
when tested under controlled conditions on a specified government test\
course.
For example, a tire graded 150 would wear one and one-half (1 1/2) tim\
es as well
on the government course as a tire graded 100. The relative performance \
of
tires depends upon the actual conditions of their use, however, and may depart
significantly from the norm due to variations in driving habits, servi\
ce practices,
and differences in road characteristics and climate.
TractionThe traction grades, from highest to lowest, are AA, A, B, and C. Those \
grades
represent the tire’s ability to stop on wet pavement as measured under controlled
conditions on specified government test surfaces of asphalt and concre\
te. A tire
marked C may have poor traction performance.
WARNING: The traction grade assigned to this tire is based on straight-ahead
braking traction tests, and does not include acceleration, cornering, hy\
droplaning,
or peak traction characteristics.
Page 68 of 76
, B, and C, representing the\
tire’s
resistance to the generation of heat and its ability to")
128 || 129
MAINTENANCE
MAINTENANCE
Temperature
The temperature grades are A (the highest), B, and C, representing the\
tire’s
resistance to the generation of heat and its ability to dissipate heat w\
hen tested
under controlled conditions on a specified indoor laboratory test whee\
l. Sustained
high temperature can cause the material of the tire to degenerate and re\
duce
tire life, and excessive temperature can lead to sudden tire failure. Th\
e grade
C corresponds to a level of performance which all passenger car tires must
meet under the Federal Motor Vehicle Safety Standard No. 109. Grades B and
A represent higher levels of performance on the laboratory test wheel th\
an the
minimum required by law.
WARNING: The temperature grade for this tire is established for a tire that
is properly inflated and not overloaded. Excessive speed, underinfla\
tion, or
excessive loading, either separately or in combination, can cause heat b\
uildup
and possible tire failure.Testing of Readiness Codes
Your vehicle has readiness codes as part of the onboard self-diagnostic s\
ystem.
Some states use these codes to verify whether your vehicle’s emissions components
are working properly. The codes may not be read if you go through the emissions
testing just after the battery has gone dead or been disconnected.
To check if they are set, turn the vehicle on without starting the engine\
. The
malfunction indicator lamp will come on for several seconds. If it goes \
off, the
readiness codes are set. If it blinks five times, the readiness codes \
are not set.
If you are required to have your vehicle emissions tested before the rea\
diness codes
are set, prepare the vehicle for retesting by doing the following:
1.
Fill the gas tank to approximately 3/4 full.
2.
Park the vehicle and leave the engine off for 6 hours or more.
3.
Make sure the ambient temperature is between 40°F and 95°F (4°\
C and 35°C).
4.
Start the engine without touching the accelerator pedal, and let it idle\
for 20
seconds.
5.
Keep the vehicle in Park (P) or Neutral (manual transmission). Incre\
ase the engine speed to 2,000 rpm, and hold it there for about 3 minutes.
6.
Let the engine idle with your foot off the accelerator for 20 seconds.
7.
Select a nearby, lightly traveled major highway where you can maintain a speed
of 50 to 60 mph (80 to 97 km/h) for at least 20 minutes. Drive on the \
highway with
the vehicle in Drive (D) or 6th gear (manual transmission). Do not u\
se cruis
e
control. When traffic allows, drive for 90 seconds without using the a\
ccelerator
pedal. (Vehicle speed may vary slightly; this is OK.) If you cannot do this for
a continuous 90 seconds because of traffic conditions, drive for at le\
ast 30
seconds, then repeat two more times (for a total of 90 seconds).
8.
Drive in city or suburban traffic for at least 10 minutes. When traffi\
c conditions
allow, let the vehicle coast for several seconds without using the acceler
ator
pedal or the brake pedal.
9.
Park the vehicle and leave the engine off for 30 minutes.
The readiness codes are erased when the battery is disconnected, and set\
again
only after several days of driving under a variety of conditions.
If an emissions testing facility determines that the readiness codes are\
not set, you
may be requested to return at a later date to complete the test, or see \
your dealer.
Page 69 of 76

Charge Quantity 13.2 – 15.0 oz (375 – 425 g)
Lubricant Type ND-OIL8
Quantity 3")
130 || 131
SPECIFICATIONS
SPECIFICATIONS
Vehicle
Air Conditioning:
Refrigerant Type HFC-134a (R-134a )
Charge Quantity 13.2 – 15.0 oz (375 – 425 g)
Lubricant Type ND-OIL8
Quantity 3.3 – 4.0 cu-in (55 – 67 cm³)
ModelFitNo. of Passengers:
Front2
Rear 3
5
Tota lWeights :
Gross Vehicle
Weight Rating*1U.S. :3 ,374 lbs (1,530 kg )*43,431 lbs (1,556 kg )*63,498 lbs (1,586 kg)*8Canada:1,519 kg*31,535 k g*41,546 kg*51,559 kg*6Gross Vehicle Weight Rating*2U.S.:3 ,416 lbs (1,549 kg )*43,482 lbs (1,579 kg )*63,498 lbs (1,586 kg)*7
Canada:1,554 kg*41,565 k g*51,583 kg*61,590 kg*7Gross Axle Weight Rating (Front)*1
Canada:794 k g*3
U.S. :1 ,781 lbs (808 kg )*41,783 lbs (809 kg )*61,867 lbs (847 kg)*8
810 kg*4814 kg*5811 kg*6Gross Axle Weight Rating (Rear)*1
Canada:731 k g*3
U.S. :1 ,618 lbs (734 kg )*41,662 lbs (754 kg )*61,651 lbs (749 kg)*8
737 kg*4742 kg*5754 kg*6
*
*1:
Manual transmission models
* 2:
Continuously variable transmission models
* 3:
DX
* 4:
LX *
5: SE *6:
EX
* 7:
EX-L
8: EX-LNA
Rating (Front)*2U.S.:
Gross Axle Weight 1,825 lbs (828 kg)*41,858 lbs (843 kg)*61,867 lbs (847 kg)*7
Canada:830 kg*4834 kg*5845 kg*6846 kg*7
Gross Axle Weight
Rating (Rear )*2U.S.:1,607 lbs (729 kg)*41,655 lbs (751 kg)*61,651 lbs (749 kg)*7
Canada:734 kg*4738 kg*5754 kg*6755 kg*7
3,500 lbs (1,587 kg )*8
1,869 lbs (848 kg)*8
1,657 lbs (752 kg)*8
Engine and Fuel
Engine Speci�cations
FuelDisplacement91.4 cu-in (1,498 cm3)
Spark Plug sNGKD
ILZKAR7C11S
DENSODXE22HCR11S
Fuel:
Typ eUnleaded gasoline, Pump octane number of 87 or higher
Fuel Tank Capacity 10.6 US gal (40 L)
Tires
*1: LX, Canadian DX*2: EX, EX-L, Canadian SE
Regular
Size185/60R15 84 T*1185/55R16 83H*2
Pressure
psi (kPa[kgf/cm2])
Front33 (230 [2.3])
Rear33 (230 [2.3])*132 (220 [2.2])*2
Compact
Spar e Size
T135/80D15 99M
Pressure
psi (kPa[kgf/cm2]) 60 (420 [4.2])
Wheel SizeRegular15 x 6J*116 x 6J*2Co
mpact Spar e15 x 4T
SPECIFICATIONS
*if equipped
Light Bulbs
60/55W (H4LL/HB2LL*)Fog Lights*35W (H8 LL)Side Marker Lights3CP
Front Turn Signal/Parking Lights
Brake/Tail/Side Marker LightsLE D
Back-Up Lights
Rear Turn Signal Lights21W
High-M ount Brake Light
Side Turn Signal LightsLED
Rear License Plate Light s
Cargo Area Light5W
In teri or Lights
Map Lights8WCeiling Ligh t
Headlights/DRLs (high/low beams )
28/8W (Amber)
21W
LED
5W
8W
Fluids
Brake Fluid
Continuously Variable Transmission Fluid *
Manual Transmission Fluid*
Speci�edHonda Heavy Duty Brake Fluid DOT 3
Speci�edHonda HCF-2 Transmission Fluid
Capacity Change 3.6 US qt (3.4 L)
Speci�edHonda Manual Transmission Fluid
Capacity Change 1.5 US qt (1.4 L)
Engine Oil
Engine Coolan
t
*1:Continuously variable transmission models*2:Manual transmission model s
Recommended·Genuine Honda Motor Oil 0W-2 0
·API Premium-grade 0W-20 detergent oi l
Capacity Change
3.3 US qt (3.1 L)
Change
including
�lter 3.5 US qt (3.3 L)
Speci�e
dHonda Long-Life Anti freeze/Coolant Type 2
Ratio 50/50 with distilled wate r
Capacity
0.999 US gal (3.78 L) *1(change including the remaining
0.111 US gal (0.42 L) in the reserve tank )
0.999 US gal (3.78 L)*2
(change including the remaining
0.111 US gal (0.42 L) in the reserve tank )
Washer Fluid
Tank CapacityU.S.: 2.6 US qt (2.5 L)
Canada: 4.2 US qt (4.0 L)
*if equipped
Page 70 of 76

132 || 133
CUSTOMER INFORMATION
CUSTOMER INFORMATION
Learn about information specific to you as a Honda customer and how to\
get help.
Frequently Asked Questions/Troubleshooting
Below are some frequently asked questions and troubleshooting items that\
you may
have about the vehicle.
Q:
How do I set the vehicle clock?
A:
For vehicles without navigation, see page 45. For vehicles with navigati\
on, the
time is automatically set using GPS signals.
Q:
Why doesn’t the vehicle start when I press the ENGINE START/STOP button?*
A:
The brake pedal must be pressed to start the engine.
Q:
What is the AUTO* setting on my headlight lever?
A:
When in the AUTO position, the vehicle’s exterior lights will automatically turn
on or off depending on the ambient lighting.
Q:
Why won’t the driver’s door unlock when I grab the door handle, even though
the keyless access remote is within range?*
A:
If you pull the handle too quickly, the system may not have time to confirm the
door is unlocked. Wait to hear a beep to confirm the door is unlocked. If you are
wearing gloves, the system may be slow to respond.
Q:
After my battery was disconnected or went dead, the audio system is aski\
ng for
a code. Where do I find this?
A:
In most cases, you do not need to enter a code. Turn on the vehicle and the
audio system, and press and hold the power button until the system react\
ivates.
Q:
Why can’t I operate Pandora® through the audio system?
A:
Audio may be streaming through Bluetooth® Audio. Make sure Pandora mode
is selected and the phone cable is properly connected to the USB adapter\
.
Some phones may prompt you to “Allow” a connection.
Q:
Is my phone compatible with Bluetooth features?
A:
Visit handsfreelink.com (U.S.) or
handsfreelink.ca (Canada) to check phone
compatibility for Bluetooth® Audio, Bluetooth® HandsFreeLink®, and SMS text
messaging.
Q:
Every time I press the Talk button, the system gives me voice prompts. Can I turn
these off?*
A:
From the Home screen, select Settings. Select the Voice Recog tab, then select
Voice Prompt. Select Off.
CUSTOMER INFORMATION
*if equipped
Contact Us
Honda dealer personnel are trained professionals. They should be able to\
answer
all your questions. If you encounter a problem that your dealership does\
not solve
to your satisfaction, please discuss it with the dealership’s service manager or
general manager. If you are dissatisfied with the decision made by the dealership’\
s
management, contact Honda Automobile Customer Service.
U.S. owners
American Honda Motor Co., Inc.
Honda Automobile Customer Service
1919 Torrance Blvd.
Mail Stop 500-2N-7A
Torrance, CA 90501-2746
Tel: (800) 999-1009
In Puerto Rico and
the U.S. Virgin Islands
Bella International
P.O. Box 190816
San Juan, PR 00919-0816
Tel: (787) 620-7546
When you call or write, please give us the following information:
•
Vehicle Identification Number
•
Date of purchase
•
Odometer reading of your vehicle
•
Your name, address, and telephone number
•
A detailed description of the problem
•
Name of the dealer who sold the vehicle to you
Q:
Why can’t I select an item using the selector knob or touchscreen*?
A:
To prevent driver distraction, certain items are limited or inoperable wh\
ile the
vehicle is moving. Use voice commands or pull over to select the items.
Q:
Where can I find the vehicle identification number (VIN)?
A:
Check the label on the driver’s doorjamb.
*if equipped
Canadian owners
Honda Canada, Inc.
Customer Relations
180 Honda Blvd.
Markham, ON
L6C 0H9
Tel: (888) 946-6329
Fax: (877) 939-0909
e-mail: [email protected]
Page 71 of 76

134 || 135
VOICE COMMAND INDEX
CUSTOMER INFORMATION
Honda Roadside Assistance
24-hour emergency road service is available to you in the United States \
and Canada
throughout your 3-year/36,000-mile warranty term. Services include jump starting,
flat tire and lockout assistance, towing, and more (limitations apply\
).
Call (866) 864-5211 (U.S.) or (800) 465-7587 (Canada).
Warranty Coverages
Below is a brief summary of the warranties covering your new vehicle.
New Vehicle Limited Warranty: Covers your new vehicle, except for the emissions
control system and accessories, against defects in materials and workman\
ship.
Emissions Control Systems Defects Warranty and Emissions Performance
Warranty: Covers your vehicle’s emissions control systems. Time, mileage, and
coverage are conditional.
Seat Belt Limited Warranty: Covers seat belts that fail to function properly.
Rust Perforation Limited Warranty: Covers all exterior body panels that rust through
from the inside.
Accessory Limited Warranty: Covers Honda accessories.
Replacement Parts Limited Warranty: Covers all Honda replacement parts against
defects in materials and workmanship.
Replacement Battery Limited Warranty: Provides prorated coverage for a
replacement battery purchased from a Honda dealer.
Replacement Muffler Lifetime Limited Warranty: Covers a replacement muffler for
the duration of the ownership.
Restrictions and exclusions apply to all these warranties. See the Warranty Manual
on the Owner Information CD or at owners.honda.com (U.S.) or myhonda.ca
(Canada) for complete descriptions of each warranty, including time, mileage, and
other conditional limitations.
Your vehicle’s original tires are covered by their manufacturer. Tire warranty
information can be found on the Owner Information CD or at owners.honda.com
(U.S.) or myhonda.ca (Canada). Learn about all available voice commands to help you operate the vehicle\
. Available
on vehicles with navigation.
Press the Talk button before you say a command. To view a list of available
commands in the vehicle, say “Voice help.” Select a category to hear the commands
read aloud. General Commands
The system accepts these commands on any screen.
Navigation CommandsThe system accepts these commands on the map/guidance screen.
General Commands
•
Display map
•
Display navigation
•
Go home 1 (or 2)
Map Display Commands
•
Voice help
•
Display menu
•
Display setting
•
Display navigation
•
Display information •
Display audio
•
Display phone
•
Back/Cancel
•
What is today’s date?
•
What time is it?
•
Display current location
•
Display/Hide (specify icon type):
− AT M
− gas station
− restaurant
− post office
− grocery store
− lodging (hotel, motel)
− parking garage
− parking lot
− school
− hospital
− freeway exit information
− traffic*
− traffic speeds*
− traffic icons*
•
Display north up
•
Display heading up
•
Display 3D map
•
Display zoom in
•
Display zoom out
VOICE COMMAND INDEX
*U.S. models only
EPA Contact Information
An owner may obtain further information
concerning emission warranties or report
violations of the terms of the emission
warranties by contacting: U.S. Environmental Protection Agency
Office of Transportation and Air Quality
Compliance Division,
Light-Duty Vehicles Group
Attn: Warranty Complaints
2000 Traverwood Drive
Ann Arbor, MI 48105
Email: [email protected]
Page 72 of 76

Find Place Commands
•
Find nearest (specify place):
− Fuel and auto
− Honda dealers
− Gas s")
136 || 137
VOICE COMMAND INDEX
VOICE COMMAND INDEX
Navigation Commands (continued)
Find Place Commands
•
Find nearest (specify place):
− Fuel and auto
− Honda dealers
− Gas station
− Auto parts & electronics
− Auto repair & maintenance
− Car wash & detailing
− Motorcycle dealers
− Other car dealerships
− Roadside assistance
− AT M
− Bank
− Check cashing
− Currency exchange
− Community
− Business
− City hall
− Civic center
− Convention center
− Court house
− Higher education
− Library
− Post office
− School
− Emergency room
− Hospital
− Police station
− Veterinarian
− Lodging
− Bed & breakfast
− Hotel
− Resort
− Recreation
− Amusement park
− Golf course
− Historical monument
− Marina
− Movie theater
− Museum
− Park
− Performing arts
− Sports complex
− Tourist attraction
− Restaurant
− American restaurant
− Californian restaurant
− Chinese restaurant
− Coffee shop
− Continental restaurant
− Fast food
− French restaurant
− German restaurant
− Greek restaurant
− Indian restaurant
− Italian restaurant
− Japanese restaurant
− Korean restaurant
− Mexican restaurant
− Pizza
− Seafood restaurant
− Thai restaurant
− Vegetarian restaurant
− Vietnamese restaurant
− Other restaurant
− Shopping
− Shopping area
− Accessory store
− Book store
− Clothing store
− Grocery store
− Home improvement store
− Mall
− Office supply store
− Pharmacy
− Pet food store
− Sewing store
− Shoe store
− Sporting goods store
− Toy store Route Commands
The system accepts these commands when a route is set.
•
How long to the destination?
•
How far to the destination?
•
Display destination map
•
Display entire route
− Travel center
− Airport
− Automobile club
− Bus station
− Camping
− Commuter rail station
− Ferry terminal
− Named place
− Park & ride
− Parking garage
− Parking lot
− Rental car agency
− Rest area
− Ski area
− Tourist information
− Train station
− Travel agency
− Truck stop
Climate Control Commands**
The system accepts these commands on most screens. Available on Canadian
models only.
•
Climate control automatic
(maintains selected temperature)
•
Climate control on*
•
Climate control off*
•
Air conditioner on*
•
Air conditioner off*
•
Rear defrost on*
•
Rear defrost off*
•
Climate control fresh air
•
Climate control recirculate
•
Climate control vent
•
Climate control bi-level (vent and
floor •
Climate control floor
•
Climate control floor and defrost
•
Fan speed up
•
Fan speed down
•
Fan speed # (#: 1 to 7)
•
Temperature # degrees
(#: 57 to 87°F / 15 to 29°C)
•
Temperature up
•
Temperature down
•
Driver temperature up
•
Driver temperature down
•
Temperature max heat
•
Temperature max cool
*These commands toggle the function on and off, so the command may not match your intended action. **if equipped
• Cancel route
•
Repeat guidance
•
Route menu