Page 9 of 76

10 || 11
S
AFETYSAFETY
Side Airbags
The side airbags help protect the upper torso and pelvis of the driver o\
r a front
passenger during a moderate-to-severe side impact. They are housed in th\
e
outside edge of the driver’s and front passenger’s seat-backs. Both are marked
SIDE AIRBAG.
Side Curtain AirbagsSide curtain airbags help protect the heads of the driver and passengers\
in outer
seating positions during a moderate-to-severe side impact. The side curt\
ain
airbags equipped in this vehicle are also designed to help reduce the li\
kelihood
of partial and complete ejection of vehicle occupants through side windo\
ws in
crashes, particularly rollover crashes.
The side curtain airbags are located in the ceiling
above the side windows on both sides of the
vehicle.
The side curtain airbags are designed to deploy
in a rollover or moderate-to-severe side impact.
If the SRS control unit senses that your vehicle is
about to roll over, it immediately deploys both side
curtain airbags and activates both front seat belt
tensioners. If the impact is on the passenger’s side,
the passenger’s side curtain airbag will inflate even
if there are no occupants on that side of the vehicle.
To get the best protection from the side curtain airbags, occupants shoul\
d wear
their seat belts properly and sit upright and well back in their seats.
Do not attach any objects to the side windows or roof pillars, as they c\
an interfere
with the proper operation of the side curtain airbags.
When side curtain airbags deploy in a frontal collision
One or both side curtain airbags may inflate in a moderate-to-severe a\
ngled
frontal collision.
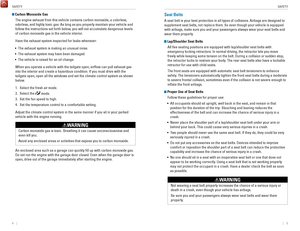
Side curtain airbag storage
Deployed side curtain airbag
Important Facts About Your AirbagsAlways wear your seat belt properly, and sit upright and as far back from the
steering wheel as possible while allowing full control of the vehicle. A\
front
passenger should move their seat as far back from the dashboard as possi\
ble.
Do not place hard or sharp objects between yourself and a front airbag. Carrying
hard or sharp objects on your lap, or driving with a pipe or other sharp\
object in
your mouth, can result in injuries if your front airbag inflates.
Do not attach or place objects on the front airbag covers. Objects on the covers
marked SRS AIRBAG could interfere with the proper operation of the airbags or be
propelled inside the vehicle and hurt someone if the airbags inflate.
Do not attach accessories on or near the side airbags. They can interfere with the
proper operation of the airbags, or hurt someone if an airbag inflates\
.
Do not attach any objects to the side windows or roof pillars. They can interfere
with the proper operation of the side curtain airbags.
Do not cover or replace the front seat-back covers. This can prevent your side
airbags from properly deploying during a side impact.
An open glove box can cause serious injury to your passenger in a crash,\
even if the passenger is wearing the seat belt.
Always keep the glove box closed while driving.
WARNING
Airbag System IndicatorsIf a problem occurs in the airbag system, the SRS indicator comes on.
SRS (Supplemental Restraint System) indicator
If the indicator comes on at any other time besides
vehicle start-up, or does not come on at all, have the
system checked by a dealer as soon as possible. If
you don’t, your airbags and seat belt tensioners may
not work properly when they are needed.
Ignoring the SRS indicator can result in serious injury or death if the \
airbag
systems or tensioners do not work properly.
Have your vehicle checked by a dealer as soon as possible if the SRS
indicator alerts you to a possible problem.
WARNING
Page 10 of 76

12 || 13
S
AFETYSAFETY
Passenger Airbag Off indicator
The indicator comes on to alert you that the front
passenger’s front airbag has been turned off. This
occurs when the front passenger’s weight sensors
detect 65 lbs (29 kg) or less, the weight of an infant
or small child, on the seat.
Infants and small children should always ride properly restrained in a b\
ack seat.
Objects placed on the seat can also cause the indicator to come on.
If the front passenger‘s seat is empty, the passenger’s front airbag will not deploy
and the indicator will not come on.
If the indicator comes on with no occupant or objects in the front passe\
nger’s
seat, something may be interfering with the weight sensors, such as:
•
An object hanging on the seat or in the seat-back pocket.
•
A child seat or other object pressing against the rear of the seat-back.\
•
A rear passenger pushing or pulling on the back of the front passenger’\
s seat.
•
The front seat or seat-back is forced against an object on the seat or fl\
oor
behind it.
•
An object placed under the front passenger’s seat.
If none of these conditions exist, have your vehicle checked by a dealer\
as soon
as possible.
The passenger airbag off indicator may go on and off repeatedly if the t\
otal weight
on the seat is near the airbag cutoff threshold.
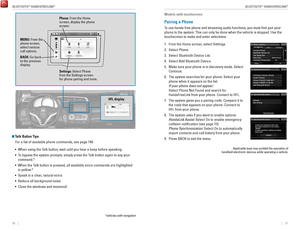
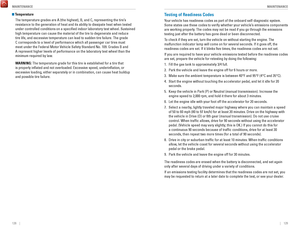
1 Two SRS (Supplemental Restraint System) front airbags. The driver’s
airbag is stored in the center
of the steering wheel; the front
passenger’s airbag is stored in the
dashboard. Both are marked SRS
AIRBAG.
2 Two side airbags, one for the driver and one for the front passenger.
The airbags are stored in the outer
edges of the seat-backs. Both are
marked SIDE AIRBAG.
3 Two side curtain airbags, one for each side of the vehicle. The
airbags are stored in the ceiling,
above the side windows. The front
and rear pillars are marked SIDE
CURTAIN AIRBAG.
4 An electronic control unit that continually monitors and can
record information about the
sensors, the airbag activators, the
seat belt tensioners, and driver and
front passenger seat belt use when
the vehicle is on.
5 Automatic front seat belt tensioners. The driver’s and front passenger’s
seat belts incorporate sensors that
detect whether or not they are
fastened.
6 A driver’s seat position sensor. If the seat is too far forward, the airbag
will inflate with less force.
7 Weight sensors in the front passenger’s seat. The front
passenger’s airbag will be turned off
if the weight on the seat is 65 lbs (29
kg) or less (the weight of an infant or
small child).
8 Impact sensors that can detect a moderate-to-severe front or side
impact.
9 An indicator on the dashboard that alerts you that the front passenger’s
front airbag has been turned off.
10 An indicator on the instrument panel that alerts you to a possible problem
with the airbag system or seat belt
tensioners.
11 A rollover sensor that detects whether the vehicle is about to roll
over.
Airbag System Components
6
789
11
810
8
8
8
8
U.S. model shown
Page 11 of 76

14 || 15
S
AFETYSAFETY
Airbag Care
You do not need to, and should not, perform any maintenance on or replace\
any
airbag system components yourself. However, you should have your vehicle
inspected by a dealer in the following situations:
When the airbags have deployed
If an airbag has inflated, the control unit and other related parts mu\
st be replaced.
Similarly, once an automatic seat belt tensioner has been activated, it must be
replaced.
When the vehicle has been in a moderate-to-severe collision
Even if the airbags did not inflate, have your dealer inspect the foll\
owing: the
driver’s seat position sensor, weight sensors in the passenger’s seat, front seat
belt tensioners, and each seat belt that was worn during the crash.
Do not remove or modify a front seat without first consulting a dealer
This would likely disable the driver’s seat position sensor or the weight sensors
in the passenger’s seat. If it is necessary to remove or modify a front seat to
accommodate a person with disabilities, contact a Honda dealer. For U.S.
vehicles, call Honda Automobile Customer Service at (800) 999-1009. Fo\
r Canadian
vehicles, call Honda Canada Customer Relations at (888) 946-6329.Child Safety
Each year, many children are injured or killed in vehicle crashes because they are
either unrestrained or not properly restrained. In fact, vehicle collisi\
ons are the
number one cause of death of children ages 12 and under.
The National Highway Traffic Safety Administration and Transport Canada
recommend that all children ages 12 and under be properly restrained in \
a rear seat.
Some states or provinces/territories have laws restricting where childre\
n may ride.
To reduce the number of child deaths and injuries, every state, Canadian \
province
and territory requires that infants and children be properly restrained \
when they ride
in a vehicle.
Protecting Child Passengers•
An inflating front or side airbag can injure or kill a child sitting i\
n the front seat.
•
A child in the front seat is more likely to interfere with the driver’\
s ability to
safely control the vehicle.
•
Statistics show that children of all sizes and ages are safer when they \
are
properly restrained in a rear seat.
•
Any child who is too small to wear a seat belt correctly must be restrai\
ned in an
approved child seat that is properly secured to the vehicle using either\
the lap
belt portion of the lap/shoulder belt or the lower anchors of the LATCH system.
•
Never hold a child on your lap because it is impossible to protect them \
in the
event of a collision.
•
Never put a seat belt over yourself and a child. During a crash, the bel\
t would
likely press deep into the child and cause serious or fatal injuries.
•
Never let two children use the same seat belt. Both children could be ve\
ry
seriously injured in a crash.
•
Do not allow children to operate the doors, windows, or seat adjusters.
•
Do not leave children in the vehicle unattended, especially in hot weath\
er when
the inside of the vehicle can get hot enough to kill them. They could al\
so activate
vehicle controls, causing it to move unexpectedly.
Children who are unrestrained or improperly restrained can be seriously \
injured or killed in a crash.
Any child too small for a seat belt should be properly restrained in a c\
hild
seat. A larger child should be properly restrained with a seat belt, usi\
ng
a
booster seat if necessary.
WARNING
Page 12 of 76

16 || 17
S
AFETYSAFETY
Protecting Infants
An infant must be properly restrained in a rear-facing, reclining child seat until the
infant reaches the seat maker’s weight or height limit for the seat, and the infant
is at least one year old. Many experts recommend use of a rear-facing seat for
a child up to two years old if the child’s height and weight are appropriate for a
rear-facing seat.
Child seats must be placed and secured in a rear
seating position. Rear-facing child seats should
never be installed in a forward-facing position.
When properly installed, a rear-facing child seat may prevent the driver or a front
passenger from moving their seat all the way back, or from locking their\
seat-back
in the desired position. If this occurs, we recommend that you install t\
he child
seat directly behind the front passenger’s seat, move the seat as far forward as
needed, and leave it unoccupied. Or, you may wish to get a smaller rear-facing
child seat.
Placing a rear-facing child seat in the front seat can result in serious injury or
death during a crash.
Always place a rear-facing child seat in the rear seat, not the front.
WARNING
Allowing a child to play with a seat belt or wrap one around their neck \
can
result in serious injury or death.
Instruct children not to play with any seat belt and make sure any unuse\
d
seat belt a child can reach is buckled, fully retracted, and locked.
WARNING Protecting Smaller ChildrenIf a child is at least one year old and within the weight range indicate\
d by the child
seat manufacturer, the child should be properly restrained in a firmly secured
forward-facing child seat.
We strongly recommend placing a forward-facing
child seat in a rear seating position.
Placing a forward-facing child seat in the front seat
can be hazardous, even with advanced front airbags
that automatically turn the passenger’s front airbag
off. A rear seat is the safest place for a child.
Placing a forward-facing child seat in the front seat can result in seri\
ous
injury or death if the front airbag inflates.
If you must place a forward-facing child seat in front, move the vehicle\
seat
as far back as possible, and properly restrain the child.
WARNING
Selecting a Child SeatMost child seats are LATCH-compatible (Lower Anchors and Tethers for CHildren).
Some have a rigid-type connector, while others have a flexible-type connector.
Both are equally easy to use. Some existing and previously owned child s\
eats can
only be installed using the seat belt. Whichever type you choose, follow\
the child
seat manufacturer’s use and care instructions as well as the instructions in this
manual. Proper installation is key to maximizing your child’s safety.
In seating positions and vehicles not equipped with LATCH, a LATCH-compatible
child seat can be installed using the seat belt and a top tether for add\
ed security.
This is because all child seats are required to be designed so that they\
can be
secured with a lap belt or the lap part of a lap/shoulder belt. In addit\
ion, the
child seat manufacturer may advise that a seat belt be used to attach a \
LATCH-
compatible seat once a child reaches a specified weight. Please read t\
he child
seat owner’s manual for proper installation instructions.
Important considerations when selecting a child seat
Make sure the child seat meets the following three requirements:
•
The child seat is the correct type and size for the child.
•
The child seat is the correct type for the seating position.
•
The child seat is compliant with Federal Motor Vehicle Safety Standard 213 or
Canadian Motor Vehicle Safety Standard 213.
Page 13 of 76

18 || 19
S
AFETYSAFETY
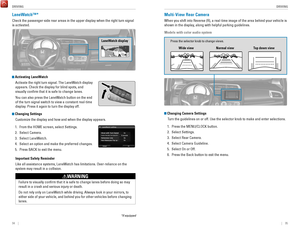
Installing a LATCH-Compatible Child Seat
A LATCH-compatible child seat can be installed in either of the two outer re\
ar
seats. A child seat is attached to the lower anchors with either the rig\
id or flexible
type of connectors.
1.
Locate the lower anchors under the marks.
2.
Raise the head restraint to its highest position.
3.
Place the child seat on the vehicle seat, then
attach the child seat to the lower anchors
according to the instructions that came with the
child seat. Make sure that the lower anchors
are not obstructed by the seat belt or any other
object. If necessary, remove the cargo area
cover.*
4.
Route the tether strap between the head restraint
legs. Make sure the strap is not twisted. Secure
the tether strap hook onto the anchor.
5.
Tighten the tether strap according to the seat
manufacturer’s instructions.
6.
Make sure the child seat is firmly secured by
rocking it forward and back and side to side; little
movement should be felt.
7.
Make sure any unused seat belt that a child
can reach is buckled, the lockable retractor
is activated, and the belt is fully retracted and
locked. If necessary, reinstall the cargo area
cover.*
Installing a Child Seat with a Lap/Shoulder Seat Belt 1.
Raise the head restraint to its highest position.
2.
Place the child seat on the vehicle seat.
3.
Route the seat belt through the child seat
according to the seat manufacturer’s
instructions, and insert the latch plate into the
buckle. Insert the latch plate fully until it clicks.
4.
Slowly pull the shoulder part of the belt all the
way out until it stops. This activates the lockable
retractor.
5.
Let the seat belt completely wind up into the
retractor, then try to pull it out to make sure the
retractor is locked. If you are able to pull the
shoulder belt out, the lockable retractor is not
activated. Pull the seat belt all the way out, and
repeat steps 4 – 5.
6.
Grab the shoulder part of the seat belt near the
buckle, and pull up to remove any slack from
the lap part of the belt. When doing this, place
your weight on the child seat and push it into the
vehicle seat.
7.
Make sure the child seat is firmly secured by
rocking it forward and back and side to side; little
movement should be felt.
8.
Make sure any unused seat belt that a child
can reach is buckled, the lockable retractor
is activated, and the belt is fully retracted and
locked.
To deactivate a lockable retractor, release the buckle and allow the seat belt to
wind up all the way
.
Marks
*if equipped (Canadian models)
Rigid type
Lower anchors
Flexible type
Anchor
Tether strap hook
Page 14 of 76

20 || 21
S
AFETYSAFETY
Adding Security with a Tether
Two tether anchorage points are provided behind the rear outer seating po\
sitions
and one in the ceiling for the rear center. A child seat that is installed with a seat
belt and comes with a tether can use the tether for additional security.
1.
Using an outer anchor: If necessary, remove the
cargo area cover
.* Raise the head restraint to
its highest position, then route the tether strap
through the head restraint legs.
Using the center anchor: Lower the head
restraint to its lowest position. Open the anchor
cover. Route the tether strap over the head
restraint.
2.
Secure the tether strap hook onto the anchor.
Make sure the strap is not twisted.
3.
Tighten the tether strap according to the seat
manufacturer’s instructions. If necessary
,
reinstall the cargo area cover.* Protecting Larger Children
When a child is too big for a child seat, secure the child in a rear sea\
t using the
lap/shoulder seat belt.
Have the child sit upright and all the way back, then ensure the followi\
ng:
•
The child’s knees bend comfortably over the edge
of the seat.
•
The shoulder belt crosses between the child’s
neck and arm.
•
The lap part of the seat belt is as low as possible,
touching the child’s thighs.
•
The child can stay seated for the whole trip.
If a lap/shoulder belt cannot be used properly, position the child in a booster seat
in a rear seating position. For the child’s safety
, check that the child meets the
booster seat manufacturer’s recommendations.
Some U.S. states and Canadian provinces/territories require children to \
use a
booster seat until they reach a given age or weight (e.g., 6 years or 6\
0 lbs). Be sure
to check current laws in the state or province/territory where you inten\
d to drive.
Allowing a child age 12 or under to sit in the front can result in injur\
y or death
if the passenger’s front airbag inflates.
If a larger child must ride in front, move the vehicle seat as far to th\
e rear as
possible, then have the child sit up properly and wear the seat belt pro\
perly,
using a booster seat if needed.
WARNING
Tether
anchorage
points
Tether strap hook Anchor
*if equipped (Canadian models)
Tether anchorage point
Anchor
Anchor cover
Page 15 of 76

22 || 23
S
AFETYSAFETY
Safety Label Locations
Safety labels are in the locations shown. They warn you of potential haz\
ards that
can cause serious injury or death. Read these labels carefully.
Reporting Safety Defects
In the U.S.
If you believe that your vehicle has a defect which could cause a crash \
or could
cause injury or death, you should immediately inform the National Highway Traffic
Safety Administration (NHTSA) in addition to notifying American Honda \
Motor Co.,
Inc.
If NHTSA receives similar complaints, it may open an investigation, and \
if it finds
that a safety defect exists in a group of vehicles, it may order a recal\
l and remedy
campaign. However, NHTSA cannot become involved in individual problems
between you, your dealer, or American Honda Motor Co., Inc.
To contact NHTSA, you may call the Vehicle Safety Hotline toll-free at 1-888-327-
4236 (TTY: 1-800-424-9153); go to http://www.safercar.gov; or write to: Administrator,
NHTSA, 1200 New Jersey Avenue, SE., Washington, DC 20590. You can also obtain
other information about motor vehicle safety from http://www.safercar.gov.
In Canada
If you believe that your vehicle has a defect which could cause a crash \
or could
cause injury or death, you should immediately inform Honda Canada, Inc.,\
and you
may also inform Transport Canada.
If Transport Canada receives similar complaints, it may open an investigation, and if
it finds that a safety defect exists in a group of vehicles, it may le\
ad to a recall and
remedy campaign. However, Transport Canada cannot become involved in individual
problems between you, your dealer, or Honda Canada, Inc.
To contact Transport Canada’s Defect Investigations and Recalls Division, you may
call 1-800-333-0510. For more information on reporting safety defects or\
about motor
vehicle safety, go to http://www.tc.gc.ca/roadsafety.
Sun visor
U.S. models
Canadian models
Dashboard
U.S. models
Radiator cap
Page 16 of 76

• The emissions control s")
24 || 25
I
NSTRUMENT PANELINSTRUMENT PANEL
Smart Entry system*
There is a problem with the smart entry system.
Malfunction indicator lamp (check engine light)
• The emissions control system may have a problem, or the fuel cap is\
loose
or missing.
• (Blinks) A
misfire in the engine’s cylinders is detected. Stop in a safe place,
and wait for the engine to cool down.
Anti-lock Brake System (ABS)
There is a problem with the anti-lock brake system. Y
our vehicle still has
normal braking ability, but no anti-lock function.
Tire Pressure Monitoring System (TPMS) (U.S. models only)
There is a problem with the tire pressure monitoring system, or the vehi\
cle is
fitted with the compact spare tire.
Vehicle Stability Assist (VSA
®)
There is a problem with the VSA system or hill start assist system.
Brake system
There is a problem with a braking system other than the regular brakes.
Electric power steering
There is a problem with the system. Stop in a safe place, and restart th\
e
vehicle.
Starter system*
There is a problem with the starter system.
High temperature
The engine coolant temperature is high. Drive slowly to prevent overheat\
ing.
If the indicator remains on, immediately stop the vehicle in a safe plac\
e (see
page 100).
Low temperature
The engine coolant temperature is low. If the indicator remains on, there
may be a problem with temperature sensors.
Canada U.S.
U.S.
Canada
Learn about the indicators, gauges, and displays related to driving the \
vehicle.
Indicators briefly appear with each engine start and then go out. Red \
and amber
indicators are most critical. Blue and green indicators are used for gen\
eral
information.
Malfunction Indicators
These are the most critical indicators. If they come on and stay lit whi\
le driving or at
any other time, there may be a problem. See your dealer if necessary.
Brake system
• Brake fluid is low.
• The brake system has a problem.
Press the brake pedal lightly to check pedal pressure. If normal, check \
the brake fluid level when you stop. If abnormal, take immediate actio\
n. If
necessary, downshift the transmission to slow the vehicle using engine
braking. Have your vehicle repaired immediately.
Low oil pressure
Engine oil pressure is low. Stop in a safe place. Open the hood. Check the oil
level, and add oil if necessary (see page 117). If the indicator does \
not turn
off, have your vehicle repaired immediately.
Charging system
The battery is not charging. Turn off all electrical items, but do not turn off
the vehicle to prevent further battery discharge. Have your vehicle repa\
ired
immediately.
Supplemental Restraint System (SRS)
There is a problem with one of the airbag systems or seat belt tensioner\
s.
Canada
U.S.
INSTRUMENT PANEL
*if equipped