Page 49 of 80

90 || 91
NAVIGATION
NAVIGATION
Entering a Destination
Use several methods to enter a destination.
Home Address
Store your home address in the system so you can easily route to it.
1.
From the map screen, select the Search icon.
2.
Select MeNU.
3.
Select Set Home Location.
4.
Select enter My Address.
5.
Select Search All.
6.
enter the street number and select Done.
7.
enter the street name and select Done. Select
the street from the list.
8.
Select the address from the list. A map of the
address is shown. Select Select.
When your home address is stored, you can press the Talk
button and say
“Navigation
” and then “Go home” at any time. You can also select Go Home from
the Where To? menu.
Street Address
enter a street address.
1.
From the map screen, select the Search icon.
2.
Select Address.
3.
Select Search All.
4.
enter the street number and select Done.
5.
enter the street name and select Done. Select
the street from the list.
6.
Select the address from the list.
7.
Select Go!.
You can also enter a street address using
voice commands. Press the Talk button and say
“
Navigation” and then “Find Address.” Follow the
prompts.
Place Category
enter a destination using a point of interest or landmark.
1.
From the map screen, press MeNU.
2.
Select Where To?.
3.
Select Categories.
4.
Select a category (and a subcategory if
necessary).
5.
Select a place from the list.
6.
Select Go!.
You can also enter a street address using
voice commands. Press the Talk button and say
“
Navigation” and then “Find Place.” Follow the
prompts.
Recent Places
Select an address from a list of your 50 most recent destinations.
1.
From the map screen, press MeNU.
2.
Select Where To?.
3.
Select recent.
4.
Select a place from the list.
5.
Select Go!.
Page 50 of 80
92 || 93
NAVIGATION
NAVIGATION
Saved Places
Save locations so you can quickly route to them.
Saving a location
1.
From the map screen, press MeNU.
2.
Select Where To?.
3.
Select enter Search.
4.
enter the address or place name.
5.
Select the destination name when it appears on
the map screen.
6.
Select the menu icon.
7.
Select Save.
8.
Select oK.
You can also save your current location. From the
map screen, select the vehicle icon. Select Save.
enter a name for the location.
Select Done. Select
oK.
Routing to a saved location
1.
From the map screen, press MeNU.
2.
Select Where To?.
3.
Select Saved.
4.
Select the destination from the list.
5.
Select Go!.
Routing
After a destination is set, you can alter or cancel your route.
Map Legend
During route guidance
Next guidance
point
Speed limit Search icon
Turn-by-turn directions
Shows a more detailed view of the next maneuver on the upper display.
Distance to next
guidance point Lane guidance
Cancel route
Current route
Page 51 of 80

94 || 95
DRIVING
NAVIGATION
Traffic
view traffic flow and incidents in major metro areas. You can also select traffic to
avoid. T
raffic coverage is limited in Canada.
Viewing traffic
1.
From the map screen, select the traffic icon.
2.
Select Traffic Conditions.
3.
Traffic icons are shown on the map. Select the
magnifying glass icon to display a full list of traffic
delays.
Avoiding traffic on your route
1.
From the map screen, select the traffic icon.
2.
Select Traffic on route.
3.
Select an incident to avoid from the list.
4.
Select the menu icon.
5.
Select Avoid.
DRIVING
Learn about preparation for driving, as well as other features.
Before Driving
Check the following items before you begin driving.
Exterior Checks •
Make sure there are no obstructions on the windows, door mirrors, exteri\
or
lights, or other parts of the vehicle.
•
remove any frost, snow, or ice.
•
Make sure the hood is securely closed.
•
Heat from the engine and exhaust can ignite flammable materials left u\
nder
the hood, causing a fire. If you’ve parked your vehicle for an exte\
nded period,
inspect and remove any debris that may have collected, such as dried gra\
ss and leaves that have fallen or have been carried in for use as a nest by\
a small animal. Also check under the hood for leftover flammable materials aft\
er you or
someone else has performed maintenance on your vehicle.
•
Make sure the tires are in good condition.
•
Make sure there are no people or objects behind or around the vehicle.
Interior Checks •
Store or secure all items on board properly.
•
Do not pile items higher in the cargo area than the seat-back height.
•
Do not place anything in the front seat footwells. Make sure to secure t\
he floor
mats.
•
If you have any animals on board, do not let them move freely around in \
the
vehicle.
•
Securely close and lock all doors and the trunk.
•
Adjust your seating position, mirrors, and steering wheel properly.
•
Make sure items placed on the floor behind the front seats cannot roll\
under the
seats.
•
everyone in the vehicle must fasten their seat belt.
•
Make sure that the indicators in the instrument panel come on when you s\
tart
the vehicle, and go off soon after.
If the doors are frozen shut, use warm water around the door edges to me\
lt any
ice. Do not try to force them open, as this can damage the rubber trim a\
round the
doors. When done, wipe dry to avoid further freezing.
NOTICE
Page 52 of 80
 of operation, avoid sudden acc\
eleration or
full throttle operation so as not to damage the power system")
96 || 97
DRIVING
DRIVING
In addition:
•
During the first 600 miles (1,000 km) of operation, avoid sudden acc\
eleration or
full throttle operation so as not to damage the power system or powertra\
in.
•
Avoid hard braking for the first 200 miles (300 km). You should also follow this
when the brake pads are replaced.
Improper accessories or modifications can affect your vehicle’
s handling, and
stability, and performance, and cause a crash in which you can be seriously
hurt or killed.
Follow all instructions in the vehicle owner’s manual regarding accessories
and modifications.
WARNING
Maximum Load Limit
Carrying too much cargo or improperly storing it can affect your vehicle\
’s handling,
stability, stopping distance, and tires, and make it unsafe.
The maximum load for your vehicle is 850 lbs (385 kg). See the Tire and Loading
Information label on the driver’s doorjamb.
This figure includes the total weight of all occupants, cargo, and
accessories, and the tongue load if you are towing a trailer. Below are the
steps for determining the correct load limit:
1.
Locate the statement “The combined weight of occupants and cargo
should never exceed XXX kg or XXX lbs.” on your vehicle’s placard.
2.
Determine the combined weight of the driver and passengers that will be \
riding in your vehicle.
3.
Subtract the combined weight of the driver and passengers from XXX kg
or XXX lbs.
4.
The resulting figure equals the available amount of cargo and luggage \
load capacity. For example, if the “XXX” amount equals 1,400 lbs. and
there will be five 150 lb. passengers in your vehicle, the amount of
available cargo and luggage load capacity is 650 lbs. (1,400 - 750 (5 \
x 150)
= 650 lbs.)
5.
Determine the combined weight of luggage and cargo being loaded on
the vehicle. That weight may not safely exceed the available cargo and
luggage load capacity calculated in step 4.
6.
If your vehicle will be towing a trailer, load from your trailer will be
transferred to your vehicle. Consult the
owner’s Manual on the owner
Information CD or at owners.honda.com
(U.S.) or myhonda.ca (Canada)
to determine how this reduces the available cargo and luggage load
capacity of your vehicle.
In addition, the total weight of the vehicle, all occupants, accessories\
,
cargo, and trailer tongue load must not exceed the Gross
vehicle Weight
rating (GvWr) or the Gross Axle Weight rating (GAWr). Both are on a label
on the driver’s doorjamb.
Label example
Page 53 of 80

98 || 99
DRIVING
DRIVING
The headlight aim on your vehicle was set by the factory, and does not need to be
adjusted. However, if you regularly carry heavy items in the trunk or tow a trailer,
have the aiming readjusted at your dealer or by a qualified technician\
.
overloading or improper loading can affect handling and stability and cau\
se a
crash in which you can be hurt or killed.
Follow all load limits and other loading guidelines in this guide.
WARNING
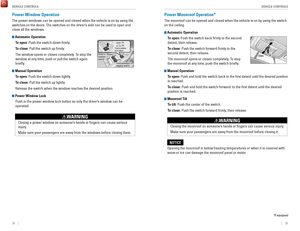
Load limits example
Example 1
Max load 850 lbs
(385 kg ) Passenger weight
150 lbs x 2 = 300 lbs (68 kg x 2 = 136 kg )Cargo
weight
550 lbs
(249 kg )
Example 2
Max load
850 lbs
(385 kg ) Passenger weight
150 lbs x 5 = 750 lbs (68 kg x 5 = 340 kg) Cargo weight
100 lbs
(45 kg)
Towing a Trailer
Your vehicle is not designed to tow a trailer. Attempting to do so can void your
warranties.
Remote Power System Start
Start the power system using the remote transmitter before you enter the\
vehicle.
Make sure the vehicle is in a safe location when using remote power system start
(i.e., a well-ventilated area, away from any flammable materials).
Starting the Power system
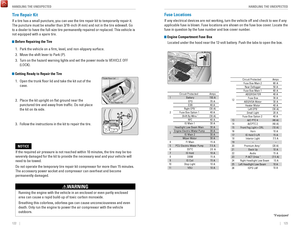
Press the Lock button, then press and hold the P
oWer button within 5 seconds to
remotely start the power system.
The power system runs for up to 10 minutes. To extend the run time for another 10
minutes, repeat the procedure during the initial 10 minutes.
While the power system is running, the climate control system adjusts th\
e cabin
temperature, the security system remains on, and lights and accessories remain
off.
Stopping the Power System
Press and hold the P
oWer button.
The power system will also stop if it has been running for more than 10 \
minutes, or
if any door is opened without using the remote or smart entry
.
engine exhaust contains toxic carbon monoxide gas.
Breathing carbon monoxide can kill you or cause unconsciousness.
Never use the remote power system starter when the vehicle is parked in \
a
garage or other area with limited ventilation.
WARNING
Lock button
POWER button
Page 54 of 80
,")
100 || 101
DRIVING
DRIVING
Starting to Drive
Turn on the vehicle and start the power system to begin driving.
Before Starting the Power System
Check that the shift lever is in Park (P), then press
the brake pedal. Keep your foot firmly on the brake
pedal when starting the power system.
The power system is harder to start in cold weather
and in thinner air found at altitudes above 8,000 feet
(2,400 m). When starting the power system in cold
weather, turn off all electrical accessories such as
the lights, climate control system, and rear defogger
in order to reduce battery drain.
Brake peda l
removing the key from the ignition switch while driving locks the steerin\
g.
This can cause you to lose control of the vehicle.
remove the key from the ignition switch only when parked.
WARNING
Changing the Power Mode
Use the P
oWer button to cycle through power modes or start the power system.
Accessory or On mode: Press the P
oWer button once
without pressing the brake pedal for Accessory
mode. Press it again for
on mode.
Starting the power system: Press and hold the brake
pedal, then press the P
oWer button. Keep your foot
firmly on the brake pedal until the
reADY indicator
comes on.
If you press the button and the shift lever is not in
Park (P), the vehicle goes into Accessory mode.
Turning the vehicle off:
Shift to Park (P), then press the P
oWer button.
Shifting
Change the shift position based on your driving needs.
Continuously Variable Transmission (CVT)Park (P): Used for parking or turning the power on
or off.
Reverse (R): Used for reversing.
Neutral (N): Drive power is not sent to the wheels.
Drive (D): Used for normal driving.
Drive (B): Used for extended downhill driving and to
increase regenerative braking.
When you change the shift lever from D to
r and vice versa, come to a complete
stop and keep the brake pedal depressed.
operating the shift lever before the
vehicle has come to a complete standstill can damage the transmission.
Do not operate the shift lever while pressing the accelerator pedal. You could
damage the transmission.
NOTICE
release Button
Page 55 of 80

102 || 103
DRIVING
DRIVING
Braking
Slow down or stop your vehicle, and keep it from moving when parked.
Foot Brake
Press the brake pedal to slow down or stop your
vehicle from moving.
Brake Assist System During hard or emergency braking, the system
increases braking force. The brake pedal may move
slightly or make a noise; this is normal. Continue to
hold the brake pedal firmly down.
Anti-Lock Brake System (ABS) During hard or emergency braking, the system
rapidly pumps the brakes to prevent wheel lockup
and help you maintain steering control. The brake
pedal may pulsate slightly during ABS operation;
this is normal. Do not pump the brake pedal, and
continue to hold it firmly down.
Parking BrakeKeep the vehicle from moving when it is parked.
To apply: Pull the lever up fully without pressing the
release button.
To release: Press and hold the release button, then
lower the lever down all the way.
Brake peda l
Brake pedal
The ABS may not function correctly if you use an incorrect tire type and\
size.
NOTICE
release the parking brake fully before driving. The rear brakes and axle \
can be
damaged if you drive with the parking brake applied.
NOTICE
Acoustic Vehicle Alerting System
Alerts people outside your vehicle when it is powered
solely by electricity and is travelling at about 12 mph
(20 km/h) or less.
Canada models
Press the button to turn the system on and off. The
system defaults to on, even if you turned it off the last
time you drove the vehicle.
Eco Assist System
Can help improve fuel economy by adjusting the performance of the power \
system,
transmission, climate control system, and cruise control.
ECON Button
Press the
eCoN button to turn the system on or off.
The
eCoN Mode indicator and a message in the
multi-information display* appear when the system
is turned on.
Ambient Meter
Color-coded bars change based on your driving
style and brake or accelerator pedal operation.
Green: Fuel-efficient driving
Blue green: Moderate acceleration/deceleration
Blue: Spirited acceleration/deceleration
Ambient Meter
Vehicle Stability Assist (VSA®)
Also known as electronic Stability Control (eSC), vSA helps to stabilize the vehicle
during cornering if the vehicle turns more or less than what was intende\
d. It assists
in maintaining traction on slippery surfaces by regulating power system \
output and
selectively applying the brakes.
Turning VSA On or Off
vSA is turned on every time you start the power
system, even if you previously turned it off. If you
turn
vSA off, your vehicle has normal braking and
cornering ability, but
vSA traction and stability
enhancement become less effective.
Press and hold the
vSA oFF button until you hear
a beep to turn
vSA on or off. The vSA oFF indicator
appears when the system is off.
Traction control becomes less effective, which may make it easier when t
rying to
free your vehicle if it is stuck in mud or snow.
VSA OFF indicator
Page 56 of 80

104 || 105
DRIVING
DRIVING
SPORT Mode
enhances the throttle response for more driving enjoyment. SPorT mode is set to
off every time the vehicle is started. When in SP
orT mode, the ambient meter (see
page 103) changes to blue.
SPORT Button
Press the SP
orT button to turn the mode on or off. A SPorT Mode indicator and a
message in the multi-information display appear when the system is on.
EV Mode
Under certain conditions, the vehicle will operate exclusively on the ba\
tteries and
electric motor.
ev mode will self-cancel if battery, driving or road conditions warrant.
EV Button
Press the
ev button to turn the mode on or off. The ev mode indicator and a
message in the multi-information display appear when the system is on.
Press
Press
Adaptive Cruise Control (ACC)
Helps maintain a constant vehicle speed and a set following interval beh\
ind a
vehicle detected ahead of yours.
Activating and Setting the Vehicle Speed
1.
Press the MAIN button. The ACC indicator appears
in the multi-information display.
2.
Accelerate to the desired speed (above 25 mph/
40 km/h). Take your foot off the pedal and press the
-/S
eT button to set the speed.
Adjusting the Vehicle Speed
Press the
reS/+ button to increase speed or the -/SeT
button to decrease speed.
each time you press the button, the vehicle speed is
increased or decreased by about 1 mph (1.6 km/h). If you
keep the button pressed, the vehicle speed increases or
decreases by 5 mph or 5 km/h until you release it.
Adjusting the Vehicle Distance
Press the Interval button to change the following
interval.
each time you press the button, the setting
cycles through short, middle, long, and extra long.
Switching to Standard Cruise Control
Press and hold the Interval button. Cruise Mode appears
in the multi-information display. Press and hold the button
again to switch back to ACC.
MAIN button
RES/+ button
CANCEL button
-/SET button
Distance button