2017 FORD TAURUS clock
[x] Cancel search: clockPage 23 of 504
Use a child safety seat (sometimes calledan infant carrier, convertible seat, ortoddler seat) for infants, toddlers, orchildren weighing 40 lb (18 kg) or less(generally age four or younger).
Using Lap and Shoulder Belts
WARNINGS
Airbags can kill or injure a child in achild restraint. Never place arear-facing child restraint in front ofan active airbag. If you must use aforward-facing child restraint in the frontseat, move the seat upon which the childrestraint is installed all the way back.
Airbags can kill or injure a child in achild restraint. Properly restrainchildren 12 and under in the rear seatwhenever possible.
Depending on where you secure achild restraint, and depending on thechild restraint design, you may blockaccess to certain seatbelt buckleassemblies and LATCH lower anchors,rendering those features potentiallyunusable. To avoid risk of injury, make sureoccupants only use seating positionswhere they are able to be properlyrestrained.
When installing a child safety seat withcombination lap and shoulder belts:
•Use the correct seatbelt buckle for thatseating position.
•Insert the belt tongue into the properbuckle until you hear a click and feel itlatch. Make sure the tongue is securelyfastened in the buckle.
•Keep the buckle release buttonpointing up and away from the safetyseat, with the tongue between the childrestraint and the release button, toprevent accidental unbuckling.
•Place the vehicle seat upon which thechild restraint will be installed in theupright position.
•Put the seatbelt in the automaticlocking mode. See Step 5. This vehicledoes not require the use of a lockingclip.
Perform the following steps wheninstalling the child restraint withcombination lap and shoulder belts:
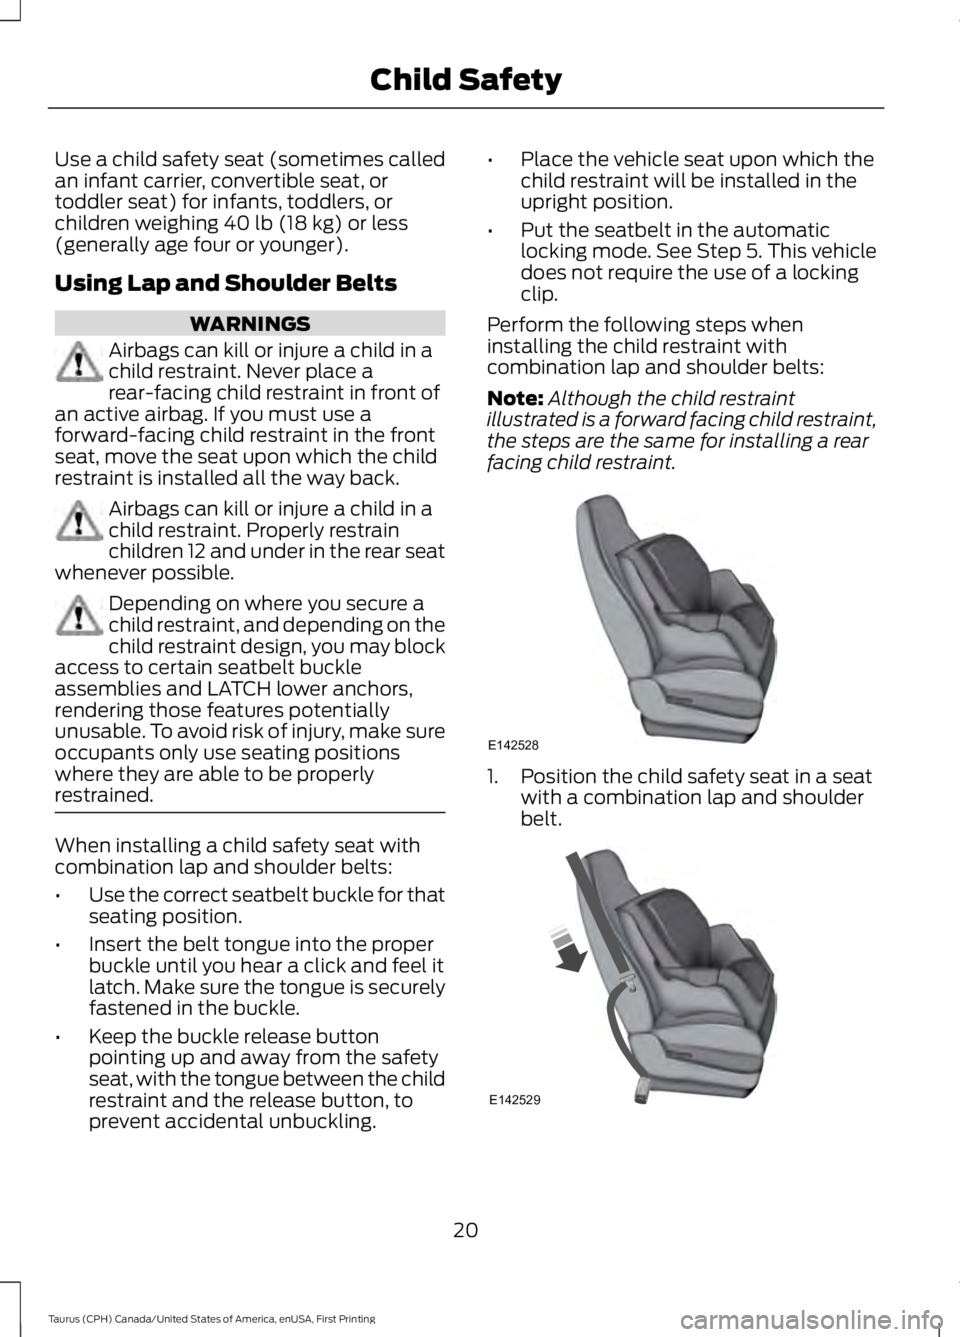
Note:Although the child restraintillustrated is a forward facing child restraint,the steps are the same for installing a rearfacing child restraint.
1. Position the child safety seat in a seatwith a combination lap and shoulderbelt.
20
Taurus (CPH) Canada/United States of America, enUSA, First Printing
Child SafetyE142528 E142529
Page 24 of 504
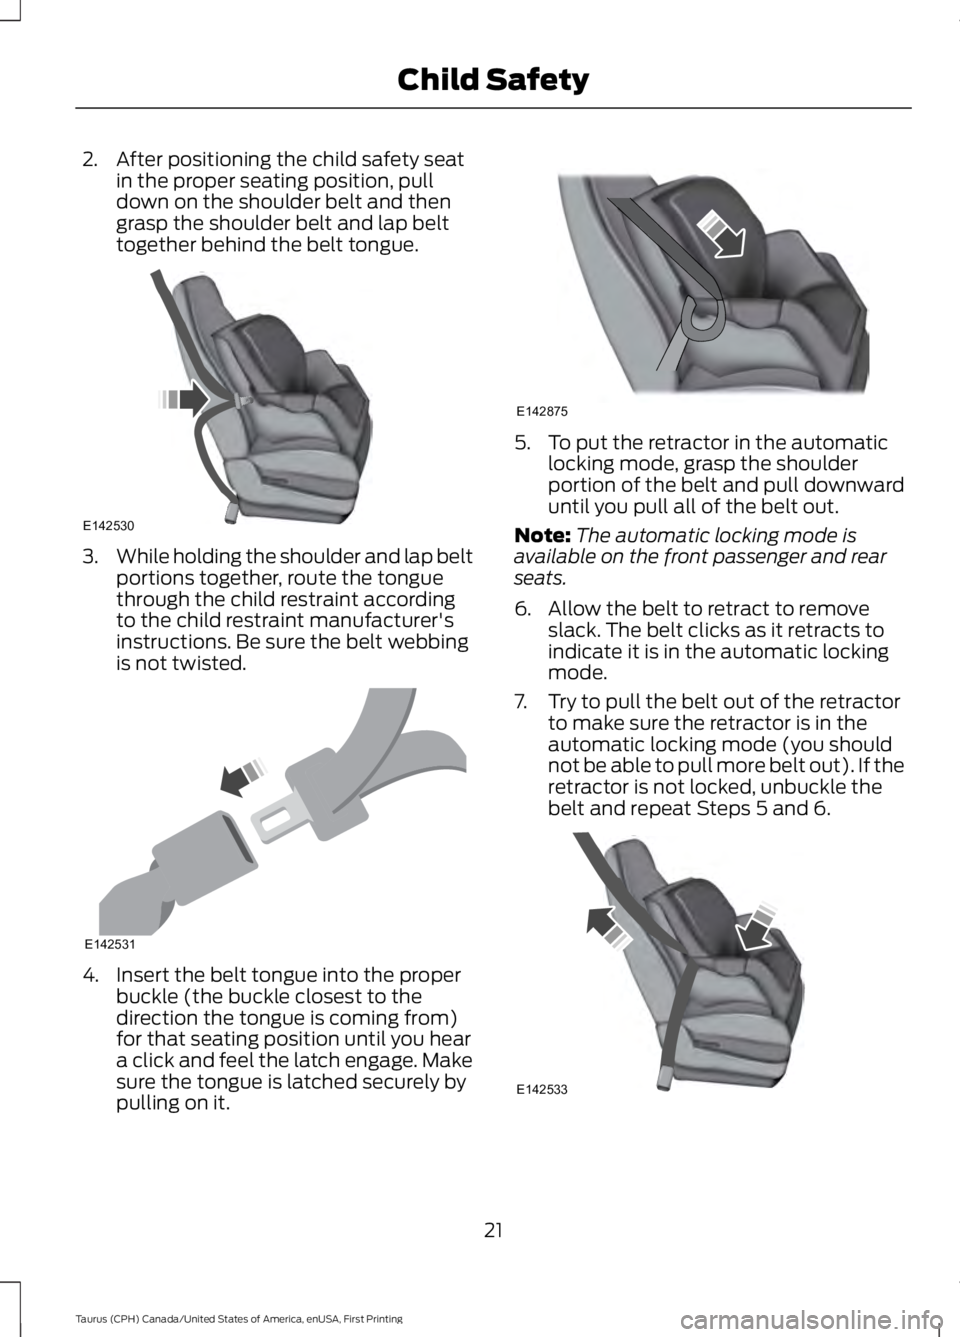
2. After positioning the child safety seatin the proper seating position, pulldown on the shoulder belt and thengrasp the shoulder belt and lap belttogether behind the belt tongue.
3.While holding the shoulder and lap beltportions together, route the tonguethrough the child restraint accordingto the child restraint manufacturer'sinstructions. Be sure the belt webbingis not twisted.
4. Insert the belt tongue into the properbuckle (the buckle closest to thedirection the tongue is coming from)for that seating position until you heara click and feel the latch engage. Makesure the tongue is latched securely bypulling on it.
5. To put the retractor in the automaticlocking mode, grasp the shoulderportion of the belt and pull downwarduntil you pull all of the belt out.
Note:The automatic locking mode isavailable on the front passenger and rearseats.
6. Allow the belt to retract to removeslack. The belt clicks as it retracts toindicate it is in the automatic lockingmode.
7. Try to pull the belt out of the retractorto make sure the retractor is in theautomatic locking mode (you shouldnot be able to pull more belt out). If theretractor is not locked, unbuckle thebelt and repeat Steps 5 and 6.
21
Taurus (CPH) Canada/United States of America, enUSA, First Printing
Child SafetyE142530 E142531 E142875 E142533
Page 32 of 504
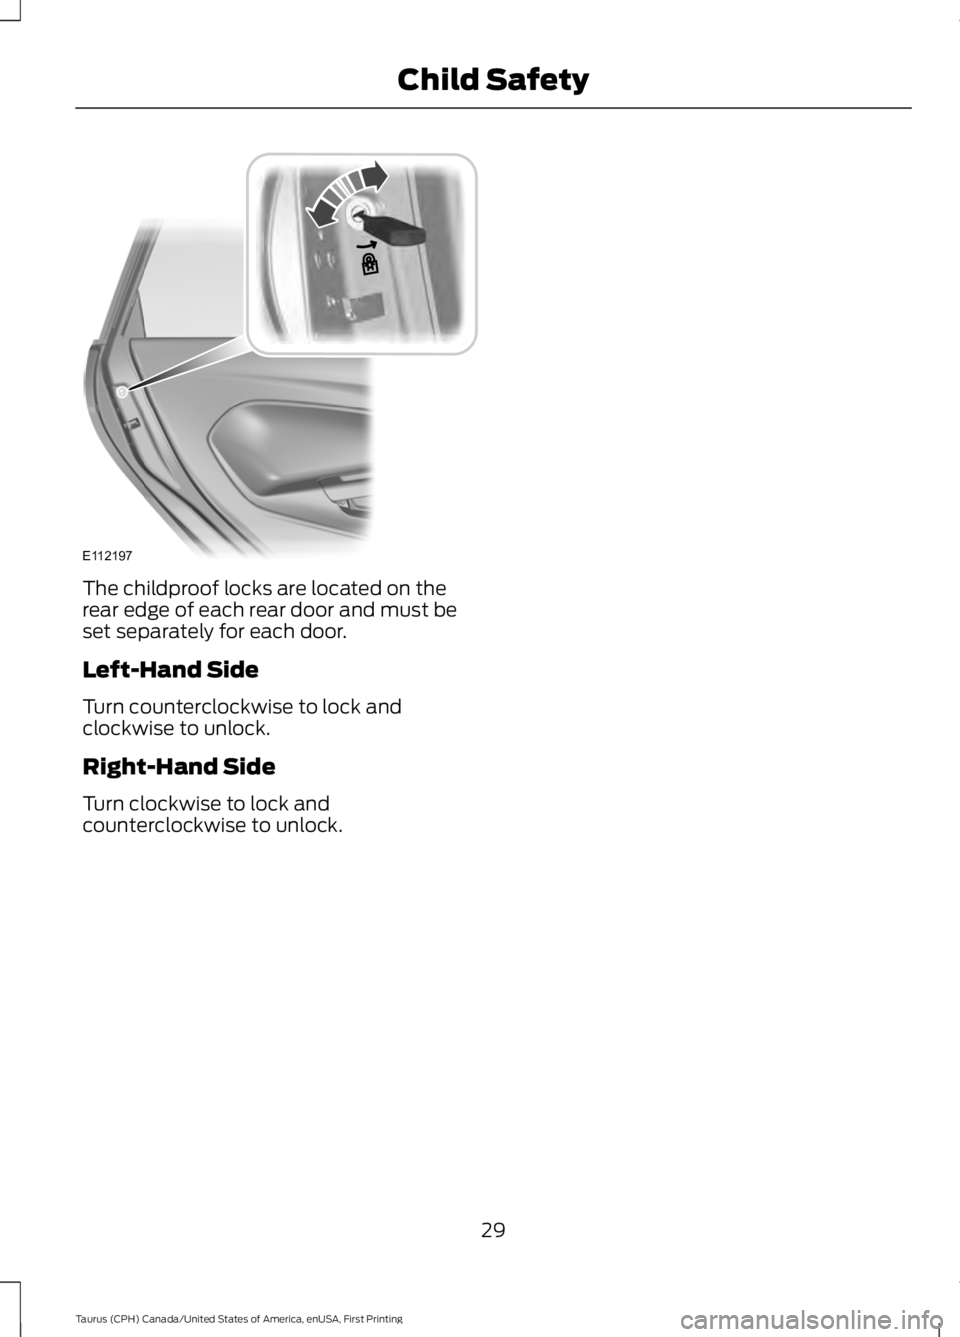
The childproof locks are located on therear edge of each rear door and must beset separately for each door.
Left-Hand Side
Turn counterclockwise to lock andclockwise to unlock.
Right-Hand Side
Turn clockwise to lock andcounterclockwise to unlock.
29
Taurus (CPH) Canada/United States of America, enUSA, First Printing
Child SafetyE112197
Page 33 of 504

PRINCIPLE OF OPERATION
WARNINGS
Always drive and ride with yourseatback upright and the lap beltsnug and low across the hips.
To reduce the risk of injury, makesure children sit where they can beproperly restrained.
Never let a passenger hold a child onhis or her lap while your vehicle ismoving. The passenger cannotprotect the child from injury in a crash.
All occupants of your vehicle,including the driver, should alwaysproperly wear their seatbelts, evenwhen an airbag supplemental restraintsystem is provided. Failure to properly wearyour seatbelt could seriously increase therisk of injury or death.
It is extremely dangerous to ride in acargo area, inside or outside of avehicle. In a crash, people riding inthese areas are more likely to be seriouslyinjured or killed. Do not allow people to ridein any area of your vehicle that is notequipped with seats and seatbelts. Be sureeveryone in your vehicle is in a seat andusing a seatbelt properly.
In a rollover crash, an unbeltedperson is significantly more likely todie than a person wearing a seatbelt.
Each seating position in your vehiclehas a specific seatbelt assemblywhich is made up of one buckle andone tongue that are designed to be usedas a pair. 1) Use the shoulder belt on theoutside shoulder only. Never wear theshoulder belt under the arm. 2) Neverswing the seatbelt around your neck overthe inside shoulder. 3) Never use a singlebelt for more than one person.
WARNINGS
When possible, all children 12 yearsold and under should be properlyrestrained in a rear seating position.Failure to follow this could seriouslyincrease the risk of injury or death.
Seatbelts and seats can become hotin a vehicle that has been closed upin sunny weather; they could burn asmall child. Check seat covers and bucklesbefore you place a child anywhere nearthem.
Front and rear seat occupants,including pregnant women, shouldwear seatbelts for optimumprotection in an accident.
All seating positions in your vehicle havelap and shoulder seatbelts. All occupantsof the vehicle should always properly weartheir seatbelts, even when an airbagsupplemental restraint system is provided.
The seatbelt system consists of:
•Lap and shoulder seatbelts.
•Shoulder seatbelt with automaticlocking mode, (except driver seatbelt).
•Height adjuster at the front outboardseating positions.
•Seatbelt pretensioner at the frontoutboard seating positions.
•Belt tension sensor at the frontoutboard passenger seating position.
· Seatbelt warning light andchime.
· Crash sensors and monitoringsystem with readiness indicator.
30
Taurus (CPH) Canada/United States of America, enUSA, First Printing
SeatbeltsE71880 E67017
Page 36 of 504
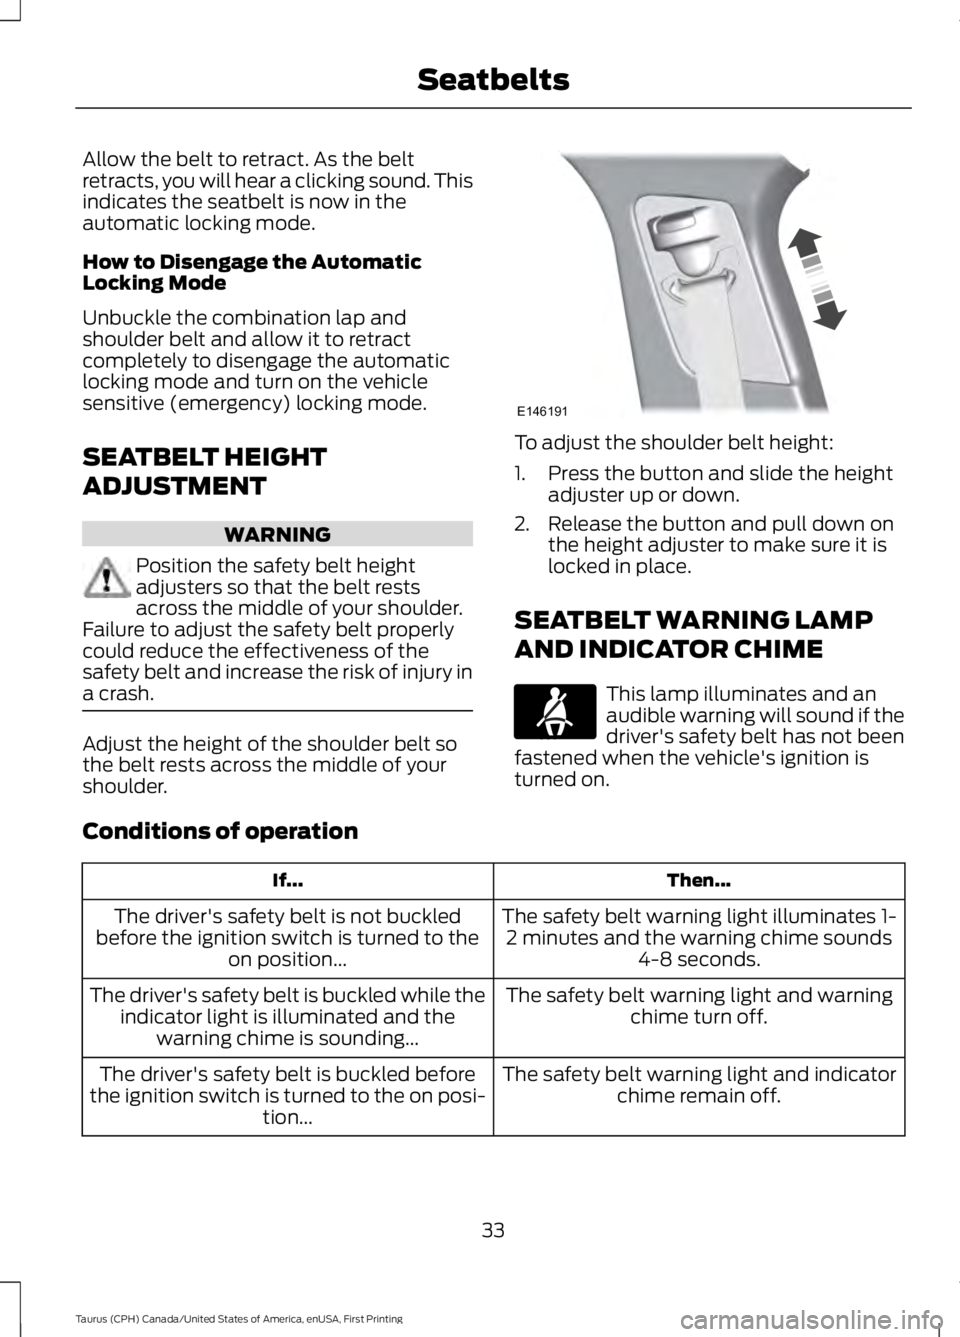
Allow the belt to retract. As the beltretracts, you will hear a clicking sound. Thisindicates the seatbelt is now in theautomatic locking mode.
How to Disengage the AutomaticLocking Mode
Unbuckle the combination lap andshoulder belt and allow it to retractcompletely to disengage the automaticlocking mode and turn on the vehiclesensitive (emergency) locking mode.
SEATBELT HEIGHT
ADJUSTMENT
WARNING
Position the safety belt heightadjusters so that the belt restsacross the middle of your shoulder.Failure to adjust the safety belt properlycould reduce the effectiveness of thesafety belt and increase the risk of injury ina crash.
Adjust the height of the shoulder belt sothe belt rests across the middle of yourshoulder.
To adjust the shoulder belt height:
1. Press the button and slide the heightadjuster up or down.
2. Release the button and pull down onthe height adjuster to make sure it islocked in place.
SEATBELT WARNING LAMP
AND INDICATOR CHIME
This lamp illuminates and anaudible warning will sound if thedriver's safety belt has not beenfastened when the vehicle's ignition isturned on.
Conditions of operation
Then...If...
The safety belt warning light illuminates 1-2 minutes and the warning chime sounds4-8 seconds.
The driver's safety belt is not buckledbefore the ignition switch is turned to theon position...
The safety belt warning light and warningchime turn off.The driver's safety belt is buckled while theindicator light is illuminated and thewarning chime is sounding...
The safety belt warning light and indicatorchime remain off.The driver's safety belt is buckled beforethe ignition switch is turned to the on posi-tion...
33
Taurus (CPH) Canada/United States of America, enUSA, First Printing
SeatbeltsE146191 E71880
Page 245 of 504
4. Switch the engine off and wait 15minutes for the oil to drain into the oilpan. Checking the engine oil level toosoon after you switch the engine offmay result in an inaccurate reading.
5. Open the hood. See Opening andClosing the Hood (page 236).
6. Remove the dipstick and wipe it witha clean, lint-free cloth. See UnderHood Overview (page 240).
7. Replace the dipstick and remove itagain to check the oil level. SeeEngine Oil Dipstick (page 241).
8.Make sure that the oil level is betweenthe maximum and minimum marks. Ifthe oil level is at the minimum mark,add oil immediately. See Capacitiesand Specifications (page 304).
9. If the oil level is correct, replace thedipstick and make sure it is fully seated.
Note:Do not remove the dipstick when theengine is running.
Note: If the oil level is between themaximum and minimum marks, the oil levelis acceptable. Do not add oil.
Note:The oil consumption of new enginesreaches its normal level after approximately3,100 mi (5,000 km).
Adding Engine Oil
WARNING
Do not remove the filler cap whenthe engine is running.
Do not use supplemental engine oiladditives because they are unnecessaryand could lead to engine damage that maynot be covered by the vehicle Warranty.
Only use oils certified for gasoline enginesby the American Petroleum Institute (API).An oil with this trademark symbolconforms to the current engine andemission system protection standards andfuel economy requirements of theInternational Lubricants SpecificationAdvisory Committee (ILSAC).
To top up the engine oil level do thefollowing:
1. Clean the area surrounding the engineoil filler cap before you remove it.
2. Remove the engine oil filler cap. SeeUnder Hood Overview (page 240).Turn it counterclockwise and removeit.
3. Add engine oil that meets Fordspecifications. See Capacities andSpecifications (page 304). You mayhave to use a funnel to pour the engineoil into the opening.
4. Recheck the oil level.
5. If the oil level is correct, replace thedipstick and make sure it is fully seated.
6. Replace the engine oil filler cap. Turnit clockwise until you feel a strongresistance.
Note: Do not add oil further than themaximum mark. Oil levels above themaximum mark may cause engine damage.
242
Taurus (CPH) Canada/United States of America, enUSA, First Printing
MaintenanceE142732
Page 247 of 504
Note: Coolant expands when it is hot. Thelevel may extend beyond the MAX mark.
Maintain coolant concentration within48% to 50%, which equates to a freezepoint between -30°F (-34°C) and -34°F(-37°C). Coolant concentration should bechecked using a refractometer. We do notrecommend the use of hydrometers orcoolant test strips for measuring coolantconcentration.
Adding Coolant
WARNING
Never remove the coolant reservoircap when the engine is running orhot.
Note: Automotive fluids are notinterchangeable. Take care not to putengine coolant in the windshield washerfluid reservoir or windshield washer fluid inthe engine coolant reservoir.
Note: Do not use stop leak pellets, coolingsystem sealants, or non-specified additivesas they can cause damage to the enginecooling or heating systems. Resultingcomponent damage may not be covered bythe vehicle Warranty.
It is very important to use predilutedcoolant approved to the correctspecification in order to avoid plugging thesmall passageways in the engine coolingsystem. See Capacities andSpecifications (page 297). Do not mixdifferent colors or types of coolant in yourvehicle. Mixing of engine coolants or usingan incorrect coolant may harm the engineor cooling system components and maynot be covered by the vehicle Warranty.
Note:If prediluted coolant is not available,use the approved concentrated coolantdiluting it to 50/50 with distilled water. SeeCapacities and Specifications (page 297).Using water that has not been deionisedmay contribute to deposit formation,corrosion and plugging of the small coolingsystem passageways.
Note:Coolants marketed for all makes andmodels may not be approved to Fordspecifications and may cause damage tothe cooling system. Resulting componentdamage may not be covered by the vehicleWarranty.
If the coolant level is at or below theminimum mark, add prediluted coolantimmediately.
To top up the coolant level do thefollowing:
1. Unscrew the cap slowly. Any pressureescapes as you unscrew the cap.
2. Add prediluted coolant approved tothe correct specification. SeeCapacities and Specifications (page297).
3. Add enough prediluted coolant toreach the correct level.
4.Replace the coolant reservoir cap, turnit clockwise until you feel a strongresistance.
5. Check the coolant level in the coolantreservoir the next few times you driveyour vehicle. If necessary, add enoughprediluted engine coolant to bring thecoolant level to the correct level.
If you have to add more than 1.1 qt (1 L) ofengine coolant per month, have yourvehicle checked as soon as possible.Operating an engine with a low level ofcoolant can result in engine overheatingand possible engine damage.
244
Taurus (CPH) Canada/United States of America, enUSA, First Printing
Maintenance
Page 252 of 504

4. Remove two bolts that attach the airfilter assembly to the front of thevehicle.
5. Remove the harness retaining clip bypulling up.
6. Do not disconnect the sensor.
7. Pull the air filter assembly up todisconnect it from the seatedgrommets located under the air filterassembly.
8. Rotate the air filter assembly 90degrees counterclockwise. Make surethe rubber hose is still connected to theair filter assembly.
9. Tighten the clamp.
You can now access the transmission fluidlevel indicator.
Checking the fluid level
Low fluid level
If the fluid level is below the MIN range ofthe dipstick, add fluid to reach the hashmark level.
Note:If the fluid level is below the MINlevel, do not drive the vehicle. An underfillcondition may cause shift or engagementconcerns or possible damage.
Correct fluid level
249
Taurus (CPH) Canada/United States of America, enUSA, First Printing
MaintenanceE173334
654 E173400 E158842 E158843