2017 FORD TAURUS seats
[x] Cancel search: seatsPage 4 of 504

Introduction
About This Manual...........................................7
Symbols Glossary.............................................7
Data Recording..................................................9
California Proposition 65..............................11
Perchlorate.........................................................11
Ford Credit..........................................................11
Replacement PartsRecommendation.......................................12
Special Notices................................................12
Mobile CommunicationsEquipment.....................................................13
Export Unique Options..................................13
Environment
Protecting the Environment........................15
At a Glance
Instrument Panel Overview........................16
Child Safety
General Information.......................................18
Installing Child Restraints............................19
Booster Seats..................................................25
Child Restraint Positioning..........................27
Child Safety Locks.........................................28
Seatbelts
Principle of Operation..................................30
Fastening the Seatbelts................................31
Seatbelt Height Adjustment......................33
Seatbelt Warning Lamp and IndicatorChime.............................................................33
Seatbelt Reminder........................................34
Child Restraint and SeatbeltMaintenance................................................35
Seatbelt Extension........................................36
Personal Safety System™
Personal Safety System™..........................37
Supplementary RestraintsSystem
Principle of Operation..................................38
Driver and Passenger Airbags...................39
Front Passenger Sensing System............40
Side Airbags.....................................................42
Safety Canopy™............................................43
Crash Sensors and Airbag Indicator.......44
Airbag Disposal...............................................45
Keys and Remote Controls
General Information on RadioFrequencies.................................................46
Remote Control..............................................46
Replacing a Lost Key or RemoteControl...........................................................50
MyKey™
Principle of Operation...................................51
Creating a MyKey............................................52
Clearing All MyKeys.......................................53
Checking MyKey System Status...............54
Using MyKey With Remote StartSystems.........................................................55
MyKey Troubleshooting...............................55
Doors and Locks
Locking and Unlocking.................................57
Keyless Entry...................................................60
Interior Luggage CompartmentRelease..........................................................62
Security
Passive Anti-Theft System........................64
Anti-Theft Alarm............................................65
Steering Wheel
Adjusting the Steering Wheel - VehiclesWith: Manual Adjustable SteeringColumn..........................................................66
1
Taurus (CPH) Canada/United States of America, enUSA, First Printing
Table of Contents
Page 5 of 504

Adjusting the Steering Wheel - VehiclesWith: Power Adjustable SteeringColumn..........................................................66
Audio Control...................................................67
Voice Control...................................................68
Cruise Control.................................................68
Information Display Control......................68
Heated Steering Wheel...............................68
Pedals
Adjusting the Pedals....................................69
Wipers and Washers
Windshield Wipers.........................................70
Autowipers........................................................70
Windshield Washers.......................................71
Lighting
General Information......................................72
Lighting Control...............................................72
Autolamps.........................................................73
Instrument Lighting Dimmer......................74
Headlamp Exit Delay....................................74
Daytime Running Lamps.............................74
Automatic High Beam Control..................75
Direction Indicators........................................76
Interior Lamps.................................................76
Windows and Mirrors
Power Windows..............................................78
Global Opening...............................................79
Exterior Mirrors................................................79
Interior Mirror....................................................81
Sun Visors..........................................................81
Sun Shades.......................................................81
Moonroof...........................................................82
Instrument Cluster
Gauges...............................................................83
Warning Lamps and Indicators................85
Audible Warnings and Indicators.............88
Information Displays
General Information.....................................89
Information Messages.................................98
Climate Control
Manual Climate Control............................109
Automatic Climate Control - VehiclesWithout: Touchscreen Display.............110
Automatic Climate Control - VehiclesWith: Premium AM/FM/CD....................111
Automatic Climate Control - VehiclesWith: Sony Audio System.......................113
Hints on Controlling the InteriorClimate..........................................................115
Heated Windows and Mirrors....................117
Cabin Air Filter.................................................117
Remote Start..................................................118
Seats
Sitting in the Correct Position...................119
Head Restraints.............................................119
Manual Seats..................................................121
Power Seats....................................................122
Memory Function..........................................125
Rear Seats.......................................................126
Heated Seats..................................................127
Climate Controlled Seats..........................128
Rear Seat Armrest........................................128
Universal Garage DoorOpener
Universal Garage Door Opener...............130
Auxiliary Power Points
Auxiliary Power Points................................135
Storage Compartments
Center Console..............................................136
2
Taurus (CPH) Canada/United States of America, enUSA, First Printing
Table of Contents
Page 7 of 504

Jump Starting the Vehicle.........................216
Post-Crash Alert System...........................218
Customer Assistance
Getting the Services You Need................219
In California (U.S. Only)............................220
The Better Business Bureau (BBB) AutoLine Program (U.S. Only).......................221
Utilizing the Mediation/ArbitrationProgram (Canada Only)........................222
Getting Assistance Outside the U.S. andCanada........................................................222
Ordering Additional Owner'sLiterature.....................................................223
Reporting Safety Defects (U.S.Only).............................................................224
Reporting Safety Defects (CanadaOnly).............................................................224
Fuses
Fuse Specification Chart..........................226
Changing a Fuse...........................................234
Maintenance
General Information...................................236
Opening and Closing the Hood..............236
Under Hood Overview - 2.0LEcoBoost™................................................238
Under Hood Overview - 3.5LDuratec........................................................239
Under Hood Overview - 3.5LEcoboost™................................................240
Engine Oil Dipstick - 2.0LEcoBoost™.................................................241
Engine Oil Dipstick - 3.5L Duratec/3.5LEcoboost™.................................................241
Engine Oil Check...........................................241
Oil Change Indicator Reset......................243
Engine Coolant Check...............................243
Automatic Transmission Fluid Check -2.0L EcoBoost™......................................247
Automatic Transmission Fluid Check -3.5L Duratec/3.5L Ecoboost™...........247
Brake Fluid Check.........................................251
Power Steering Fluid Check......................251
Washer Fluid Check.....................................251
Fuel Filter........................................................252
Changing the 12V Battery.........................252
Checking the Wiper Blades.....................254
Changing the Wiper Blades.....................254
Adjusting the Headlamps.........................255
Changing a Bulb...........................................256
Bulb Specification Chart...........................257
Changing the Engine Air Filter................259
Vehicle Care
General Information...................................260
Cleaning Products......................................260
Cleaning the Exterior.................................260
Waxing..............................................................261
Cleaning the Engine....................................262
Cleaning the Windows and WiperBlades..........................................................262
Cleaning the Interior...................................263
Cleaning the Instrument Panel andInstrument Cluster Lens.......................263
Cleaning Leather Seats.............................264
Repairing Minor Paint Damage..............264
Cleaning the Wheels..................................264
Vehicle Storage............................................265
Wheels and Tires
General Information...................................267
Tire Sealant and Inflator Kit.....................267
Tire Care...........................................................273
Using Summer Tires...................................286
Using Snow Chains.....................................286
Tire Pressure Monitoring System...........287
Changing a Road Wheel............................291
Technical Specifications..........................296
4
Taurus (CPH) Canada/United States of America, enUSA, First Printing
Table of Contents
Page 15 of 504
We offer a number of convenient ways foryou to contact us, and to manage youraccount.
Call 1-800-727-7000.
For more information about Ford Creditand access to the Account Manager, go towww.fordcredit.com.
REPLACEMENT PARTS
RECOMMENDATION
We have built your vehicle to the higheststandards using quality parts. Werecommend that you demand the use ofgenuine Ford and Motorcraft partswhenever your vehicle requires scheduledmaintenance or repair. You can clearlyidentify genuine Ford and Motorcraft partsby looking for the Ford, FoMoCo orMotorcraft branding on the parts or theirpackaging.
Scheduled Maintenance andMechanical Repairs
One of the best ways for you to make surethat your vehicle provides years of serviceis to have it maintained in line with ourrecommendations using parts thatconform to the specifications detailed inthis Owner’s Manual. Genuine Ford andMotorcraft parts meet or exceed thesespecifications.
Collision Repairs
We hope that you never experience acollision, but accidents do happen.Genuine Ford replacement collision partsmeet our stringent requirements for fit,finish, structural integrity, corrosionprotection and dent resistance. During
vehicle development we validate thatthese parts deliver the intended level ofprotection as a whole system. A great wayto know for sure you are getting this levelof protection is to use genuine Fordreplacement collision parts.
Warranty on Replacement Parts
Genuine Ford and Motorcraft replacementparts are the only replacement parts thatbenefit from a Ford Warranty. The FordWarranty may not cover damage causedto your vehicle as a result of failednon-Ford parts. For additional information,refer to the terms and conditions of theFord Warranty.
SPECIAL NOTICES
New Vehicle Limited Warranty
For a detailed description of what iscovered and what is not covered by yourvehicle’s New Vehicle Limited Warranty,see the Warranty Manual that is providedto you along with your Owner’s Manual.
Special Instructions
For your added safety, your vehicle is fittedwith sophisticated electronic controls.
WARNINGS
You risk death or serious injury toyourself and others if you do notfollow the instruction highlighted bythe warning symbol. Failure to follow thespecific warnings and instructions couldresult in personal injury.
Never place front seat mountedrear-facing child or infant seats infront of an active passenger airbag.
12
Taurus (CPH) Canada/United States of America, enUSA, First Printing
Introduction
Page 22 of 504
Recommendations for Safety Restraints for Children
Recommended restrainttypeChild size, height, weight, or ageChild
Use a child safety seat(sometimes called aninfant carrier, convertibleseat, or toddler seat).
Children weighing 40 lb (18 kg) or less(generally age four or younger).Infants ortoddlers
Use a belt-positioningbooster seat.
Children who have outgrown or no longerproperly fit in a child safety seat (gener-ally children who are less than 4 ft. 9 in.(1.45 m) tall, are greater than age fourand less than age 12, and between 40 lb(18 kg) and 80 lb (36 kg) and upward to100 lb (45 kg) if recommended by yourchild restraint manufacturer).
Small children
Use a vehicle safety belthaving the lap belt snugand low across the hips,shoulder belt centeredacross the shoulder andchest, and seatbackupright.
Children who have outgrown or no longerproperly fit in a belt-positioning boosterseat (generally children who are at least4 ft. 9 in. (1.45 m) tall or greater than80 lb (36 kg) or 100 lb (45 kg) if recom-mended by child restraint manufacturer).
Larger children
•You are required by law to properly usesafety seats for infants and toddlers inthe United States and Canada.
•Many states and provinces require thatsmall children use approved boosterseats until they reach age eight, aheight of 4 feet 9 inches (1.45 meters)tall, or 80 lb (36 kg). Check your localand state or provincial laws for specificrequirements about the safety ofchildren in your vehicle.
•When possible, always properlyrestrain children 12 years of age andunder in a rear seating position of yourvehicle. Accident statistics suggest thatchildren are safer when properlyrestrained in the rear seating positionsthan in a front seating position. SeeFront Passenger Sensing System(page 40).
INSTALLING CHILD
RESTRAINTS
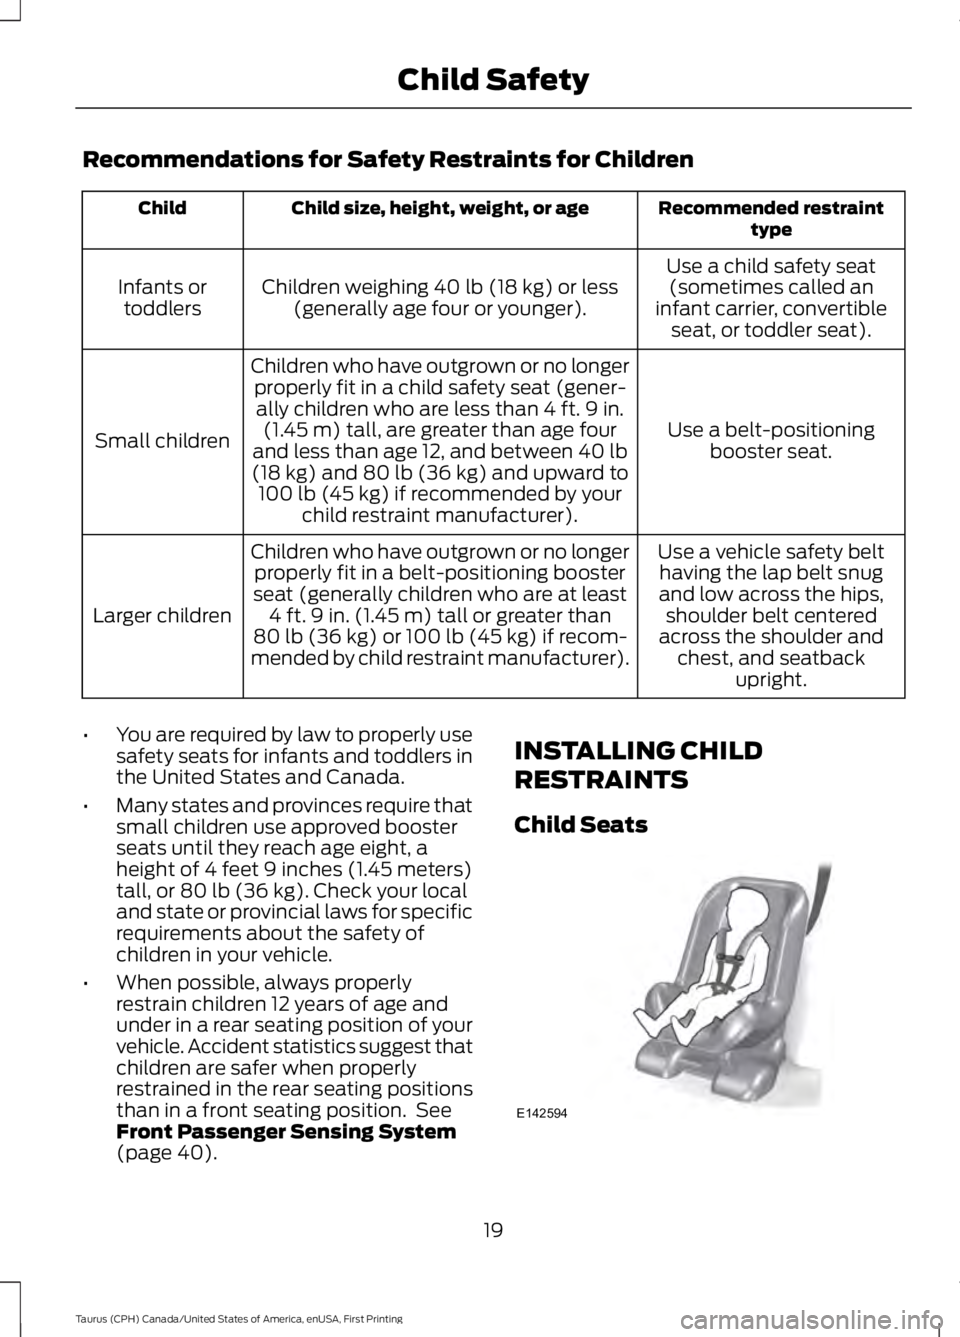
Child Seats
19
Taurus (CPH) Canada/United States of America, enUSA, First Printing
Child SafetyE142594
Page 24 of 504
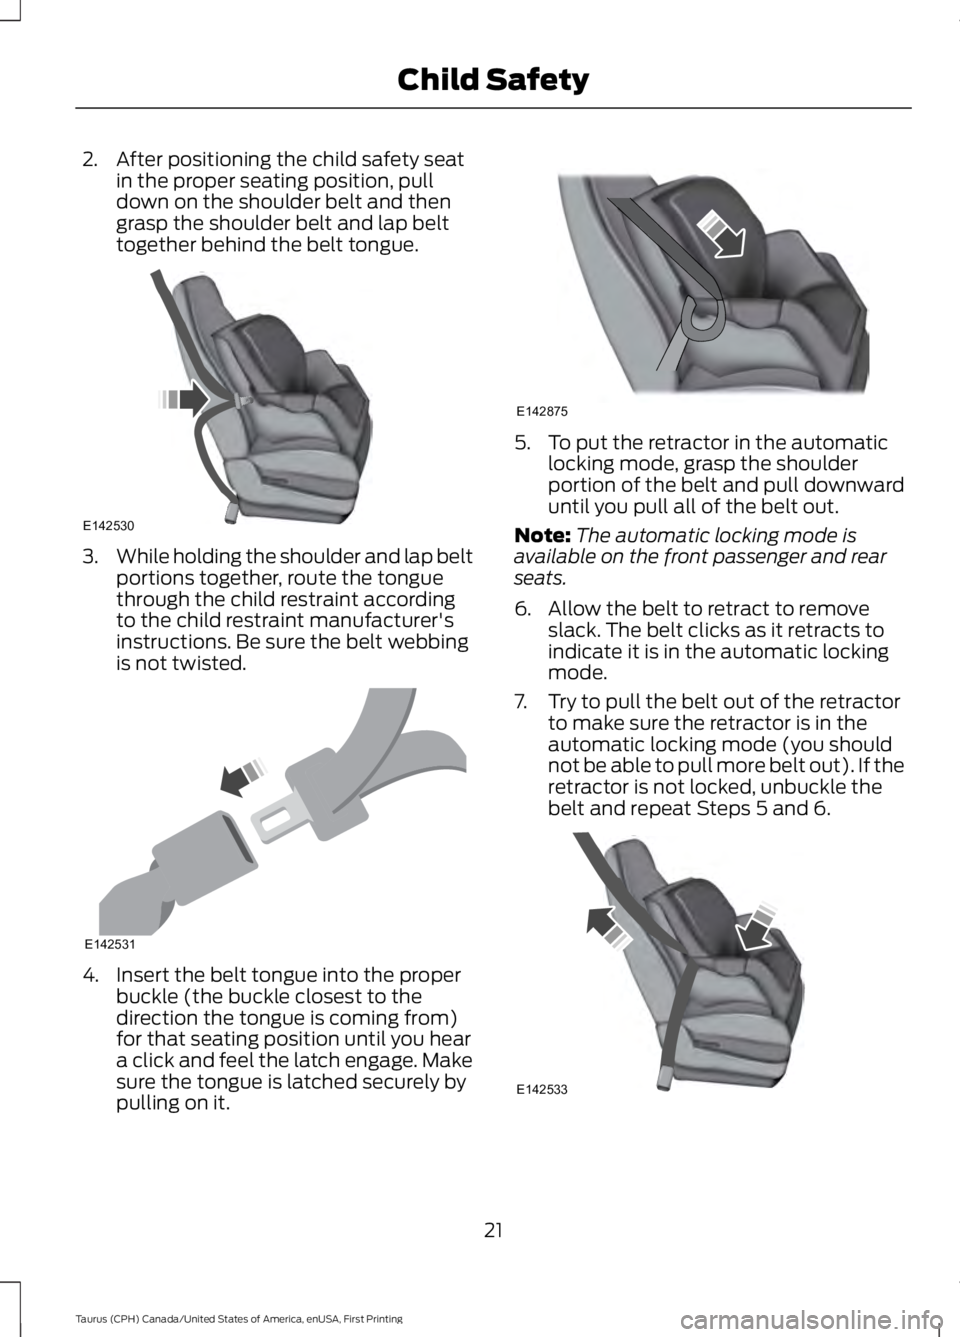
2. After positioning the child safety seatin the proper seating position, pulldown on the shoulder belt and thengrasp the shoulder belt and lap belttogether behind the belt tongue.
3.While holding the shoulder and lap beltportions together, route the tonguethrough the child restraint accordingto the child restraint manufacturer'sinstructions. Be sure the belt webbingis not twisted.
4. Insert the belt tongue into the properbuckle (the buckle closest to thedirection the tongue is coming from)for that seating position until you heara click and feel the latch engage. Makesure the tongue is latched securely bypulling on it.
5. To put the retractor in the automaticlocking mode, grasp the shoulderportion of the belt and pull downwarduntil you pull all of the belt out.
Note:The automatic locking mode isavailable on the front passenger and rearseats.
6. Allow the belt to retract to removeslack. The belt clicks as it retracts toindicate it is in the automatic lockingmode.
7. Try to pull the belt out of the retractorto make sure the retractor is in theautomatic locking mode (you shouldnot be able to pull more belt out). If theretractor is not locked, unbuckle thebelt and repeat Steps 5 and 6.
21
Taurus (CPH) Canada/United States of America, enUSA, First Printing
Child SafetyE142530 E142531 E142875 E142533
Page 25 of 504
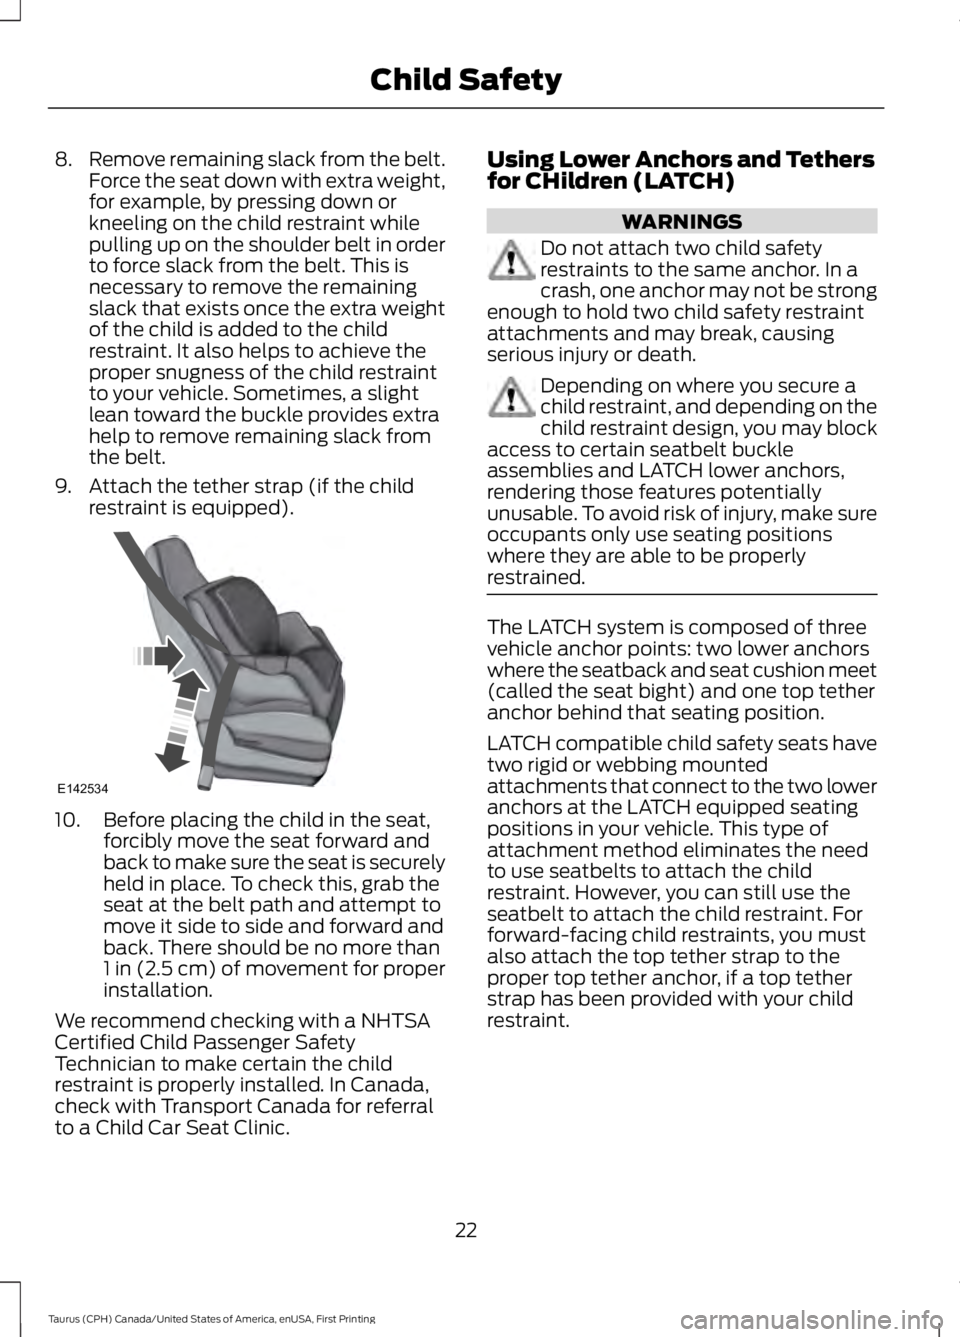
8.Remove remaining slack from the belt.Force the seat down with extra weight,for example, by pressing down orkneeling on the child restraint whilepulling up on the shoulder belt in orderto force slack from the belt. This isnecessary to remove the remainingslack that exists once the extra weightof the child is added to the childrestraint. It also helps to achieve theproper snugness of the child restraintto your vehicle. Sometimes, a slightlean toward the buckle provides extrahelp to remove remaining slack fromthe belt.
9. Attach the tether strap (if the childrestraint is equipped).
10. Before placing the child in the seat,forcibly move the seat forward andback to make sure the seat is securelyheld in place. To check this, grab theseat at the belt path and attempt tomove it side to side and forward andback. There should be no more than1 in (2.5 cm) of movement for properinstallation.
We recommend checking with a NHTSACertified Child Passenger SafetyTechnician to make certain the childrestraint is properly installed. In Canada,check with Transport Canada for referralto a Child Car Seat Clinic.
Using Lower Anchors and Tethersfor CHildren (LATCH)
WARNINGS
Do not attach two child safetyrestraints to the same anchor. In acrash, one anchor may not be strongenough to hold two child safety restraintattachments and may break, causingserious injury or death.
Depending on where you secure achild restraint, and depending on thechild restraint design, you may blockaccess to certain seatbelt buckleassemblies and LATCH lower anchors,rendering those features potentiallyunusable. To avoid risk of injury, make sureoccupants only use seating positionswhere they are able to be properlyrestrained.
The LATCH system is composed of threevehicle anchor points: two lower anchorswhere the seatback and seat cushion meet(called the seat bight) and one top tetheranchor behind that seating position.
LATCH compatible child safety seats havetwo rigid or webbing mountedattachments that connect to the two loweranchors at the LATCH equipped seatingpositions in your vehicle. This type ofattachment method eliminates the needto use seatbelts to attach the childrestraint. However, you can still use theseatbelt to attach the child restraint. Forforward-facing child restraints, you mustalso attach the top tether strap to theproper top tether anchor, if a top tetherstrap has been provided with your childrestraint.
22
Taurus (CPH) Canada/United States of America, enUSA, First Printing
Child SafetyE142534
Page 26 of 504
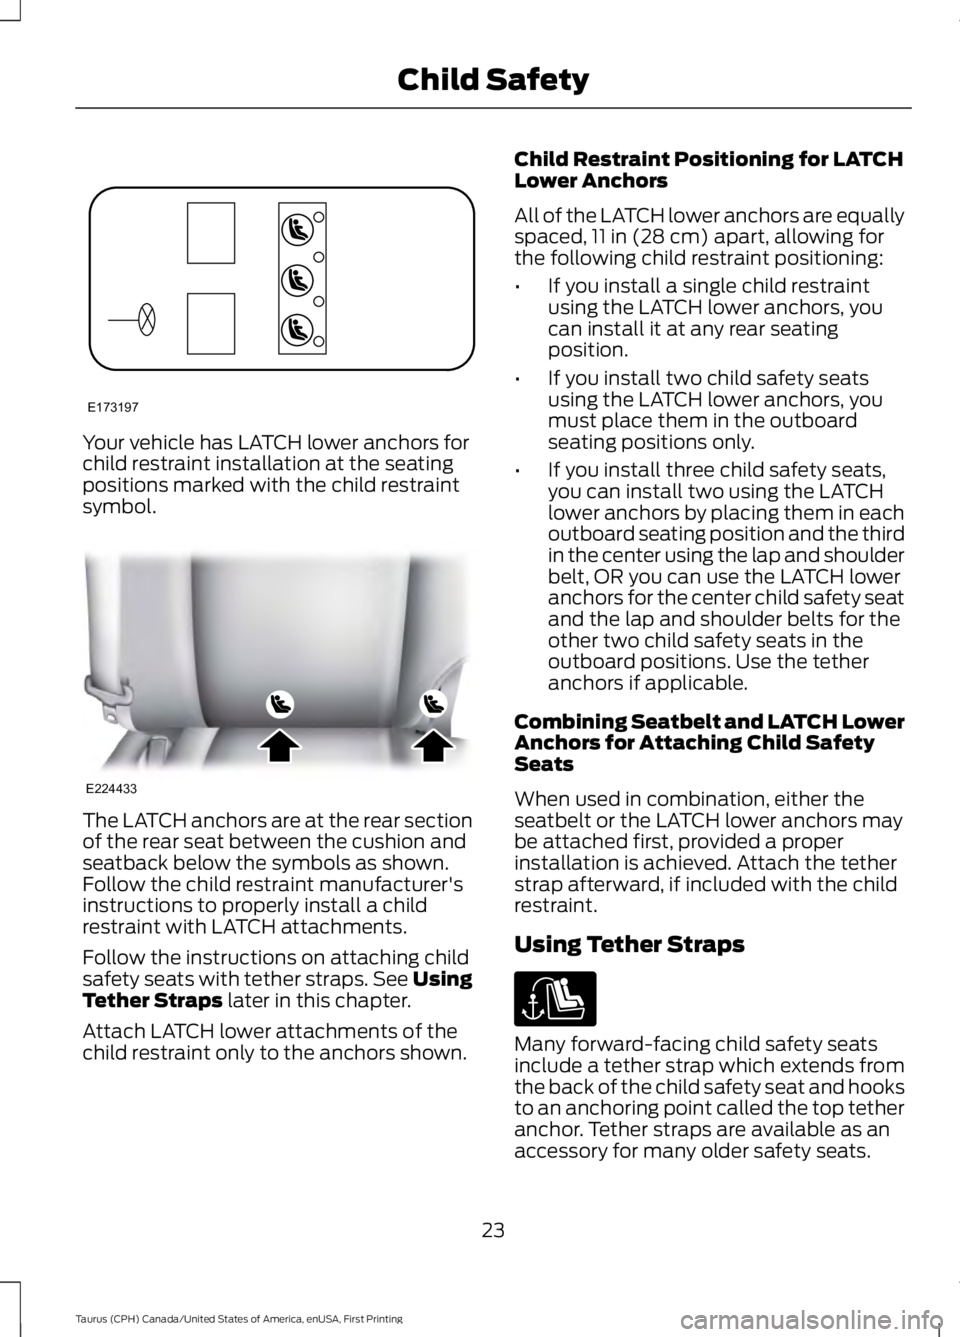
Your vehicle has LATCH lower anchors forchild restraint installation at the seatingpositions marked with the child restraintsymbol.
The LATCH anchors are at the rear sectionof the rear seat between the cushion andseatback below the symbols as shown.Follow the child restraint manufacturer'sinstructions to properly install a childrestraint with LATCH attachments.
Follow the instructions on attaching childsafety seats with tether straps. See UsingTether Straps later in this chapter.
Attach LATCH lower attachments of thechild restraint only to the anchors shown.
Child Restraint Positioning for LATCHLower Anchors
All of the LATCH lower anchors are equallyspaced, 11 in (28 cm) apart, allowing forthe following child restraint positioning:
•If you install a single child restraintusing the LATCH lower anchors, youcan install it at any rear seatingposition.
•If you install two child safety seatsusing the LATCH lower anchors, youmust place them in the outboardseating positions only.
•If you install three child safety seats,you can install two using the LATCHlower anchors by placing them in eachoutboard seating position and the thirdin the center using the lap and shoulderbelt, OR you can use the LATCH loweranchors for the center child safety seatand the lap and shoulder belts for theother two child safety seats in theoutboard positions. Use the tetheranchors if applicable.
Combining Seatbelt and LATCH LowerAnchors for Attaching Child SafetySeats
When used in combination, either theseatbelt or the LATCH lower anchors maybe attached first, provided a properinstallation is achieved. Attach the tetherstrap afterward, if included with the childrestraint.
Using Tether Straps
Many forward-facing child safety seatsinclude a tether strap which extends fromthe back of the child safety seat and hooksto an anchoring point called the top tetheranchor. Tether straps are available as anaccessory for many older safety seats.
23
Taurus (CPH) Canada/United States of America, enUSA, First Printing
Child SafetyE173197 E224433