2017 FORD TAURUS warning light
[x] Cancel search: warning lightPage 203 of 504
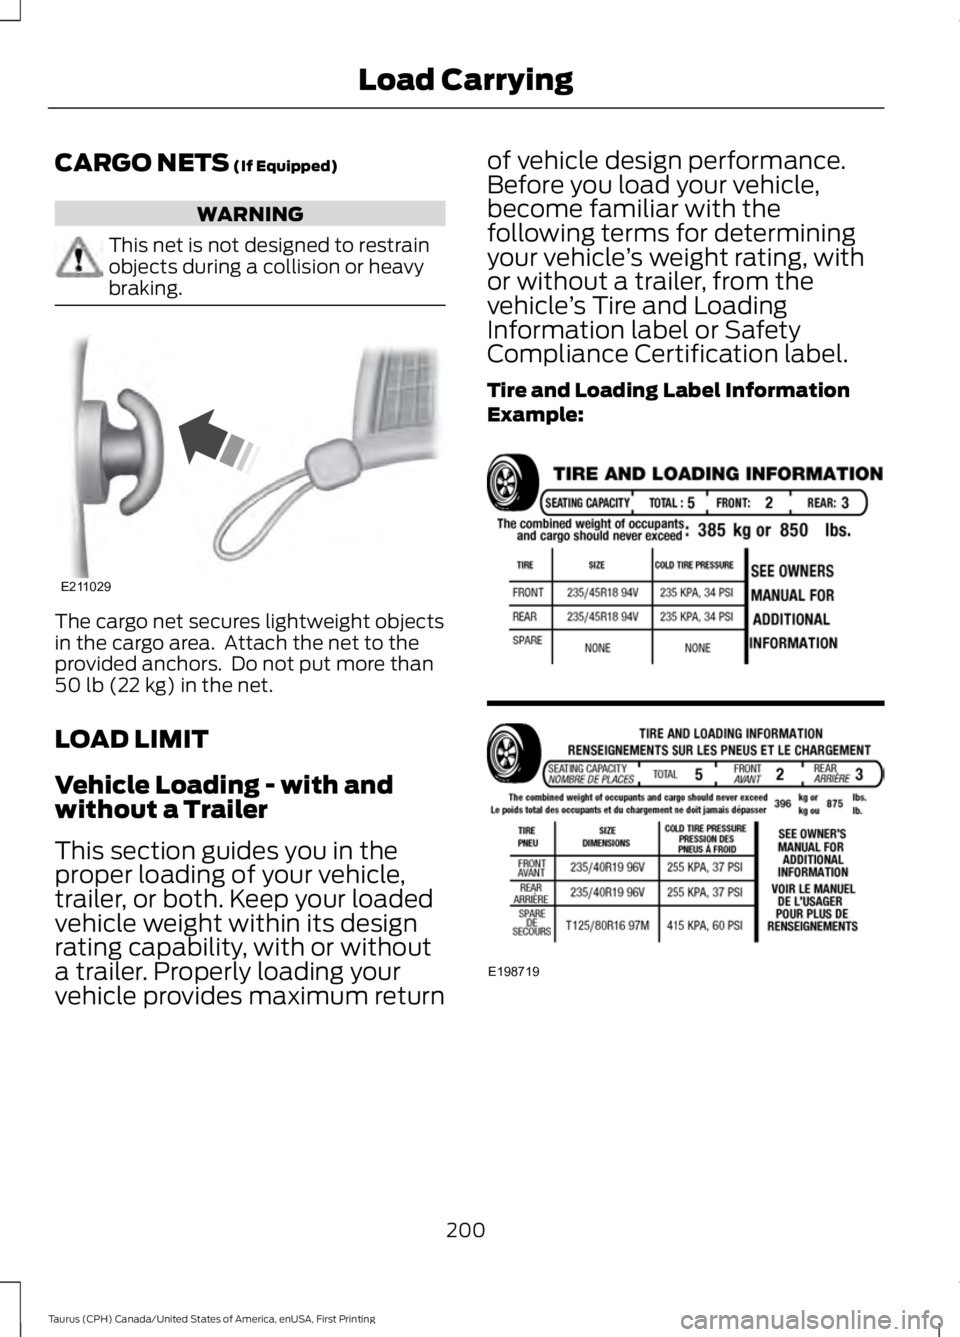
CARGO NETS (If Equipped)
WARNING
This net is not designed to restrainobjects during a collision or heavybraking.
The cargo net secures lightweight objectsin the cargo area. Attach the net to theprovided anchors. Do not put more than50 lb (22 kg) in the net.
LOAD LIMIT
Vehicle Loading - with andwithout a Trailer
This section guides you in theproper loading of your vehicle,trailer, or both. Keep your loadedvehicle weight within its designrating capability, with or without
a trailer. Properly loading yourvehicle provides maximum return
of vehicle design performance.Before you load your vehicle,become familiar with thefollowing terms for determiningyour vehicle’s weight rating, withor without a trailer, from thevehicle’s Tire and LoadingInformation label or SafetyCompliance Certification label.
Tire and Loading Label InformationExample:
200
Taurus (CPH) Canada/United States of America, enUSA, First Printing
Load CarryingE211029 E198719
Page 209 of 504

TOWING A TRAILER
WARNINGS
Towing trailers beyond themaximum recommendedgross trailer weight exceeds thelimit of your vehicle and couldresult in engine damage,transmission damage, structuraldamage, loss of vehicle control,vehicle rollover and personalinjury.
Do not exceed the GVWR orthe GAWR specified on thecertification label.
Note: See RecommendedTowing Weights (page 207).
Your vehicle may have electricalitems, such as fuses or relays,related to towing. See Fuses(page 226).
Your vehicle's load capacitydesignation is by weight, not byvolume, so you cannot necessarilyuse all available space whenloading a vehicle or trailer.
Towing a trailer places an extraload on your vehicle's engine,transmission, axle, brakes, tiresand suspension. Inspect thesecomponents periodically during,and after, any towing operation.
Load Placement
To help minimize how trailermovement affects your vehiclewhen driving:
•Load the heaviest items closestto the trailer floor.
•Load the heaviest itemscentered between the left andright side trailer tires.
•Load the heaviest items abovethe trailer axles or just slightlyforward toward the trailertongue. Do not allow the finaltrailer tongue weight to goabove or below 10-15% of theloaded trailer weight.
•Select a ball mount with thecorrect rise or drop and loadcapacity. When both theloaded vehicle and trailer areconnected, the trailer frameshould be level, or slightlyangled down toward yourvehicle, when viewed from theside.
When driving with a trailer orpayload, a slight takeoff vibrationor shudder may be present due tothe increased payload weight.Additional information regardingproper trailer loading and settingyour vehicle up for towing islocated in another chapter of thismanual. See Load Limit (page200).
You can also find information inthe RV & Trailer Towing Guideavailable at your authorizeddealer, or online.
206
Taurus (CPH) Canada/United States of America, enUSA, First Printing
Towing
Page 211 of 504
ESSENTIAL TOWING CHECKS
Follow these guidelines for safe towing:
•Do not tow a trailer until you drive yourvehicle at least 1,000 mi (1,600 km).
•Consult your local motor vehicle lawsfor towing a trailer.
•See the instructions included withtowing accessories for the properinstallation and adjustmentspecifications.
•Service your vehicle more frequently ifyou tow a trailer. See your scheduledmaintenance information.
•If you use a rental trailer, follow theinstructions the rental agency givesyou.
You can find information on loadspecification terms found on the tire labeland Safety Compliance label as well asinstructions on calculating your vehicle'sload in the Load Carrying chapter. SeeLoad Limit (page 200).
Remember to account for the trailertongue weight as part of your vehicle loadwhen calculating the total vehicle weight.
Hitches
Do not use a hitch that either clamps ontothe bumper or attaches to the axle.
Distribute the trailer load so 10-15% of thetotal trailer weight is on the tongue.
Safety Chains
Note:Never attach safety chains to thebumper.
Always connect the safety chains to thehook retainers of your vehicle hitch.
To connect the trailer’s safety chains, crossthem under the trailer tongue and allowenough slack for turning tight corners. Donot allow the chains to drag on the ground.
Trailer Brakes
WARNING
Do not connect a trailer's hydraulicbrake system directly to yourvehicle's brake system. Your vehiclemay not have enough braking power andyour chances of having a collision greatlyincrease.
Electric brakes and manual, automatic orsurge-type trailer brakes are safe if youinstall them properly and adjust them tothe manufacturer's specifications. Thetrailer brakes must meet local and federalregulations.
The rating for the tow vehicle's brakingsystem operation is at the gross vehicleweight rating, not the gross combinedweight rating.
Separate functioning brake systemsare required for safe control of towedvehicles and trailers weighing morethan 1500 pounds (680 kilograms)when loaded.
Trailer Lamps
WARNING
Never connect any trailer lamp wiringto the vehicle's tail lamp wiring; thismay damage the electrical systemresulting in fire. Contact your authorizeddealer as soon as possible for assistancein proper trailer tow wiring installation.Additional electrical equipment may berequired.
Trailer lamps are required on most towedvehicles. Make sure all running lights, brakelights, turn signals and hazard lights areworking.
208
Taurus (CPH) Canada/United States of America, enUSA, First Printing
Towing
Page 215 of 504

•Transmissions give their best fueleconomy when operated in the topcruise gear and with steady pressureon the gas pedal.
•Four-wheel-drive operation (ifequipped) is less fuel efficient thantwo-wheel-drive operation.
•Close the windows for high-speeddriving.
DRIVING THROUGH WATER
WARNING
Do not drive through flowing or deepwater as you may lose control of yourvehicle.
Note:Driving through standing water cancause vehicle damage.
Note:Engine damage can occur if waterenters the air filter.
Before driving through standing water,check the depth. Never drive through waterthat is higher than the bottom of the frontrocker area of your vehicle.
When driving through standing water, drivevery slowly and do not stop your vehicle.Your brake performance and traction maybe limited. After driving through water andas soon as it is safe to do so:
•Lightly press the brake pedal to dry thebrakes and to check that they work.
•Check that the horn works.
•Check that the exterior lights work.
•Turn the steering wheel to check thatthe steering power assist works.
FLOOR MATS
WARNINGS
Always use floor mats that aredesigned to fit the foot well of yourvehicle. Only use floor mats thatleave the pedal area unobstructed. Onlyuse floor mats that are firmly secured toretention posts so that they cannot slip outof position and interfere with the pedalsor impair safe operation of your vehicle inother ways.
Pedals that cannot move freely cancause loss of vehicle control andincrease the risk of serious personalinjury.
Always make sure that the floormats are properly attached to theretention posts in the carpet that aresupplied with your vehicle. Floor mats mustbe properly secured to both retention poststo make sure mats do not shift out ofposition.
Never place floor mats or any othercovering in the vehicle foot well thatcannot be properly secured toprevent them from moving and interferingwith the pedals or the ability to control thevehicle.
Never place floor mats or any othercovering on top of already installedfloor mats. Floor mats should alwaysrest on top of vehicle carpeting surface andnot another floor mat or other covering.Additional floor mats or any other coveringwill reduce the pedal clearance andpotentially interfere with pedal operation.
212
Taurus (CPH) Canada/United States of America, enUSA, First Printing
Driving HintsE176360
Page 219 of 504
Note:When you try to restart your vehicleafter a fuel shutoff, the vehicle makes surethat various systems are safe to restart.Once your vehicle determines that thesystems are safe, then the vehicle will allowyou to restart.
Note:In the event that your vehicle doesnot restart after your third attempt, contactan authorized dealer.
JUMP STARTING THE VEHICLE
WARNINGS
Batteries normally produce explosivegases which can cause personalinjury. Therefore, do not allowflames, sparks or lighted substances tocome near the battery. When working nearthe battery, always shield your face andprotect your eyes. Always provide correctventilation.
Keep batteries out of reach ofchildren. Batteries contain sulfuricacid. Avoid contact with skin, eyes orclothing. Shield your eyes when workingnear the battery to protect against possiblesplashing of acid solution. In case of acidcontact with skin or eyes, flushimmediately with water for a minimum of15 minutes and get prompt medicalattention. If acid is swallowed, call aphysician immediately.
Use only adequately sized cableswith insulated clamps.
Preparing Your Vehicle
Do not attempt to push-start yourautomatic transmission vehicle.
Note:Attempting to push-start a vehiclewith an automatic transmission may causetransmission damage.
Note:Use only a 12-volt supply to start yourvehicle.
Note:Do not disconnect the battery of thedisabled vehicle as this could damage thevehicle electrical system.
Park the booster vehicle close to the hoodof the disabled vehicle, making sure thetwo vehicles do not touch.
Connecting the Jumper Cables
WARNINGS
Do not attach the cables to fuel lines,engine rocker covers, the intakemanifold or electrical componentsas grounding points. Stay clear of movingparts. To avoid reverse polarityconnections, make sure that you correctlyidentify the positive (+) and negative (-)terminals on both the disabled and boostervehicles before connecting the cables.
Do not attach the end of the positivecable to the studs or L-shaped eyeletlocated above the positive (+)terminal of your vehicle’s battery. Highcurrent may flow through and causedamage to the fuses.
Do not connect the end of thesecond cable to the negative (-)terminal of the battery to be jumped.A spark may cause an explosion of thegases that surround the battery.
Note:In the illustration, the bottom vehiclerepresents the booster vehicle.
216
Taurus (CPH) Canada/United States of America, enUSA, First Printing
Roadside Emergencies
Page 246 of 504

Note:Make sure you install the oil filler capcorrectly.
Note:Soak up any spillage with anabsorbent cloth immediately.
OIL CHANGE INDICATOR
RESET
Use the information display controls onthe steering wheel to reset the oil changeindicator.
From the main menu scroll to:
Action and descriptionMessage
Press the right arrow button,then from this menu scrollto the following message.
Settings
Press the right arrow button,then from this menu scrollto the following message.
Vehicle
Press the right arrow button,then from this menu scrollto the following message.
Oil Life
Press and hold the OKbutton until the instrumentcluster displays thefollowing message.
Hold OK toReset
Reset Successful
When the oil change indic-ator resets the instrumentcluster displays 100%.
Remaining Life
{00}%
Action and descriptionMessage
If the instrument clusterdisplays one of the followingmessages, repeat theprocess.
Not Reset
Reset Cancelled
ENGINE COOLANT CHECK
WARNINGS
Do not remove the coolant reservoircap when the cooling system is hot.Wait 10 minutes for the coolingsystem to cool down. Cover the coolantreservoir cap with a thick cloth to preventthe possibility of scalding and slowlyremove the cap. Failure to follow thisinstruction could result in personal injury.
Do not put coolant in the windshieldwasher fluid reservoir. If sprayed onthe windshield, coolant could makeit difficult to see through the windshield.
To reduce the risk of personal injury,make sure the engine is cool beforeunscrewing the coolant pressurerelief cap. The cooling system is underpressure. Steam and hot liquid can comeout forcefully when you loosen the capslightly.
Do not add coolant further than theMAX mark.
When the engine is cold, check theconcentration and level of the coolant atthe intervals listed in the scheduledmaintenance information. See ScheduledMaintenance (page 447).
Note:Make sure that the coolant level isbetween the MIN and MAX marks on thecoolant reservoir.
243
Taurus (CPH) Canada/United States of America, enUSA, First Printing
Maintenance
Page 255 of 504
Add fluid to fill the reservoir if the level islow. Only use a washer fluid that meetsFord specifications. See Capacities andSpecifications (page 297).
State or local regulations on volatileorganic compounds may restrict the useof methanol, a common windshield washerantifreeze additive. Washer fluidscontaining non-methanol antifreezeagents should be used only if they providecold weather protection without damagingthe vehicle’s paint finish, wiper blades orwasher system.
FUEL FILTER
Your vehicle is equipped with a lifetimefuel filter that is integrated with the fueltank. Regular maintenance or replacementis not needed.
CHANGING THE 12V BATTERY
WARNINGS
Batteries normally produce explosivegases which can cause personalinjury. Therefore, do not allowflames, sparks or lighted substances tocome near the battery. When working nearthe battery, always shield your face andprotect your eyes. Always provide correctventilation.
When lifting a plastic-cased battery,excessive pressure on the end wallscould cause acid to flow through thevent caps, resulting in personal injury anddamage to the vehicle or battery. Lift thebattery with a battery carrier or with yourhands on opposite corners.
WARNINGS
Keep batteries out of reach ofchildren. Batteries contain sulfuricacid. Avoid contact with skin, eyes orclothing. Shield your eyes when workingnear the battery to protect against possiblesplashing of acid solution. In case of acidcontact with skin or eyes, flushimmediately with water for a minimum of15 minutes and get prompt medicalattention. If acid is swallowed, call aphysician immediately.
Battery posts, terminals and relatedaccessories contain lead and leadcompounds. Wash hands afterhandling.
This vehicle may be fitted with morethan one battery. Removing thebattery cables from only one batterydoes not disconnect your vehicle electricalsystem. Make sure you disconnect thebattery cables from all batteries whendisconnecting power. Failure to do so maycause serious personal injury or propertydamage.
Your vehicle is fitted with a Motorcraftmaintenance-free battery which normallydoes not require additional water.
When a battery replacement is required,you must use a recommendedreplacement battery that matches theelectrical requirements of the vehicle.
Note:After cleaning or replacing thebattery, make sure you reinstall the batterycover or shield.
Note:If you add electrical accessories orcomponents to the vehicle, it may adverselyaffect the low voltage battery performanceand durability. This may also affect theperformance of other electrical systems inthe vehicle.
For longer, trouble-free operation, keep thetop of the battery clean and dry.
252
Taurus (CPH) Canada/United States of America, enUSA, First Printing
Maintenance
Page 259 of 504
5. Locate the vertical adjuster on eachheadlamp. Use a Phillips #2screwdriver to turn the adjuster eitherclockwise or counterclockwise toadjust the vertical aim of theheadlamp. The horizontal edge of thebrighter light should touch thehorizontal reference line.
6.Repeat Steps 3 through 7 to adjust theother headlamp.
7.Close the hood and turn off the lamps.
Horizontal Aim Adjustment
Horizontal aim is not required for thisvehicle and is not adjustable.
CHANGING A BULB
WARNINGS
Bulbs can become hot. Let the bulbcool down before removing it. Failureto do so could result in personalinjury.
Switch the lamps and the ignition off.Failure to follow this warning couldresult in serious personal injury.
Use the correct specification bulb. SeeBulb Specification Chart (page 257).
Install in the reverse order unless otherwisestated.
High-Intensity DischargeHeadlamps
These lamps operate at a high voltage. Seean authorized dealer if they fail.
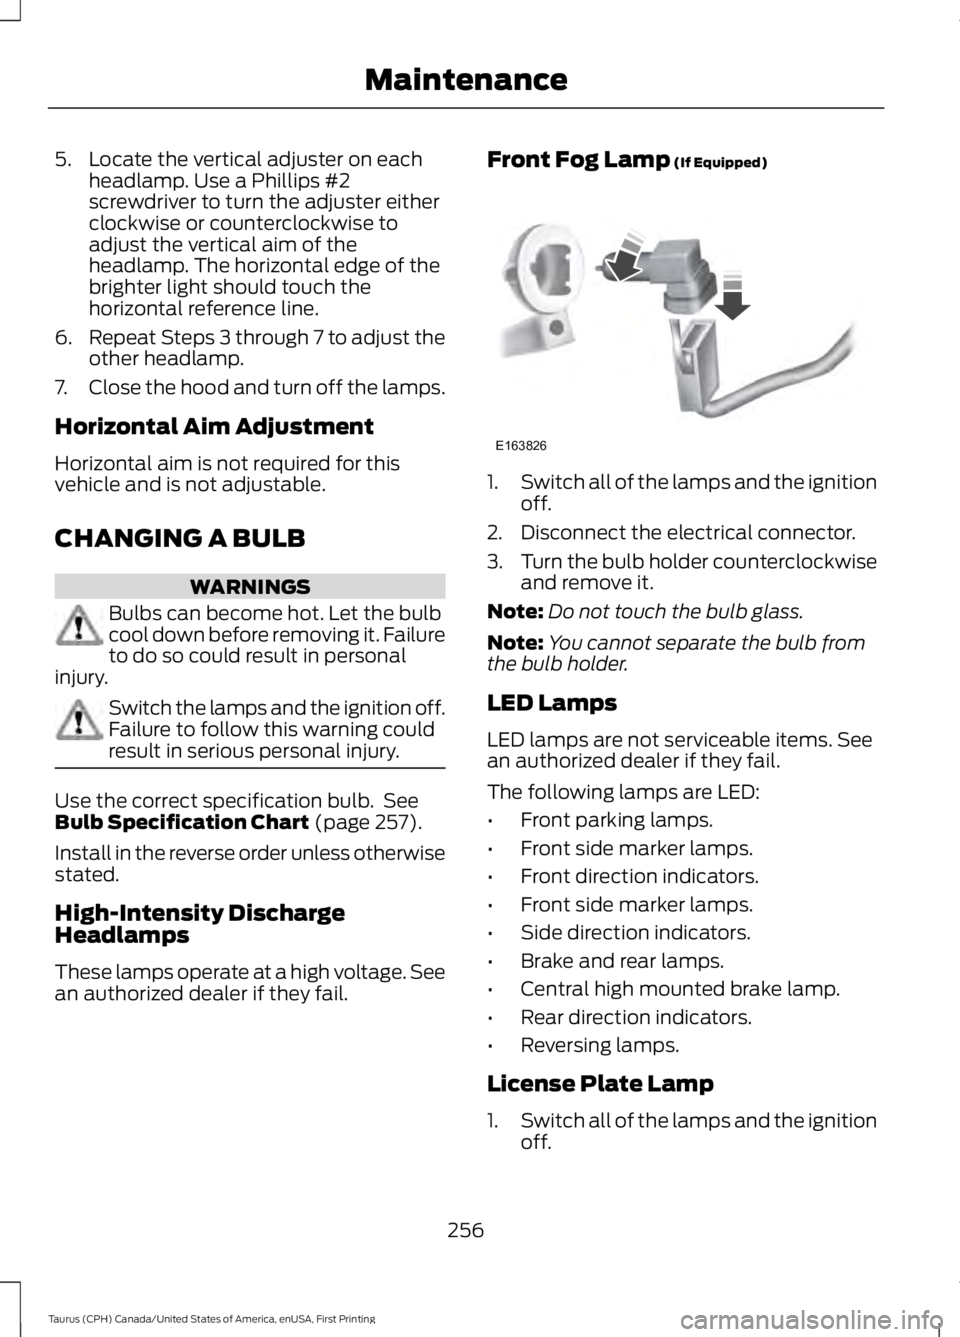
Front Fog Lamp (If Equipped)
1.Switch all of the lamps and the ignitionoff.
2. Disconnect the electrical connector.
3.Turn the bulb holder counterclockwiseand remove it.
Note:Do not touch the bulb glass.
Note:You cannot separate the bulb fromthe bulb holder.
LED Lamps
LED lamps are not serviceable items. Seean authorized dealer if they fail.
The following lamps are LED:
•Front parking lamps.
•Front side marker lamps.
•Front direction indicators.
•Front side marker lamps.
•Side direction indicators.
•Brake and rear lamps.
•Central high mounted brake lamp.
•Rear direction indicators.
•Reversing lamps.
License Plate Lamp
1.Switch all of the lamps and the ignitionoff.
256
Taurus (CPH) Canada/United States of America, enUSA, First Printing
MaintenanceE163826