2017 FORD TAURUS warning light
[x] Cancel search: warning lightPage 5 of 504

Adjusting the Steering Wheel - VehiclesWith: Power Adjustable SteeringColumn..........................................................66
Audio Control...................................................67
Voice Control...................................................68
Cruise Control.................................................68
Information Display Control......................68
Heated Steering Wheel...............................68
Pedals
Adjusting the Pedals....................................69
Wipers and Washers
Windshield Wipers.........................................70
Autowipers........................................................70
Windshield Washers.......................................71
Lighting
General Information......................................72
Lighting Control...............................................72
Autolamps.........................................................73
Instrument Lighting Dimmer......................74
Headlamp Exit Delay....................................74
Daytime Running Lamps.............................74
Automatic High Beam Control..................75
Direction Indicators........................................76
Interior Lamps.................................................76
Windows and Mirrors
Power Windows..............................................78
Global Opening...............................................79
Exterior Mirrors................................................79
Interior Mirror....................................................81
Sun Visors..........................................................81
Sun Shades.......................................................81
Moonroof...........................................................82
Instrument Cluster
Gauges...............................................................83
Warning Lamps and Indicators................85
Audible Warnings and Indicators.............88
Information Displays
General Information.....................................89
Information Messages.................................98
Climate Control
Manual Climate Control............................109
Automatic Climate Control - VehiclesWithout: Touchscreen Display.............110
Automatic Climate Control - VehiclesWith: Premium AM/FM/CD....................111
Automatic Climate Control - VehiclesWith: Sony Audio System.......................113
Hints on Controlling the InteriorClimate..........................................................115
Heated Windows and Mirrors....................117
Cabin Air Filter.................................................117
Remote Start..................................................118
Seats
Sitting in the Correct Position...................119
Head Restraints.............................................119
Manual Seats..................................................121
Power Seats....................................................122
Memory Function..........................................125
Rear Seats.......................................................126
Heated Seats..................................................127
Climate Controlled Seats..........................128
Rear Seat Armrest........................................128
Universal Garage DoorOpener
Universal Garage Door Opener...............130
Auxiliary Power Points
Auxiliary Power Points................................135
Storage Compartments
Center Console..............................................136
2
Taurus (CPH) Canada/United States of America, enUSA, First Printing
Table of Contents
Page 11 of 504

Cabin air filter
Check fuel cap
Child safety door lock or unlock
Child seat lower anchor
Child seat tether anchor
Cruise control
Do not open when hot
Engine air filter
Engine coolant
Engine coolant temperature
Engine oil
Explosive gas
Fan warning
Fasten seatbelt
Flammable
Front airbag
Front fog lamps
Fuel pump reset
Fuse compartment
Hazard warning flashers
Heated rear window
Heated windshield
Interior luggage compartmentrelease
Jack
Keep out of reach of children
Lighting control
Low tire pressure warning
Maintain correct fluid level
Note operating instructions
Panic alarm
8
Taurus (CPH) Canada/United States of America, enUSA, First Printing
Introduction E71340 E71880 E231160 E67017 E161353
Page 15 of 504
We offer a number of convenient ways foryou to contact us, and to manage youraccount.
Call 1-800-727-7000.
For more information about Ford Creditand access to the Account Manager, go towww.fordcredit.com.
REPLACEMENT PARTS
RECOMMENDATION
We have built your vehicle to the higheststandards using quality parts. Werecommend that you demand the use ofgenuine Ford and Motorcraft partswhenever your vehicle requires scheduledmaintenance or repair. You can clearlyidentify genuine Ford and Motorcraft partsby looking for the Ford, FoMoCo orMotorcraft branding on the parts or theirpackaging.
Scheduled Maintenance andMechanical Repairs
One of the best ways for you to make surethat your vehicle provides years of serviceis to have it maintained in line with ourrecommendations using parts thatconform to the specifications detailed inthis Owner’s Manual. Genuine Ford andMotorcraft parts meet or exceed thesespecifications.
Collision Repairs
We hope that you never experience acollision, but accidents do happen.Genuine Ford replacement collision partsmeet our stringent requirements for fit,finish, structural integrity, corrosionprotection and dent resistance. During
vehicle development we validate thatthese parts deliver the intended level ofprotection as a whole system. A great wayto know for sure you are getting this levelof protection is to use genuine Fordreplacement collision parts.
Warranty on Replacement Parts
Genuine Ford and Motorcraft replacementparts are the only replacement parts thatbenefit from a Ford Warranty. The FordWarranty may not cover damage causedto your vehicle as a result of failednon-Ford parts. For additional information,refer to the terms and conditions of theFord Warranty.
SPECIAL NOTICES
New Vehicle Limited Warranty
For a detailed description of what iscovered and what is not covered by yourvehicle’s New Vehicle Limited Warranty,see the Warranty Manual that is providedto you along with your Owner’s Manual.
Special Instructions
For your added safety, your vehicle is fittedwith sophisticated electronic controls.
WARNINGS
You risk death or serious injury toyourself and others if you do notfollow the instruction highlighted bythe warning symbol. Failure to follow thespecific warnings and instructions couldresult in personal injury.
Never place front seat mountedrear-facing child or infant seats infront of an active passenger airbag.
12
Taurus (CPH) Canada/United States of America, enUSA, First Printing
Introduction
Page 19 of 504
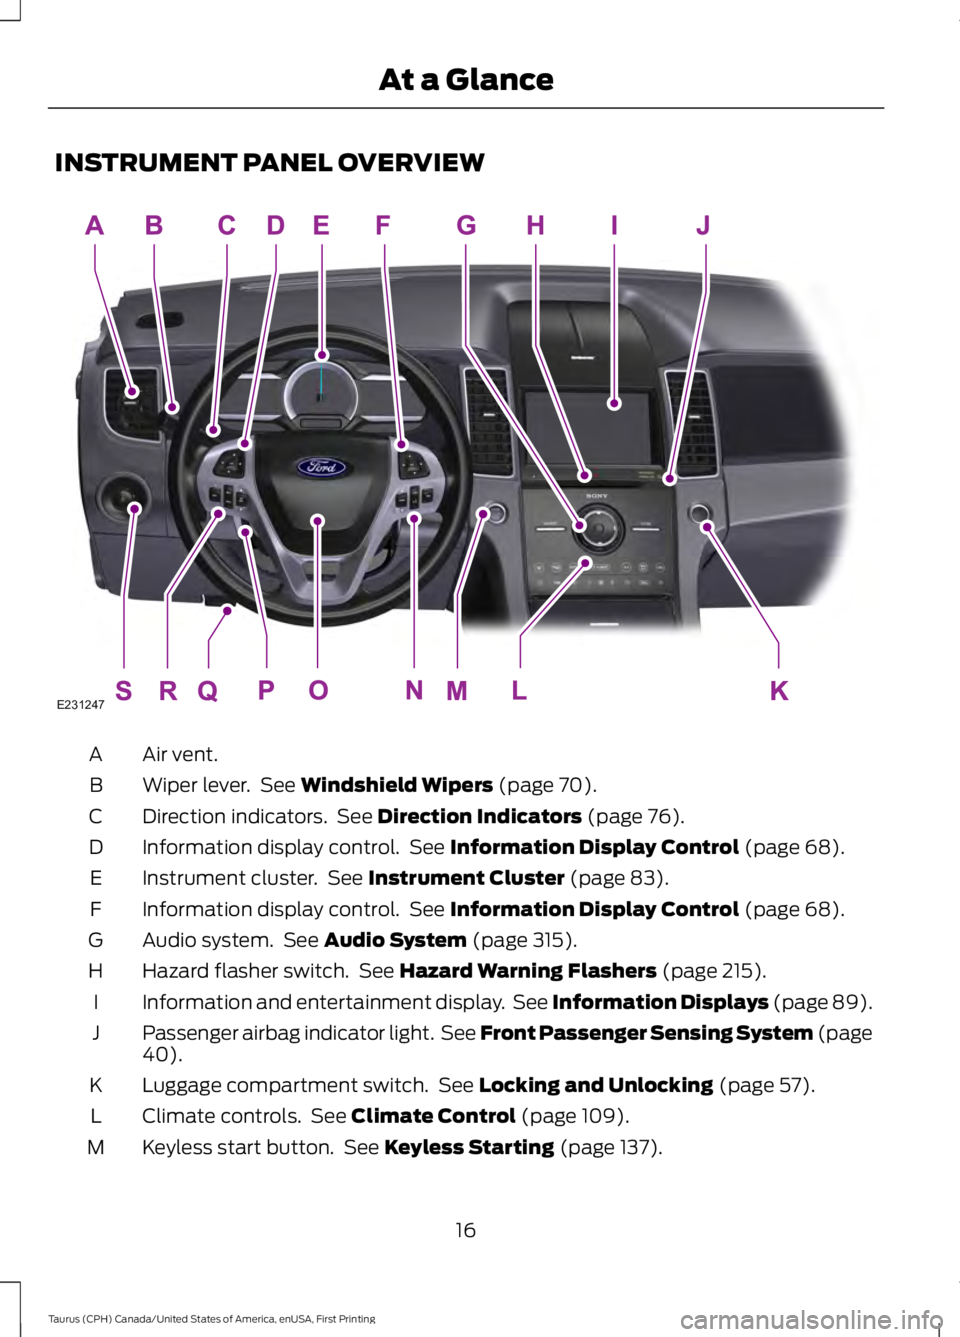
INSTRUMENT PANEL OVERVIEW
Air vent.A
Wiper lever. See Windshield Wipers (page 70).B
Direction indicators. See Direction Indicators (page 76).C
Information display control. See Information Display Control (page 68).D
Instrument cluster. See Instrument Cluster (page 83).E
Information display control. See Information Display Control (page 68).F
Audio system. See Audio System (page 315).G
Hazard flasher switch. See Hazard Warning Flashers (page 215).H
Information and entertainment display. See Information Displays (page 89).I
Passenger airbag indicator light. See Front Passenger Sensing System (page40).J
Luggage compartment switch. See Locking and Unlocking (page 57).K
Climate controls. See Climate Control (page 109).L
Keyless start button. See Keyless Starting (page 137).M
16
Taurus (CPH) Canada/United States of America, enUSA, First Printing
At a GlanceE231247
Page 25 of 504
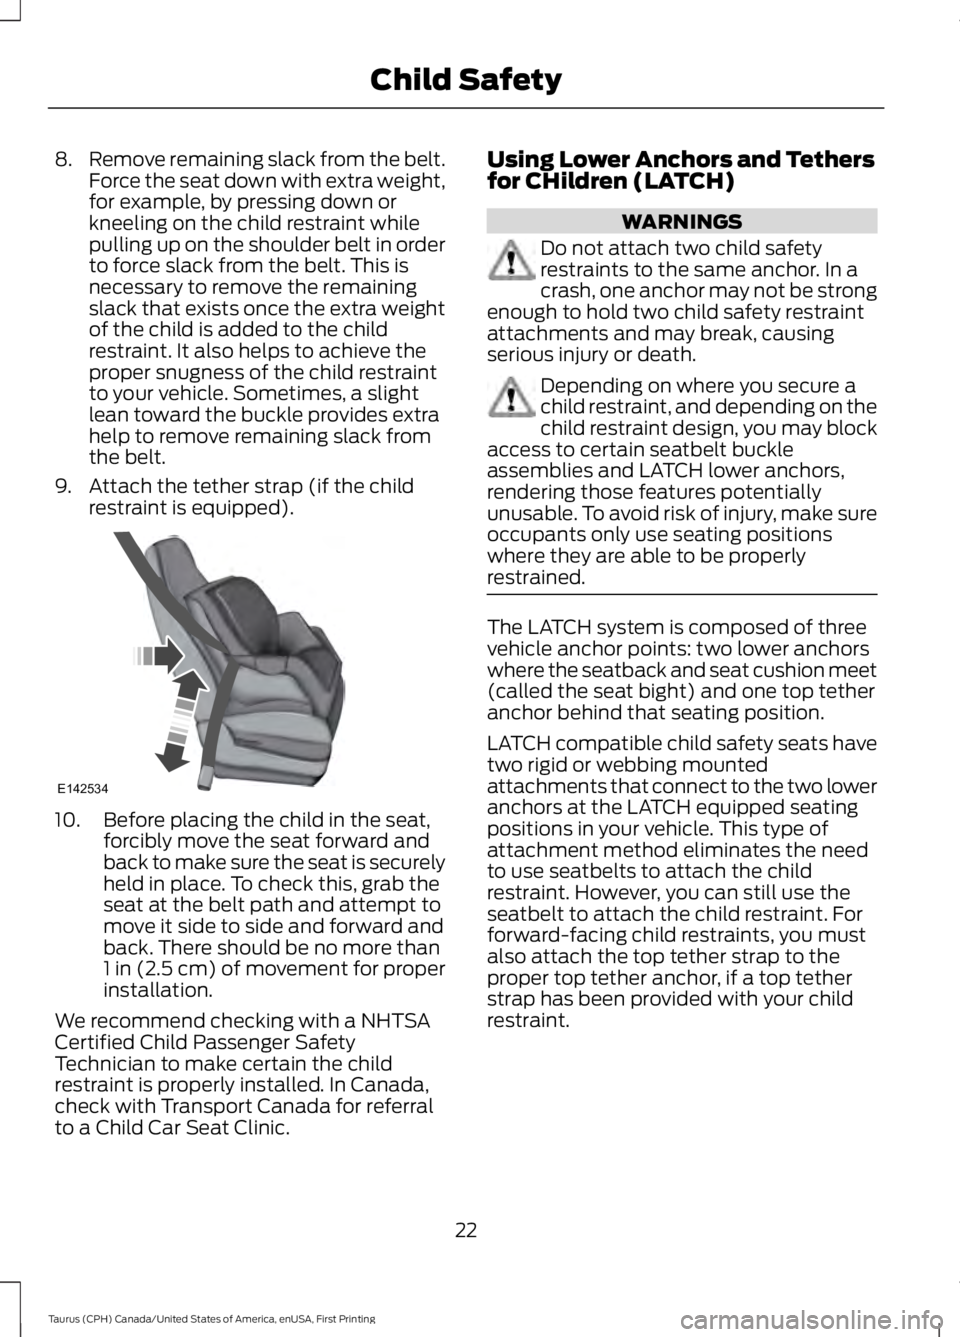
8.Remove remaining slack from the belt.Force the seat down with extra weight,for example, by pressing down orkneeling on the child restraint whilepulling up on the shoulder belt in orderto force slack from the belt. This isnecessary to remove the remainingslack that exists once the extra weightof the child is added to the childrestraint. It also helps to achieve theproper snugness of the child restraintto your vehicle. Sometimes, a slightlean toward the buckle provides extrahelp to remove remaining slack fromthe belt.
9. Attach the tether strap (if the childrestraint is equipped).
10. Before placing the child in the seat,forcibly move the seat forward andback to make sure the seat is securelyheld in place. To check this, grab theseat at the belt path and attempt tomove it side to side and forward andback. There should be no more than1 in (2.5 cm) of movement for properinstallation.
We recommend checking with a NHTSACertified Child Passenger SafetyTechnician to make certain the childrestraint is properly installed. In Canada,check with Transport Canada for referralto a Child Car Seat Clinic.
Using Lower Anchors and Tethersfor CHildren (LATCH)
WARNINGS
Do not attach two child safetyrestraints to the same anchor. In acrash, one anchor may not be strongenough to hold two child safety restraintattachments and may break, causingserious injury or death.
Depending on where you secure achild restraint, and depending on thechild restraint design, you may blockaccess to certain seatbelt buckleassemblies and LATCH lower anchors,rendering those features potentiallyunusable. To avoid risk of injury, make sureoccupants only use seating positionswhere they are able to be properlyrestrained.
The LATCH system is composed of threevehicle anchor points: two lower anchorswhere the seatback and seat cushion meet(called the seat bight) and one top tetheranchor behind that seating position.
LATCH compatible child safety seats havetwo rigid or webbing mountedattachments that connect to the two loweranchors at the LATCH equipped seatingpositions in your vehicle. This type ofattachment method eliminates the needto use seatbelts to attach the childrestraint. However, you can still use theseatbelt to attach the child restraint. Forforward-facing child restraints, you mustalso attach the top tether strap to theproper top tether anchor, if a top tetherstrap has been provided with your childrestraint.
22
Taurus (CPH) Canada/United States of America, enUSA, First Printing
Child SafetyE142534
Page 33 of 504

PRINCIPLE OF OPERATION
WARNINGS
Always drive and ride with yourseatback upright and the lap beltsnug and low across the hips.
To reduce the risk of injury, makesure children sit where they can beproperly restrained.
Never let a passenger hold a child onhis or her lap while your vehicle ismoving. The passenger cannotprotect the child from injury in a crash.
All occupants of your vehicle,including the driver, should alwaysproperly wear their seatbelts, evenwhen an airbag supplemental restraintsystem is provided. Failure to properly wearyour seatbelt could seriously increase therisk of injury or death.
It is extremely dangerous to ride in acargo area, inside or outside of avehicle. In a crash, people riding inthese areas are more likely to be seriouslyinjured or killed. Do not allow people to ridein any area of your vehicle that is notequipped with seats and seatbelts. Be sureeveryone in your vehicle is in a seat andusing a seatbelt properly.
In a rollover crash, an unbeltedperson is significantly more likely todie than a person wearing a seatbelt.
Each seating position in your vehiclehas a specific seatbelt assemblywhich is made up of one buckle andone tongue that are designed to be usedas a pair. 1) Use the shoulder belt on theoutside shoulder only. Never wear theshoulder belt under the arm. 2) Neverswing the seatbelt around your neck overthe inside shoulder. 3) Never use a singlebelt for more than one person.
WARNINGS
When possible, all children 12 yearsold and under should be properlyrestrained in a rear seating position.Failure to follow this could seriouslyincrease the risk of injury or death.
Seatbelts and seats can become hotin a vehicle that has been closed upin sunny weather; they could burn asmall child. Check seat covers and bucklesbefore you place a child anywhere nearthem.
Front and rear seat occupants,including pregnant women, shouldwear seatbelts for optimumprotection in an accident.
All seating positions in your vehicle havelap and shoulder seatbelts. All occupantsof the vehicle should always properly weartheir seatbelts, even when an airbagsupplemental restraint system is provided.
The seatbelt system consists of:
•Lap and shoulder seatbelts.
•Shoulder seatbelt with automaticlocking mode, (except driver seatbelt).
•Height adjuster at the front outboardseating positions.
•Seatbelt pretensioner at the frontoutboard seating positions.
•Belt tension sensor at the frontoutboard passenger seating position.
· Seatbelt warning light andchime.
· Crash sensors and monitoringsystem with readiness indicator.
30
Taurus (CPH) Canada/United States of America, enUSA, First Printing
SeatbeltsE71880 E67017
Page 35 of 504
Pregnant women should always wear theirseatbelt. Position the lap belt portion of acombination lap and shoulder belt lowacross the hips below the belly and wornas tight as comfort allows. Position theshoulder belt to cross the middle of theshoulder and the center of the chest.
Seatbelt Locking Modes
WARNINGS
After a crash, have a qualifiedtechnician check all the seatbelts tomake sure the seatbelts includingthe automatic locking retractor feature forchild restraints operate properly. Werecommend replacing any system that hasdamage or does not operate properly.Failure to do so can result in personal injuryor death in the event of a sudden stop oranother crash.
You must replace the seatbelt if theautomatic locking retractor or anyother seatbelt function is notoperating correctly. Failure to replace theseatbelt and retractor assembly couldincrease the risk of injury in a crash.
All safety restraints in the vehicle arecombination lap and shoulder belts. Thedriver seatbelt has the first type of lockingmode, and the front outboard passengerand rear seat seatbelts have both types oflocking modes described as follows:
Vehicle Sensitive Mode
This is the normal retractor mode, whichallows free shoulder belt lengthadjustment to your movements andlocking in response to vehicle movement.For example, if the driver brakes suddenlyor turns a corner sharply, or the vehiclereceives an impact of about 5 mph(8 km/h) or more, the combinationseatbelts lock to help reduce forwardmovement of the driver and passengers.
In addition, the retractor is designed to lockif the webbing is pulled out too quickly. Ifthis occurs, let the belt retract slightly andpull the webbing out again in a slow andcontrolled manner.
Automatic Locking Mode
In this mode, the shoulder beltautomatically pre-locks. The belt retractsto remove any slack in the shoulder belt.The automatic locking mode is notavailable on the driver seatbelt.
When to Use the Automatic LockingMode
Use this mode any time a child safety seat,except a booster, is installed in passengerfront or rear seating positions. Children 12years old and under should be properlyrestrained in a rear seating positionwhenever possible. See Child Safety(page 18).
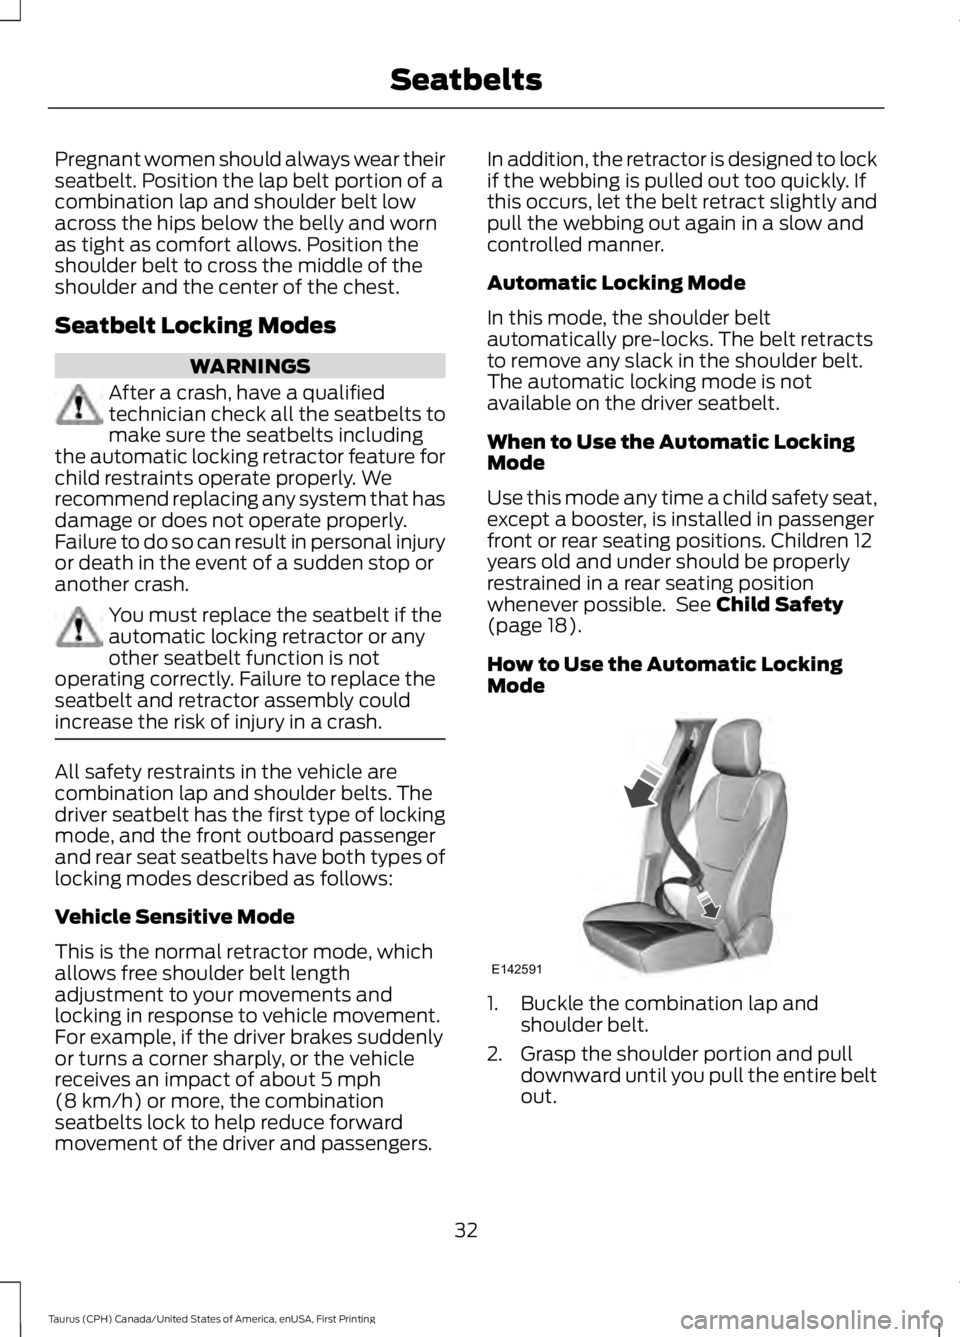
How to Use the Automatic LockingMode
1. Buckle the combination lap andshoulder belt.
2. Grasp the shoulder portion and pulldownward until you pull the entire beltout.
32
Taurus (CPH) Canada/United States of America, enUSA, First Printing
SeatbeltsE142591
Page 36 of 504
Allow the belt to retract. As the beltretracts, you will hear a clicking sound. Thisindicates the seatbelt is now in theautomatic locking mode.
How to Disengage the AutomaticLocking Mode
Unbuckle the combination lap andshoulder belt and allow it to retractcompletely to disengage the automaticlocking mode and turn on the vehiclesensitive (emergency) locking mode.
SEATBELT HEIGHT
ADJUSTMENT
WARNING
Position the safety belt heightadjusters so that the belt restsacross the middle of your shoulder.Failure to adjust the safety belt properlycould reduce the effectiveness of thesafety belt and increase the risk of injury ina crash.
Adjust the height of the shoulder belt sothe belt rests across the middle of yourshoulder.
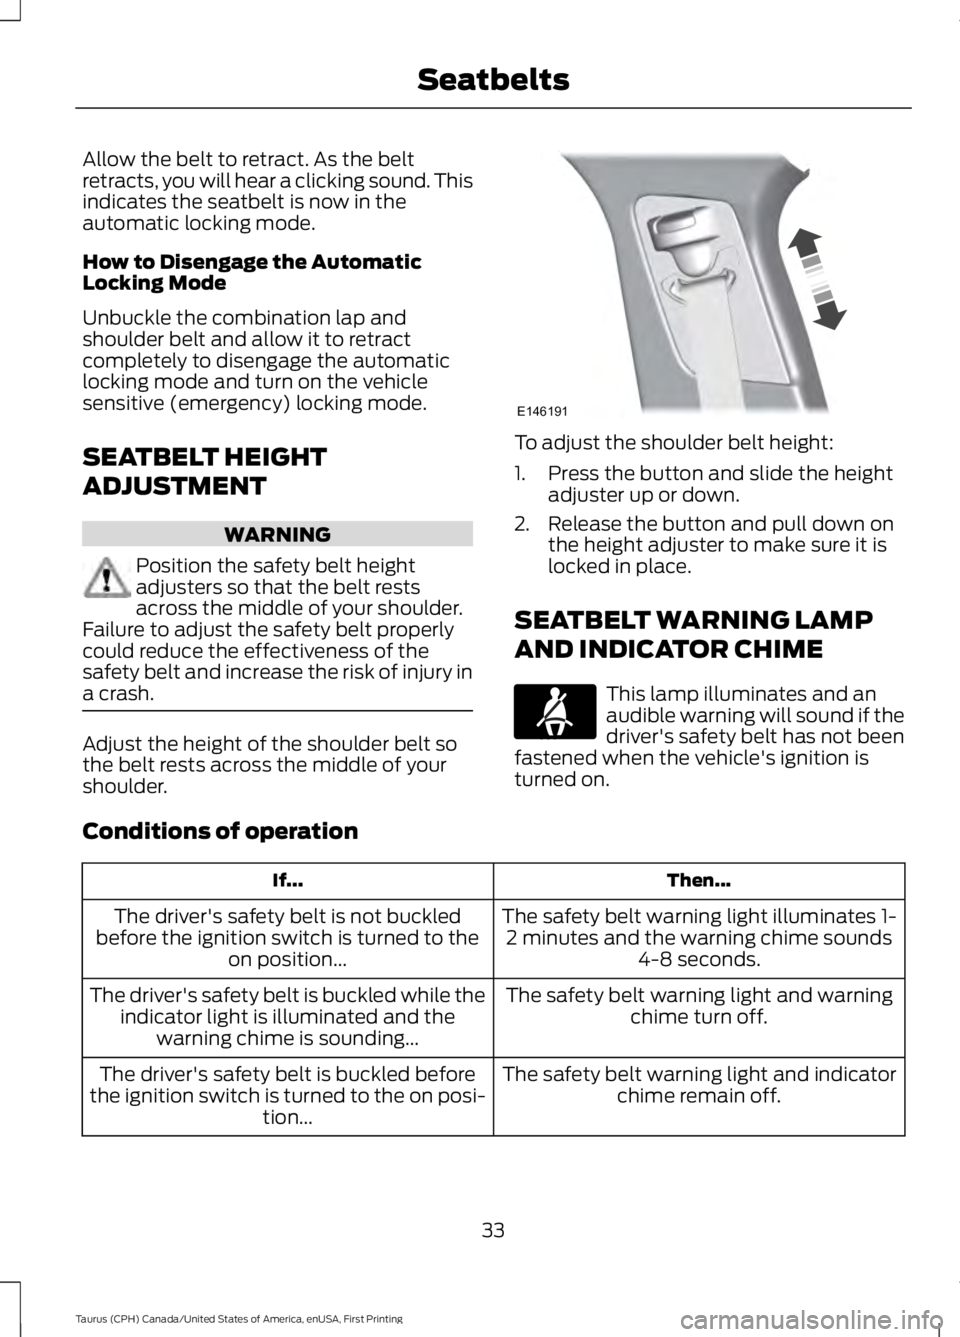
To adjust the shoulder belt height:
1. Press the button and slide the heightadjuster up or down.
2. Release the button and pull down onthe height adjuster to make sure it islocked in place.
SEATBELT WARNING LAMP
AND INDICATOR CHIME
This lamp illuminates and anaudible warning will sound if thedriver's safety belt has not beenfastened when the vehicle's ignition isturned on.
Conditions of operation
Then...If...
The safety belt warning light illuminates 1-2 minutes and the warning chime sounds4-8 seconds.
The driver's safety belt is not buckledbefore the ignition switch is turned to theon position...
The safety belt warning light and warningchime turn off.The driver's safety belt is buckled while theindicator light is illuminated and thewarning chime is sounding...
The safety belt warning light and indicatorchime remain off.The driver's safety belt is buckled beforethe ignition switch is turned to the on posi-tion...
33
Taurus (CPH) Canada/United States of America, enUSA, First Printing
SeatbeltsE146191 E71880