2017 FORD TAURUS warning light
[x] Cancel search: warning lightPage 103 of 504
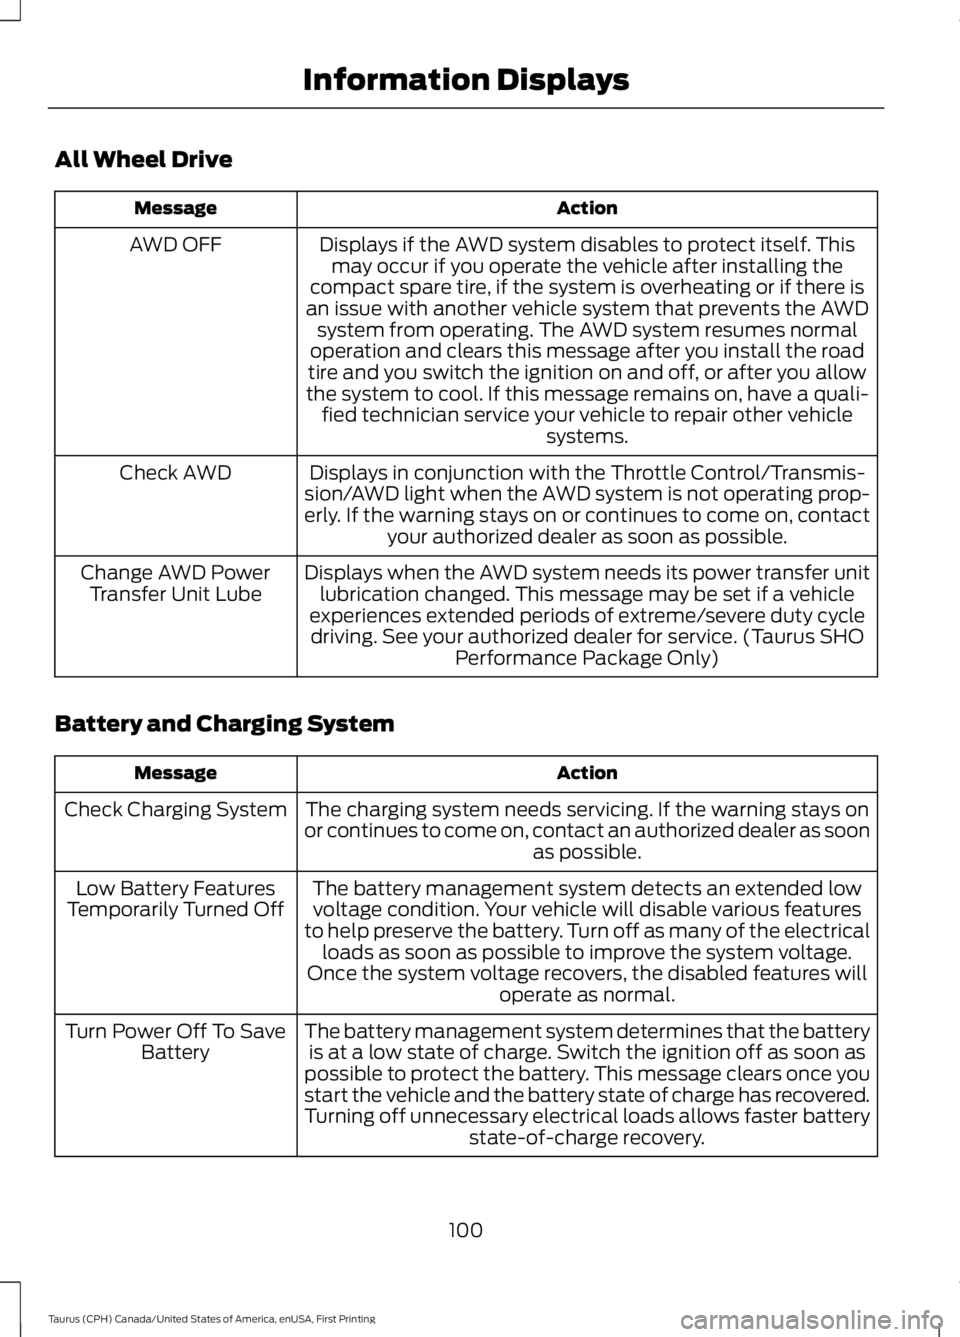
All Wheel Drive
ActionMessage
Displays if the AWD system disables to protect itself. Thismay occur if you operate the vehicle after installing thecompact spare tire, if the system is overheating or if there isan issue with another vehicle system that prevents the AWDsystem from operating. The AWD system resumes normaloperation and clears this message after you install the roadtire and you switch the ignition on and off, or after you allowthe system to cool. If this message remains on, have a quali-fied technician service your vehicle to repair other vehiclesystems.
AWD OFF
Displays in conjunction with the Throttle Control/Transmis-sion/AWD light when the AWD system is not operating prop-erly. If the warning stays on or continues to come on, contactyour authorized dealer as soon as possible.
Check AWD
Displays when the AWD system needs its power transfer unitlubrication changed. This message may be set if a vehicleexperiences extended periods of extreme/severe duty cycledriving. See your authorized dealer for service. (Taurus SHOPerformance Package Only)
Change AWD PowerTransfer Unit Lube
Battery and Charging System
ActionMessage
The charging system needs servicing. If the warning stays onor continues to come on, contact an authorized dealer as soonas possible.
Check Charging System
The battery management system detects an extended lowvoltage condition. Your vehicle will disable various featuresto help preserve the battery. Turn off as many of the electricalloads as soon as possible to improve the system voltage.Once the system voltage recovers, the disabled features willoperate as normal.
Low Battery FeaturesTemporarily Turned Off
The battery management system determines that the batteryis at a low state of charge. Switch the ignition off as soon aspossible to protect the battery. This message clears once youstart the vehicle and the battery state of charge has recovered.Turning off unnecessary electrical loads allows faster batterystate-of-charge recovery.
Turn Power Off To SaveBattery
100
Taurus (CPH) Canada/United States of America, enUSA, First Printing
Information Displays
Page 122 of 504
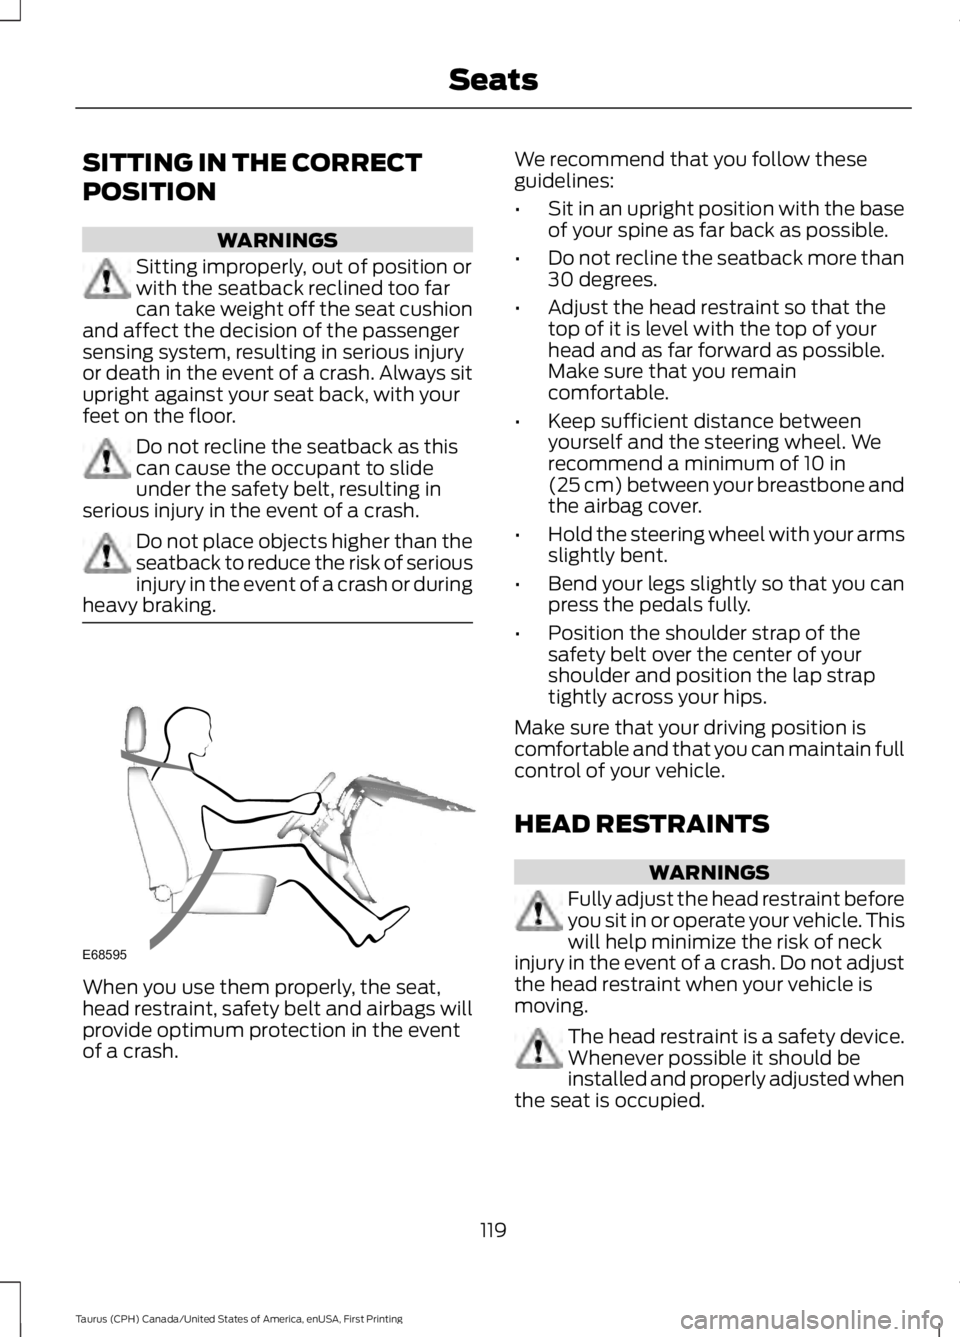
SITTING IN THE CORRECT
POSITION
WARNINGS
Sitting improperly, out of position orwith the seatback reclined too farcan take weight off the seat cushionand affect the decision of the passengersensing system, resulting in serious injuryor death in the event of a crash. Always situpright against your seat back, with yourfeet on the floor.
Do not recline the seatback as thiscan cause the occupant to slideunder the safety belt, resulting inserious injury in the event of a crash.
Do not place objects higher than theseatback to reduce the risk of seriousinjury in the event of a crash or duringheavy braking.
When you use them properly, the seat,head restraint, safety belt and airbags willprovide optimum protection in the eventof a crash.
We recommend that you follow theseguidelines:
•Sit in an upright position with the baseof your spine as far back as possible.
•Do not recline the seatback more than30 degrees.
•Adjust the head restraint so that thetop of it is level with the top of yourhead and as far forward as possible.Make sure that you remaincomfortable.
•Keep sufficient distance betweenyourself and the steering wheel. Werecommend a minimum of 10 in(25 cm) between your breastbone andthe airbag cover.
•Hold the steering wheel with your armsslightly bent.
•Bend your legs slightly so that you canpress the pedals fully.
•Position the shoulder strap of thesafety belt over the center of yourshoulder and position the lap straptightly across your hips.
Make sure that your driving position iscomfortable and that you can maintain fullcontrol of your vehicle.
HEAD RESTRAINTS
WARNINGS
Fully adjust the head restraint beforeyou sit in or operate your vehicle. Thiswill help minimize the risk of neckinjury in the event of a crash. Do not adjustthe head restraint when your vehicle ismoving.
The head restraint is a safety device.Whenever possible it should beinstalled and properly adjusted whenthe seat is occupied.
119
Taurus (CPH) Canada/United States of America, enUSA, First Printing
SeatsE68595
Page 130 of 504
HEATED SEATS (If Equipped)
WARNING
People who are unable to feel painto their skin because of advancedage, chronic illness, diabetes, spinalcord injury, medication, alcohol use,exhaustion or other physical conditions,must use caution when using the heatedseat. The heated seat may cause burnseven at low temperatures, especially ifused for long periods of time. Do not placeanything on the seat that may block theheat, such as a blanket or cushion. This cancause the heated seat to overheat. Do notpuncture the seat with pins, needles orother pointed objects. This damages theheating element and can cause the heatedseat to overheat. An overheated seat maycause serious personal injury.
Do not do the following:
•Place heavy objects on the seat.
•Operate the heated seat if water or anyother liquid spills on the seat. Allow theseat to dry thoroughly.
Note:You must switch the ignition on touse this feature.
Press the heated seat symbol to cyclethrough the various heat settings and off.More indicator lights indicate warmersettings.
Rear Heated Seats (If Equipped)
WARNING
People who are unable to feel painto their skin because of advancedage, chronic illness, diabetes, spinalcord injury, medication, alcohol use,exhaustion or other physical conditions,must use caution when using the heatedseat. The heated seat may cause burnseven at low temperatures, especially ifused for long periods of time. Do not placeanything on the seat that may block theheat, such as a blanket or cushion. This cancause the heated seat to overheat. Do notpuncture the seat with pins, needles orother pointed objects. This damages theheating element and can cause the heatedseat to overheat. An overheated seat maycause serious personal injury.
Do not do the following:
•Place heavy objects on the seat.
•Operate the heated seat if water or anyother liquid spills on the seat. Allow theseat to dry thoroughly.
Note:You must switch the ignition on touse this feature.
The rear seat heat controls are on the rearof the center console.
Press the heated seat symbol to cyclethrough the various heat settings and off.More indicator lights indicate warmersettings.
127
Taurus (CPH) Canada/United States of America, enUSA, First Printing
SeatsE146322 E146322
Page 131 of 504
CLIMATE CONTROLLED SEATS
(If Equipped)
Heated Seats
WARNING
People who are unable to feel painto their skin because of advancedage, chronic illness, diabetes, spinalcord injury, medication, alcohol use,exhaustion or other physical conditions,must use caution when using the heatedseat. The heated seat may cause burnseven at low temperatures, especially ifused for long periods of time. Do not placeanything on the seat that may block theheat, such as a blanket or cushion. This cancause the heated seat to overheat. Do notpuncture the seat with pins, needles orother pointed objects. This damages theheating element and can cause the heatedseat to overheat. An overheated seat maycause serious personal injury.
Note:Do not do the following:
•Place heavy objects on the seat.
•Operate the seat heater if water or anyother liquid spills on the seat. Allow theseat to dry thoroughly.
The heated seats only function when theengine is running.
Press the heated seat symbol to cyclethrough the various heat settings and off.More indicator lights indicate warmersettings.
If the engine falls below 350 RPM whilethe heated seats are on, the feature willturn itself off. You will need to reactivateit.
Cooled Seats
The cooled seats only function when theengine is running.
Press the cooled seat symbol to cyclethrough the various cooling settings andoff. More indicator lights indicate coolersettings.
If the engine falls below 350 RPM whilethe cooled seats are on, the feature willturn itself off. You will need to reactivateit.
Climate Controlled Seat Air FilterReplacement
Your vehicle has lifetime air filters that areintegrated with the seats. You do not needto regularly maintain or replace them.
REAR SEAT ARMREST (If Equipped)
WARNING
Use only soft cups in the cupholder.Hard objects can injure you in a crash.
128
Taurus (CPH) Canada/United States of America, enUSA, First Printing
SeatsE146322 E146309
Page 133 of 504
HomeLink Wireless ControlSystem
WARNINGS
Make sure that the garage door andsecurity device are free fromobstruction when you areprogramming. Do not program the systemwith the vehicle in the garage.
Do not use the system with anygarage door opener that does nothave the safety stop and reversefeature as required by U.S. Federal SafetyStandards (this includes any garage dooropener manufactured before April 1, 1982).A garage door opener which cannot detectan object, signaling the door to stop andreverse, does not meet current federalsafety standards. Using a garage dooropener without these features increasesthe risk of serious injury or death.
Note:Make sure you keep the originalremote control transmitter for use in othervehicles as well as for future systemprogramming.
Note:We recommend that upon the saleor lease termination of your vehicle, youerase the programmed function buttons forsecurity reasons. See Erasing the FunctionButton Codes.
Note:You can program a maximum ofthree devices. To change or replace any ofthe three devices after it has been initiallyprogrammed, you must first erase thecurrent settings. See Erasing the FunctionButton Codes.
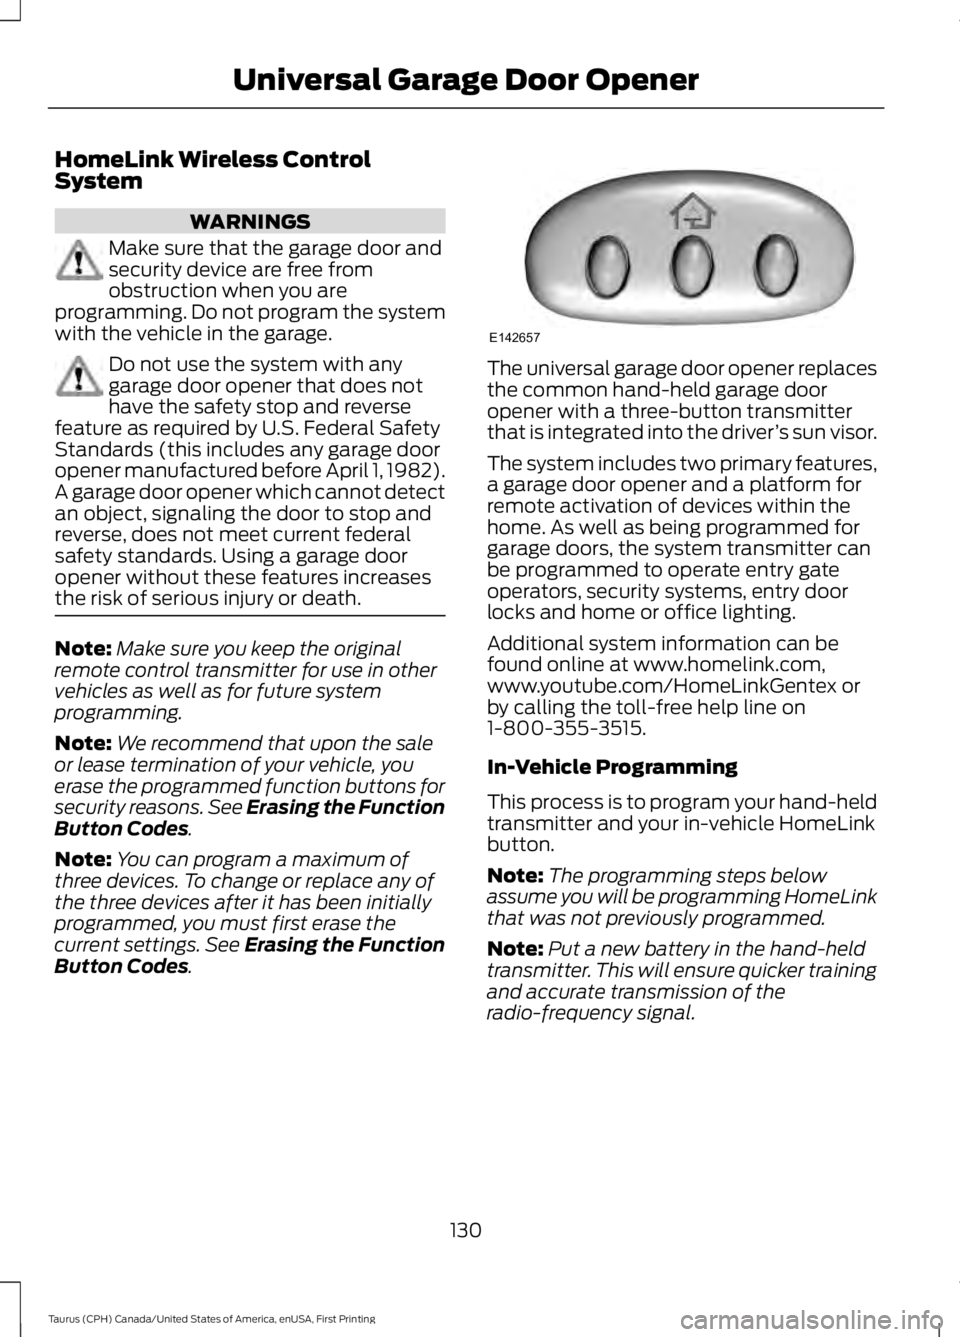
The universal garage door opener replacesthe common hand-held garage dooropener with a three-button transmitterthat is integrated into the driver’s sun visor.
The system includes two primary features,a garage door opener and a platform forremote activation of devices within thehome. As well as being programmed forgarage doors, the system transmitter canbe programmed to operate entry gateoperators, security systems, entry doorlocks and home or office lighting.
Additional system information can befound online at www.homelink.com,www.youtube.com/HomeLinkGentex orby calling the toll-free help line on1-800-355-3515.
In-Vehicle Programming
This process is to program your hand-heldtransmitter and your in-vehicle HomeLinkbutton.
Note:The programming steps belowassume you will be programming HomeLinkthat was not previously programmed.
Note:Put a new battery in the hand-heldtransmitter. This will ensure quicker trainingand accurate transmission of theradio-frequency signal.
130
Taurus (CPH) Canada/United States of America, enUSA, First Printing
Universal Garage Door OpenerE142657
Page 138 of 504
12 Volt DC Power Point
WARNINGS
Do not plug optional electricalaccessories into the cigar lightersocket. Incorrect use of the cigarlighter can cause damage not covered bythe vehicle warranty, and can result in fireor serious injury.
Do not use a power point foroperating a cigar lighter. Incorrectuse of the power points can causedamage not covered by the vehiclewarranty, and can result in fire or seriousinjury.
Note:When you switch the ignition on, youcan use the socket to power 12 voltappliances with a maximum current ratingof 15 amps.
If the power supply does not work after youswitch the ignition off, switch the ignitionon.Note:Do not hang any accessory from theaccessory plug.
Note:Do not use the power point over thevehicle capacity of 12 volt DC 180 watts ora fuse may blow.
Note:Always keep the power point capsclosed when not in use.
Do not insert objects other than anaccessory plug into the power point. Thiswill damage the power point and blow thefuse.
Run the vehicle for full capacity use of thepower point.
To prevent the battery from running out ofcharge:
•Do not use the power point longer thannecessary when the vehicle is notrunning.
•Do not leave devices plugged inovernight or when you park your vehiclefor extended periods.
Locations
Power points may be in the followinglocations:
•On the instrument panel.
•Inside the center console.
•On the rear of the center console.
135
Taurus (CPH) Canada/United States of America, enUSA, First Printing
Auxiliary Power Points
Page 141 of 504

Ignition Modes
The keyless starting system has threemodes:
Off: Turns the ignition off.
•Without applying the brake pedal,press and release the button oncewhen the ignition is in the on mode, orwhen the engine is running but thevehicle is not moving.
On: All electrical circuits are operationaland the warning lamps and indicatorsilluminate.
•Without applying the brake pedal,press and release the button once.
Note:You may have to press the pushbutton ignition switch twice to switch theignition on.
Start: Starts the engine.
•Press the brake pedal, and then pressthe button for any length of time. Anindicator light on the button illuminateswhen then ignition is on and when theengine starts.
STARTING A GASOLINE
ENGINE
When you start the engine, the idle speedincreases. This helps to warm up theengine. If the engine idle speed does notslow down automatically, have yourvehicle checked by an authorized dealer.
Note: You can crank the engine for a totalof 60 seconds without the engine startingbefore the starting system temporarilydisables. The 60 seconds does not have tobe all at once. For example, if you crank theengine three times for 20 seconds eachtime, without the engine starting, youreached the 60-second time limit. Amessage appears in the information displayalerting you that you exceeded the crankingtime. You cannot attempt to start theengine for at least 15 minutes. After 15minutes, you are limited to a 15-secondengine cranking time. You need to wait 60minutes before you can crank the engine for60 seconds again.
Before starting your vehicle, check thefollowing:
•Make sure all occupants have fastenedtheir safety belts.
•Make sure the headlamps andelectrical accessories are off.
•Make sure the parking brake is on.
•Make sure the transmission is in park(P).
•Switch the ignition on. For vehicles witha keyless ignition, see the followinginstructions.
Vehicles with an Ignition Key
Note:Do not touch the accelerator pedal.
1. Fully depress the brake pedal.
2. Turn the key to the start position tostart the engine.
138
Taurus (CPH) Canada/United States of America, enUSA, First Printing
Starting and Stopping the EngineE191075
Page 151 of 504

Note:When you insert the correct size fuelpump nozzle a spring loaded inhibitor willopen.
2. Insert the fuel pump nozzle up to thefirst notch on the nozzle A. Keep itresting on the cover of the fuel tankfiller pipe opening.
3. Hold the fuel pump nozzle in positionB when refueling. Holding the fuelnozzle in position A can affect the flowof fuel and shut off the fuel nozzlebefore the fuel tank is full.
4. Operate the fuel pump nozzle withinthe area shown.
5.Slightly raise the fuel pump nozzle andthen slowly remove it.
6. Fully close the fuel tank filler door.
Note: Do not attempt to start the engineif you have filled the fuel tank with incorrectfuel. Incorrect fuel use can cause damagenot covered by the vehicle Warranty. Haveyour vehicle checked immediately.
System Warnings (If Equipped)
If the fuel filler inlet does not fully close awarning message appears in theinformation display.
1. Stop your vehicle as soon as safelypossible and shift the transmission intopark (P) or neutral (N).
2.Apply the parking brake and switch theignition off.
3.Fully open the fuel tank filler door untilit engages.
4. Check the fuel filler inlet and the areaaround it for any items or debris thatmay be obstructing its movement.
148
Taurus (CPH) Canada/United States of America, enUSA, First Printing
Fuel and RefuelingE139202
A E139203
A
B E206912
AB E119081