2017 FORD TAURUS instrument cluster
[x] Cancel search: instrument clusterPage 5 of 504

Adjusting the Steering Wheel - VehiclesWith: Power Adjustable SteeringColumn..........................................................66
Audio Control...................................................67
Voice Control...................................................68
Cruise Control.................................................68
Information Display Control......................68
Heated Steering Wheel...............................68
Pedals
Adjusting the Pedals....................................69
Wipers and Washers
Windshield Wipers.........................................70
Autowipers........................................................70
Windshield Washers.......................................71
Lighting
General Information......................................72
Lighting Control...............................................72
Autolamps.........................................................73
Instrument Lighting Dimmer......................74
Headlamp Exit Delay....................................74
Daytime Running Lamps.............................74
Automatic High Beam Control..................75
Direction Indicators........................................76
Interior Lamps.................................................76
Windows and Mirrors
Power Windows..............................................78
Global Opening...............................................79
Exterior Mirrors................................................79
Interior Mirror....................................................81
Sun Visors..........................................................81
Sun Shades.......................................................81
Moonroof...........................................................82
Instrument Cluster
Gauges...............................................................83
Warning Lamps and Indicators................85
Audible Warnings and Indicators.............88
Information Displays
General Information.....................................89
Information Messages.................................98
Climate Control
Manual Climate Control............................109
Automatic Climate Control - VehiclesWithout: Touchscreen Display.............110
Automatic Climate Control - VehiclesWith: Premium AM/FM/CD....................111
Automatic Climate Control - VehiclesWith: Sony Audio System.......................113
Hints on Controlling the InteriorClimate..........................................................115
Heated Windows and Mirrors....................117
Cabin Air Filter.................................................117
Remote Start..................................................118
Seats
Sitting in the Correct Position...................119
Head Restraints.............................................119
Manual Seats..................................................121
Power Seats....................................................122
Memory Function..........................................125
Rear Seats.......................................................126
Heated Seats..................................................127
Climate Controlled Seats..........................128
Rear Seat Armrest........................................128
Universal Garage DoorOpener
Universal Garage Door Opener...............130
Auxiliary Power Points
Auxiliary Power Points................................135
Storage Compartments
Center Console..............................................136
2
Taurus (CPH) Canada/United States of America, enUSA, First Printing
Table of Contents
Page 7 of 504

Jump Starting the Vehicle.........................216
Post-Crash Alert System...........................218
Customer Assistance
Getting the Services You Need................219
In California (U.S. Only)............................220
The Better Business Bureau (BBB) AutoLine Program (U.S. Only).......................221
Utilizing the Mediation/ArbitrationProgram (Canada Only)........................222
Getting Assistance Outside the U.S. andCanada........................................................222
Ordering Additional Owner'sLiterature.....................................................223
Reporting Safety Defects (U.S.Only).............................................................224
Reporting Safety Defects (CanadaOnly).............................................................224
Fuses
Fuse Specification Chart..........................226
Changing a Fuse...........................................234
Maintenance
General Information...................................236
Opening and Closing the Hood..............236
Under Hood Overview - 2.0LEcoBoost™................................................238
Under Hood Overview - 3.5LDuratec........................................................239
Under Hood Overview - 3.5LEcoboost™................................................240
Engine Oil Dipstick - 2.0LEcoBoost™.................................................241
Engine Oil Dipstick - 3.5L Duratec/3.5LEcoboost™.................................................241
Engine Oil Check...........................................241
Oil Change Indicator Reset......................243
Engine Coolant Check...............................243
Automatic Transmission Fluid Check -2.0L EcoBoost™......................................247
Automatic Transmission Fluid Check -3.5L Duratec/3.5L Ecoboost™...........247
Brake Fluid Check.........................................251
Power Steering Fluid Check......................251
Washer Fluid Check.....................................251
Fuel Filter........................................................252
Changing the 12V Battery.........................252
Checking the Wiper Blades.....................254
Changing the Wiper Blades.....................254
Adjusting the Headlamps.........................255
Changing a Bulb...........................................256
Bulb Specification Chart...........................257
Changing the Engine Air Filter................259
Vehicle Care
General Information...................................260
Cleaning Products......................................260
Cleaning the Exterior.................................260
Waxing..............................................................261
Cleaning the Engine....................................262
Cleaning the Windows and WiperBlades..........................................................262
Cleaning the Interior...................................263
Cleaning the Instrument Panel andInstrument Cluster Lens.......................263
Cleaning Leather Seats.............................264
Repairing Minor Paint Damage..............264
Cleaning the Wheels..................................264
Vehicle Storage............................................265
Wheels and Tires
General Information...................................267
Tire Sealant and Inflator Kit.....................267
Tire Care...........................................................273
Using Summer Tires...................................286
Using Snow Chains.....................................286
Tire Pressure Monitoring System...........287
Changing a Road Wheel............................291
Technical Specifications..........................296
4
Taurus (CPH) Canada/United States of America, enUSA, First Printing
Table of Contents
Page 19 of 504

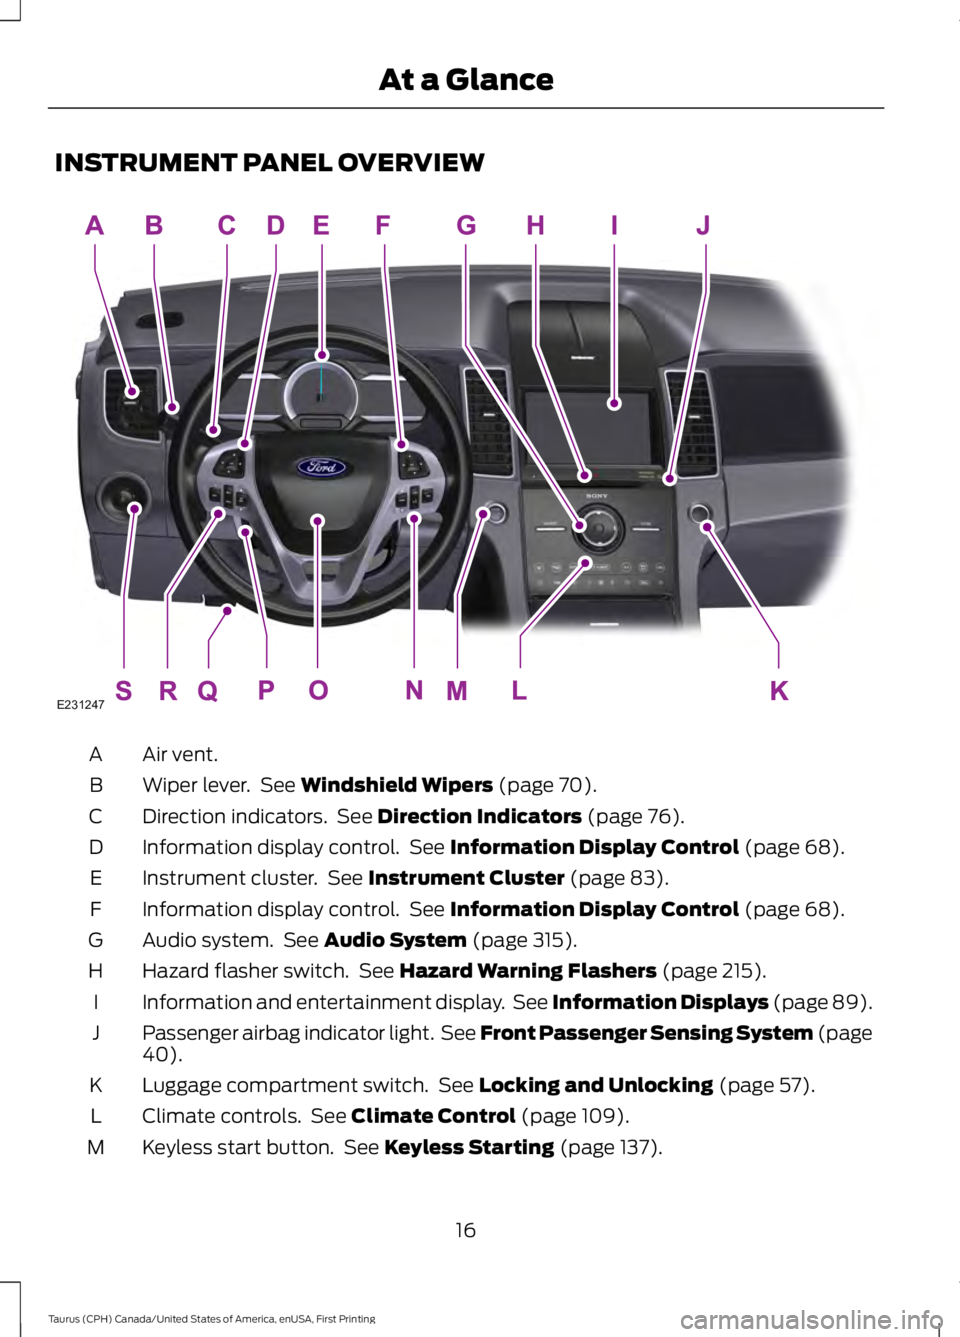
INSTRUMENT PANEL OVERVIEW
Air vent.A
Wiper lever. See Windshield Wipers (page 70).B
Direction indicators. See Direction Indicators (page 76).C
Information display control. See Information Display Control (page 68).D
Instrument cluster. See Instrument Cluster (page 83).E
Information display control. See Information Display Control (page 68).F
Audio system. See Audio System (page 315).G
Hazard flasher switch. See Hazard Warning Flashers (page 215).H
Information and entertainment display. See Information Displays (page 89).I
Passenger airbag indicator light. See Front Passenger Sensing System (page40).J
Luggage compartment switch. See Locking and Unlocking (page 57).K
Climate controls. See Climate Control (page 109).L
Keyless start button. See Keyless Starting (page 137).M
16
Taurus (CPH) Canada/United States of America, enUSA, First Printing
At a GlanceE231247
Page 47 of 504

The system consists of the following:
•Safety Canopy curtain airbags locatedabove the trim panels over the frontand rear side windows identified by alabel or wording on the headliner orroof-pillar trim.
•A flexible headliner which opens abovethe side doors to allow air curtaindeployment
· Crash sensors and monitoringsystem with a readinessindicator. See Crash Sensorsand Airbag Indicator (page 44).
Properly restrain children 12 years old andunder in the rear seats. The Safety Canopywill not interfere with children restrainedusing a properly installed child or boosterseat because it is designed to inflatedownward from the headliner above thedoors along the side window opening.
The design and development of the SafetyCanopy included recommended testingprocedures that were developed by agroup of automotive safety experts knownas the Side Airbag Technical WorkingGroup. These recommended testingprocedures help reduce the risk of injuriesrelated to the deployment of side airbags(including the Safety Canopy).
CRASH SENSORS AND
AIRBAG INDICATOR
WARNING
Modifying or adding equipment tothe front end of the vehicle (includingframe, bumper, front end bodystructure and tow hooks) may affect theperformance of the airbag system,increasing the risk of injury. Do not modifythe front end of the vehicle.
Your vehicle has a collection of crash andoccupant sensors which provideinformation to the restraints controlmodule. The restraints control moduledeploys (activates) the front seatbeltpretensioners, driver airbag, passengerairbag, seat mounted side airbags and theSafety Canopy. Based on the type of crash,the restraints control module will deploythe appropriate safety devices.
The restraints control module alsomonitors the readiness of the above safetydevices plus the crash and occupantsensors. The readiness of the safetysystem is indicated by a warning indicatorlight in the instrument cluster or by abackup tone if the warning light is notworking. Routine maintenance of theairbag is not required.
A difficulty with the system is indicated byone or more of the following:
The readiness light will notilluminate immediately after theignition is turned on.
•The readiness light will either flash orstay lit.
•A series of five beeps will be heard. Thetone pattern will repeat periodicallyuntil the problem, the light or both arerepaired.
44
Taurus (CPH) Canada/United States of America, enUSA, First Printing
Supplementary Restraints SystemE75004 E67017 E67017
Page 56 of 504

Note:You can clear or change your MyKeysettings at any time during the same keycycle as you created the MyKey. Once youhave switched the vehicle off, however, youwill need an admin key to change or clearyour MyKey settings.
CLEARING ALL MYKEYS
You can clear or change your MyKeysettings using the information displaycontrol on the steering wheel. SeeInformation Displays (page 89).
Switch the ignition on using an admin key.
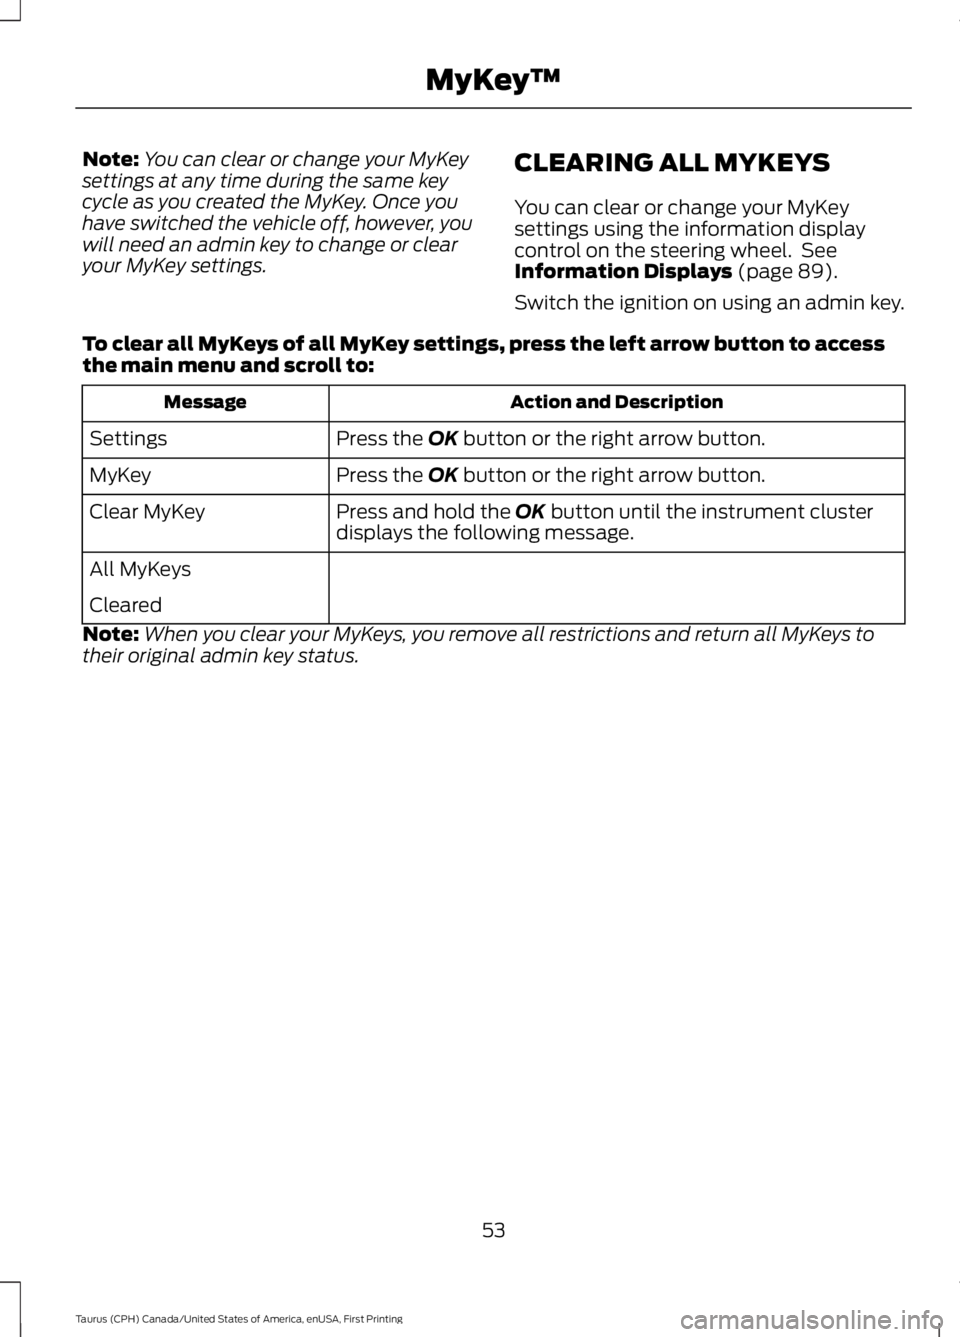
To clear all MyKeys of all MyKey settings, press the left arrow button to accessthe main menu and scroll to:
Action and DescriptionMessage
Press the OK button or the right arrow button.Settings
Press the OK button or the right arrow button.MyKey
Press and hold the OK button until the instrument clusterdisplays the following message.Clear MyKey
All MyKeys
Cleared
Note:When you clear your MyKeys, you remove all restrictions and return all MyKeys totheir original admin key status.
53
Taurus (CPH) Canada/United States of America, enUSA, First Printing
MyKey™
Page 77 of 504

INSTRUMENT LIGHTING
DIMMER
Note:If you disconnect and connect thebattery, or fully discharge and charge thebattery, the lighting level will switch to themaximum setting.
Use the instrument lighting dimmer toadjust the brightness of the instrumentpanel and all applicable lighting in yourvehicle.
•Tap the top or bottom of the controlto the first detent to brighten or dim allinterior lighting incrementally.
•Press and hold the top or bottom ofthe control to the first detent until youreach the desired lighting level.
•Press and hold the top of the controlto the second detent to switch theinterior lights on.
•Press and hold the bottom of thecontrol to the second detent to switchthe interior lights off.
HEADLAMP EXIT DELAY
You can set the delay time to keep theheadlamps on for up to three minutes afterthe ignition is switched off.
Follow the steps below to change thedelay time (Steps 1 through 6 must bedone within 10 seconds):
1. Switch the ignition off.
2. Turn the lighting control to theautolamp position.
3. Turn the lighting control to the offposition.
4. Switch the ignition on.
5. Switch the ignition off.
6. Turn the lighting control to theautolamp position. The headlamps andparking lamps will turn on.
7. Turn the lighting control to the offposition when the desired delay timehas been reached. The headlamps andparking lamps will turn off. You can setthe headlamp exit delay to one of thefollowing settings:
•Off.
•10 seconds.
•20 seconds.
•120 seconds.
Note:You can also adjust the time delayusing the display controls in the instrumentcluster. See Information Displays (page89).
DAYTIME RUNNING LAMPS
WARNING
The daytime running lamps systemdoes not activate the rear lamps andmay not provide adequate lightingduring low visibility driving conditions. Also,the autolamps switch position may notactivate the headlamps in all low visibilityconditions, such as daytime fog. Make surethe headlamps are switched to auto or on,as appropriate, during all low visibilityconditions. Failure to do so may result in acrash.
74
Taurus (CPH) Canada/United States of America, enUSA, First Printing
LightingE173259
Page 78 of 504

The daytime running lamps turn on when:
1. The ignition is switched to the onposition.
2. The lighting control is in the offposition, parking lamps position or theautolamps position, and the sensordetects daylight.
3. Your vehicle is in drive (D).
AUTOMATIC HIGH BEAM
CONTROL (If Equipped)
The system will automatically turn on yourhigh beams if it is dark enough and no othertraffic is present. When it detects theheadlights of an approaching vehicle, thetail lamps of the preceding vehicle or streetlighting, the system will turn off the highbeams. The low beams remain on.
Note:If it appears that automatic controlof the high beams is not functioningproperly, check the windshield in front ofthe camera for a blockage. A clear view ofthe road is required for proper systemoperation. Have any windshield damage inthe area of the camera’s field-of-viewrepaired.
Note:If the system detects a blockage suchas bird droppings, bug splatter, snow or ice,and you do not observe changes, the systemwill go into low beam mode until you clearthe blockage. A message may also appearin the instrument cluster display noting thefront camera is blocked.
Note:In cold or inclement weatherconditions, you will notice a decrease in theavailability of the high beam system,especially at start up. If you want to changethe beam state independently of theautomatic control, you may switch the highbeams on or off using the lever. Automaticcontrol will resume when conditions arecorrect.
Note:Modification of the vehicle ride heightsuch as using much larger tires, maydegrade feature performance.
A camera sensor, centrally mountedbehind the windshield of your vehicle,continuously monitors conditions to decidewhen to turn the high beams off and on.
Once the system is active, the high beamswill turn on if:
•The ambient light level is low enough.
•There is no traffic in front of the vehicle.
•The vehicle speed is greater than32 mph (52 km/h).
The high beams will turn off if:
•The system detects the headlamps ofan approaching vehicle or the taillamps of a preceding vehicle.
•Vehicle speed falls below 27 mph(44 km/h).
•The ambient light level is high enoughthat high beams are not required.
•The system detects severe rain, snowor fog.
•The camera is blocked.
Activating the System
Switch on the system using the informationdisplay and autolamps. See InformationDisplays (page 89).
Switch the lighting control to theautolamps position. See Autolamps(page 73).
75
Taurus (CPH) Canada/United States of America, enUSA, First Printing
Lighting
Page 86 of 504

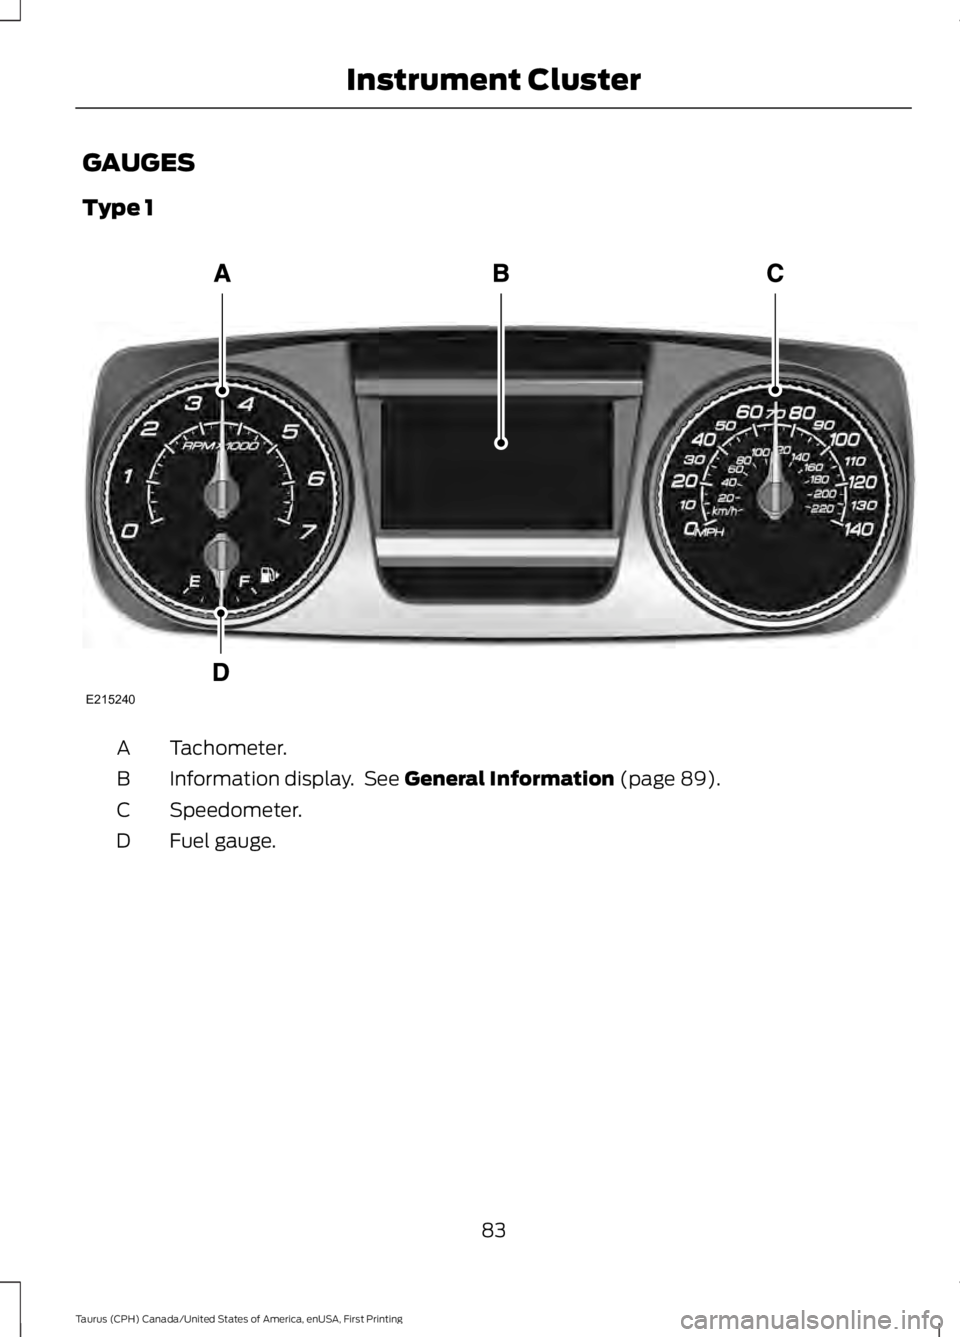
GAUGES
Type 1
Tachometer.A
Information display. See General Information (page 89).B
Speedometer.C
Fuel gauge.D
83
Taurus (CPH) Canada/United States of America, enUSA, First Printing
Instrument ClusterE215240