2017 FORD TAURUS change time
[x] Cancel search: change timePage 179 of 504
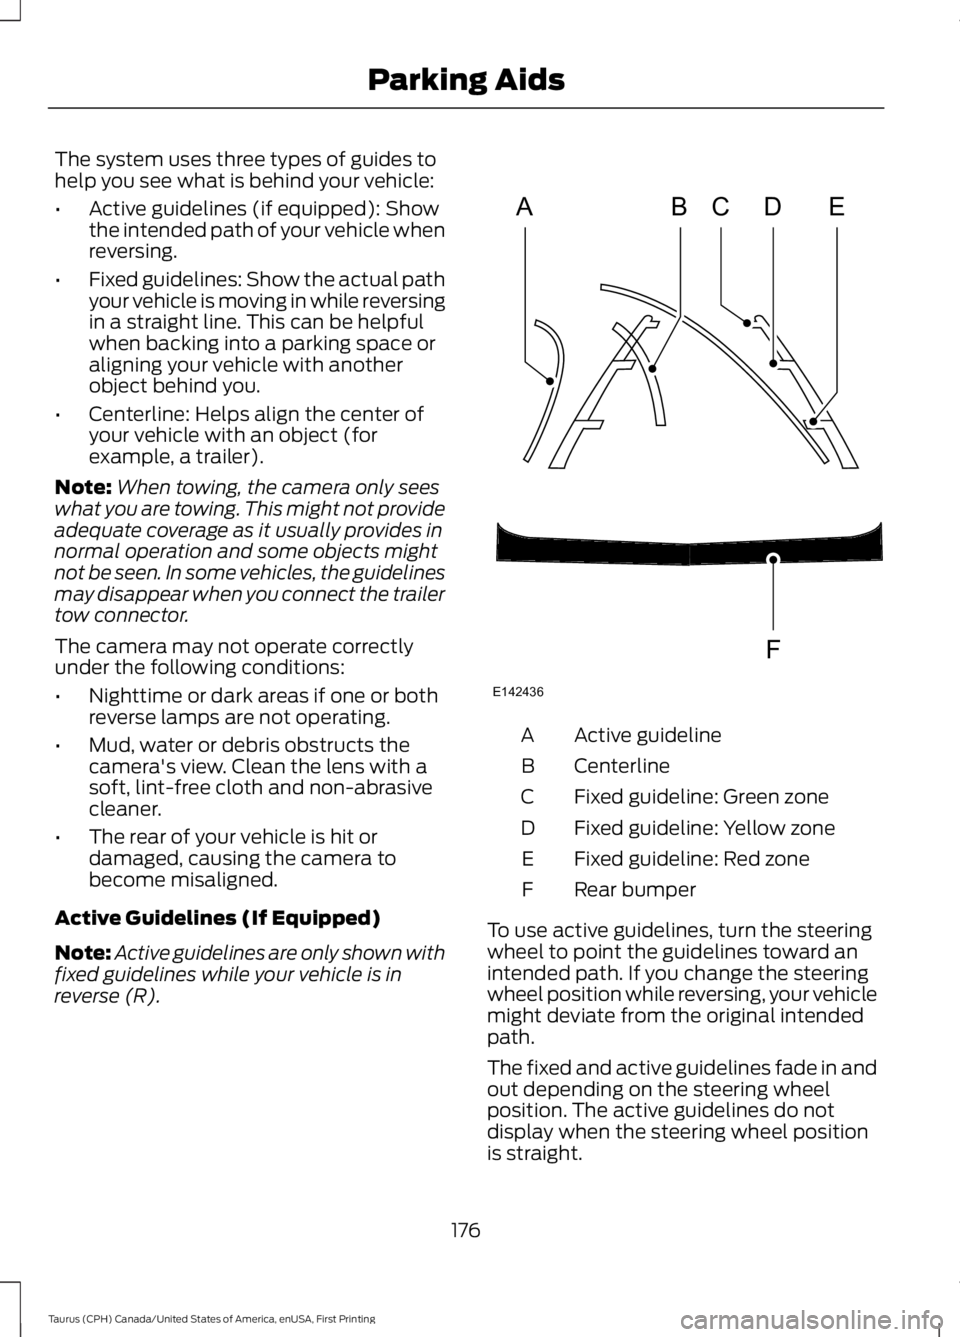
The system uses three types of guides tohelp you see what is behind your vehicle:
•Active guidelines (if equipped): Showthe intended path of your vehicle whenreversing.
•Fixed guidelines: Show the actual pathyour vehicle is moving in while reversingin a straight line. This can be helpfulwhen backing into a parking space oraligning your vehicle with anotherobject behind you.
•Centerline: Helps align the center ofyour vehicle with an object (forexample, a trailer).
Note:When towing, the camera only seeswhat you are towing. This might not provideadequate coverage as it usually provides innormal operation and some objects mightnot be seen. In some vehicles, the guidelinesmay disappear when you connect the trailertow connector.
The camera may not operate correctlyunder the following conditions:
•Nighttime or dark areas if one or bothreverse lamps are not operating.
•Mud, water or debris obstructs thecamera's view. Clean the lens with asoft, lint-free cloth and non-abrasivecleaner.
•The rear of your vehicle is hit ordamaged, causing the camera tobecome misaligned.
Active Guidelines (If Equipped)
Note:Active guidelines are only shown withfixed guidelines while your vehicle is inreverse (R).
Active guidelineA
CenterlineB
Fixed guideline: Green zoneC
Fixed guideline: Yellow zoneD
Fixed guideline: Red zoneE
Rear bumperF
To use active guidelines, turn the steeringwheel to point the guidelines toward anintended path. If you change the steeringwheel position while reversing, your vehiclemight deviate from the original intendedpath.
The fixed and active guidelines fade in andout depending on the steering wheelposition. The active guidelines do notdisplay when the steering wheel positionis straight.
176
Taurus (CPH) Canada/United States of America, enUSA, First Printing
Parking AidsABCD
F
E
E142436
Page 185 of 504
Each time you start the vehicle, the systemwill select the last chosen gap for thecurrent driver.
Disengaging the System
Press the brake pedal or press CNCL. Thelast set speed will appear in grey.
Overriding the System
WARNING
If you override the system by pressingthe accelerator pedal, it does notautomatically apply the brakes tomaintain a gap from any vehicle ahead.
You can override the set speed and gapdistance by pressing the accelerator pedal.
When you override the system,the green indicator lightilluminates and the lead vehiclegraphic does not show in the informationdisplay.
The system will resume operation whenyou release the accelerator pedal. Thevehicle speed will decrease to the setspeed, or a lower speed if following aslower vehicle.
Changing the Set Speed
•Press and release SET+ or SET-. Whenyou select km/h as the displaymeasurement in the informationdisplay, the set speed changes inapproximately 1 km/h increments.When you select mph as the displaymeasurement in the informationdisplay, the set speed changes inapproximately 1 mph increments.
•Press and hold SET+ or SET-. The setspeed changes in approximately 5 mph(10 km/h) increments.
The system may apply the brakes to slowthe vehicle to the new set speed. The setspeed displays continuously in theinformation display when the system isactive.
Note: If you accelerate by pressing theaccelerator pedal, the set speed will notchange. When you release the acceleratorpedal, your vehicle returns to the speed thatyou previously set.
Resuming the Set Speed
Note:Only use resume if you are aware ofthe set speed and intend to return to it.
Press and release RES. The vehicle willreturn to the previously set speed. The setspeed will display continuously in theinformation display while the system isactive.
Automatic Cancellation
The system is not functional at vehiclespeeds below 12 mph (20 km/h). Anaudible alarm will sound and theautomatic braking releases if the vehicledrops below this speed.
Hilly Condition Usage
Note:An audible alarm will sound and thesystem will shut down if it is applying brakesfor an extended period of time. This allowsthe brakes to cool down. The system willfunction normally again when the brakeshave cooled down.
You should select a lower gear positionwhen the system is active in situationssuch as prolonged downhill driving onsteep grades, for example in mountainousareas. The system needs additional enginebraking in these situations to reduce theload on the vehicle’s regular brake systemto prevent them from overheating.
182
Taurus (CPH) Canada/United States of America, enUSA, First Printing
Cruise ControlE144529
Page 187 of 504

If something hits the front end of yourvehicle or damage occurs, theradar-sensing zone may change. This couldcause missed or false vehicle detections.See an authorized dealer to have the radarchecked for proper coverage andoperation.
Blocked Sensor
A message displays if something obstructsthe radar signals from the sensor. Thesensor is located behind a fascia covernear the driver side of the lower grille. Thesystem cannot detect a vehicle ahead andwill not function when something obstructsthe radar signals. The following table listspossible causes and actions for thismessage displaying.
ActionCause
Clean the grille surface in front of the radaror remove the object causing the obstruc-tion.
The surface of the radar in the grille is dirtyor obstructed in some way.
Wait a short time. It may take severalminutes for the radar to detect that it is freefrom obstruction.
The surface of the radar in the grille is cleanbut the message remains in the display.
Do not use the system in these conditionsbecause it may not detect any vehiclesahead.
Heavy rain or snow is interfering with theradar signals.
Do not use the system in these conditionsbecause it may not detect any vehiclesahead.
Swirling water, or snow or ice on the surfaceof the road may interfere with the radarsignals.
Wait a short time or switch to normal cruisecontrol.You are in a desert or remote area with noother vehicles and no roadside objects.
Due to the nature of radar technology, it ispossible to get a blockage warning and notbe blocked. This can happen, for example,when driving in sparse rural or desertenvironments. A false blocked conditionwill either self clear or clear after a keycycle.
184
Taurus (CPH) Canada/United States of America, enUSA, First Printing
Cruise ControlE145632
Page 190 of 504

System Display
When active the system will runautomatically in the background and onlyissue a warning if required. You can viewthe status at any time using theinformation display. See GeneralInformation (page 89).
The alertness level is shown by six stepsin a colored bar.
The current assessment of your alertnessis within a typical range.
The current assessment of your alertnessindicates that you should rest as soon assafely possible.
The status bar will travel from left to rightas the calculated alertness leveldecreases. As the rest icon is approachedthe color turns from green to yellow to red.
The yellow position indicates the firstwarning is active and the red positionindicates the second warning is active.
Note:If you have recently received awarning; you should consider resting, evenif the current assessment is within thetypical range.
Note:If the camera sensor cannot track theroad lane markings or if your vehicle speeddrops below approximately 40 mph(64 km/h), the alertness level will changeto grey for a short time and the informationdisplay will inform you that the system isunavailable.
Resetting the System
You can reset the system by either:
•Switching the ignition off and on.
•Stopping the vehicle and then openingand closing the driver’s door.
LANE KEEPING SYSTEM (If
Equipped)
WARNINGS
The system is designed to aid thedriver. It is not intended to replaceyour attention and judgment. You arestill responsible to drive with due care andattention.
At all times, you are responsible forcontrolling your vehicle, supervisingthe system and intervening, ifrequired. Failure to take care may result inthe loss of control of your vehicle, seriouspersonal injury or death.
The system is designed to aid thedriver. It is not intended to replaceyour attention and judgment. You arestill responsible to drive with due care andattention.
In cold and severe weatherconditions the system may notfunction. Rain, snow and spray canall limit sensor performance.
If damage occurs in the immediatearea surrounding the sensor, haveyour vehicle checked as soon aspossible.
187
Taurus (CPH) Canada/United States of America, enUSA, First Printing
Driving AidsE131358 E131359
Page 191 of 504

Note:Large contrasts in lighting can limitsensor performance.
Note:The system works above 40 mph(64 km/h).
Note:The system works as long as thecamera can detect one lane marking.
Note:When Aid mode is on and the systemdetects no steering activity for a shortperiod, the system will alert you to put yourhands on the steering wheel. The systemmay detect a light grip or touch on thesteering wheel as hands off driving.
The system notifies you to stay in your lanethrough the steering system and theinstrument cluster display when the frontcamera detects an unintentional drift outof your lane is likely to occur. The systemautomatically detects and tracks the roadlane markings using a camera mountedbehind the interior rear view mirror.
Switching the System On and Off
Note:The system on or off setting is storeduntil it is manually changed, unless a MyKeyis detected. If the system detects a MyKeyit defaults to on and the mode is set to Alert.
Note:If a MyKey is detected, pressing thebutton will not affect the on or off status ofthe system.
Press the button located on thecenter console to switch thesystem on or off.
System Settings
The system has optional setting menusavailable. To view or adjust the settings,See General Information (page 89). Thesystem stores the last-known selection foreach of these settings. You do not need toreadjust your settings each time you turnon the system.
Mode (if equipped): This setting allowsyou to select which of the system featuresyou can enable.
Alert only – Provides a steering wheelvibration when the system detects anunintended lane departure.
Note:Some vehicles are equipped with thealert function only.
Aid only (if equipped) – Provides anassistance steering torque input towardthe lane center when the system detectsan unintended lane departure.
188
Taurus (CPH) Canada/United States of America, enUSA, First Printing
Driving AidsE173233 E165515 E165516
Page 193 of 504
•The road has no or poor lane markingsin the camera field-of-view.
•The camera is obscured or unable todetect the lane markings due toenvironmental conditions (significantsun angles, shadows, snow, heavy rainor fog), traffic conditions (following alarge vehicle that is blocking orshadowing the lane), or vehicleconditions (poor headlampillumination).
See Troubleshooting for additionalinformation.
Green: Indicates that the system isavailable or ready to provide a warning orintervention, on the indicated side(s).
Yellow: Indicates that the system isproviding or has just provided a lanekeeping aid intervention.
Red: Indicates that the system is providingor has just provided a lane keeping alertwarning.
The system can be temporarily suppressedat any time by the following:
•Quick braking.
•Fast acceleration.
•Using the turn signal indicator.
•Evasive steering maneuver.
Troubleshooting
Why is the feature not available (line markings are gray) when I can see the lane markingson the road?
Vehicle speed is outside the operational range of the feature
Sun is shining directly into the camera lens
Quick intentional lane change
Staying too close to the lane marking
Driving at high speeds in curves
The last Alert warning or Aid intervention occurred a short time ago
Ambiguous lane markings (mainly in construction zones)
Rapid transition from light to dark or vice versa
Sudden offset in lane markings
ABS or AdvanceTrac activation
Camera blockage due to dirt, grime, fog, frost or water on the windshield
Driving too close to the vehicle in front of you
Transitioning between no lane markings to lane markings or vice versa
Standing water on the road
Faint lane markings (partial yellow lane markings on concrete roads)
190
Taurus (CPH) Canada/United States of America, enUSA, First Printing
Driving Aids
Page 212 of 504
Before Towing a Trailer
Practice turning, stopping and backing upto get the feel of your vehicle-trailercombination before starting on a trip.When turning, make wider turns so thetrailer wheels clear curbs and otherobstacles.
When Towing a Trailer
•Do not drive faster than 70 mph(113 km/h) during the first 500 mi(800 km).
•Do not make full-throttle starts.
•Check your hitch, electrical connectionsand trailer wheel lug nuts thoroughlyafter you have traveled 50 mi (80 km).
•When stopped in congested or heavytraffic during hot weather, place thegearshift in position P to aid engine andtransmission cooling and to help A/Cperformance.
•Turn off the speed control with heavyloads or in hilly terrain. The speedcontrol may turn off automaticallywhen you are towing on long, steepgrades.
•Shift to a lower gear when driving downa long or steep hill. Do not apply thebrakes continuously, as they mayoverheat and become less effective.
•If your transmission is equipped with aGrade Assist or Tow/Haul feature, usethis feature when towing. This providesengine braking and helps eliminateexcessive transmission shifting foroptimum fuel economy andtransmission cooling.
•Allow more distance for stopping witha trailer attached. Anticipate stops andbrake gradually.
•Avoid parking on a grade. However, ifyou must park on a grade:
1. Turn the steering wheel to point yourvehicle tires away from traffic flow.
2. Set your vehicle parking brake.
3. Place the automatic transmission inposition P.
4. Place wheel chocks in front and backof the trailer wheels. (Chocks notincluded with vehicle.)
Launching or Retrieving a Boat orPersonal Watercraft (PWC)
Note:Disconnect the wiring to the trailerbefore backing the trailer into the water.
Note:Reconnect the wiring to the trailerafter removing the trailer from the water.
When backing down a ramp during boatlaunching or retrieval:
•Do not allow the static water level torise above the bottom edge of the rearbumper.
•Do not allow waves to break higherthan 6 in (15 cm) above the bottomedge of the rear bumper.
Exceeding these limits may allow water toenter vehicle components:
•Causing internal damage to thecomponents.
•Affecting driveability, emissions, andreliability.
Replace the rear axle lubricant anytimethe rear axle has been submerged in water.Water may have contaminated the rearaxle lubricant, which is not normallychecked or changed unless a leak issuspected or other axle repair is required.
209
Taurus (CPH) Canada/United States of America, enUSA, First Printing
Towing
Page 214 of 504
BREAKING-IN
You need to break in new tires forapproximately 300 mi (480 km). Duringthis time, your vehicle may exhibit someunusual driving characteristics.
Avoid driving too fast during the first1,000 mi (1,600 km). Vary your speedfrequently and change up through thegears early. Do not labor the engine.
Do not tow during the first 1,000 mi(1,600 km).
ECONOMICAL DRIVING
Your fuel economy is affected by severalthings, such as how you drive, theconditions you drive under, and how youmaintain your vehicle.
You may improve your fuel economy bykeeping these things in mind:
•Accelerate and slow down in a smooth,moderate fashion.
•Drive at steady speeds withoutstopping.
•Anticipate stops; slowing down mayeliminate the need to stop.
•Combine errands and minimizestop-and-go driving.
•Close the windows for high-speeddriving.
•Drive at reasonable speeds (travelingat 55 mph [88 km/h] uses 15% lessfuel than traveling at 65 mph [105km/h]).
•Keep the tires properly inflated and useonly the recommended size.
•Use the recommended engine oil.
•Perform all regularly scheduledmaintenance.
Avoid these actions; they reduce your fueleconomy:
•Sudden accelerations or hardaccelerations.
•Revving the engine before turning it off.
•Idle for periods longer than one minute.
•Warm up your vehicle on coldmornings.
•Use the air conditioner or frontdefroster.
•Use the speed control in hilly terrain.
•Rest your foot on the brake pedal whiledriving.
•Drive a heavily loaded vehicle or tow atrailer.
•Carry unnecessary weight(approximately 1 mpg [0.4 km/L] islost for every 400 lb [180 kilogram] ofweight carried).
•Driving with the wheels out ofalignment.
Conditions
•Heavily loading a vehicle or towing atrailer may reduce fuel economy at anyspeed.
•Adding certain accessories to yourvehicle (for example bug deflectors,rollbars, light bars, running boards, skiracks or luggage racks) may reducefuel economy.
•To maximize the fuel economy, drivewith the tonneau cover installed (ifequipped).
•Using fuel blended with alcohol maylower fuel economy.
•Fuel economy may decrease with lowertemperatures during the first 8–10miles (12–16 kilometers) of driving.
•Driving on flat terrain offers improvedfuel economy as compared to drivingon hilly terrain.
211
Taurus (CPH) Canada/United States of America, enUSA, First Printing
Driving Hints