2017 FORD TAURUS change time
[x] Cancel search: change timePage 224 of 504
You are required to submit your warrantydispute to BBB AUTO LINE before assertingin court any rights or remedies conferredby California Civil Code Section 1793.22(b).You are also required to use BBB AUTOLINE before exercising rights or seekingremedies created by the FederalMagnuson-Moss Warranty Act, 15 U.S.C.sec. 2301 et seq. If you choose to seekredress by pursuing rights and remediesnot created by California Civil Code Section1793.22(b) or the Magnuson-MossWarranty Act, resort to BBB AUTO LINE isnot required by those statutes.
THE BETTER BUSINESS
BUREAU (BBB) AUTO LINE
PROGRAM (U.S. ONLY)
Your satisfaction is important to FordMotor Company and to your dealer. If awarranty concern has not been resolvedusing the three-step procedure outlinedearlier in this chapter in the Getting theServices you need section, you may beeligible to participate in the BBB AUTOLINE program.
The BBB AUTO LINE program consists oftwo parts – mediation and arbitration.During mediation, a representative of theBBB will contact both you and Ford MotorCompany to explore options for settlementof the claim. If an agreement is not reachedduring mediation or you do not want toparticipate in mediation, and if your claimis eligible, you may participate in thearbitration process. An arbitration hearingwill be scheduled so that you can presentyour case in an informal setting before animpartial person. The arbitrator willconsider the testimony provided and makea decision after the hearing.
Disputes submitted to the BBB AUTO LINEprogram are usually decided within fortydays after you file your claim with the BBB.You are not bound by the decision, andmay reject the decision and proceed tocourt where all findings of the BBB AutoLine dispute, and decision, are admissiblein the court action. Should you choose toaccept the BBB AUTO LINE decision, Fordis then bound by the decision, and mustcomply with the decision within 30 daysof receipt of your acceptance letter.
BBB AUTO LINE Application: Using theinformation provided below, please call orwrite to request a program application.You will be asked for your name andaddress, general information about yournew vehicle, information about yourwarranty concerns, and any steps you havealready taken to try to resolve them. ACustomer Claim Form will be mailed thatwill need to be completed, signed andreturned to the BBB along with proof ofownership. Upon receipt, the BBB willreview the claim for eligibility under theProgram Summary Guidelines.
You can get more information bycalling BBB AUTO LINE at1-800-955-5100, or writing to:
BBB AUTO LINE3033 Wilson Boulevard, Suite 600Arlington, Virginia 22201
BBB AUTO LINE applications can also berequested by calling the Ford MotorCompany Customer Relationship Centerat 1-800-392-3673.
Note:Ford Motor Company reserves theright to change eligibility limitations, modifyprocedures, or to discontinue this processat any time without notice and withoutobligation.
221
Taurus (CPH) Canada/United States of America, enUSA, First Printing
Customer Assistance
Page 247 of 504
Note: Coolant expands when it is hot. Thelevel may extend beyond the MAX mark.
Maintain coolant concentration within48% to 50%, which equates to a freezepoint between -30°F (-34°C) and -34°F(-37°C). Coolant concentration should bechecked using a refractometer. We do notrecommend the use of hydrometers orcoolant test strips for measuring coolantconcentration.
Adding Coolant
WARNING
Never remove the coolant reservoircap when the engine is running orhot.
Note: Automotive fluids are notinterchangeable. Take care not to putengine coolant in the windshield washerfluid reservoir or windshield washer fluid inthe engine coolant reservoir.
Note: Do not use stop leak pellets, coolingsystem sealants, or non-specified additivesas they can cause damage to the enginecooling or heating systems. Resultingcomponent damage may not be covered bythe vehicle Warranty.
It is very important to use predilutedcoolant approved to the correctspecification in order to avoid plugging thesmall passageways in the engine coolingsystem. See Capacities andSpecifications (page 297). Do not mixdifferent colors or types of coolant in yourvehicle. Mixing of engine coolants or usingan incorrect coolant may harm the engineor cooling system components and maynot be covered by the vehicle Warranty.
Note:If prediluted coolant is not available,use the approved concentrated coolantdiluting it to 50/50 with distilled water. SeeCapacities and Specifications (page 297).Using water that has not been deionisedmay contribute to deposit formation,corrosion and plugging of the small coolingsystem passageways.
Note:Coolants marketed for all makes andmodels may not be approved to Fordspecifications and may cause damage tothe cooling system. Resulting componentdamage may not be covered by the vehicleWarranty.
If the coolant level is at or below theminimum mark, add prediluted coolantimmediately.
To top up the coolant level do thefollowing:
1. Unscrew the cap slowly. Any pressureescapes as you unscrew the cap.
2. Add prediluted coolant approved tothe correct specification. SeeCapacities and Specifications (page297).
3. Add enough prediluted coolant toreach the correct level.
4.Replace the coolant reservoir cap, turnit clockwise until you feel a strongresistance.
5. Check the coolant level in the coolantreservoir the next few times you driveyour vehicle. If necessary, add enoughprediluted engine coolant to bring thecoolant level to the correct level.
If you have to add more than 1.1 qt (1 L) ofengine coolant per month, have yourvehicle checked as soon as possible.Operating an engine with a low level ofcoolant can result in engine overheatingand possible engine damage.
244
Taurus (CPH) Canada/United States of America, enUSA, First Printing
Maintenance
Page 250 of 504
If you tow a trailer with your vehicle, theengine may temporarily reach a highertemperature during severe operatingconditions, for example ascending a longor steep grade in high ambienttemperatures.
At this time, you may notice the coolanttemperature gauge moves toward the redzone and a message may appear in theinformation display.
You may notice a reduction in vehiclespeed caused by reduced engine power inorder to manage the engine coolanttemperature. Your vehicle may enter thismode if certain high-temperature andhigh-load conditions take place. Theamount of speed reduction depends onvehicle loading, grade and ambienttemperature. If this occurs, there is no needto pull off the road. You can continue todrive your vehicle.
The air conditioning may automaticallyturn on and off during severe operatingconditions to protect the engine fromoverheating. When the coolanttemperature decreases to the normaloperating temperature, the air conditioningturns on.
If the coolant temperature gauge movesfully into the red zone, or if the coolanttemperature warning or service enginesoon messages appear in your informationdisplay, do the following:
1. Pull off the road as soon as safelypossible and shift the transmission intopark (P).
2. Leave the engine running until thecoolant temperature gauge needlereturns to the normal position. Afterseveral minutes, if the temperaturedoes not drop, follow the remainingsteps.
3.Switch the engine off and wait for it tocool. Check the coolant level.
4. If the coolant level is at or below theminimum mark, add prediluted coolantimmediately.
5. If the coolant level is normal, restartthe engine and continue.
AUTOMATIC TRANSMISSION
FLUID CHECK - 2.0L
ECOBOOST™
6F35 Transmission
The automatic transmission does not havea transmission fluid dipstick.
The automatic transmission does notconsume fluid. If the transmission is notworking correctly, for example, thetransmission slips, shifts slowly or thereare signs of fluid leakage, have the systemchecked by an authorized dealer.
Change the automatic transmission fluidand filter at the correct service interval.
Do not use supplemental automatictransmission fluid additives because theyare unnecessary and could lead totransmission damage that may not becovered by the vehicle Warranty.
AUTOMATIC TRANSMISSION
FLUID CHECK - 3.5L DURATEC/
3.5L ECOBOOST™
6F50/6F55 Transmission (If Equipped)
WARNINGS
The dipstick cap and surroundingcomponents may be hot, use gloves.
Use gloves when moving the air filterassembly. Components will be hot.
247
Taurus (CPH) Canada/United States of America, enUSA, First Printing
Maintenance
Page 251 of 504
Note:Automatic transmission fluidexpands when warmed. To obtain anaccurate fluid check, drive your vehicle untilyou warm it up, approximately 20 mi(30 km). If you operate your vehicle for anextended period at high speeds, in city trafficduring hot weather or pulling a trailer, switchyour vehicle off until it reaches normaloperating temperatures to allow the fluidto cool before checking. Depending onvehicle use, cooling times could take up to30 minutes or longer.
Refer to your scheduled maintenanceinformation for scheduled intervals for fluidchecks and changes. Your transmissiondoes not consume fluid. However, youshould check the fluid level if thetransmission is not working properly. Forexample, if the transmission slips or shiftsslowly or if you notice some sign of a fluidleak.
1. Drive your vehicle 20 mi (30 km) oruntil it reaches normal operatingtemperature.
2.Park your vehicle on a level surface andengage the parking brake.
3. With the parking brake engaged andyour foot on the brake pedal, start theengine and move the gearshift leverthrough all of the gear ranges. Allow aminimum of 10 seconds for each gearto engage.
4. Put the gearshift lever in park (P) andleave the engine running.
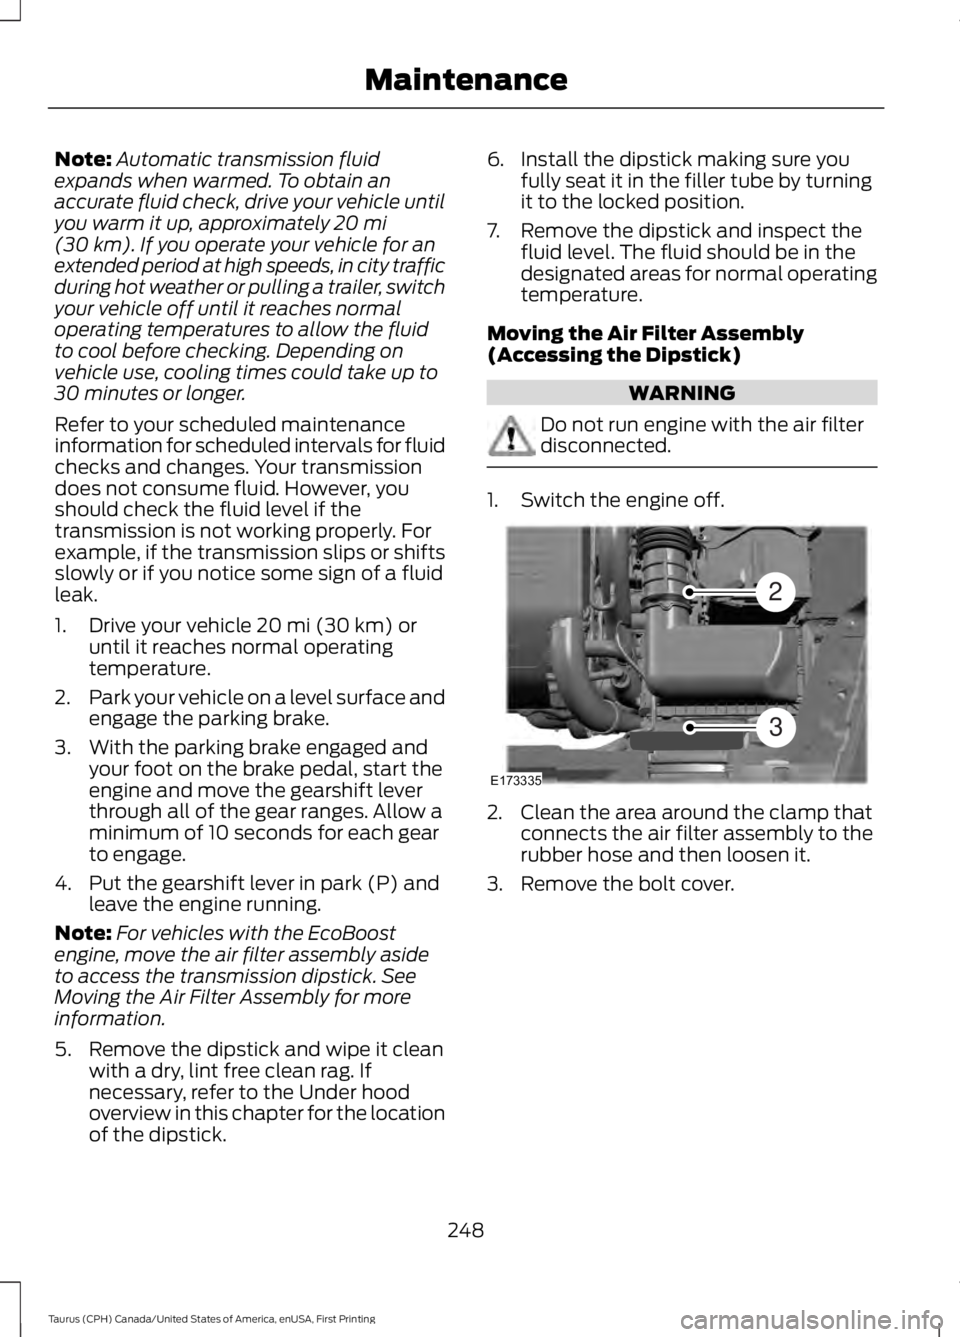
Note:For vehicles with the EcoBoostengine, move the air filter assembly asideto access the transmission dipstick. SeeMoving the Air Filter Assembly for moreinformation.
5. Remove the dipstick and wipe it cleanwith a dry, lint free clean rag. Ifnecessary, refer to the Under hoodoverview in this chapter for the locationof the dipstick.
6. Install the dipstick making sure youfully seat it in the filler tube by turningit to the locked position.
7. Remove the dipstick and inspect thefluid level. The fluid should be in thedesignated areas for normal operatingtemperature.
Moving the Air Filter Assembly(Accessing the Dipstick)
WARNING
Do not run engine with the air filterdisconnected.
1. Switch the engine off.
2. Clean the area around the clamp thatconnects the air filter assembly to therubber hose and then loosen it.
3. Remove the bolt cover.
248
Taurus (CPH) Canada/United States of America, enUSA, First Printing
MaintenanceE173335
2
3
Page 258 of 504
ADJUSTING THE HEADLAMPS
Vertical Aim Adjustment
The headlamps on your vehicle areproperly aimed at the assembly plant. Ifyour vehicle has been in an accident, havethe alignment of your headlamps checkedby your authorized dealer.
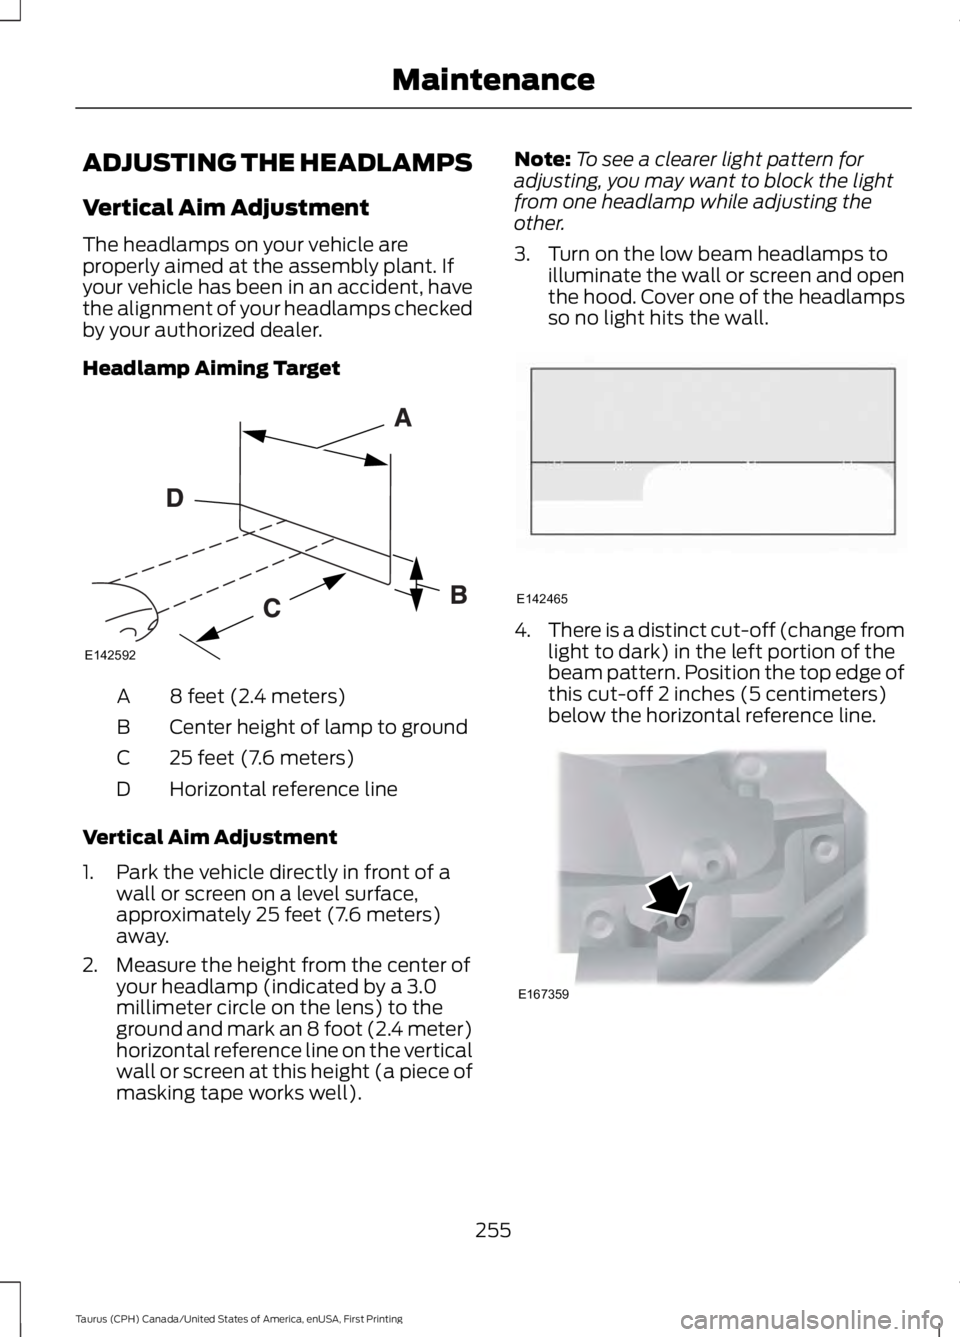
Headlamp Aiming Target
8 feet (2.4 meters)A
Center height of lamp to groundB
25 feet (7.6 meters)C
Horizontal reference lineD
Vertical Aim Adjustment
1. Park the vehicle directly in front of awall or screen on a level surface,approximately 25 feet (7.6 meters)away.
2. Measure the height from the center ofyour headlamp (indicated by a 3.0millimeter circle on the lens) to theground and mark an 8 foot (2.4 meter)horizontal reference line on the verticalwall or screen at this height (a piece ofmasking tape works well).
Note:To see a clearer light pattern foradjusting, you may want to block the lightfrom one headlamp while adjusting theother.
3. Turn on the low beam headlamps toilluminate the wall or screen and openthe hood. Cover one of the headlampsso no light hits the wall.
4.There is a distinct cut-off (change fromlight to dark) in the left portion of thebeam pattern. Position the top edge ofthis cut-off 2 inches (5 centimeters)below the horizontal reference line.
255
Taurus (CPH) Canada/United States of America, enUSA, First Printing
MaintenanceE142592 E142465 E167359
Page 268 of 504
Note:Industrial-strength or heavy-dutycleaners in combination with brush agitationto remove brake dust and dirt, could wearaway the clear coat finish over a period time.
Note:Do not use hydrofluoric acid-basedor high caustic-based wheel cleaners, steelwool, fuels or strong household detergents.
Note:If you intend parking your vehicle foran extended period after cleaning thewheels with a wheel cleaner, drive yourvehicle for a few minutes before doing so.This will reduce the risk of increasedcorrosion of the brake discs.
Alloy wheels and wheel covers are coatedwith a clear coat paint finish. To maintaintheir condition we recommend that you:
•Clean the wheels weekly usingMotorcraft Wheel and Tire Cleaner.Apply using manufacturer'sinstructions.
•Use a sponge to remove heavydeposits of dirt and brake dustaccumulation.
•Rinse thoroughly with a strong streamof water when you have completed thecleaning process.
•To remove tar and grease, useMotorcraft Bug and Tar Remover.
VEHICLE STORAGE
If you plan on storing your vehicle for 30days or more, read the followingmaintenance recommendations to makesure your vehicle stays in good operatingcondition.
We engineer and test all motor vehiclesand their components for reliable, regulardriving. Under various conditions,long-term storage may lead to degradedengine performance or failure unless youuse specific precautions to preserve enginecomponents.
General
•Store all vehicles in a dry, ventilatedplace.
•Protect from sunlight, if possible.
•If vehicles are stored outside, theyrequire regular maintenance to protectagainst rust and damage.
Body
•Wash your vehicle thoroughly toremove dirt, grease, oil, tar or mud fromexterior surfaces, rear-wheel housingand the underside of front fenders.
•Periodically wash your vehicle if it isstored in exposed locations.
•Touch-up exposed or primed metal toprevent rust.
•Cover chrome and stainless steel partswith a thick coat of auto wax to preventdiscoloration. Re-wax as necessarywhen you wash your vehicle.
•Lubricate all hood, door and luggagecompartment hinges and latches witha light grade oil.
•Cover interior trim to prevent fading.
•Keep all rubber parts free from oil andsolvents.
Engine
•Change the engine oil and filter prior tostorage because used engine oilcontains contaminates which maycause engine damage.
•Start the engine every 15 days for aminimum of 15 minutes. Run at fast idlewith the climate controls set to defrostuntil the engine reaches normaloperating temperature.
265
Taurus (CPH) Canada/United States of America, enUSA, First Printing
Vehicle Care
Page 279 of 504
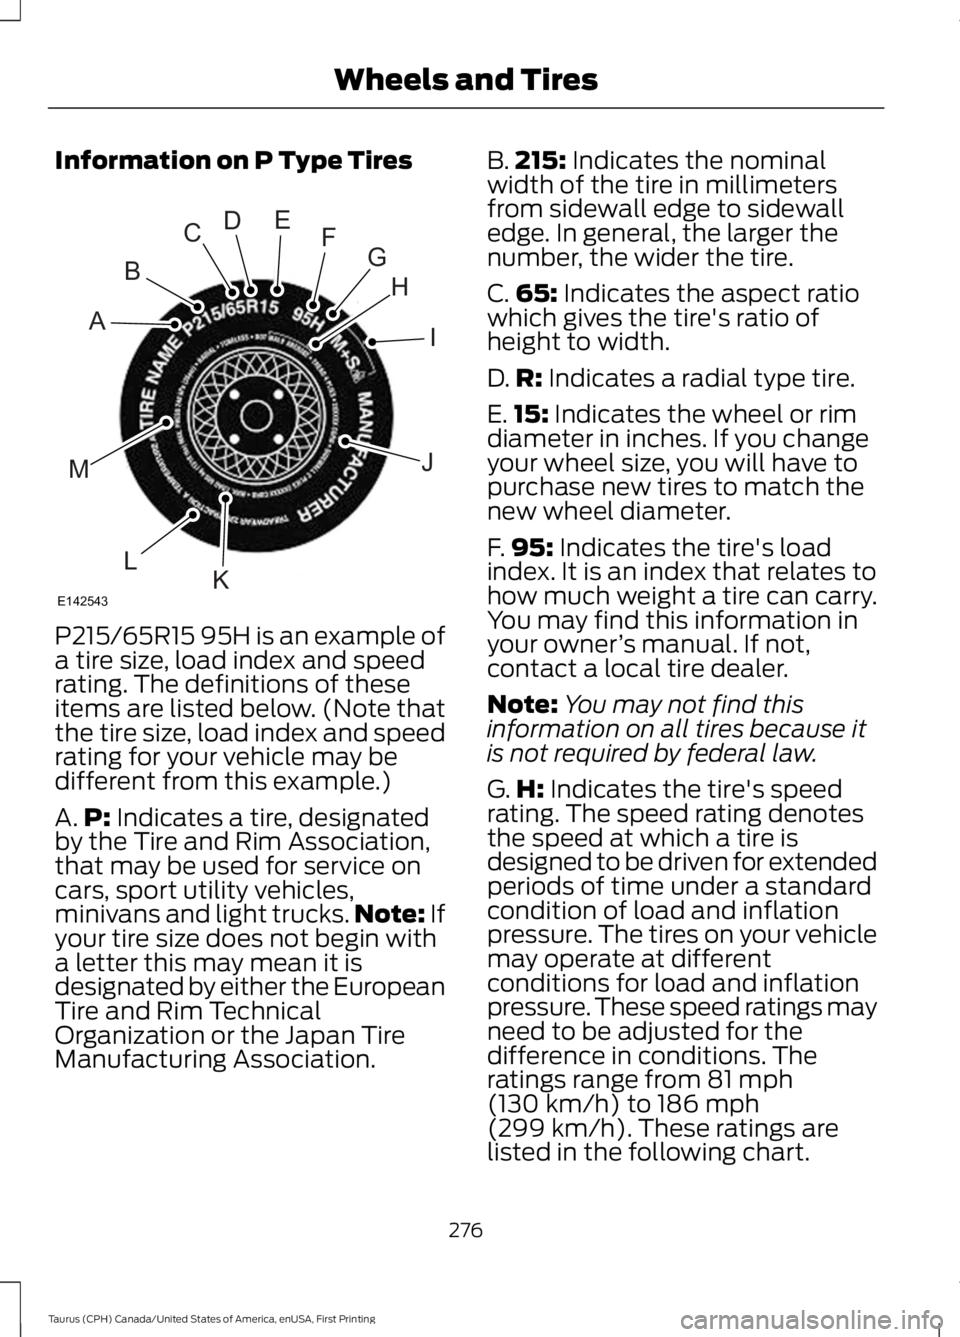
Information on P Type Tires
P215/65R15 95H is an example of
a tire size, load index and speedrating. The definitions of theseitems are listed below. (Note thatthe tire size, load index and speedrating for your vehicle may bedifferent from this example.)
A.P: Indicates a tire, designatedby the Tire and Rim Association,that may be used for service oncars, sport utility vehicles,minivans and light trucks.Note: Ifyour tire size does not begin witha letter this may mean it isdesignated by either the EuropeanTire and Rim TechnicalOrganization or the Japan TireManufacturing Association.
B.215: Indicates the nominalwidth of the tire in millimetersfrom sidewall edge to sidewalledge. In general, the larger thenumber, the wider the tire.
C.65: Indicates the aspect ratiowhich gives the tire's ratio ofheight to width.
D.R: Indicates a radial type tire.
E.15: Indicates the wheel or rimdiameter in inches. If you changeyour wheel size, you will have topurchase new tires to match thenew wheel diameter.
F.95: Indicates the tire's loadindex. It is an index that relates tohow much weight a tire can carry.You may find this information inyour owner’s manual. If not,contact a local tire dealer.
Note:You may not find thisinformation on all tires because itis not required by federal law.
G.H: Indicates the tire's speedrating. The speed rating denotesthe speed at which a tire isdesigned to be driven for extendedperiods of time under a standardcondition of load and inflationpressure. The tires on your vehiclemay operate at differentconditions for load and inflationpressure. These speed ratings mayneed to be adjusted for thedifference in conditions. Theratings range from 81 mph(130 km/h) to 186 mph
(299 km/h). These ratings arelisted in the following chart.
276
Taurus (CPH) Canada/United States of America, enUSA, First Printing
Wheels and TiresH
I
J
KL
M
A
B
CDEFG
E142543
Page 295 of 504
2.Full-size dissimilar spare with labelon wheel: This spare tire has a label onthe wheel that states: THIS WHEEL ANDTIRE ASSEMBLY FOR TEMPORARY USEONLY.
When driving with one of the dissimilarspare tires listed above, do not:
•Exceed 50 mph (80 km/h).
•Load the vehicle beyond maximumvehicle load rating listed on the SafetyCompliance Label.
•Tow a trailer.
•Use snow chains on the end of thevehicle with the dissimilar spare tire.
•Use more than one dissimilar spare tireat a time.
•Use commercial car washingequipment.
•Try to repair the dissimilar spare tire.
Use of one of the dissimilar spare tireslisted above at any one wheel location canlead to impairment of the following:
•Handling, stability and brakingperformance.
•Comfort and noise.
•Ground clearance and parking at curbs.
•Winter weather driving capability.
•Wet weather driving capability.
•All-wheel driving capability.
3.Full-size dissimilar spare withoutlabel on wheel
When driving with the full-size dissimilarspare wheel and tire assembly, do not:
•Exceed 70 mph (113 km/h).
•Use more than one dissimilar sparewheel and tire assembly at a time.
•Use commercial car washingequipment.
•Use snow chains on the end of thevehicle with the dissimilar spare wheeland tire assembly.
The usage of a full-size dissimilar sparewheel and tire assembly can lead toimpairment of the following:
•Handling, stability and brakingperformance.
•Comfort and noise.
•Ground clearance and parking at curbs.
•Winter weather driving capability.
•Wet weather driving capability.
•All-wheel driving capability.
When driving with the full-size dissimilarspare wheel and tire assembly additionalcaution should be given to:
•Towing a trailer.
•Driving vehicles equipped with acamper body.
•Driving vehicles with a load on thecargo rack.
Drive cautiously when using a full-sizedissimilar spare wheel and tire assemblyand seek service as soon as possible.
Tire Change Procedure
WARNINGS
When one of the front wheels is offthe ground, the transmission alonewill not prevent the vehicle frommoving or slipping off the jack, even if thetransmission is in park (P).
To help prevent your vehicle frommoving when changing a wheel, shiftthe transmission into park (P), setthe parking brake and use an appropriateblock or wheel chock to secure the wheeldiagonally opposite to the wheel beingchanged. For example, when changing thefront left wheel, place an appropriate blockor wheel chock on the right rear wheel.
Do not work on your vehicle whenthe jack is the only support. If thevehicle slips off the jack, you orsomeone else could be seriously injured.
292
Taurus (CPH) Canada/United States of America, enUSA, First Printing
Wheels and Tires