2017 FORD F150 change time
[x] Cancel search: change timePage 228 of 599
Changing the Set Speed
Note:
If you accelerate by pressing the
accelerator pedal, the set speed will not
change. When you release the accelerator
pedal, your vehicle returns to the speed that
you previously set.
• Press the accelerator or brake pedal
until you reach the desired speed. Press
and release SET+.
• Press and hold SET+ or SET-. Release
the control when you reach the desired
speed.
• Press and release
SET+ or SET-. The
set speed will change in approximately
1 mph (2 km/h) increments.
Canceling the Set Speed
Press
CNCL or tap the brake pedal, this
action does not erase the set speed.
Resuming the Set Speed
Press and release
RES.
Switching Cruise Control Off
Press and release
OFF or switch the
ignition off.
Note: You will erase the set speed if you
switch the system off.
USING ADAPTIVE CRUISE
CONTROL
(If Equipped) WARNINGS
Always pay close attention to
changing road conditions when using
adaptive cruise control. The system
does not replace attentive driving. Failing
to pay attention to the road may result in
a crash, serious injury or death. Adaptive cruise control is not a crash
warning or avoidance system. WARNINGS
Adaptive cruise control does not
detect stationary or slow moving
vehicles below
6 mph (10 km/h).
Adaptive cruise control does not
detect pedestrians or objects in the
road.
Adaptive cruise control does not
detect oncoming vehicles in the
same lane.
Do not use adaptive cruise control
on winding roads, in heavy traffic or
when the road surface is slippery.
This could result in loss of vehicle control,
serious injury or death. Do not use adaptive cruise control
with a snow plow blade installed.
Do not use adaptive cruise control
when towing a trailer that has trailer
brakes. The auto-brake component
of the adaptive cruise control system does
not operate the trailer brakes. Using
adaptive cruise control when towing a
trailer that has trailer brakes may result in
the loss of vehicle control, which could
result in serious injury. Do not use tire sizes other than those
recommended because this can
affect the normal operation of the
system. Failure to do so may result in a loss
of vehicle control, which could result in
serious injury. Note:
It is your responsibility to stay alert,
drive safely and control the vehicle at all
times.
The system adjusts your speed to maintain
a proper distance between you and the
vehicle in front of you in the same lane. You
can select from one of four gap settings.
225
F-150 (TFC) Canada/United States of America, enUSA, First Printing Cruise Control
(If Equipped)
Page 231 of 599
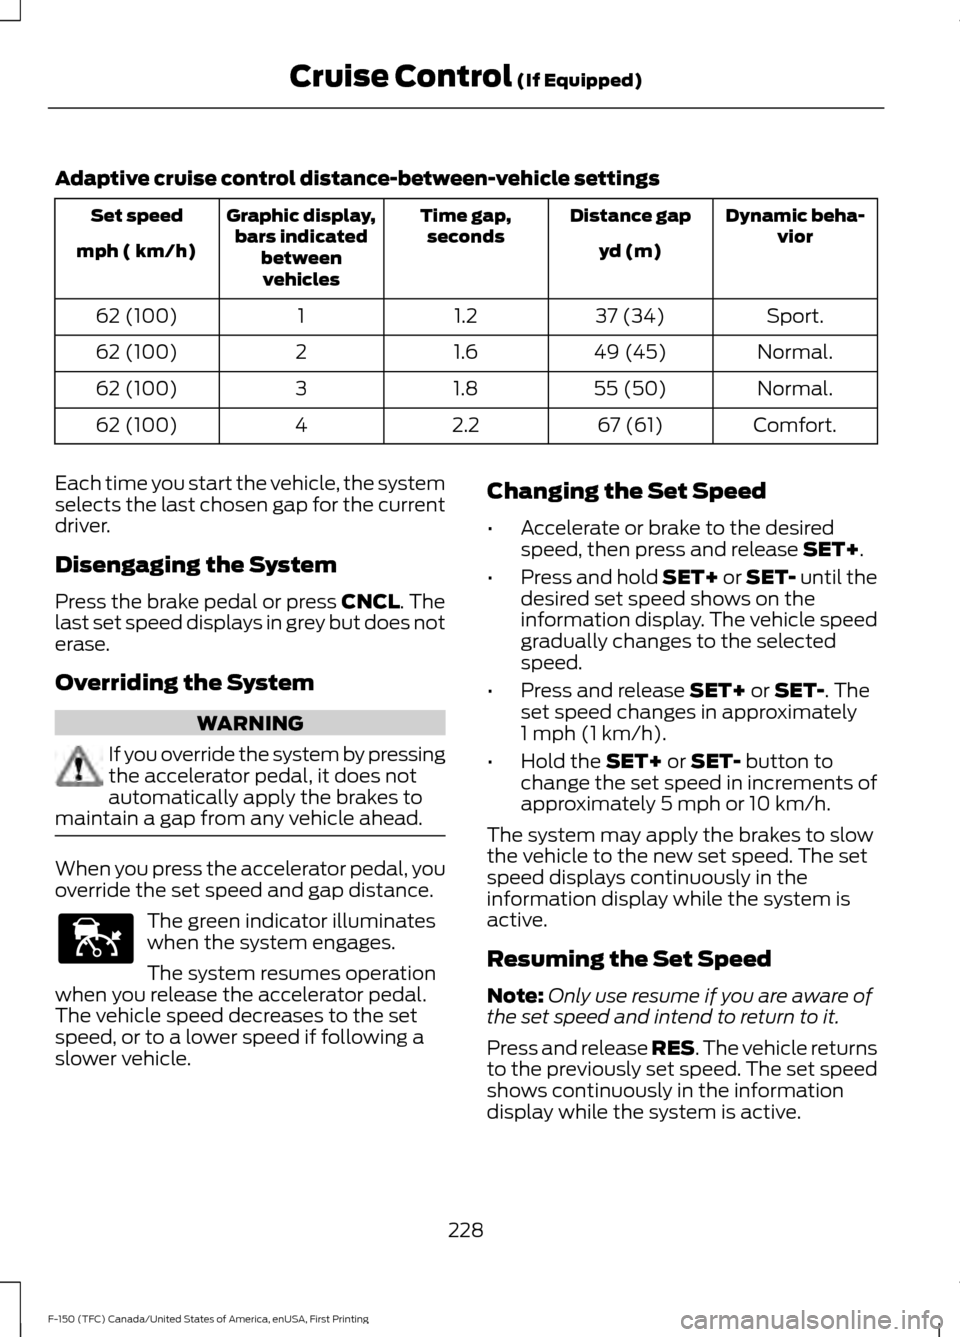
Adaptive cruise control distance-between-vehicle settings
Dynamic beha-
vior
Distance gap
Time gap,
seconds
Graphic display,
bars indicated betweenvehicles
Set speed
yd (m)
mph ( km/h)
Sport.
37 (34)
1.2
1
62 (100)
Normal.
49 (45)
1.6
2
62 (100)
Normal.
55 (50)
1.8
3
62 (100)
Comfort.
67 (61)
2.2
4
62 (100)
Each time you start the vehicle, the system
selects the last chosen gap for the current
driver.
Disengaging the System
Press the brake pedal or press CNCL. The
last set speed displays in grey but does not
erase.
Overriding the System WARNING
If you override the system by pressing
the accelerator pedal, it does not
automatically apply the brakes to
maintain a gap from any vehicle ahead. When you press the accelerator pedal, you
override the set speed and gap distance.
The green indicator illuminates
when the system engages.
The system resumes operation
when you release the accelerator pedal.
The vehicle speed decreases to the set
speed, or to a lower speed if following a
slower vehicle. Changing the Set Speed
•
Accelerate or brake to the desired
speed, then press and release
SET+.
• Press and hold SET+ or SET- until the
desired set speed shows on the
information display. The vehicle speed
gradually changes to the selected
speed.
• Press and release
SET+ or SET-. The
set speed changes in approximately
1 mph (1 km/h)
.
• Hold the
SET+ or SET- button to
change the set speed in increments of
approximately 5 mph or 10 km/h.
The system may apply the brakes to slow
the vehicle to the new set speed. The set
speed displays continuously in the
information display while the system is
active.
Resuming the Set Speed
Note: Only use resume if you are aware of
the set speed and intend to return to it.
Press and release RES. The vehicle returns
to the previously set speed. The set speed
shows continuously in the information
display while the system is active.
228
F-150 (TFC) Canada/United States of America, enUSA, First Printing Cruise Control
(If Equipped)E144529
Page 234 of 599
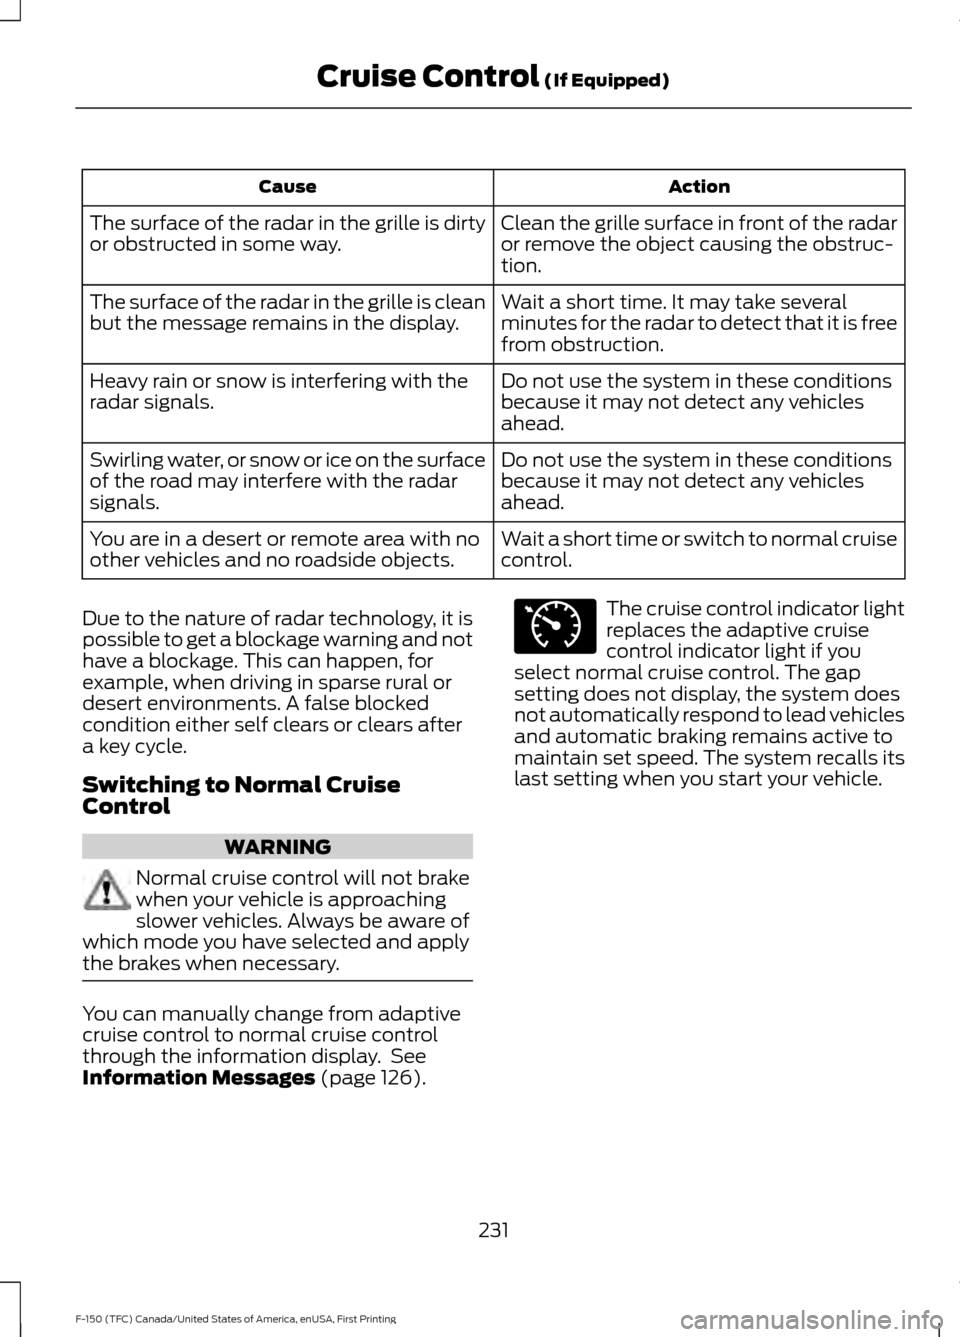
Action
Cause
Clean the grille surface in front of the radar
or remove the object causing the obstruc-
tion.
The surface of the radar in the grille is dirty
or obstructed in some way.
Wait a short time. It may take several
minutes for the radar to detect that it is free
from obstruction.
The surface of the radar in the grille is clean
but the message remains in the display.
Do not use the system in these conditions
because it may not detect any vehicles
ahead.
Heavy rain or snow is interfering with the
radar signals.
Do not use the system in these conditions
because it may not detect any vehicles
ahead.
Swirling water, or snow or ice on the surface
of the road may interfere with the radar
signals.
Wait a short time or switch to normal cruise
control.
You are in a desert or remote area with no
other vehicles and no roadside objects.
Due to the nature of radar technology, it is
possible to get a blockage warning and not
have a blockage. This can happen, for
example, when driving in sparse rural or
desert environments. A false blocked
condition either self clears or clears after
a key cycle.
Switching to Normal Cruise
Control WARNING
Normal cruise control will not brake
when your vehicle is approaching
slower vehicles. Always be aware of
which mode you have selected and apply
the brakes when necessary. You can manually change from adaptive
cruise control to normal cruise control
through the information display. See
Information Messages (page 126). The cruise control indicator light
replaces the adaptive cruise
control indicator light if you
select normal cruise control. The gap
setting does not display, the system does
not automatically respond to lead vehicles
and automatic braking remains active to
maintain set speed. The system recalls its
last setting when you start your vehicle.
231
F-150 (TFC) Canada/United States of America, enUSA, First Printing Cruise Control
(If Equipped)E71340
Page 236 of 599
Note:
When Aid mode is on and the system
detects no steering activity for a short
period, the system will alert you to put your
hands on the steering wheel. The system
may detect a light grip or touch on the
steering wheel as hands off driving.
The system notifies you to stay in your lane
through the steering system and the
instrument cluster display when the front
camera detects an unintentional drift out
of your lane is likely to occur. The system
automatically detects and tracks the road
lane markings using a camera mounted
behind the interior rear view mirror.
Switching the System On and Off
Note: The system on or off setting is stored
until it is manually changed, unless a
MyKey® is detected. If the system detects
a MyKey®, it defaults to on and the mode
is set to alert.
Note: If a MyKey® is detected, pressing the
button will not affect the on or off status of
the system. You can only change the mode
and intensity settings. Press the button located on the
center console to switch the
system on or off.
System Settings
The system has one standard feature
setting and one optional setting menu
available. See General Information
(page 110). The system stores the last
known selection for each of these settings.
You do not need to readjust your settings
each time you turn on the system.
Adjust the settings to enable one of the
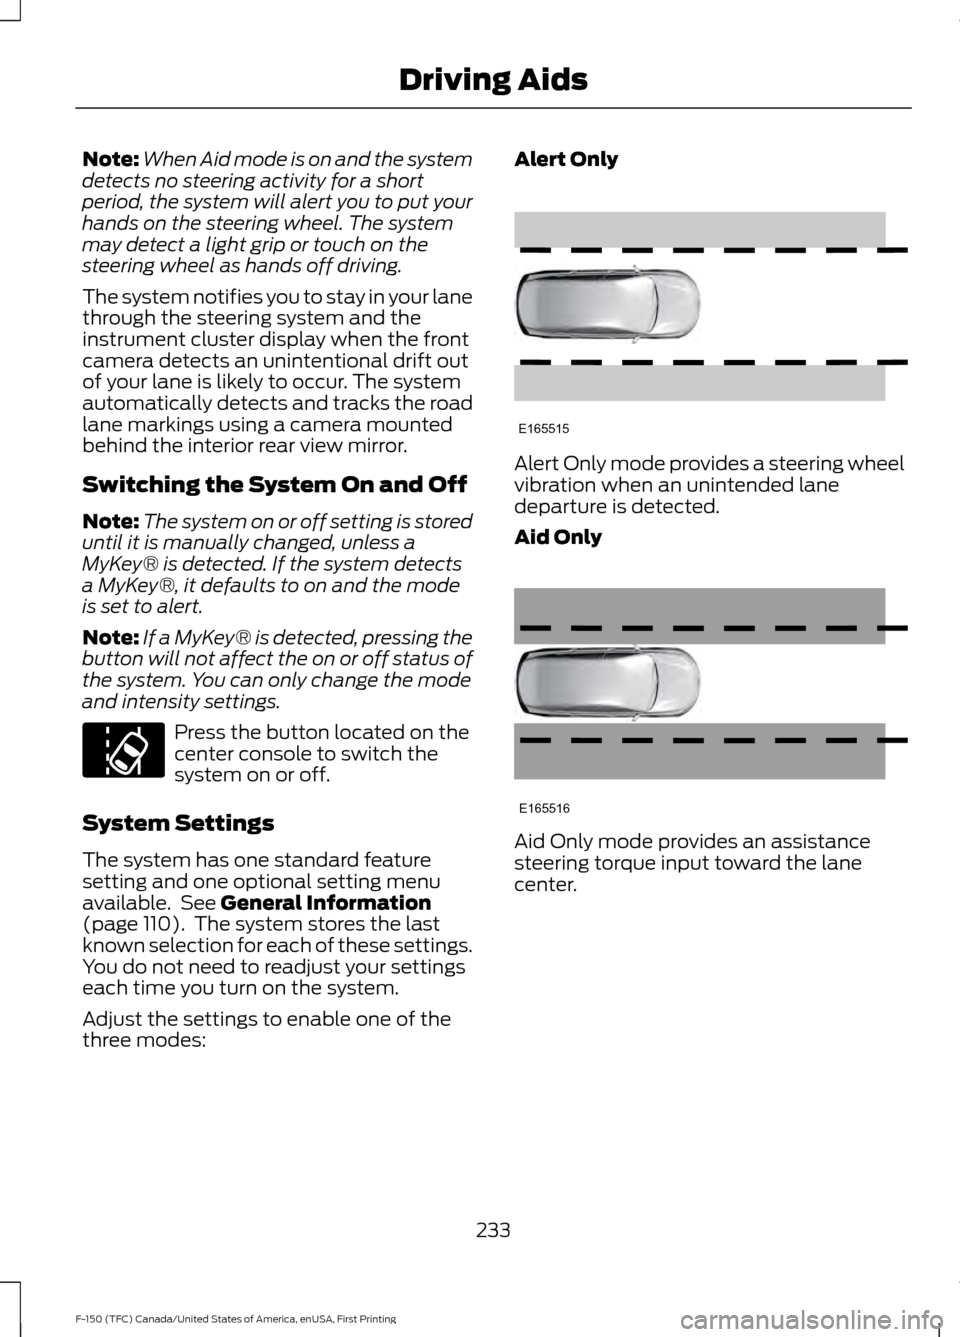
three modes: Alert Only
Alert Only mode provides a steering wheel
vibration when an unintended lane
departure is detected.
Aid Only
Aid Only mode provides an assistance
steering torque input toward the lane
center.
233
F-150 (TFC) Canada/United States of America, enUSA, First Printing Driving AidsE173233 E165515 E165516
Page 248 of 599

You can use your information display
control to adjust the collision warning
system's sensitivity or to turn the system
On or Off. Your vehicle will remember
these settings across key cycles. You may
change the collision warning system
sensitivity to any one of three possible
settings. See General Information (page
110).
Note: It is recommended that you turn the
collision warning system off if a snow plow
or similar object is installed in such a way
that it may block the radar sensor. Your
vehicle will remember the selected setting
across key cycles.
Note: When possible, the manufacturer
recommends using the highest sensitivity
setting. If warnings are too frequent, you can
reduce your system's sensitivity. Reduced
sensitivity causes fewer and later system
warnings.
See General Information (page
110). Blocked Sensors If a blocked sensor message appears in the
information display, dirt, water, or an object
is blocking the sensor. The sensor is
located behind a cover near the driver side
of the lower grille. If anything blocks the
sensor, your vehicle cannot see through
the sensor, and the collision warning
system will not work. Possible causes for
the blocked sensor message and corrective
actions are listed below.
Action
Cause
Clean the radar sensor cover or remove theobstruction
The radar sensor cover in the grille is dirty
or obstructed
Wait a short time. The radar may take
several minutes to reset after you remove the obstruction
The surface of the radar sensor cover is
clean but the message remains in the display
The collision warning system is temporarilydisabled. Shortly after weather conditions improve, the collision warning system automatically reactivates
Heavy rain, spray, snow or fog in the air
interferes with the radar signals
The collision warning system is temporarilydisabled. Shortly after weather conditions improve, the collision warning system automatically reactivates
Swirling water, snow or ice on the road
surface interferes with the radar signals
245
F-150 (TFC) Canada/United States of America, enUSA, First Printing Driving AidsE183741
Page 285 of 599
The gain setting sets the trailer brake
controller for the specific towing condition.
You should change the setting as towing
conditions change. Changes to towing
conditions include trailer load, vehicle load,
road conditions and weather.
The gain should be set to provide the
maximum trailer braking assistance while
making sure the trailer wheels do not lock
when using the brakes. Locked trailer
wheels may lead to trailer instability.
1.
Make sure the trailer brakes are in good
working condition, functioning normally
and properly adjusted. See your trailer
dealer if necessary.
2. Hook up the trailer and make the electrical connections according to the
trailer manufacturer's instructions.
3. When you plug in a trailer with electric or electric-over-hydraulic brakes, a
message confirming connection
appears in the information display.
4. Use the gain adjustment (+ and -) buttons to increase or decrease the
gain setting to the desired starting
point. A gain setting of 6.0 is a good
starting point for heavier loads.
5. In a traffic-free environment, tow the trailer on a dry, level surface at a speed
of 20-25 mph (30-40 km/h) and
squeeze the manual control lever
completely.
6. If the trailer wheels lock up, indicated by squealing tires, reduce the gain
setting. If the trailer wheels turn freely,
increase the gain setting. Repeat Steps
5 and 6 until the gain setting is at a
point just below trailer wheel lock-up.
If towing a heavier trailer, trailer wheel
lock-up may not be attainable even
with the maximum gain setting of 10. Explanation of Information Display
Warning Messages
Note:
An authorized dealer can diagnose
the trailer brake controller to determine
exactly which trailer fault has occurred.
However, your Ford warranty does not cover
this diagnosis if the fault is with the trailer.
A message indicating a trailer brake
module fault may display in response to
faults sensed by the trailer brake controller,
accompanied by a single tone. If this
message appears, contact an authorized
dealer as soon as possible for diagnosis
and repair. The controller may still
function, but performance may be
degraded.
A message indicating a trailer wiring fault
may display when there is a short circuit
on the electric brake output wire. If this
message displays, accompanied by a
single tone, with no trailer connected, the
problem is with your vehicle wiring
between the trailer brake controller and
the 7-pin connector at the bumper. If the
message only displays with a trailer
connected, the problem is with the trailer
wiring. Consult your trailer dealer for
assistance. This can be a short to ground
(such as a chaffed wire), short to voltage
(such as a pulled pin on trailer emergency
breakaway battery) or the trailer brakes
may be drawing too much current.
Points to Remember
Note: Do not attempt removal of the trailer
brake controller without consulting the
Workshop Manual. Damage to the unit may
result.
• Adjust gain setting before using the
trailer brake controller for the first time.
• Adjust gain setting, using the procedure
above, whenever road, weather and
trailer or vehicle loading conditions
change from when the gain was initially
set.
282
F-150 (TFC) Canada/United States of America, enUSA, First Printing Towing
Page 288 of 599

Replace the rear axle lubricant anytime
the rear axle has been submerged in water.
Water may have contaminated the rear
axle lubricant, which is not normally
checked or changed unless a leak is
suspected or other axle repair is required.
TOWING THE VEHICLE ON
FOUR WHEELS
WARNING
If your vehicle has a steering wheel
lock make sure the ignition is in the
accessory or on position when being
towed. Emergency Towing
If your vehicle becomes inoperable
(without access to wheel dollies,
car-hauling trailer, or flatbed transport
vehicle), it can be flat-towed (all wheels
on the ground, regardless of the powertrain
and transmission configuration) under the
following conditions:
•
Your vehicle is facing forward for
towing in a forward direction.
• Place the transmission in position N. If
you cannot move the transmission into
N
, you may need to override it. See
Transmission (page 186).
• Maximum speed is 35 mph (56 km/h).
• Maximum distance is
50 mi (80 km).
Recreational Towing
Note: Put your climate control system in
recirculated air mode to prevent exhaust
fumes from entering your vehicle. See
Climate Control
(page 141).
Follow these guidelines if you have a need
for recreational towing, such as towing
your vehicle behind a motorhome. We
designed these guidelines to prevent
damage to your transmission. Two-wheel Drive Vehicles
You cannot tow a two-wheel drive vehicle
with any wheels on the ground as vehicle
or transmission damage may occur. You
must tow your vehicle with all four wheels
off the ground, such as when using a
car-hauling trailer.
Four-wheel Drive Vehicles
You can only tow a four-wheel drive
vehicle with all wheels on the ground by
placing the transfer case in its neutral
position and engaging the
four-wheel-down towing feature. Perform
the steps outlined in the following section
after positioning your vehicle behind the
tow vehicle and properly securing them
together.
Note:
Make sure you properly secure your
vehicle to the tow vehicle.
Four-wheel-down Towing
1. Put the ignition in the on position, but do not start the engine. If your vehicle
has an ignition key, turn the key to on.
If your vehicle has intelligent access,
press the engine START/STOP button
once without pressing the brake pedal.
2. Press and hold the brake pedal.
3. Rotate the four-wheel drive switch to 2H
.
4. Shift the transmission to position
N.
5. Rotate the four-wheel drive switch from
2H to 4L and back to 2H five
times within seven seconds.
Note: If completed successfully, the
information display shows NEUTRAL TOW
LEAVE IN N or NEUTRAL TOW ENABLED
LEAVE TRANSMISSION IN NEUTRAL
.
This indicates that your vehicle is safe to
tow with all wheels on the ground.
Note: If you do not see the message in the
display, you must perform the procedure
again from the beginning.
285
F-150 (TFC) Canada/United States of America, enUSA, First Printing Towing
Page 291 of 599
BREAKING-IN
You need to break in new tires for
approximately 300 miles (480
kilometers). During this time, your vehicle
may exhibit some unusual driving
characteristics.
Avoid driving too fast during the first 1000
miles (1600 kilometers). Vary your speed
frequently and change up through the
gears early. Do not labor the engine.
Do not tow during the first 1000 miles
(1600 kilometers).
ECONOMICAL DRIVING
Your fuel economy is affected by several
things, such as how you drive, the
conditions you drive under, and how you
maintain your vehicle.
You may improve your fuel economy by
keeping these things in mind:
•
Accelerate and slow down in a smooth,
moderate fashion.
• Drive at steady speeds without
stopping.
• Anticipate stops; slowing down may
eliminate the need to stop.
• Combine errands and minimize
stop-and-go driving.
• Close the windows for high-speed
driving.
• Drive at reasonable speeds (traveling
at 55 mph [88 km/h] uses 15% less
fuel than traveling at 65 mph [105
km/h]).
• Keep the tires properly inflated and use
only the recommended size.
• Use the recommended engine oil.
• Perform all regularly scheduled
maintenance. Avoid these actions; they reduce your fuel
economy:
•
Sudden accelerations or hard
accelerations.
• Revving the engine before turning it off.
• Idle for periods longer than one minute.
• Warm up your vehicle on cold
mornings.
• Use the air conditioner or front
defroster.
• Use the speed control in hilly terrain.
• Rest your foot on the brake pedal while
driving.
• Drive a heavily loaded vehicle or tow a
trailer.
• Carry unnecessary weight
(approximately 1 mpg [0.4 km/L] is
lost for every 400 lb [180 kilogram] of
weight carried).
• Driving with the wheels out of
alignment.
Conditions
• Heavily loading a vehicle or towing a
trailer may reduce fuel economy at any
speed.
• Adding certain accessories to your
vehicle (for example bug deflectors,
rollbars, light bars, running boards, ski
racks or luggage racks) may reduce
fuel economy.
• To maximize the fuel economy, drive
with the tonneau cover installed (if
equipped).
• Using fuel blended with alcohol may
lower fuel economy.
• Fuel economy may decrease with lower
temperatures during the first 8– 10
miles (12 –16 kilometers) of driving.
• Driving on flat terrain offers improved
fuel economy as compared to driving
on hilly terrain.
288
F-150 (TFC) Canada/United States of America, enUSA, First Printing Driving Hints