2017 FORD F150 oil change
[x] Cancel search: oil changePage 7 of 599

Load Carrying
Load Retaining Fixtures.............................247
Load Limit......................................................248
Bed Access
.....................................................252
Bed Ramps
.....................................................253
Towing
Towing a Trailer
............................................256
Trailer Reversing Aids..................................257
Trailer Sway Control....................................267
Recommended Towing Weights............267
Essential Towing Checks..........................278
Towing the Vehicle on Four Wheels
......285
Driving Hints
Breaking-In....................................................288
Economical Driving
.....................................288
Driving Through Water
..............................289
Floor Mats
......................................................289
Snowplowing................................................290
Roadside Emergencies
Roadside Assistance..................................293
Hazard Warning Flashers.........................294
Fuel Shutoff...................................................294
Jump Starting the Vehicle........................295
Post-Crash Alert System
..........................297
Transporting the Vehicle...........................297
Towing Points
...............................................298
Customer Assistance
Getting the Services You Need..............300
In California (U.S. Only).............................301
The Better Business Bureau (BBB) Auto Line Program (U.S. Only).....................302
Utilizing the Mediation/Arbitration Program (Canada Only).......................303
Getting Assistance Outside the U.S. and Canada
........................................................303 Ordering Additional Owner's
Literature....................................................304
Reporting Safety Defects (U.S. Only)............................................................305
Reporting Safety Defects (Canada Only)............................................................305
Fuses
Fuse Specification Chart..........................307
Changing a Fuse............................................315
Maintenance
General Information
.....................................317
Opening and Closing the Hood...............317
Under Hood Overview - 2.7L EcoBoost™.................................................318
Under Hood Overview - 3.5L
....................319
Under Hood Overview - 3.5L Ecoboost™................................................320
Under Hood Overview - 5.0L....................321
Engine Oil Dipstick.......................................322
Engine Oil Check..........................................322
Oil Change Indicator Reset.......................323
Engine Coolant Check................................323
Automatic Transmission Fluid Check............................................................327
Transfer Case Fluid Check........................328
Brake Fluid Check
........................................328
Power Steering Fluid Check.....................328
Washer Fluid Check
....................................329
Fuel Filter........................................................329
Changing the 12V Battery.........................329
Checking the Wiper Blades.......................331
Changing the Wiper Blades......................331
Adjusting the Headlamps.........................332
Changing a Bulb
...........................................333
Bulb Specification Chart...........................337
Changing the Engine Air Filter................339
Vehicle Care
General Information
...................................340
4
F-150 (TFC) Canada/United States of America, enUSA, First Printing Table of Contents
Page 125 of 599
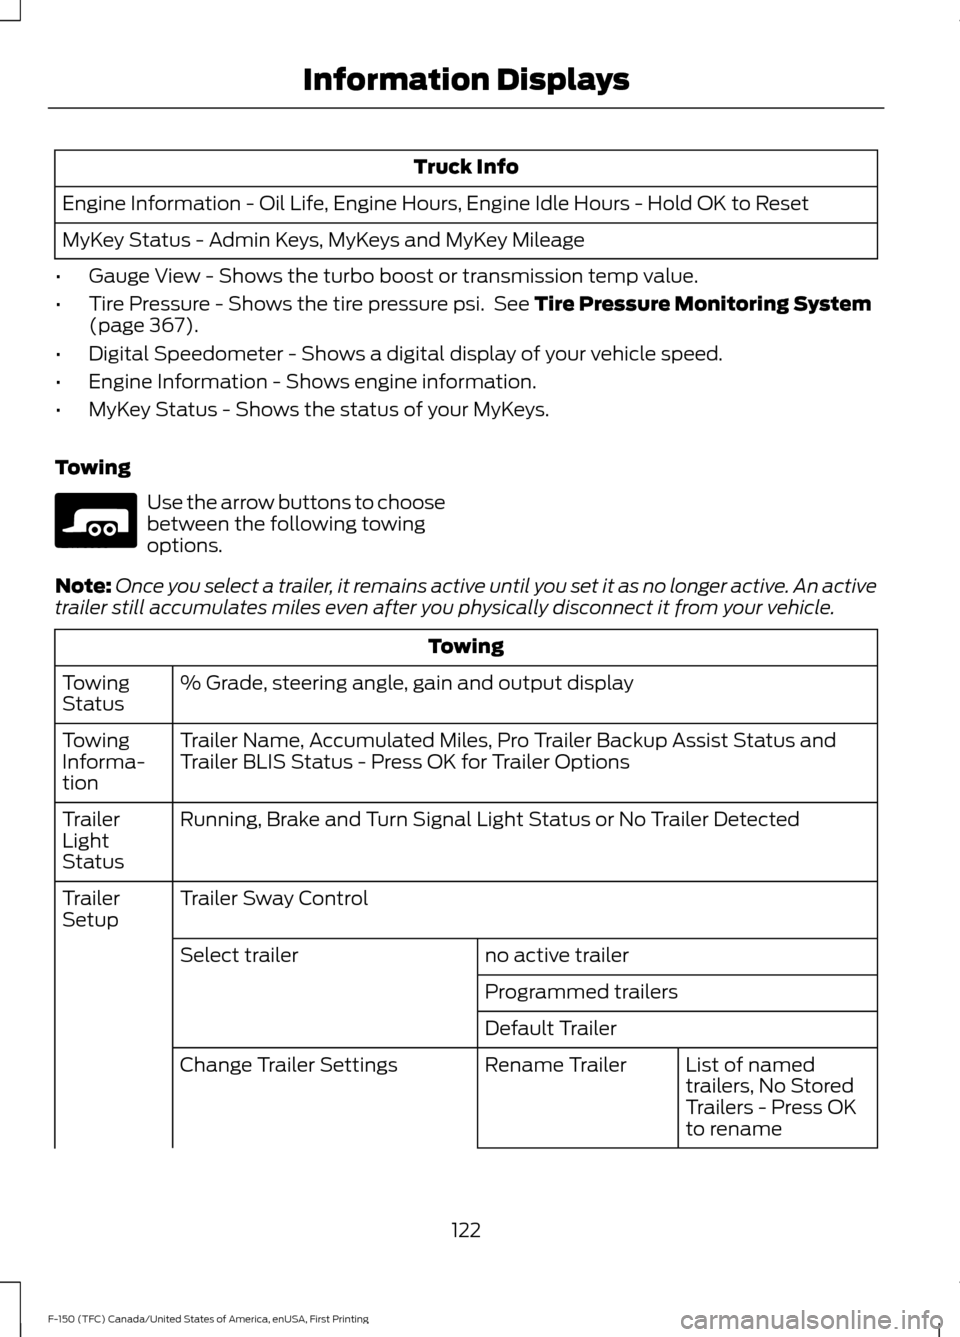
Truck Info
Engine Information - Oil Life, Engine Hours, Engine Idle Hours - Hold OK to Reset
MyKey Status - Admin Keys, MyKeys and MyKey Mileage
• Gauge View - Shows the turbo boost or transmission temp value.
• Tire Pressure - Shows the tire pressure psi. See Tire Pressure Monitoring System
(page 367).
• Digital Speedometer - Shows a digital display of your vehicle speed.
• Engine Information - Shows engine information.
• MyKey Status - Shows the status of your MyKeys.
Towing Use the arrow buttons to choose
between the following towing
options.
Note: Once you select a trailer, it remains active until you set it as no longer active. An active
trailer still accumulates miles even after you physically disconnect it from your vehicle. Towing
% Grade, steering angle, gain and output display
Towing
Status
Trailer Name, Accumulated Miles, Pro Trailer Backup Assist Status and
Trailer BLIS Status - Press OK for Trailer Options
Towing
Informa-
tion
Running, Brake and Turn Signal Light Status or No Trailer Detected
Trailer
Light
Status
Trailer Sway Control
Trailer
Setup
no active trailer
Select trailer
Programmed trailers
Default TrailerList of named
trailers, No Stored
Trailers - Press OK
to rename
Rename Trailer
Change Trailer Settings
122
F-150 (TFC) Canada/United States of America, enUSA, First Printing Information DisplaysE176096
Page 136 of 599
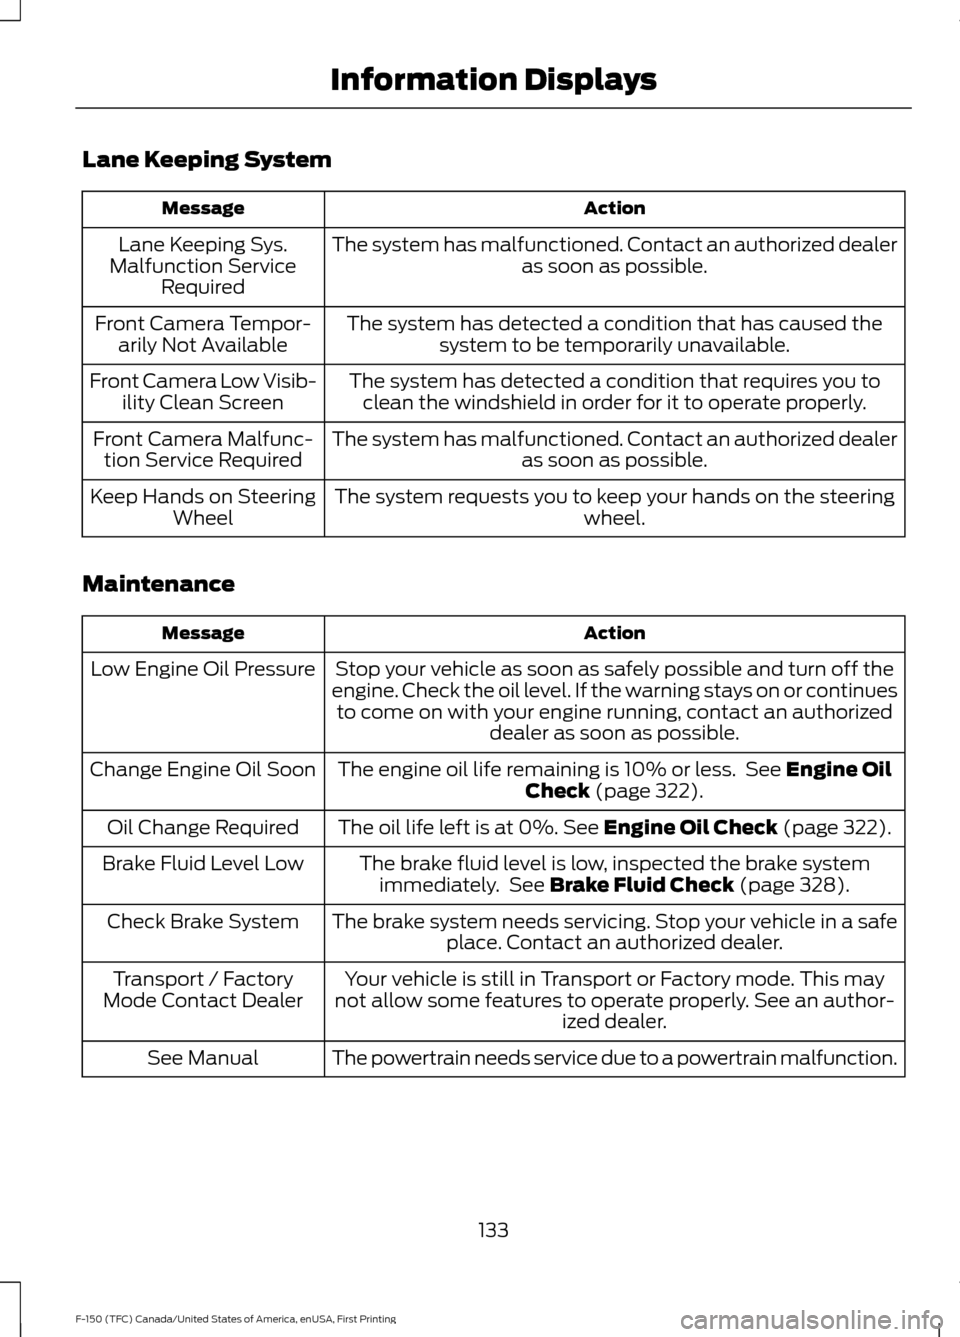
Lane Keeping System
Action
Message
The system has malfunctioned. Contact an authorized dealer as soon as possible.
Lane Keeping Sys.
Malfunction Service Required
The system has detected a condition that has caused thesystem to be temporarily unavailable.
Front Camera Tempor-
arily Not Available
The system has detected a condition that requires you toclean the windshield in order for it to operate properly.
Front Camera Low Visib-
ility Clean Screen
The system has malfunctioned. Contact an authorized dealeras soon as possible.
Front Camera Malfunc-
tion Service Required
The system requests you to keep your hands on the steering wheel.
Keep Hands on Steering
Wheel
Maintenance Action
Message
Stop your vehicle as soon as safely possible and turn off the
engine. Check the oil level. If the warning stays on or continues to come on with your engine running, contact an authorized dealer as soon as possible.
Low Engine Oil Pressure
The engine oil life remaining is 10% or less. See Engine Oil
Check (page 322).
Change Engine Oil Soon
The oil life left is at 0%.
See Engine Oil Check (page 322).
Oil Change Required
The brake fluid level is low, inspected the brake systemimmediately. See
Brake Fluid Check (page 328).
Brake Fluid Level Low
The brake system needs servicing. Stop your vehicle in a safeplace. Contact an authorized dealer.
Check Brake System
Your vehicle is still in Transport or Factory mode. This may
not allow some features to operate properly. See an author- ized dealer.
Transport / Factory
Mode Contact Dealer
The powertrain needs service due to a powertrain malfunction.
See Manual
133
F-150 (TFC) Canada/United States of America, enUSA, First Printing Information Displays
Page 181 of 599
Switching Between E85 and
Gasoline
We do not recommend repeatedly
alternating between E85 and gasoline. If
you switch from using E85 to gasoline, or
from gasoline to E85, add as much fuel as
possible, at least half a tank. Drive your
vehicle immediately for a minimum of 5 mi
(8 km) to allow it to adapt to the change
in ethanol concentration. If you use E85
exclusively, we recommend that you fill
the fuel tank with regular unleaded
gasoline at each scheduled oil change.
FUEL QUALITY - GASOLINE
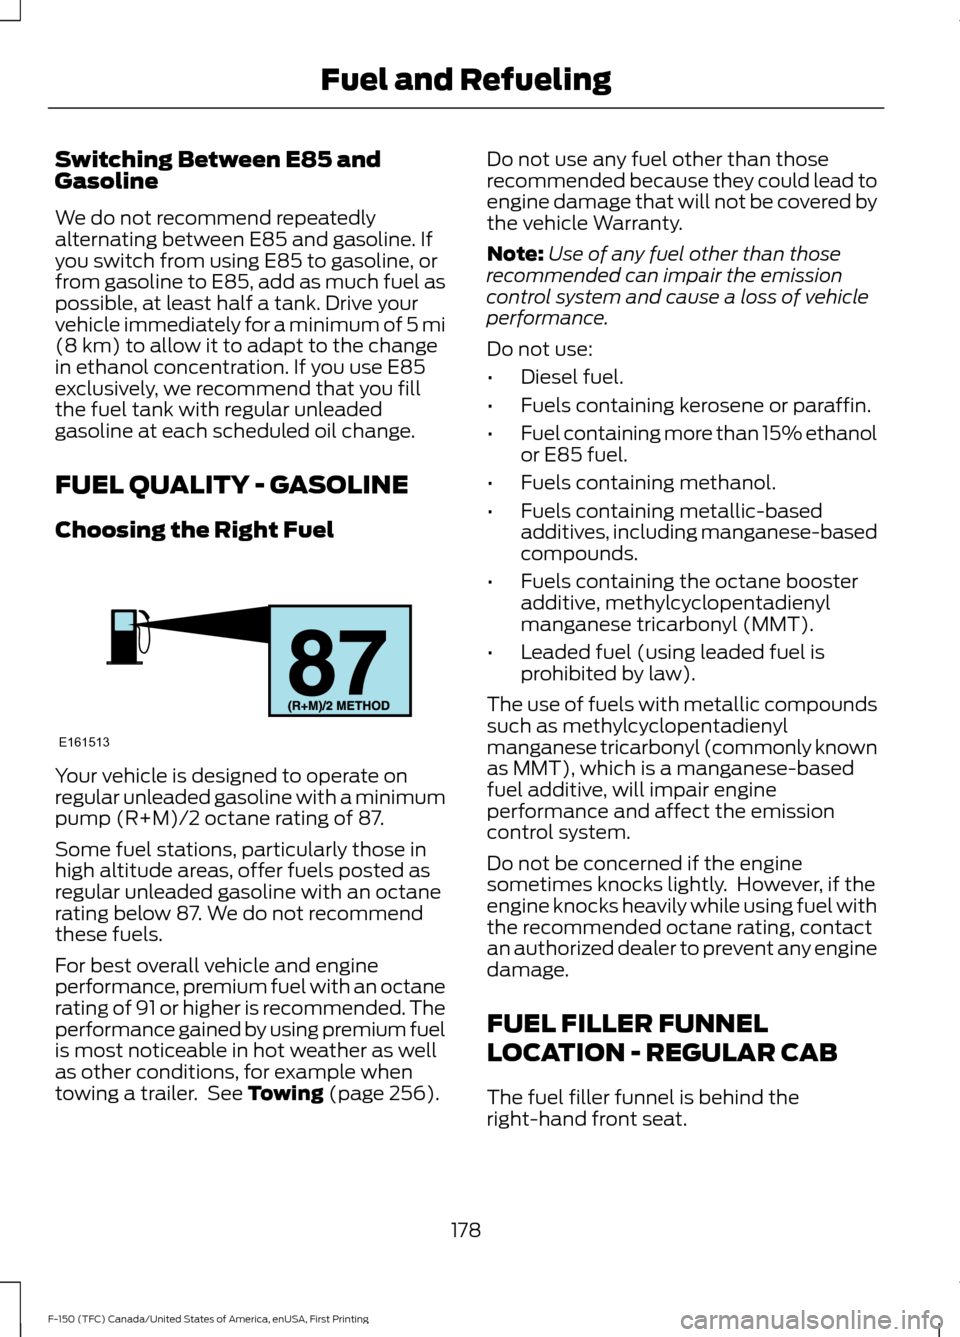
Choosing the Right Fuel Your vehicle is designed to operate on
regular unleaded gasoline with a minimum
pump (R+M)/2 octane rating of 87.
Some fuel stations, particularly those in
high altitude areas, offer fuels posted as
regular unleaded gasoline with an octane
rating below 87. We do not recommend
these fuels.
For best overall vehicle and engine
performance, premium fuel with an octane
rating of 91 or higher is recommended. The
performance gained by using premium fuel
is most noticeable in hot weather as well
as other conditions, for example when
towing a trailer. See
Towing (page 256). Do not use any fuel other than those
recommended because they could lead to
engine damage that will not be covered by
the vehicle Warranty.
Note:
Use of any fuel other than those
recommended can impair the emission
control system and cause a loss of vehicle
performance.
Do not use:
• Diesel fuel.
• Fuels containing kerosene or paraffin.
• Fuel containing more than 15% ethanol
or E85 fuel.
• Fuels containing methanol.
• Fuels containing metallic-based
additives, including manganese-based
compounds.
• Fuels containing the octane booster
additive, methylcyclopentadienyl
manganese tricarbonyl (MMT).
• Leaded fuel (using leaded fuel is
prohibited by law).
The use of fuels with metallic compounds
such as methylcyclopentadienyl
manganese tricarbonyl (commonly known
as MMT), which is a manganese-based
fuel additive, will impair engine
performance and affect the emission
control system.
Do not be concerned if the engine
sometimes knocks lightly. However, if the
engine knocks heavily while using fuel with
the recommended octane rating, contact
an authorized dealer to prevent any engine
damage.
FUEL FILLER FUNNEL
LOCATION - REGULAR CAB
The fuel filler funnel is behind the
right-hand front seat.
178
F-150 (TFC) Canada/United States of America, enUSA, First Printing Fuel and RefuelingE161513
Page 291 of 599
BREAKING-IN
You need to break in new tires for
approximately 300 miles (480
kilometers). During this time, your vehicle
may exhibit some unusual driving
characteristics.
Avoid driving too fast during the first 1000
miles (1600 kilometers). Vary your speed
frequently and change up through the
gears early. Do not labor the engine.
Do not tow during the first 1000 miles
(1600 kilometers).
ECONOMICAL DRIVING
Your fuel economy is affected by several
things, such as how you drive, the
conditions you drive under, and how you
maintain your vehicle.
You may improve your fuel economy by
keeping these things in mind:
•
Accelerate and slow down in a smooth,
moderate fashion.
• Drive at steady speeds without
stopping.
• Anticipate stops; slowing down may
eliminate the need to stop.
• Combine errands and minimize
stop-and-go driving.
• Close the windows for high-speed
driving.
• Drive at reasonable speeds (traveling
at 55 mph [88 km/h] uses 15% less
fuel than traveling at 65 mph [105
km/h]).
• Keep the tires properly inflated and use
only the recommended size.
• Use the recommended engine oil.
• Perform all regularly scheduled
maintenance. Avoid these actions; they reduce your fuel
economy:
•
Sudden accelerations or hard
accelerations.
• Revving the engine before turning it off.
• Idle for periods longer than one minute.
• Warm up your vehicle on cold
mornings.
• Use the air conditioner or front
defroster.
• Use the speed control in hilly terrain.
• Rest your foot on the brake pedal while
driving.
• Drive a heavily loaded vehicle or tow a
trailer.
• Carry unnecessary weight
(approximately 1 mpg [0.4 km/L] is
lost for every 400 lb [180 kilogram] of
weight carried).
• Driving with the wheels out of
alignment.
Conditions
• Heavily loading a vehicle or towing a
trailer may reduce fuel economy at any
speed.
• Adding certain accessories to your
vehicle (for example bug deflectors,
rollbars, light bars, running boards, ski
racks or luggage racks) may reduce
fuel economy.
• To maximize the fuel economy, drive
with the tonneau cover installed (if
equipped).
• Using fuel blended with alcohol may
lower fuel economy.
• Fuel economy may decrease with lower
temperatures during the first 8– 10
miles (12 –16 kilometers) of driving.
• Driving on flat terrain offers improved
fuel economy as compared to driving
on hilly terrain.
288
F-150 (TFC) Canada/United States of America, enUSA, First Printing Driving Hints
Page 294 of 599

•
The tire air pressures recommended
for general driving are on the vehicle ’s
Safety Certification Label. The
maximum cold inflation pressure for
the tire and associated load rating are
on the tire sidewall. Tire air pressure
may require re-adjustment within these
pressure limits to accommodate the
additional weight of the snowplow
installation.
• Federal and some local regulations
require additional exterior lamps for
snowplow-equipped vehicles. Contact
an authorized dealer for additional
information.
Snowplow Mode (If Equipped)
Press the snowplow button on the
instrument panel to switch on snowplow
mode. The button illuminates when in
snowplow mode. A message appears in
the information display indicating that
features are turned off when in snowplow
mode.
The following features are disabled when
in snowplow mode:
• 110V inverter.
• Fog lamps.
• Heated steering wheel.
• Heated front and rear seats.
• Massaging seats.
The body module also activates the
snowplow relay that provides power to
aftermarket snowplow controls.
Switch off snowplow mode by pressing
the snowplow button or switching off the
ignition. The snowplow button is no longer
illuminated and features are turned on. Note:
The electrical system is designed to
support the addition of a residential
snowplow (up to 60 Amps continuous) and
snowplow lights (up to 20 Amps
continuous) using snowplow mode. The
system is not designed to support snowplow
usage with additional electrical aftermarket
accessories.
Operating the Vehicle with the
Snowplow Attached
Note: Drive the vehicle at least 500 miles
(800 kilometers) before using your vehicle
for snow removal.
We recommend vehicle speed does not
exceed 45 mph (72 km/h) when
snowplowing.
The attached snowplow blade restricts
airflow to the radiator, and may cause the
engine to run at a higher temperature.
Attention to engine temperature is
especially important when outside
temperatures are above freezing. Angle
the blade to maximize airflow to the
radiator and monitor engine temperature
to determine whether a left or right angle
provides the best performance.
Follow the severe duty schedule in your
Scheduled Maintenance information for
engine oil and transmission fluid change
intervals.
Snowplowing with your Airbag
Equipped Vehicle WARNINGS
Do not attempt to service, repair, or
modify the airbag supplemental
restraint system (SRS) or its fuses.
Contact a Ford or Lincoln dealer.
291
F-150 (TFC) Canada/United States of America, enUSA, First Printing Driving Hints
Page 326 of 599
Only use oils certified for gasoline engines
by the American Petroleum Institute (API).
An oil with this trademark symbol
conforms to the current engine and
emission system protection standards and
fuel economy requirements of the
International Lubricants Specification
Advisory Committee (ILSAC).
To top up the engine oil level do the
following:
1. Clean the area surrounding the engine
oil filler cap before you remove it.
2. Remove the engine oil filler cap. See Under Hood Overview (page 319).
Turn it counterclockwise and remove
it.
3. Add engine oil that meets Ford specifications. See
Capacities and
Specifications (page 388). You may
have to use a funnel to pour the engine
oil into the opening.
4. Recheck the oil level.
5. If the oil level is correct, replace the dipstick and make sure it is fully seated.
6. Replace the engine oil filler cap. Turn it clockwise until you feel a strong
resistance.
Note: Do not add oil further than the
maximum mark. Oil levels above the
maximum mark may cause engine damage.
Note: Make sure you install the oil filler cap
correctly.
Note: Soak up any spillage with an
absorbent cloth immediately.
OIL CHANGE INDICATOR
RESET
Use the information display controls on
the steering wheel to reset the oil change
indicator. From the main menu scroll to: Action and description
Message
Press the right arrow button,
then from this menu scroll
to the following message.
Settings
Press the right arrow button,
then from this menu scroll
to the following message.
Conveni-
ence
Press the right arrow button,
then from this menu scroll
to the following message.
Oil Life
Reset
Press and hold the
OK
button until the instrument
cluster displays the
following message.
Hold OK to
Reset
Reset Successful
When the oil change indic-
ator resets the instrument
cluster displays 100%.
Remaining Life
{00}%
If the instrument cluster
displays one of the following
messages, repeat the
process.
Not Reset
Reset Cancelled
ENGINE COOLANT CHECK WARNINGS
Do not add engine coolant when the
engine is hot. Steam and scalding
liquids released from a hot cooling
system can burn you badly. Also, spilling
coolant on hot engine parts can burn you.
323
F-150 (TFC) Canada/United States of America, enUSA, First Printing Maintenance
Page 336 of 599

4.
For halogen or LED headlamps: On
the wall or screen you will observe a
light pattern with a distinct horizontal
edge toward the right. If this edge is not
at the horizontal reference line, you will
need to adjust the beam so the edge
is at the same height as the horizontal
reference line. 5. Locate the vertical adjuster on each
headlamp. Use a #2 Phillips
screwdriver to turn the adjuster either
counterclockwise or clockwise in order
to adjust the vertical aim of the
headlamp.
6. Repeat Steps 3 through 7 to adjust the
other headlamp.
7. Close the hood and turn off the lamps. Horizontal Aim Adjustment
Horizontal aim is not required for this
vehicle and is not adjustable.
CHANGING A BULB WARNING
Handle a halogen headlamp bulb
carefully and keep out of children
’s
reach. Grasp the bulb only by its
plastic base and do not touch the glass.
The oil from your hand could cause the
bulb to break the next time the headlamps
are operated. Note:
If the bulb is accidentally touched,
clean it with rubbing alcohol before
installing it.
Lamp Assembly Condensation
Exterior lamps are vented to
accommodate normal changes in pressure.
Condensation can be a natural by-product
of this design. When moist air enters the
lamp assembly through the vents, there is
a possibility that condensation can occur
when the temperature is cold. When
normal condensation occurs, a thin film of
mist can form on the interior of the lens.
The thin mist eventually clears and exits
through the vents during normal operation.
Clearing time may take as long as 48 hours
under dry weather conditions.
Examples of acceptable condensation are:
• Presence of thin mist (no streaks, drip
marks or droplets).
• Fine mist covers less than 50% of the
lens.
333
F-150 (TFC) Canada/United States of America, enUSA, First Printing MaintenanceE167358 E163806